Easy Noodle Stir Fry Delicious Dinner
There are some recipes that just feel like a warm hug, you know? This zucchini bread is absolutely one of those for me. It’s not just “good” or “delicious” – it’s the kind of thing that makes your kitchen smell like pure comfort and instantly brightens any day. I remember my mom making a version of this when I was little, and the aroma would fill our house, a sure sign that something wonderful was about to happen. Honestly, when I’m craving something sweet but don’t have hours to bake a fussy cake, this is my absolute lifesaver. It’s so incredibly forgiving, and the subtle sweetness with that moist, tender crumb? Unbeatable. It’s like a healthier cousin to banana bread, but with its own unique charm. You get that beautiful moisture from the zucchini, which, trust me, you can’t even taste! It’s just pure deliciousness disguised as a wholesome treat.
What is Zucchini bread?
So, what exactly is this magical zucchini bread? Think of it as a wonderfully moist, slightly sweet quick bread that happens to have grated zucchini hidden inside. The zucchini is the secret weapon here; it doesn’t add a strong flavor at all, but it contributes an unbelievable tenderness and moisture that makes every bite melt in your mouth. The name “zucchini bread” might sound a little…well, *zucchini-y*, and I get that. Some people are hesitant at first. But honestly, it’s essentially a delicious, spiced cake batter that’s baked in a loaf pan. It’s less about the zucchini flavor and more about the incredible texture and comforting spices. It’s often compared to banana bread, but it has a lighter, more subtle sweetness and a delightful crumb that’s just *chef’s kiss*. It’s the perfect way to use up extra zucchini from the garden, or just to have a delightful treat on hand.
Why you’ll love this recipe?
Oh, where do I even start with why you’ll adore this zucchini bread? First off, the FLAVOR. It’s this perfect balance of warm spices – cinnamon, nutmeg, a hint of allspice if you’re feeling fancy – with just enough sweetness to make it feel like a real treat. But here’s the kicker: the texture. It is unbelievably moist and tender, thanks to the magic of zucchini. Seriously, you can’t taste the zucchini, but you’ll definitely taste its contribution to that perfect crumb. Then there’s the SIMPLICITY. This isn’t a recipe that requires fancy techniques or hours of your time. It’s a “mix and bake” situation, which is exactly what I need on a busy weeknight or a lazy weekend morning. It’s also surprisingly COST-EFFECTIVE. The ingredients are all pantry staples, and if you happen to have zucchini from your garden, it’s practically free! And let’s talk VERSATILITY. This bread is fantastic on its own, of course, but it’s also perfect toasted with a smear of butter, or even as a base for a quick French toast if you have a leftover slice. I find it’s a lifesaver when unexpected guests pop over, or when I just need a little something sweet with my afternoon coffee. It’s honestly one of those recipes that I keep coming back to because it *always* works and *always* makes everyone happy. It’s so much better than a store-bought loaf, and the smell that fills your house while it’s baking? Pure joy!
How do you make Zucchini bread?
Quick Overview
This recipe is wonderfully straightforward, designed for busy bakers and anyone who just wants a fuss-free, delicious outcome. We’re essentially whisking together the dry ingredients, then the wet ingredients, combining them gently, folding in that star ingredient (zucchini!), and baking until golden and fragrant. The key is not to overmix, ensuring that tender crumb we all crave. It’s a foolproof method that guarantees a moist, flavorful loaf every single time. You’ll be amazed at how simple it is for such a delightful result!
Ingredients
For the Main Batter:
2 cups all-purpose flour (I find a good quality unbleached flour makes a difference in texture)
1 teaspoon baking soda
½ teaspoon baking powder
½ teaspoon salt
1 teaspoon ground cinnamon (use a fresh jar, it makes a HUGE difference!)
½ teaspoon ground nutmeg
¼ teaspoon ground allspice (optional, but I love the depth it adds!)
1 cup granulated sugar (you can reduce this slightly if you prefer less sweet, but I find this is perfect)
½ cup unsalted butter, softened (don’t skimp on the quality here!)
2 large eggs, at room temperature (this helps them incorporate better)
1 teaspoon vanilla extract (pure vanilla extract is a must!)
1 cup grated zucchini (about 1 medium zucchini, make sure to squeeze out excess moisture – more on that later!)
For the Swirl (Optional but Recommended!):
¼ cup brown sugar
1 tablespoon all-purpose flour
1 teaspoon ground cinnamon
2 tablespoons unsalted butter, melted
For the Simple Glaze:
1 cup powdered sugar
2-3 tablespoons milk or water (start with 2 and add more for desired consistency)
½ teaspoon vanilla extract
Step-by-Step Instructions
Step 1: Preheat & Prep Pan
First things first, let’s get our oven warmed up to 350°F (175°C). Then, grab a standard 9×5 inch loaf pan. I like to grease it really well with butter or cooking spray, and then dust it with a little flour. This ensures your beautiful loaf pops right out without any drama. You can also line it with parchment paper for extra insurance – I learned that trick after a few sticky pan incidents in my early baking days!
Step 2: Mix Dry Ingredients
In a medium bowl, whisk together your flour, baking soda, baking powder, salt, cinnamon, nutmeg, and allspice if you’re using it. Give it a good whisk to make sure everything is evenly distributed. This is where you build the foundation for that amazing flavor and lift!
Step 3: Mix Wet Ingredients
In a large bowl, cream together the softened butter and granulated sugar until it’s light and fluffy. This might take a few minutes with an electric mixer, or a good arm workout by hand! Then, beat in the eggs one at a time, making sure each is fully incorporated before adding the next. Stir in the vanilla extract. This is where you get that lovely, rich base going.
Step 4: Combine
Now, gradually add the dry ingredients to the wet ingredients, mixing on low speed (or stirring gently by hand) until just combined. Be careful not to overmix here! A few streaks of flour are perfectly okay. Overmixing develops the gluten too much, which can lead to a tough loaf, and we definitely don’t want that. Gently fold in your grated, squeezed zucchini. It’ll seem like a lot, but it will meld in beautifully.
Step 5: Prepare Filling
If you’re making the optional swirl, this is super easy. In a small bowl, combine the brown sugar, flour, and cinnamon. Drizzle in the melted butter and mix with a fork until it forms little clumps. This is what gives you those lovely pockets of cinnamon-y goodness throughout the bread!
Step 6: Layer & Swirl
Pour about half of the batter into your prepared loaf pan. Sprinkle about half of the cinnamon-sugar mixture over the top. Then, pour the remaining batter over that, and sprinkle the rest of the cinnamon-sugar mixture on top. Now, for the swirl! Take a knife or a skewer and gently swirl it through the batter a few times. You don’t want to overdo it; just a few passes to create those pretty ribbons. Aim for a marbled effect rather than mixing it all together.
Step 7: Bake
Pop that pan into your preheated oven. Bake for about 50-60 minutes. The best way to check for doneness is to insert a toothpick into the center of the loaf. If it comes out clean, or with just a few moist crumbs attached, it’s ready! If it comes out with wet batter, give it another 5-10 minutes and check again. Ovens can be so different, so keep an eye on it!
Step 8: Cool & Glaze
Once it’s done, let the bread cool in the pan for about 10-15 minutes. This helps it set up. Then, carefully invert it onto a wire rack to cool completely. It’s really important to let it cool completely before glazing, otherwise, the glaze will just melt right off. For the glaze, whisk together the powdered sugar, vanilla, and milk (or water) until smooth. You want it thick enough to coat the bread but pourable. Drizzle it all over the cooled loaf. It’s optional, but adds that extra touch of sweetness and makes it look so pretty!
Step 9: Slice & Serve
Once the glaze has set a little, slice into your beautiful zucchini bread. I like to use a serrated knife for clean cuts. Serve it at room temperature, or even lightly toasted. It’s absolutely divine!
What to Serve It With
This zucchini bread is so wonderfully versatile, it can truly be enjoyed anytime, anywhere! For a cozy BREAKFAST, I love it simply sliced with a smear of butter and a big mug of my favorite coffee. The spices just wake you up in the best way. For BRUNCH, it’s a lovely addition to a spread. I like to arrange slices on a pretty platter, perhaps with some fresh berries on the side. A mimosa or a fresh orange juice pairs perfectly with it. As a delightful DESSERT, it’s surprisingly satisfying. A small slice alongside a scoop of vanilla bean ice cream or a dollop of whipped cream is pure bliss. It’s the perfect sweet ending without being too heavy. And for those chilly evenings or as an afternoon pick-me-up, it’s the ultimate COZY SNACK. I often just grab a slice (or two!) with a glass of milk when I need a little comfort. My family also loves it packed in their lunchboxes – it’s a much healthier and tastier alternative to store-bought muffins or cookies. It’s just one of those recipes that fits seamlessly into any part of the day!
Top Tips for Perfecting Your Zucchini Bread
Over the years, I’ve learned a few tricks that really make this zucchini bread sing. First, the ZUCCHINI PREP is crucial. You absolutely must grate your zucchini and then squeeze out as much excess moisture as possible. I usually use a fine-mesh sieve or just my hands. This step is non-negotiable for achieving that perfect, tender texture without making the bread soggy. Trust me on this one! For MIXING ADVICE, remember: gentle is best. Overmixing is the enemy of a tender quick bread. Mix until just combined, don’t strive for a perfectly smooth batter. Little lumps are your friends! When it comes to the SWIRL CUSTOMIZATION, have fun with it! You can add a pinch of cardamom to the swirl mixture, or even some chopped nuts if you like a little crunch. You can also do a double swirl for extra visual appeal. For INGREDIENT SWAPS, I’ve experimented quite a bit. If you need to make it dairy-free, I’ve had success using a plant-based butter substitute and almond milk or oat milk for the glaze. It turns out wonderfully creamy. If you’re out of granulated sugar, you can use an equal amount of brown sugar, but it will result in a slightly denser, more caramel-like flavor. For BAKING TIPS, always know your oven. If you find your loaves tend to brown too quickly on top, you can loosely tent a piece of foil over the top for the last 15-20 minutes of baking. And that toothpick test? It’s your best friend for confirming doneness. Don’t be afraid to test multiple spots if you’re unsure. Finally, for GLAZE VARIATIONS, if you’re not a fan of the sweet glaze, try a simple dusting of powdered sugar, or even a thin spread of cream cheese frosting. Sometimes, a drizzle of honey is all you need. It’s all about making it perfect for *you*!
Storing and Reheating Tips
This zucchini bread is quite forgiving when it comes to storing, which is a huge bonus! For ROOM TEMPERATURE storage, once the bread is completely cool and the glaze has set (if you used it), you can wrap it tightly in plastic wrap or place it in an airtight container. It should stay fresh and moist for about 2-3 days. I find it’s often even tastier on the second day as the flavors meld. If you need to keep it longer, REFRIGERATOR STORAGE is your best bet. Again, an airtight container is key. It can last for up to a week in the fridge, though the texture might change slightly. When you want to enjoy it, just let it come back to room temperature for about 30 minutes, or give it a quick toast. For FREEZER INSTRUCTIONS, this bread freezes beautifully, which is great for when you’ve baked a double batch! Let it cool completely, then wrap it very tightly in plastic wrap, followed by a layer of aluminum foil or a freezer-safe bag. It can be stored in the freezer for up to 3 months. To thaw, simply unwrap it and let it come to room temperature on the counter. You can also gently reheat slices in a toaster oven or a low oven to revive its freshness. For GLAZE TIMING ADVICE, if you plan to freeze the bread, it’s best to apply the glaze *after* thawing. This prevents the glaze from cracking or becoming sticky in the freezer. If you’re storing it at room temperature or in the fridge, the glaze is usually fine to apply right away.
Frequently Asked Questions
Final Thoughts
There you have it – my absolute favorite recipe for zucchini bread! It’s more than just a recipe to me; it’s a connection to happy memories and a guaranteed way to bring a smile to people’s faces. It’s the perfect example of how simple ingredients can come together to create something truly special and comforting. The ease of preparation combined with the incredible moistness and subtle spiced flavor makes this a winner every time. If you love this recipe, you might also enjoy my recipes for Classic Banana Bread or my Lemon Blueberry Scones – they have that same cozy, homemade charm! I can’t wait for you to try this zucchini bread and experience the magic for yourself. Let me know in the comments below how yours turned out, or if you have any fun twists you’ve added! Happy baking, my friends!
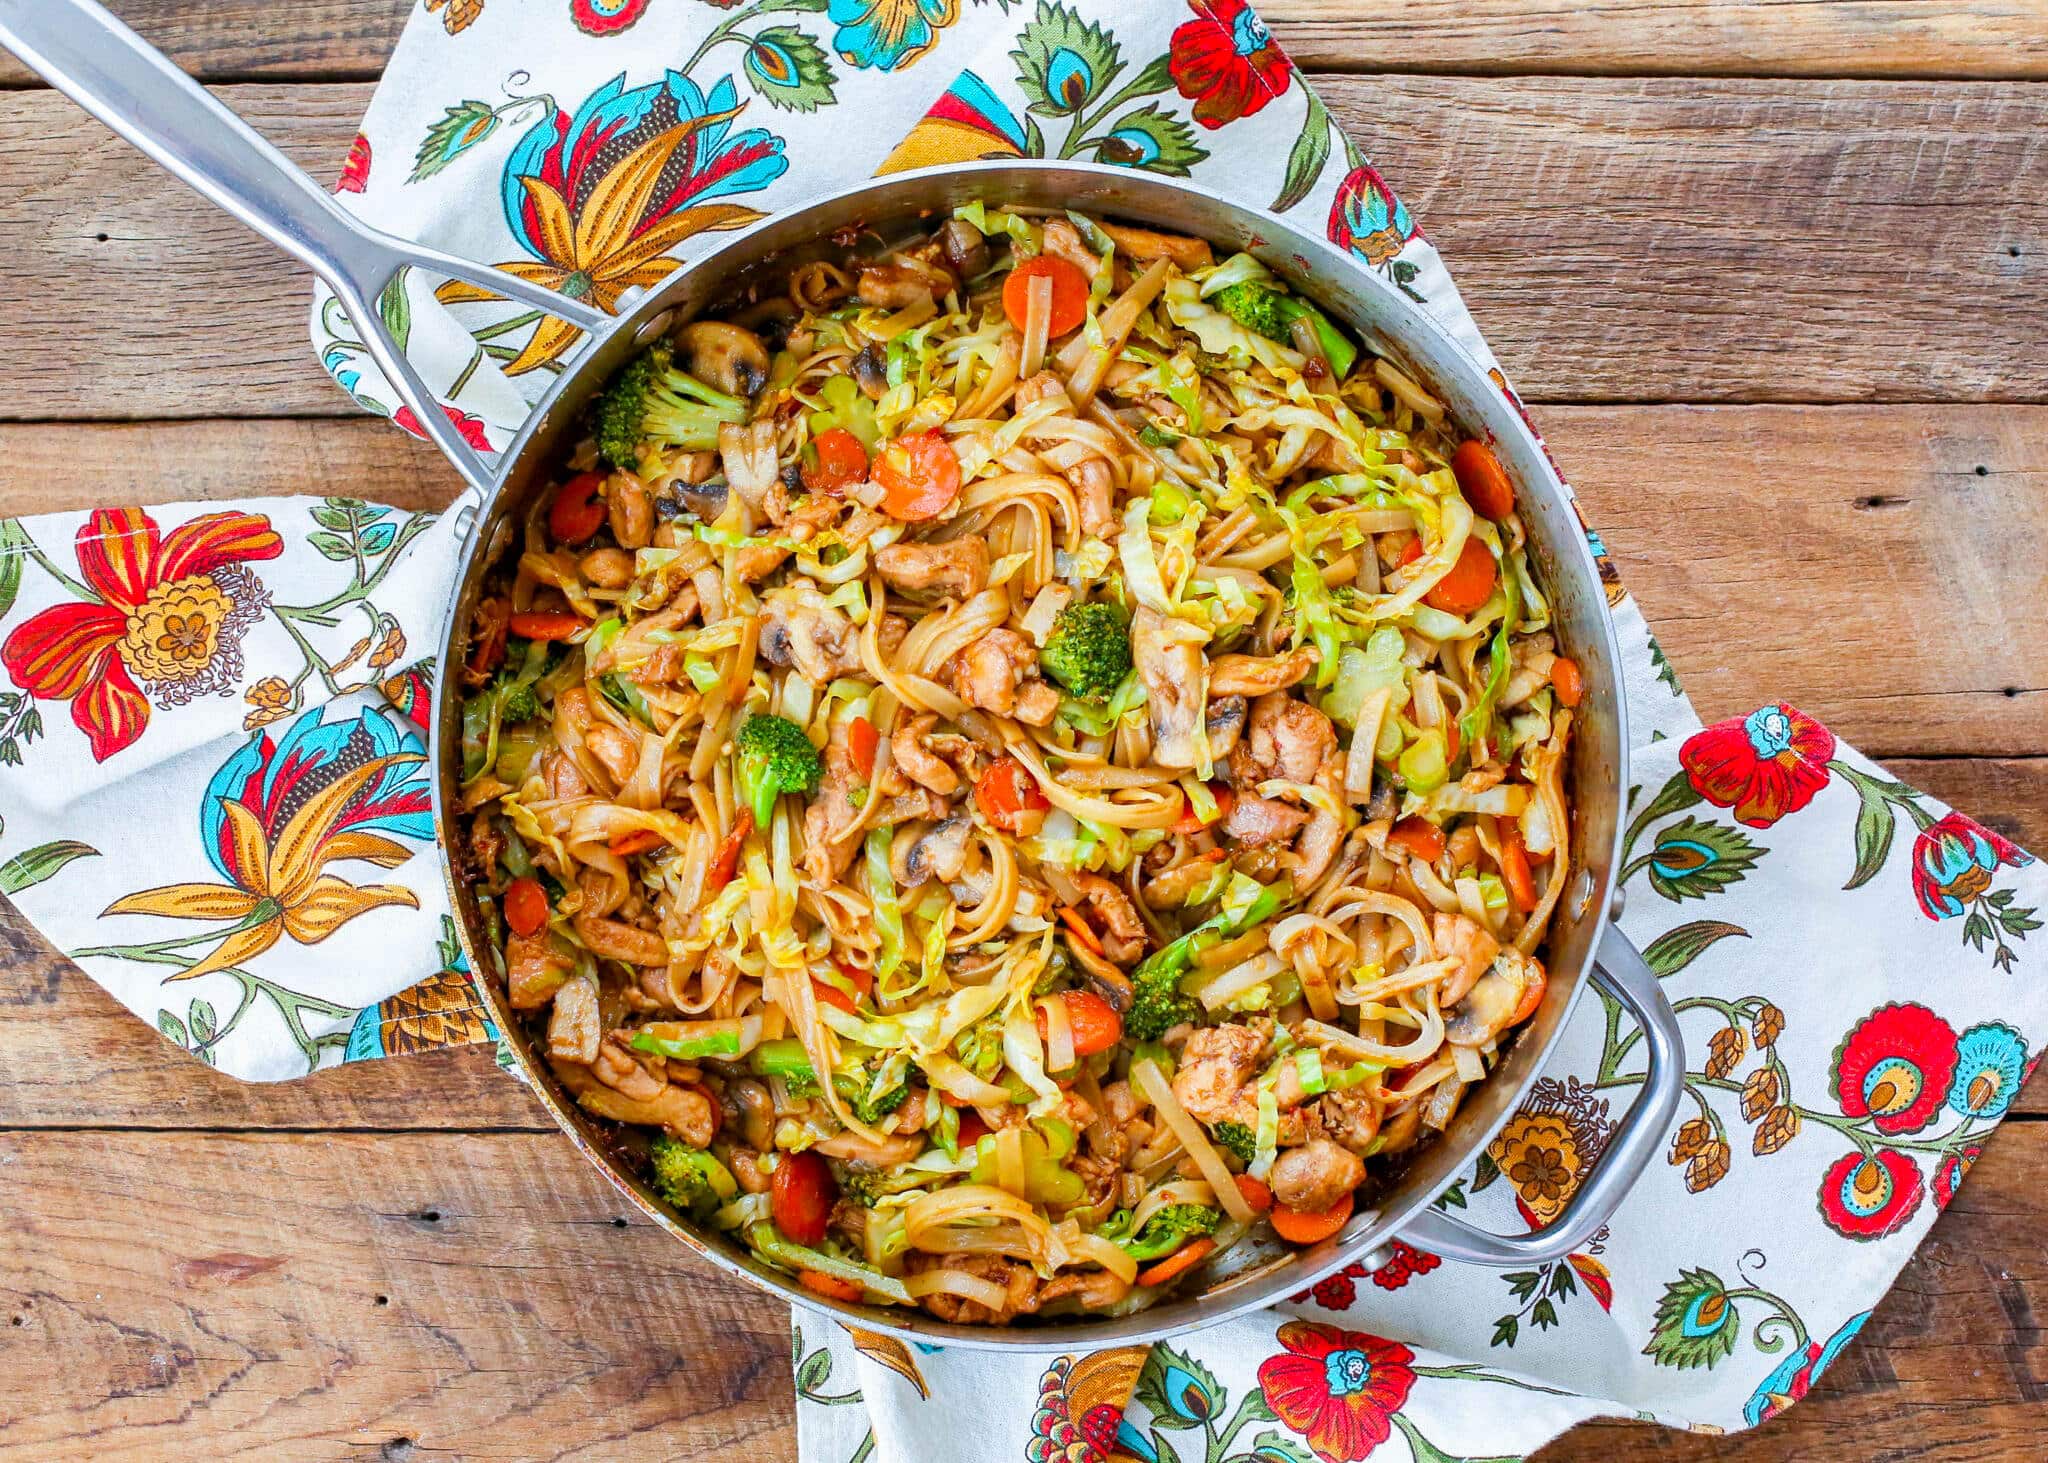
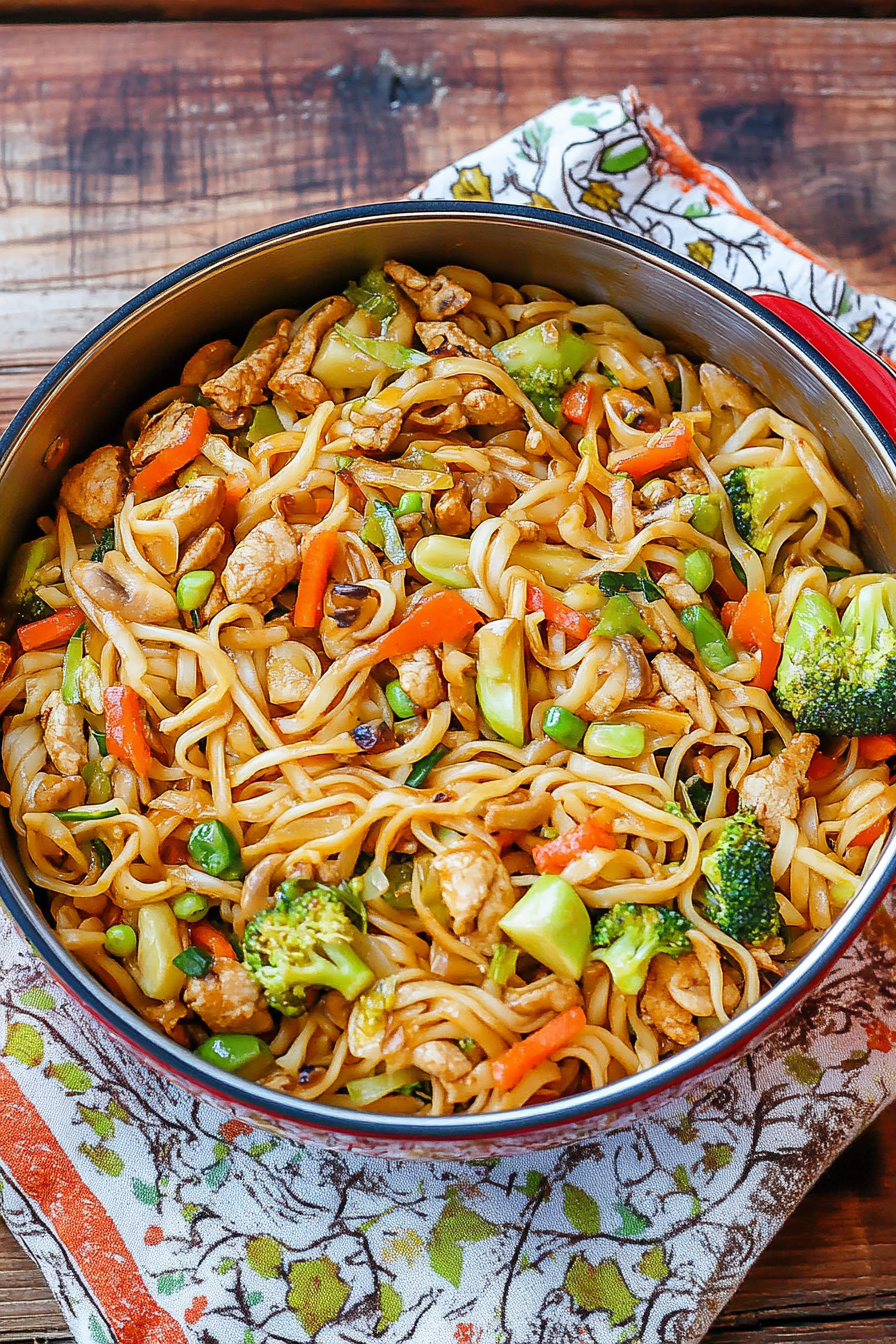
Easy Noodle Stir Fry with Chicken and Vegetables
Ingredients
Method
- Boil 8 cups of water and remove from the heat. Add the noodles and stir to cover. Set aside, stirring frequently and separating the noodles. Soak the noodles for about 8 minutes until tender. Drain, drizzle lightly with 0.5 tablespoon oil and toss well to separate.
- Set a large mixing bowl next to the stove. In a glass measuring cup or small bowl, stir together 0.5 cup soy sauce, chili paste, sugar, ginger, and garlic. Set the prepared sauce next to the empty mixing bowl by the stove.
- In a large stainless skillet, over high heat, warm 0.5 tablespoon oil until shimmering. Add the carrots, stir and cook 1 minute. Add the broccoli, stir, cover with lid and cook 1 minute. Add the mushrooms and the remaining 2 tablespoons of soy sauce. Scrape the bottom of the pan as needed and toss to coat everything with sauce. Add the cabbage to the skillet and continue cooking for about 2-3 minutes. The vegetables should be brightly colored and barely tender.
- Transfer the vegetable mixture to the mixing bowl next to the stove. Add 1 tablespoon oil to the empty skillet over high heat. Add the chicken and sprinkle with cornstarch. Stir well to coat. Continue cooking for 2 minutes, turning or stirring the pieces frequently.
- Add the prepared sauce to the chicken and scrape the bottom of the pan, stirring constantly. Cook 1-2 minutes to thicken. Transfer the chicken and most of the sauce to the bowl with the vegetables. (Leave about a tablespoon of sauce in the skillet.)
- Add the remaining tablespoon oil to the skillet and add the noodles. Toss to coat and spread across the pan. Cook, stirring or turning frequently, for 2 minutes, until the noodles are lightly browned.
- Remove from the heat, add the chicken and vegetables back to the skillet with the noodles and toss to combine. Enjoy!