Easy Roman Pasta Perfection
Okay, so you know how some recipes just feel like a warm hug? This is one of those for me. It’s my absolute go-to when I need something sweet but don’t have hours to spend in the kitchen, and honestly, it’s the only way I can get my kids to willingly eat zucchini. Weird, right? But seriously, they devour this stuff. It’s not just “good,” it’s that kind of incredible, moist, perfectly spiced zucchini bread that makes you want to curl up with a good book and a cup of tea. Think of it as the sophisticated cousin to that sad, dry loaf you might have tried once. This one’s a lifesaver on busy nights and a guaranteed crowd-pleaser. I’ve made it probably a hundred times, and every single time, it just hits the spot. It’s honestly one of my favorite things to bake, and I can’t wait to share it with you!
What is Zucchini bread?
So, what exactly *is* this magical zucchini bread we’re talking about? At its heart, it’s a quick bread, meaning it uses a leavening agent like baking soda or baking powder instead of yeast, so you don’t have to wait for it to rise. The star ingredient, zucchini, is grated and folded into the batter. Now, don’t let that scare you off if you’re not a zucchini fan – I promise you, you won’t taste it! It’s literally there to add this incredible moisture and tenderness to the bread, making it unbelievably soft and decadent. It’s not like a dense cake, but it’s definitely richer than a simple quick bread. Think of it as the perfect balance between something you can enjoy for breakfast and something that feels like a lovely treat. It’s essentially a vehicle for all those warm, comforting spices and that glorious sweet, moist crumb.
Why you’ll love this recipe?
Honestly, there are so many reasons this zucchini bread recipe is my absolute favorite, and I think you’re going to fall in love with it too. First off, the flavor. Oh, the flavor! It’s this beautiful symphony of warm spices – cinnamon, nutmeg, maybe a hint of clove if you’re feeling adventurous – mingling with the subtle sweetness of the sugar and the richness of whatever fat you use. The texture is where it really shines, though. It’s unbelievably moist and tender, thanks to that hidden zucchini. You know how some quick breads can be a bit dry? Not this one! It stays incredibly soft for days, which is a huge win in my book. And speaking of wins, it’s also super budget-friendly. Zucchini is usually pretty inexpensive, and the other ingredients are pantry staples. You really don’t need anything fancy to make something this delicious. What I love most about this is its versatility. It’s perfect on its own, but a drizzle of cream cheese frosting or a simple vanilla glaze takes it to a whole new level of indulgence. It’s a great way to use up excess zucchini from the garden, too! It’s like a hug in bread form, and who doesn’t need more of that?
How do you make Zucchini bread?
Quick Overview
This recipe is surprisingly straightforward, which is exactly why I love it. You’ll basically mix your dry ingredients, whisk together your wet ingredients, combine them gently, then fold in the grated zucchini. Pour it into a prepared loaf pan and bake until it’s golden brown and a toothpick comes out clean. The whole process, from start to finish, is usually under an hour and a half, making it totally doable even on a weeknight. What makes this method special is how it ensures that super moist crumb without any fuss. No special equipment needed, just a bowl, a whisk, and a loaf pan!
Ingredients
For the Main Batter:
2 cups all-purpose flour (I usually just use the standard kind, but if you’re feeling fancy, cake flour can make it even more tender!)
1 teaspoon baking soda (this is key for that lift!)
1/2 teaspoon salt (just to balance all that sweetness)
1 teaspoon ground cinnamon (don’t skimp here, it’s essential for that cozy flavor)
1/4 teaspoon ground nutmeg (a little goes a long way to add warmth)
Optional: 1/8 teaspoon ground cloves or allspice for an extra layer of spice complexity.
1 1/2 cups granulated sugar (you can reduce this slightly if you prefer, but it does help with moisture)
2 large eggs (room temperature is best, they incorporate better)
3/4 cup vegetable oil or melted unsalted butter (oil makes it extra moist, butter adds a lovely flavor)
1 teaspoon vanilla extract (use the good stuff if you can!)
1 1/2 cups grated zucchini (about 2 medium zucchinis, see my tips below on how to prep this!)
For the Filling:
This is where you can have fun and really customize it! My classic go-to is:
1/2 cup chopped walnuts or pecans (toasted lightly for extra flavor and crunch!)
1 teaspoon cinnamon (yes, more cinnamon!)
Optional: 1/4 cup brown sugar for a caramel-y swirl, or some mini chocolate chips!
For the Glaze:
This is totally optional, but oh-so-worth-it for that extra touch of sweetness and visual appeal.
1 cup powdered sugar (sifted, to avoid lumps)
2-3 tablespoons milk (or buttermilk for a slight tang!)
1/2 teaspoon vanilla extract
A pinch of salt
Step-by-Step Instructions
Step 1: Preheat & Prep Pan
First things first, get that oven preheating to 350 degrees Fahrenheit (175 degrees Celsius). While it’s heating up, grease and flour a standard 9×5 inch loaf pan. I like to use a little cooking spray or butter, then dust it with flour. For extra insurance against sticking, you can also line the pan with parchment paper, leaving some overhang to easily lift the bread out later. Trust me, this step is a lifesaver when it comes time to get the finished loaf out!
Step 2: Mix Dry Ingredients
In a large bowl, whisk together the all-purpose flour, baking soda, salt, cinnamon, nutmeg, and any other spices you’re using. Whisking them together really well ensures that all those leavening agents and spices are evenly distributed throughout the batter. This is super important for an even rise and consistent flavor. You don’t want a bite that’s suddenly overloaded with cinnamon! Make sure there are no little lumps of baking soda or flour hanging around.
Step 3: Mix Wet Ingredients
In a separate medium bowl, whisk together the granulated sugar and eggs until they’re well combined. Then, slowly stream in the vegetable oil (or melted butter) while whisking continuously. Add the vanilla extract and give it another good whisk. You want this mixture to look nice and emulsified, sort of pale and smooth. If you’re using melted butter, make sure it’s not too hot, or it could scramble the eggs!
Step 4: Combine
Now, pour the wet ingredients into the bowl with the dry ingredients. Using a spatula or a wooden spoon, gently fold them together until *just* combined. It’s really important not to overmix here! You’ll see some streaks of flour, and that’s okay. Overmixing develops the gluten in the flour, which can lead to a tougher, denser bread. We want tender and light, remember?
Step 5: Prepare Filling
If you’re adding nuts or chocolate chips, now’s the time to get them ready. If you’re using nuts and haven’t toasted them yet, you can do that in a dry skillet over medium heat for a few minutes until fragrant, or in a low oven. This really brings out their flavor. If you’re using brown sugar for a swirl, just have it ready to go. For a simple chopped nut or chocolate chip addition, you’ll gently fold them into the batter at the very end, just before adding the zucchini.
Step 6: Layer & Swirl
Gently fold the grated zucchini into the batter. Again, be careful not to overmix. You want the zucchini distributed, but don’t beat it into oblivion. If you’re doing a swirl, here’s my trick: pour about half of the batter into the prepared loaf pan. Sprinkle half of your filling ingredients (like cinnamon and brown sugar mixture, or nuts/chips) over the top. Then, dollop the remaining batter over that, and sprinkle the rest of the filling ingredients on top. If you want a more marbled effect, you can gently swirl with a knife or skewer, but don’t go crazy – you don’t want to mix it all up. For just nuts or chocolate chips folded in, add them now and give it one last gentle fold.
Step 7: Bake
Pop that loaf pan into your preheated oven. Bake for about 50-65 minutes. The exact time will depend on your oven, so start checking around the 50-minute mark. You’re looking for a beautifully golden brown top and sides, and when you insert a toothpick or a thin knife into the center, it should come out clean. If the top is browning too quickly but the center isn’t done, you can loosely tent it with aluminum foil. I’ve definitely had a few loaves come out a little *too* dark on top before, so foil is your friend!
Step 8: Cool & Glaze
Once it’s baked, take the loaf pan out of the oven and let it cool in the pan for about 10-15 minutes. This allows the bread to set up a bit before you try to remove it. Then, carefully invert the pan onto a wire rack to release the loaf. Let it cool completely before you even think about glazing it. If you glaze it while it’s warm, the glaze will just melt and drip off – a mistake I’ve made more times than I care to admit! For the glaze, whisk together the powdered sugar, milk (add it a tablespoon at a time until you get the consistency you like – I prefer it thick enough to drizzle but not so thin it runs everywhere), vanilla, and salt. Once the bread is totally cool, drizzle it artfully over the top. Or just pour it on, I won’t judge!
Step 9: Slice & Serve
Once the glaze has set a bit, it’s time to slice! I like to use a serrated knife for clean cuts. This bread is wonderful served at room temperature. It’s perfect on its own, but honestly, a little smear of butter is pretty divine too. If you added chocolate chips, they’ll be melty and amazing. If you did the brown sugar swirl, you’ll get these gorgeous caramel pockets. Enjoy every single bite!
What to Serve It With
This zucchini bread is honestly a star all on its own, but I love pairing it with different things depending on the occasion. For a simple breakfast, it’s fantastic with a hot cup of coffee or a glass of cold milk. I usually just slice it and go – super easy! For a more leisurely weekend brunch, I’ll sometimes serve it alongside some fresh fruit salad or even a dollop of Greek yogurt for a bit of tang. If you’re feeling fancy, a little dollop of whipped cream or a scoop of vanilla bean ice cream makes it a perfect after-dinner dessert. And for those cozy evenings when you just need a little something sweet? A warm slice with a mug of hot chocolate is pure bliss. My kids, as I mentioned, ask for this all the time, and they usually just grab a slice and eat it while playing. It’s that kind of comfort food that just fits into everyday life.
Top Tips for Perfecting Your Zucchini Bread
I’ve learned a few things over the years of making this, and I’m happy to share my hard-won wisdom! For zucchini prep, it’s crucial to grate it and then squeeze out as much moisture as possible. You can do this by hand or by wrapping it in a clean kitchen towel or cheesecloth and wringing it out. If you don’t get most of the water out, your bread can end up gummy. Fresh zucchini is always best, but if you’re using zucchini from the garden that’s a bit older, make sure to check for any bitterness. For mixing, I can’t stress this enough: don’t overmix! Just combine the wet and dry ingredients until you don’t see big dry flour patches. A few small lumps are fine. Overmixing is the fastest way to a tough loaf. When it comes to the swirl, less is often more. You want to add those extra flavor elements without completely disturbing the batter’s structure. For ingredient swaps, I’ve successfully used applesauce for a portion of the oil, but it can make it even denser, so I stick to oil or butter. If you want to make it dairy-free, a good quality plant-based milk works for the glaze, and you can use coconut oil or a vegan butter substitute. For baking, I always recommend the toothpick test. Ovens can be so finicky! If you find your loaves are always browning too fast on the outside, try baking them on the middle rack, and consider loosely tenting with foil about halfway through if needed. For the glaze, if it’s too thick, add milk a teaspoon at a time. If it’s too thin, add more powdered sugar. The key is getting it to a drizzling consistency that sets up nicely but doesn’t become rock hard.
Storing and Reheating Tips
This zucchini bread is pretty forgiving when it comes to storage, which is another reason I love it. At room temperature, if it’s completely cooled, it will stay fresh for about 2-3 days in an airtight container or wrapped well in plastic wrap. If you’ve glazed it, it’s best to wait until the glaze has set up a bit before wrapping, but it’s still fine to store it this way. If you live in a warmer climate or your kitchen is particularly warm, storing it in the refrigerator might be a better bet. Wrapped tightly, it can last up to a week in the fridge, though it might firm up slightly. To reheat, you can simply pop a slice into the toaster oven or microwave for a few seconds to warm it up and bring back some of that wonderful softness. For longer storage, this bread freezes beautifully! Let it cool completely, then wrap it tightly in plastic wrap, followed by a layer of aluminum foil or a freezer-safe bag. It can stay frozen for up to 3 months. Thaw it overnight at room temperature or gently reheat it from frozen in a low oven. I usually add the glaze *after* it’s been thawed or reheated if it was frozen with glaze on it, just to ensure it looks its best.
Frequently Asked Questions
Final Thoughts
So there you have it – my absolute favorite zucchini bread recipe. It’s more than just a recipe to me; it’s a feeling. It’s that comforting aroma filling the kitchen, the joy of seeing my family’s faces light up with each bite, and the satisfaction of creating something truly delicious with my own two hands. It’s proof that simple ingredients can create something extraordinary. If you’re looking for a recipe that’s consistently amazing, incredibly moist, and bursting with flavor, this is it. It’s perfect for any occasion, from a simple afternoon snack to a special brunch. Give it a try, and I’m willing to bet it’ll become a favorite in your kitchen too! If you loved this, you might also enjoy my recipe for [Link to another relevant recipe, e.g., Moist Banana Bread] or my [Link to another relevant recipe, e.g., Simple Apple Crumble]. I can’t wait to hear how yours turns out in the comments below! Happy baking!
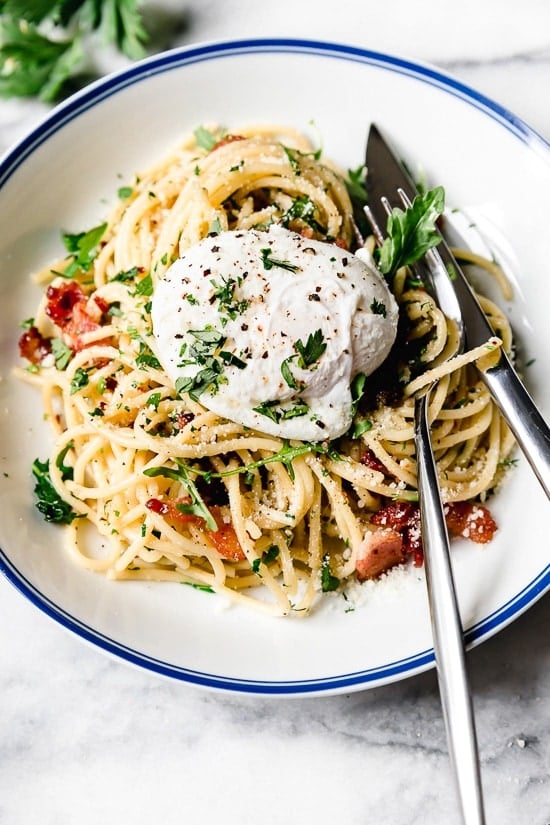
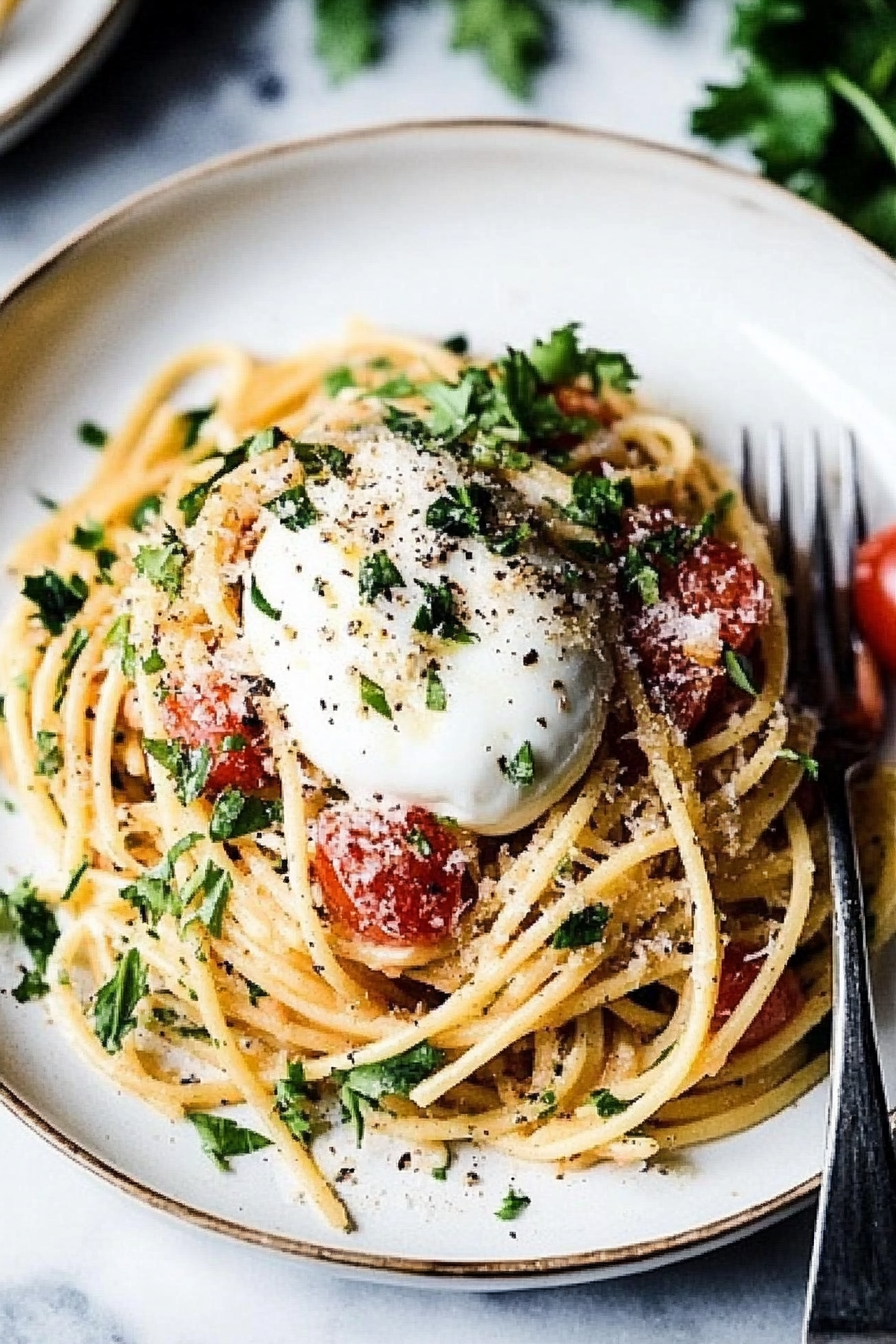
Roman Pasta
Ingredients
Method
- Bring a large pot of generously salted water to a rolling boil for the spaghetti.
- In a deep skillet or medium pot, combine 4 cups cold water, 6 tablespoons white vinegar, and 0.25 teaspoon kosher salt for the egg poaching liquid. Bring it to a boil over high heat, then reduce the heat to low to keep it warm.
- Heat a large (12-inch) skillet over medium-high heat. Add the diced bacon and cook until the fat renders and the bacon is slightly crisp, about 10 minutes. Using a slotted spoon, transfer the cooked bacon to a plate, leaving the rendered fat in the skillet.
- While the bacon cooks, add the spaghetti to the boiling salted water. To the skillet with bacon fat, add the low-sodium chicken broth and simmer to reduce its volume by about one-third, which should take 8 to 10 minutes.
- Cook the pasta until it is al dente, undercooking it by about 2 minutes compared to package directions (usually 8 to 10 minutes). Drain the pasta thoroughly but do not rinse.
- To the reduced broth in the skillet, add the chopped baby arugula (or frisée), chopped Italian parsley, a pinch of kosher salt, and ground black pepper. Stir until combined.
- Add the drained pasta to the skillet with the broth and greens. Increase the heat to high and toss vigorously to thoroughly coat the pasta with the sauce.
- Continue cooking the pasta in the broth for 2 more minutes, allowing it to absorb the liquid. Remove the skillet from the heat, then stir in both the grated Parmigiano Reggiano and Pecorino Romano cheeses, tossing until well combined and creamy. Stir in the crispy bacon.
- Working one at a time, carefully crack each extra large egg into a small bowl. Gently slide each egg into the barely boiling poaching liquid. Cook until the whites are set but the yolks remain runny, about 2 to 3 minutes. Use a slotted spoon to carefully lift each poached egg out of the water.
- Evenly divide the Roman pasta among 4 warm serving bowls. Carefully place one poached egg on top of the pasta in each bowl. Garnish generously with fresh ground black pepper.
- Serve immediately. Encourage diners to mix the egg yolk into the pasta for an even richer, creamier sauce.