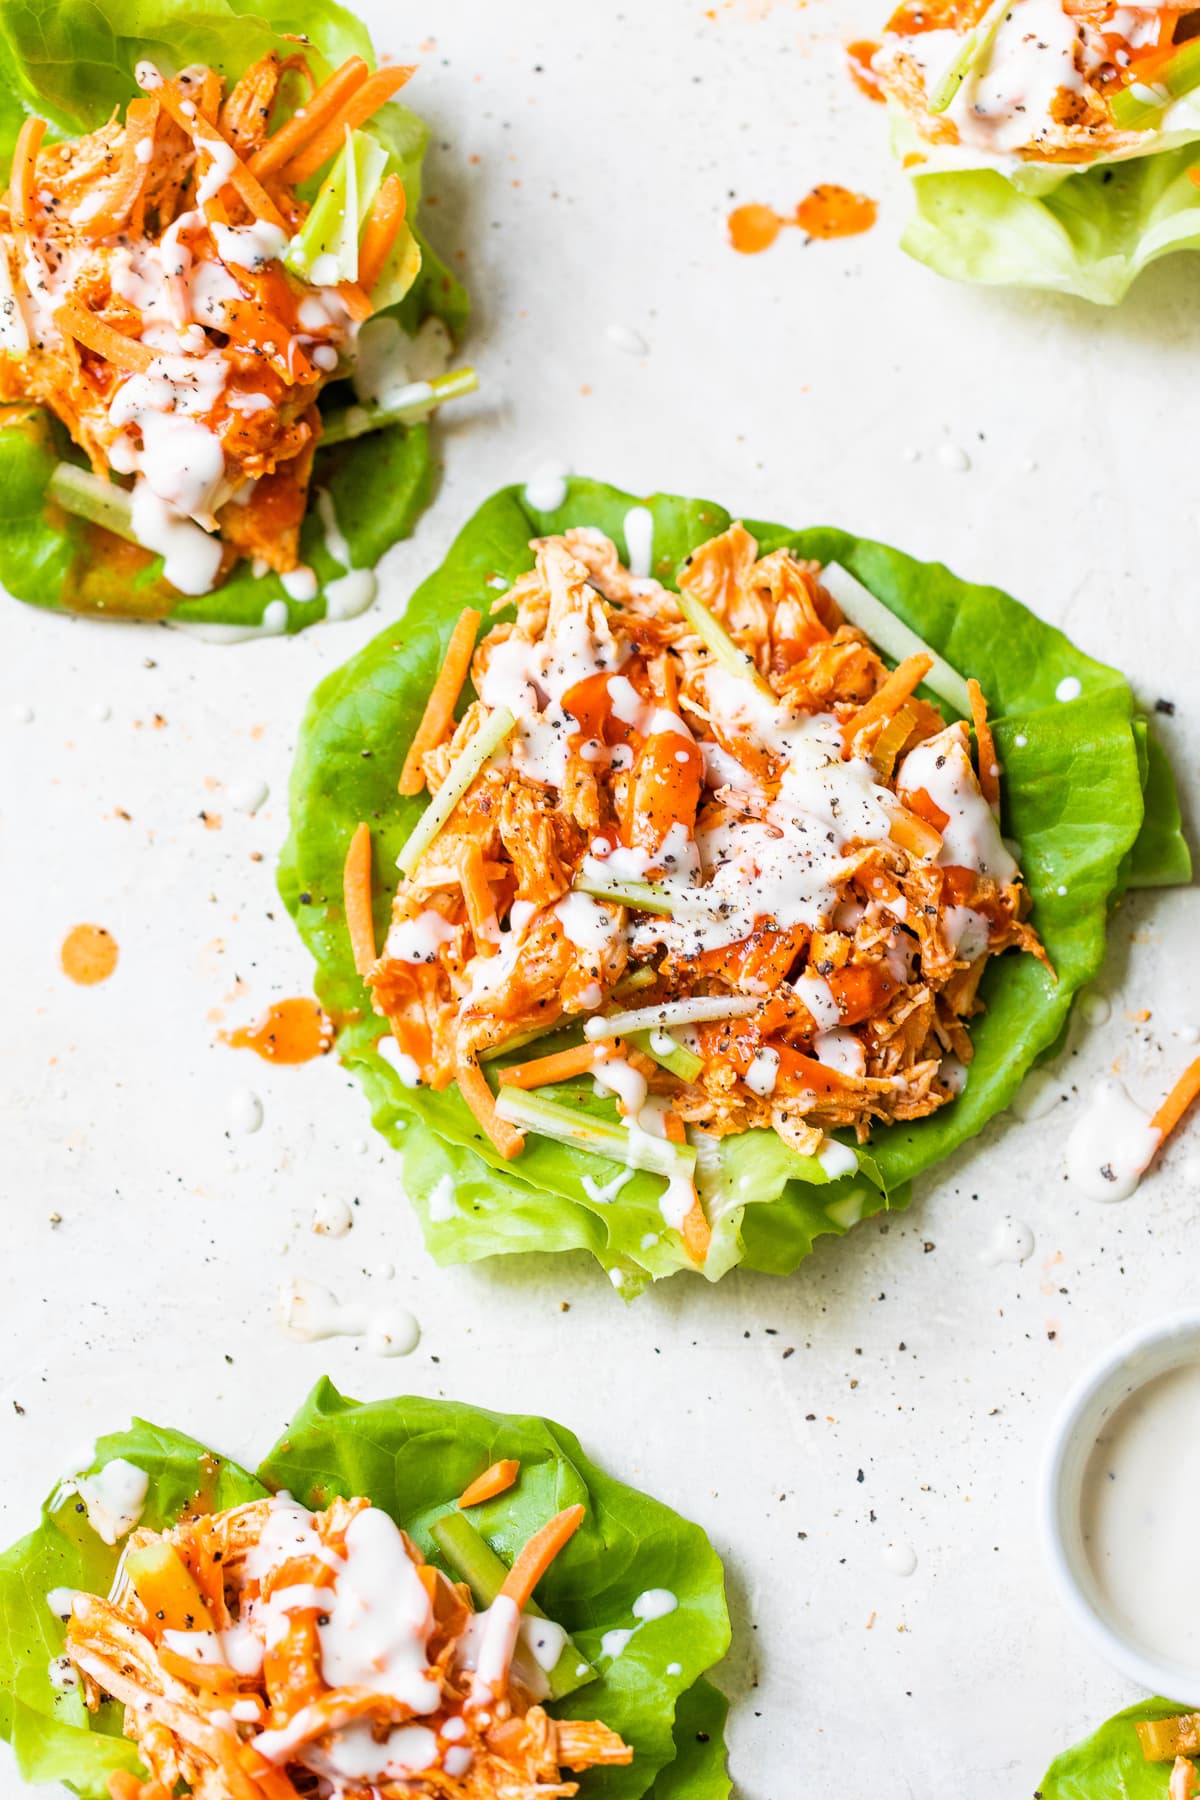
Easy Buffalo Chicken Wraps a Healthy Twist
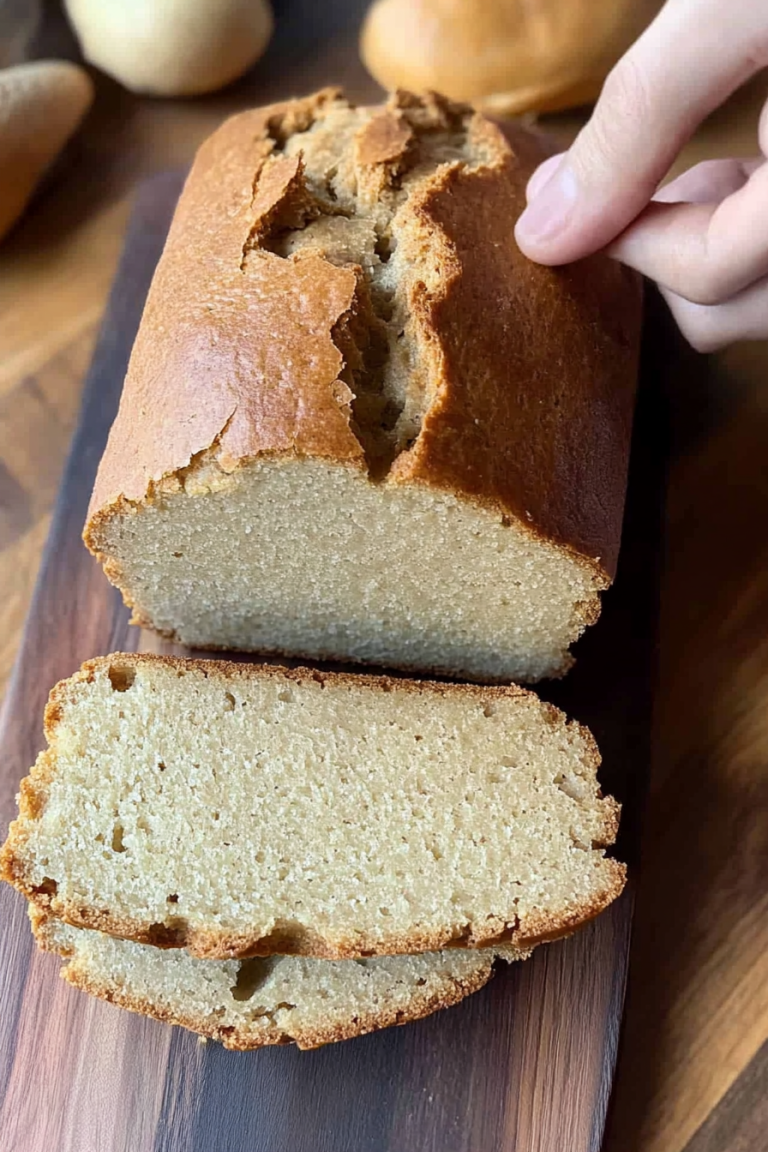
Oh, this zucchini bread! It’s more than just a recipe to me; it’s a warm hug on a chilly morning, a quick fix for an unexpected guest, and honestly, a total lifesaver on those chaotic weeknights when the “what’s for dessert?” question looms. I remember the first time I baked this. My mom had just dropped off a ridiculous amount of zucchini from her garden, and I felt totally overwhelmed. But then, this recipe popped into my head. It’s my absolute go-to when I need something delicious, moist, and comforting without a fuss. It’s like the slightly more sophisticated cousin of your average banana bread, but somehow, it feels even more special, especially with that hint of cinnamon and the perfect texture. It’s the kind of thing that disappears in minutes at my house, and my kids actually ask for seconds (which, as any parent knows, is basically a miracle!). If you’ve ever been hesitant about baking with zucchini, trust me, this is the recipe that will change your mind forever. It’s incredibly forgiving and consistently amazing.
What is Zucchini bread?
So, what exactly *is* zucchini bread? At its heart, it’s a quick bread, which means it uses chemical leaveners (like baking soda and baking powder) instead of yeast, making it super speedy to whip up. The star ingredient, of course, is zucchini, but don’t let that scare you! When baked, zucchini transforms into this incredible moistening agent. It gives the bread this tender, almost melt-in-your-mouth texture that you just can’t achieve with other ingredients. It’s not like you’ll taste “zucchini” in the traditional sense; instead, it adds a subtle earthiness and that glorious moisture that prevents it from ever being dry. Think of it as nature’s secret weapon for the perfect baked good. It’s essentially a delightful, slightly sweet cake that happens to be packed with a healthy vegetable, making it feel a little bit virtuous, even when you’re reaching for a second slice.
Why you’ll love this recipe?
There are so many reasons why this zucchini bread has become my absolute favorite, and I just know you’re going to adore it too. First off, the flavor is just out of this world. It’s perfectly sweet without being cloying, with a lovely warmth from the cinnamon that just makes it feel so cozy. When it bakes, the aroma that fills the kitchen is absolutely divine – it’s one of those smells that instantly makes a house feel like a home. Then there’s the texture. Oh, the texture! It’s incredibly moist and tender, thanks to that magic ingredient, zucchini. It’s not crumbly or dry at all, which is something I’ve struggled with in other quick breads. And the simplicity? This is where it truly shines. You can have this batter mixed up and in the oven in about 15 minutes, flat. Seriously! No fancy techniques or complicated steps. It’s the kind of recipe I can whip up on a whim, even after a long day. Plus, it’s wonderfully budget-friendly. Zucchini is usually quite affordable, and the other ingredients are pantry staples. It’s a recipe that doesn’t break the bank but delivers maximum deliciousness. I also love how versatile it is. While it’s phenomenal on its own, it’s also amazing with a smear of cream cheese or a dollop of Greek yogurt. It’s perfect for breakfast, a midday snack, or even a light dessert. What I love most about this particular recipe is how consistently perfect it turns out. I’ve made it countless times, using different types of zucchini, different ovens, and it *never* fails. It’s truly a culinary hug in loaf form.
How do I make Zucchini Bread?
Quick Overview
Making this zucchini bread is honestly a breeze. You’ll whisk together your dry ingredients, then your wet ingredients, combine them gently, fold in the grated zucchini, and bake until golden. That’s it! The beauty of this recipe lies in its simplicity and the foolproof method that guarantees a moist, flavorful loaf every single time. It’s the perfect project for beginners and a cherished favorite for seasoned bakers looking for a reliable, crowd-pleasing recipe. You won’t believe how easy it is to achieve such a fantastic result!
Ingredients
For the Main Batter:
2 cups all-purpose flour: I always use unbleached flour for the best texture. If you’re feeling fancy or have it on hand, you can also try using half whole wheat for a slightly nuttier flavor, but all-purpose is my go-to for guaranteed softness.
1 teaspoon baking soda: This is crucial for that perfect lift and tender crumb.
1 teaspoon ground cinnamon: Don’t skimp on this! It adds such a warm, inviting aroma and flavor.
1/4 teaspoon ground nutmeg (optional but highly recommended!): Just a pinch adds a subtle complexity that really elevates the cinnamon.
1/2 teaspoon salt: Balances out the sweetness and brings all the flavors together.
1 1/2 cups granulated sugar: This is the standard amount, but if you prefer it less sweet, you can reduce it to 1 1/4 cups. I’ve even tried it with a mix of sugar and brown sugar for a deeper flavor, which is lovely!
2 large eggs: Room temperature is best for proper emulsification.
1/2 cup vegetable oil (or other neutral oil like canola or light olive oil): Oil is key to that incredible moistness that lasts for days. You could experiment with melted butter, but oil truly excels here.
1/4 cup unsweetened applesauce: Another secret weapon for moisture and a slightly tender crumb. It’s a healthier fat alternative that still delivers!
1 teaspoon vanilla extract: Pure vanilla extract is always best for that rich flavor.
1 1/2 cups grated zucchini (about 2 medium zucchini), squeezed dry: This is the star! Make sure to squeeze out as much moisture as you can – I’ll tell you how below. You want the fluffy pulp, not excess water.
For Optional Add-ins (because who doesn’t love options?):
1/2 cup chopped walnuts or pecans: Adds a delightful crunch and nutty flavor.
1/2 cup chocolate chips (semi-sweet or dark): Because chocolate makes everything better, right?
For the Simple Glaze (trust me, you want this!):
1 cup powdered sugar: Sifted for the smoothest glaze.
2-3 tablespoons milk (dairy or non-dairy): Start with 2 and add more until you reach your desired drizzling consistency.
1/2 teaspoon vanilla extract: Just to enhance the sweetness.
Step-by-Step Instructions
Step 1: Preheat & Prep Pan
First things first, let’s get your oven all warmed up to 350°F (175°C). Then, grab a standard loaf pan – a 9×5 inch one is perfect. Give it a good grease with butter or non-stick spray, and then a little dusting of flour. Tap out any excess flour. This little step is key to ensuring your beautiful zucchini bread slides right out after baking without any sticking. It’s one of those simple things that makes a world of difference!
Step 2: Mix Dry Ingredients
In a large bowl, whisk together the flour, baking soda, cinnamon, nutmeg (if using), and salt. Give it a really good whisk to make sure everything is evenly distributed. This ensures your leavening agents are spread out, leading to a uniform rise. Then, add your granulated sugar and whisk it in. I like to do this step first because it makes sure all the dry ingredients are perfectly combined before we introduce the wet. No one wants a pocket of baking soda in their otherwise perfect bread!
Step 3: Mix Wet Ingredients
In a separate medium bowl, crack your eggs. Whisk them up a bit, then pour in the vegetable oil, unsweetened applesauce, and vanilla extract. Whisk until everything is nicely combined and looks smooth and emulsified. The applesauce here is a game-changer for moisture, and it adds a subtle sweetness without adding too much extra fat. If your eggs are cold, letting them sit out for about 10 minutes can help them incorporate better, leading to a smoother batter.
Step 4: Combine
Now, pour the wet ingredients into the bowl with the dry ingredients. Using a spatula or a wooden spoon, gently mix until *just* combined. Seriously, don’t overmix! A few streaks of flour are okay; they’ll disappear when you add the zucchini. Overmixing develops the gluten too much, which can lead to a tough, dense bread, and we definitely don’t want that. We’re aiming for tender and moist!
Step 5: Prepare Filling
Now for the star of the show: the zucchini! You’ll need about 1 1/2 cups of grated zucchini. The best way to do this is to use the large holes of a box grater. Once grated, take handfuls of the zucchini and squeeze out as much liquid as humanly possible. You can do this over the sink or into a clean tea towel. The drier the zucchini, the better your bread’s texture will be. Now, gently fold the squeezed, grated zucchini into the batter. If you’re adding nuts or chocolate chips, now’s the time to fold those in too!
Step 6: Layer & Swirl
Pour the batter evenly into your prepared loaf pan. Smooth the top a little with your spatula. If you’re feeling fancy and want to add a swirl, you can mix a tablespoon of cinnamon with another tablespoon of sugar and sprinkle it over the top before baking, or even swirl in a little extra batter mixed with cocoa powder for a marble effect. For this basic recipe, I usually just smooth the top and let the simple goodness shine.
Step 7: Bake
Pop that loaf pan into your preheated oven. Bake for about 50-65 minutes. The exact time will depend on your oven, so it’s important to check for doneness. You’ll know it’s ready when a wooden skewer or toothpick inserted into the center comes out clean (or with a few moist crumbs attached, but no wet batter). The top should be a beautiful golden brown. If the top starts to brown too quickly before the inside is cooked, you can loosely tent it with aluminum foil for the last 15-20 minutes of baking.
Step 8: Cool & Glaze
Once it’s done, take the loaf pan out of the oven and let it cool in the pan on a wire rack for about 10-15 minutes. This allows it to set up properly. Then, carefully invert the loaf onto the wire rack to cool completely. This is crucial: make sure it’s *completely* cool before you even think about glazing it. If it’s warm, the glaze will melt right off! For the glaze, simply whisk together the powdered sugar, milk, and vanilla extract until smooth. Add milk a tablespoon at a time until you get a nice, thick but drizzly consistency. Drizzle it generously over the cooled loaf. It hardens up slightly as it sits, giving you that perfect sweet finish.
Step 9: Slice & Serve
Once the glaze has set a little, it’s time for the best part! Slice your beautiful zucchini bread with a sharp knife. It slices best when fully cooled. Enjoy a thick slice with a cup of coffee or tea. This bread is truly a treat!
What to Serve It With
This zucchini bread is so versatile, it fits into almost any meal or occasion! For a simple and satisfying Breakfast, I love a warm slice with a mug of freshly brewed coffee. The slight sweetness and moist texture are the perfect start to the day. You can also serve it with a side of plain Greek yogurt for a little extra protein. When I’m hosting Brunch, I always include this on the table. It’s a little more special than plain toast, and it pairs beautifully with fruit salads or a savory quiche. For an elegant touch, I might dust the top with a little extra powdered sugar before slicing, or serve it alongside a berry compote. As a delightful Dessert, it’s wonderful on its own, of course, but imagine it with a scoop of vanilla bean ice cream or a drizzle of caramel sauce! It’s also surprisingly good as a slightly sweet palate cleanser after a rich meal. And for those Cozy Snacks, it’s the ultimate comfort food. It’s perfect for an afternoon pick-me-up with a glass of milk, or even a late-night treat when you’re craving something sweet but don’t want to bake a whole cake. My family also loves it toasted lightly, with a thin layer of butter melting into it. It’s just pure comfort in every bite.
Top Tips for Perfecting Your Zucchini Bread
I’ve made this recipe more times than I can count, and over the years, I’ve picked up a few tricks that make it even better. Here are my top tips to ensure your zucchini bread is absolutely perfect:
Zucchini Prep: This is probably the most crucial step for a great texture. Grating the zucchini with the large holes of a box grater is best; it releases the right amount of moisture. And please, *please* squeeze out as much liquid as you can! Use a clean kitchen towel or cheesecloth. Excess water will make your bread gummy. Don’t worry about peeling it; the skin adds nutrients and color, and it softens beautifully during baking.
Mixing Advice: Resist the urge to overmix! When you combine the wet and dry ingredients, mix only until *just* combined. A few small lumps or streaks of flour are perfectly fine. Overmixing develops the gluten, which can lead to a tough, dense loaf. We want tender and fluffy here!
Swirl Customization: While this recipe is fantastic as is, if you love a little extra flair, consider a cinnamon-sugar swirl. Mix 1 tablespoon of cinnamon with 2 tablespoons of sugar, sprinkle about half of it over the batter before you fold in the zucchini, and then gently swirl it in with a knife. You can also reserve some batter, mix it with a tablespoon of cocoa powder, and swirl that in for a chocolatey surprise!
Ingredient Swaps: I’ve tinkered with this recipe a lot! For a dairy-free version, I’ve successfully used almond milk or oat milk in the glaze, and any neutral vegetable oil works well. If you’re out of applesauce, you can substitute an equal amount of yogurt or even a bit more oil, but the applesauce adds a unique tenderness. For a healthier sugar option, you can try substituting some of the granulated sugar with brown sugar or even coconut sugar, but be aware it might slightly alter the color and flavor profile.
Baking Tips: Every oven is a little different, so always keep an eye on your bread after about 50 minutes. The toothpick test is your best friend here. If the top is browning too fast, loosely tent the loaf pan with aluminum foil. I usually bake mine on the middle rack for even heat distribution.
Glaze Variations: If the simple vanilla glaze isn’t your jam, try a lemon glaze for a zesty kick – just add a teaspoon of lemon zest and a little lemon juice to your powdered sugar mixture. A cream cheese glaze is also divine if you have cream cheese handy! Just remember to let the bread cool *completely* before applying any glaze.
Storing and Reheating Tips
One of the best things about this zucchini bread is how well it keeps, meaning you can enjoy it for several days! Here’s how I usually store it:
Room Temperature: Once completely cooled and the glaze has set, I like to wrap the loaf tightly in plastic wrap or place it in an airtight container. It stays wonderfully moist at room temperature for about 2-3 days. Honestly, it rarely lasts that long in my house!
Refrigerator Storage: If you live in a particularly warm or humid climate, or if you just want it to last a bit longer, you can store it in the refrigerator. Wrap it well to prevent it from drying out, and it should keep for up to a week. The texture might firm up a bit in the fridge, but it’s still delicious.
Freezer Instructions: This bread freezes beautifully! For the best results, I like to freeze it either whole or in individual slices. Wrap it very tightly in plastic wrap, then in a layer of aluminum foil, or place it in a freezer-safe bag. It will keep well in the freezer for up to 2-3 months. To thaw, simply leave it at room temperature for a few hours, or if you froze slices, you can pop them directly into the toaster for a quick thaw and warm-up.
Glaze Timing Advice: If you plan to freeze the bread, I highly recommend glazing it *after* it’s thawed. Glazing before freezing can sometimes lead to a slightly sticky or uneven texture after thawing. If you’re storing it at room temperature or in the fridge for a short period, you can glaze it right after it cools. For longer refrigerator storage, glazing on day 2 or 3 can help keep the top extra moist.
Frequently Asked Questions
Final Thoughts
This zucchini bread is more than just a baked good; it’s a testament to how simple ingredients can create something truly magical. It’s the kind of recipe that brings smiles to faces, whether it’s for a quick breakfast, a comforting snack, or a delightful dessert. The ease with which it comes together, combined with its incredible moistness and subtle, warm spice notes, makes it a winner every time. If you’re looking for a reliable, crowd-pleasing recipe that’s both forgiving and utterly delicious, you really can’t go wrong with this one. It’s the perfect way to use up that extra zucchini and treat yourself (and your loved ones!) to something special. Give it a try, and I’m positive it will become a staple in your kitchen too. I can’t wait to hear how yours turns out! Feel free to share your own variations or any tips you discover in the comments below!
buffalo chicken wraps
Ingredients
Method
- In a slow cooker, combine chicken breasts, diced onions, diced celery stalk, minced garlic, and chicken broth. Use enough broth to cover the chicken; supplement with water if needed.
- Cover the slow cooker and cook on high for 4 hours.
- Remove the cooked chicken from the pot, reserving 0.5 cup of the cooking broth. Discard the remaining broth.
- Shred the chicken using two forks. Return the shredded chicken to the slow cooker along with the reserved 0.25 to 0.5 cup broth and the cayenne pepper hot sauce. Set to high for an additional 30 minutes to warm through and combine flavors. This yields approximately 3 cups of buffalo chicken.
- To prepare lettuce cups, place 0.5 cup of the buffalo chicken into each lettuce leaf. Top with 0.25 cup shredded carrots, celery matchsticks, and a dressing of your choice (e.g., light blue cheese dressing). Wrap and serve immediately.
- Combine chicken breasts, diced onions, diced celery stalk, minced garlic, and chicken broth (enough to cover the chicken, use water if needed) in the Instant Pot.
- Cover and cook on high pressure for 15 minutes. Allow for natural release of pressure.
- Remove the chicken from the pot, reserving 0.5 cup broth and discarding the rest. Shred the chicken with two forks. Return it to the pot with 0.25 to 0.5 cup broth and the hot sauce. Sauté for 2 to 3 minutes to combine. This makes 3 cups of chicken.
- To prepare lettuce cups, place 0.5 cup buffalo chicken in each leaf, top with 0.25 cup shredded carrots, celery matchsticks, and dressing of your choice. Wrap up and start eating!