Easy Bar Cheesecake Perfection
Oh, hello there! Come on in, grab a mug of something warm. I’ve been meaning to share this with you for ages. You know those recipes that just feel like a hug? The ones that have that *je ne sais quoi* that makes everyone in the house sigh with happiness? Well, this zucchini bread is absolutely it for us. It’s not just any zucchini bread, mind you. This is the one that gets gobbled up before it even has a chance to cool sometimes! I swear, the smell alone – that warm, comforting aroma of cinnamon and sweet zucchini – is enough to make any day better. It’s like a little slice of sunshine, even on the gloomiest Tuesday. If you’ve ever tried those drier, crumbly versions, forget them! This one is moist, tender, and bursting with flavor. It’s the kind of treat that’s perfect for a lazy weekend morning, a delightful afternoon pick-me-up, or even a sneaky late-night craving that absolutely *must* be satisfied without resorting to a full-on cake baking session.
What is Zucchini bread?
So, what exactly *is* this magical zucchini bread I keep raving about? At its heart, it’s a quick bread, meaning it’s leavened with baking soda or baking powder rather than yeast, so there’s no fussy rising involved. Think of it as a humble loaf that happens to have shredded zucchini mixed into its batter. Now, don’t let the “zucchini” part throw you off if you’re not a huge fan of the vegetable itself. The zucchini’s job here isn’t to taste like a steamed vegetable, oh no. Its superpower is adding incredible moisture and tenderness to the bread. It basically melts into the background, leaving behind a super soft, wonderfully moist crumb that’s just begging for a generous spread of butter. It’s essentially a delightful, slightly sweet cake that you can technically get away with serving for breakfast. It’s a classic for a reason, and this particular version is the one that’s earned a permanent spot in my recipe binder.
Why you’ll love this recipe?
Honestly, there are so many reasons why this zucchini bread has become a staple in my kitchen, and I just know you’re going to adore it too. First off, the flavor is out of this world. It’s not just sweet; it’s got this wonderfully warm spice blend – cinnamon is my go-to, but a pinch of nutmeg or even a whisper of cardamom can be amazing too. And the texture? Oh, the texture! It’s incredibly moist and tender, thanks to that secret weapon, the zucchini. It never feels dry or crumbly, which is a major win in my book. You know how some baked goods feel like a lot of effort? This isn’t one of them. It’s surprisingly simple to whip up. The ingredients are pretty standard pantry staples, which is a lifesaver when you suddenly have a craving or unexpected guests. Plus, it’s incredibly budget-friendly. A couple of zucchinis, some flour, sugar, eggs, and spices – you probably have most of it already! What I love most is its sheer versatility. It’s fantastic on its own, but it’s also a wonderful canvas for add-ins. Chopped walnuts or pecans for crunch? Chocolate chips (my kids’ favorite, obviously)? A handful of dried cranberries for a tart little burst? They all work beautifully. It’s a bit like my classic banana bread, but with its own unique charm and that extra boost of moisture. This recipe truly stands out because it delivers on taste, texture, and ease every single time.
How do you make Zucchini bread?
Quick Overview
This is truly a no-fuss recipe. We’re going to whisk together our dry ingredients, then our wet ingredients separately, and finally bring them together with the star of the show: the shredded zucchini. A quick swirl of optional cinnamon-sugar mixture adds an extra layer of deliciousness and a beautiful look. It bakes up into a gorgeous, golden-brown loaf that smells heavenly. The beauty of this method is that it’s incredibly forgiving. Even if you’re new to baking, you’ll find this process straightforward and rewarding. It’s a one-bowl wonder for the batter, which means less cleanup too – always a win in my kitchen!
Ingredients
For the Main Batter:
You’ll need about 2 cups of all-purpose flour. Make sure it’s not packed too tightly in the measuring cup – I usually spoon it in and then level it off with a straight edge. This makes a world of difference in the final texture! We’ll also use 1 teaspoon of baking soda and ½ teaspoon of salt. The baking soda is crucial for that lovely rise and tender crumb. And of course, the star: 2 cups of shredded zucchini. It’s best to use medium-sized zucchinis; they have the right balance of moisture and seeds. You’ll want to grate them on the large holes of a box grater. Don’t worry about squeezing out all the moisture; a little bit is good! For sweetness, we’re going with 1 cup of granulated sugar. Some people like to use a mix of granulated and brown sugar for extra moisture and a richer flavor, which is a great variation to try!
For the Wet Ingredients & Flavor Boosters:
We need 2 large eggs, lightly beaten. They act as a binder and add richness. Then, ½ cup of melted unsalted butter. Melted butter contributes to that lovely moist texture. If you’re out of butter, a neutral-flavored oil like vegetable or canola oil works too, about the same amount. And for that comforting aroma and taste, 1 teaspoon of vanilla extract is essential. And the magic spice: 2 teaspoons of ground cinnamon. This is where you can really play – maybe add a pinch of nutmeg or ginger for an extra festive flair!
For the Optional Swirl:
If you want that beautiful marbled effect and an extra burst of cinnamon-sugar goodness, you’ll need about 2 tablespoons of granulated sugar mixed with 1 teaspoon of ground cinnamon. It’s super simple and makes the loaf look as good as it tastes!
Step-by-Step Instructions
Step 1: Preheat & Prep Pan
First things first, get your oven preheated to 350 degrees Fahrenheit (175 degrees Celsius). This is a pretty standard temperature for most quick breads. While the oven heats up, grab a standard 9×5 inch loaf pan. You’ll want to grease it really well with butter or cooking spray. For extra insurance against sticking, I like to lightly flour it after greasing, or even better, line it with parchment paper, leaving a little overhang on the sides. This makes lifting the cooled loaf out so much easier. Trust me on this one; nobody wants their beautiful bread stuck to the pan!
Step 2: Mix Dry Ingredients
In a large mixing bowl, whisk together your 2 cups of all-purpose flour, 1 teaspoon of baking soda, and ½ teaspoon of salt. Whisking these together thoroughly ensures that the leavening agent (baking soda) and salt are evenly distributed throughout the flour. This helps the bread rise evenly and prevents any pockets of saltiness. You want to see a nice, uniform blend of the dry ingredients before you move on.
Step 3: Mix Wet Ingredients
In a separate medium-sized bowl, whisk together your 2 lightly beaten eggs, ½ cup of melted butter (make sure it’s not too hot, or it might scramble the eggs!), 1 teaspoon of vanilla extract, and the 2 teaspoons of ground cinnamon. Give it a good whisk until everything is well combined and smooth. This ensures all those delicious flavors are distributed evenly before they go into the main batter.
Step 4: Combine
Now, pour the wet ingredients into the bowl with the dry ingredients. Add your 2 cups of shredded zucchini. Gently fold everything together with a spatula or wooden spoon until *just* combined. It’s super important not to overmix here! A few streaks of flour are okay. Overmixing develops the gluten in the flour, which can lead to a tough, dense bread. We want it tender and moist, remember?
Step 5: Prepare Filling (Optional Swirl Mix)
If you’re going for the swirl, now’s the time to mix your 2 tablespoons of sugar and 1 teaspoon of cinnamon in a small bowl. This is going to add a lovely flavor and texture contrast. Keep it handy for the next step!
Step 6: Layer & Swirl
Pour about half of the batter into your prepared loaf pan and spread it out evenly. Sprinkle about half of your cinnamon-sugar mixture over the top. Then, pour the remaining batter over that, smoothing the top again. Finally, sprinkle the rest of the cinnamon-sugar mixture over the top. For that signature swirl, you can gently run a knife or a skewer through the batter in a zigzag pattern. Don’t overdo it; we don’t want to mix it all in, just create some pretty ribbons of flavor!
Step 7: Bake
Pop that loaf pan into your preheated oven. Bake for about 50-65 minutes. Baking times can vary quite a bit depending on your oven, so start checking around the 50-minute mark. You’ll know it’s done when a wooden skewer or toothpick inserted into the center comes out clean, with maybe just a few moist crumbs attached. If the top is browning too quickly before the center is cooked, you can loosely tent it with aluminum foil. The smell that fills your kitchen during this stage is pure bliss!
Step 8: Cool & Glaze (Optional)
Once it’s baked to perfection, carefully remove the loaf pan from the oven. Let it cool in the pan for about 10-15 minutes. This allows it to set up properly. Then, gently invert the pan onto a wire rack and lift out the loaf. Let it cool completely on the wire rack before you even think about slicing it. If you’re feeling fancy, you can whip up a simple glaze (powdered sugar, a splash of milk, and a touch of vanilla) to drizzle over the cooled loaf. It’s totally optional, but oh-so-delicious!
Step 9: Slice & Serve
Once completely cool, use a serrated knife to slice your beautiful zucchini bread. I find slicing it when it’s at room temperature gives you the neatest slices. Serve a thick slice with a smear of butter – it’s heavenly! You can also enjoy it plain, as the flavors are so well-balanced.
What to Serve It With
This zucchini bread is so versatile, it fits into almost any meal or snack occasion! For a cozy breakfast, I love serving a warm slice with a good cup of coffee. It’s comforting and satisfying without being too heavy to start the day. For a more elaborate brunch spread, it’s wonderful alongside some scrambled eggs, crispy bacon, and fresh fruit salad. The sweetness of the bread offers a lovely contrast to savory dishes. As a dessert, it’s a winner on its own, perhaps with a dusting of powdered sugar or a dollop of whipped cream. It’s also fantastic paired with a scoop of vanilla bean ice cream for a truly decadent treat. And for those moments when you just need a little something sweet and comforting, it’s perfect for a cozy afternoon snack with a glass of milk or a cup of tea. My family has a tradition of having it with hot chocolate on rainy days – it just feels so perfectly cozy and indulgent.
Top Tips for Perfecting Your Zucchini Bread
After making this countless times, I’ve picked up a few tricks that I think make all the difference. For zucchini prep, I always use the large holes of a box grater. You don’t need to go crazy squeezing out every last drop of moisture; a little bit is actually beneficial for keeping the bread moist. Just a gentle press with your hands or a quick squeeze through a fine-mesh sieve is usually enough. For mixing, the key is really not to overmix. Seriously, this is the most important tip! Stop mixing as soon as you don’t see large streaks of dry flour. A few small lumps are perfectly fine and actually desirable. The swirl is entirely optional, but it adds such a lovely touch! If you want distinct swirls, don’t overwork the batter when you’re creating the patterns. For ingredient swaps, if you’re out of regular sugar, you can try using an equal amount of brown sugar for a deeper, caramel-like flavor. I’ve also experimented with using half whole wheat flour for a slightly heartier loaf, but I find it can make it a tad denser, so I usually stick to all-purpose for that signature tender crumb. Baking is usually straightforward, but ovens can be tricky! My best advice is to know your oven. If it tends to run hot, consider reducing the temperature slightly or using a baking stone to help regulate the heat. Always do the toothpick test for doneness; it’s the most reliable way. For the glaze, if it’s too thick, add milk or lemon juice a tiny bit at a time until you reach your desired drizzling consistency. If it’s too thin, add more powdered sugar until it thickens up.
Storing and Reheating Tips
This zucchini bread is wonderfully forgiving when it comes to storage. At room temperature, it will stay fresh and delicious for about 2-3 days when stored in an airtight container or wrapped well in plastic wrap. I usually keep it on the counter, and it’s usually gone by then anyway! If you need to keep it longer, the refrigerator is your friend. Wrap it tightly in plastic wrap and then foil, or pop it into an airtight container. It should keep well in the fridge for up to a week, although the texture might change slightly. For longer storage, freezing is an excellent option. You can freeze the whole loaf or individual slices. Wrap each slice tightly in plastic wrap, then in aluminum foil, and then place them in a freezer-safe bag or container. It will keep in the freezer for up to 3 months. To reheat, you can thaw frozen slices overnight on the counter, or gently warm them in a toaster oven or microwave for a few seconds until warmed through. If you’ve glazed your loaf, it’s best to add the glaze *after* it’s completely cooled and you’re ready to serve it, especially if you plan on storing it for more than a day, as the glaze can get a bit sticky.
Frequently Asked Questions
Final Thoughts
So there you have it – my absolute favorite zucchini bread recipe! It’s more than just a recipe; it’s a little piece of my kitchen, a symbol of comfort and simple joys. I truly believe this recipe has the power to brighten your day, just as it does mine. It’s proof that sometimes, the most delicious things are also the easiest to make. If you give this a try, I’d be absolutely thrilled to hear all about it! Did your kids gobble it up? Did you add any special mix-ins? Please leave a comment below or share your photos – I love seeing your creations! And if you enjoyed this, you might also love my Moist Banana Bread or my Easy Blueberry Muffins. Happy baking, and I can’t wait to hear how your zucchini bread turns out!
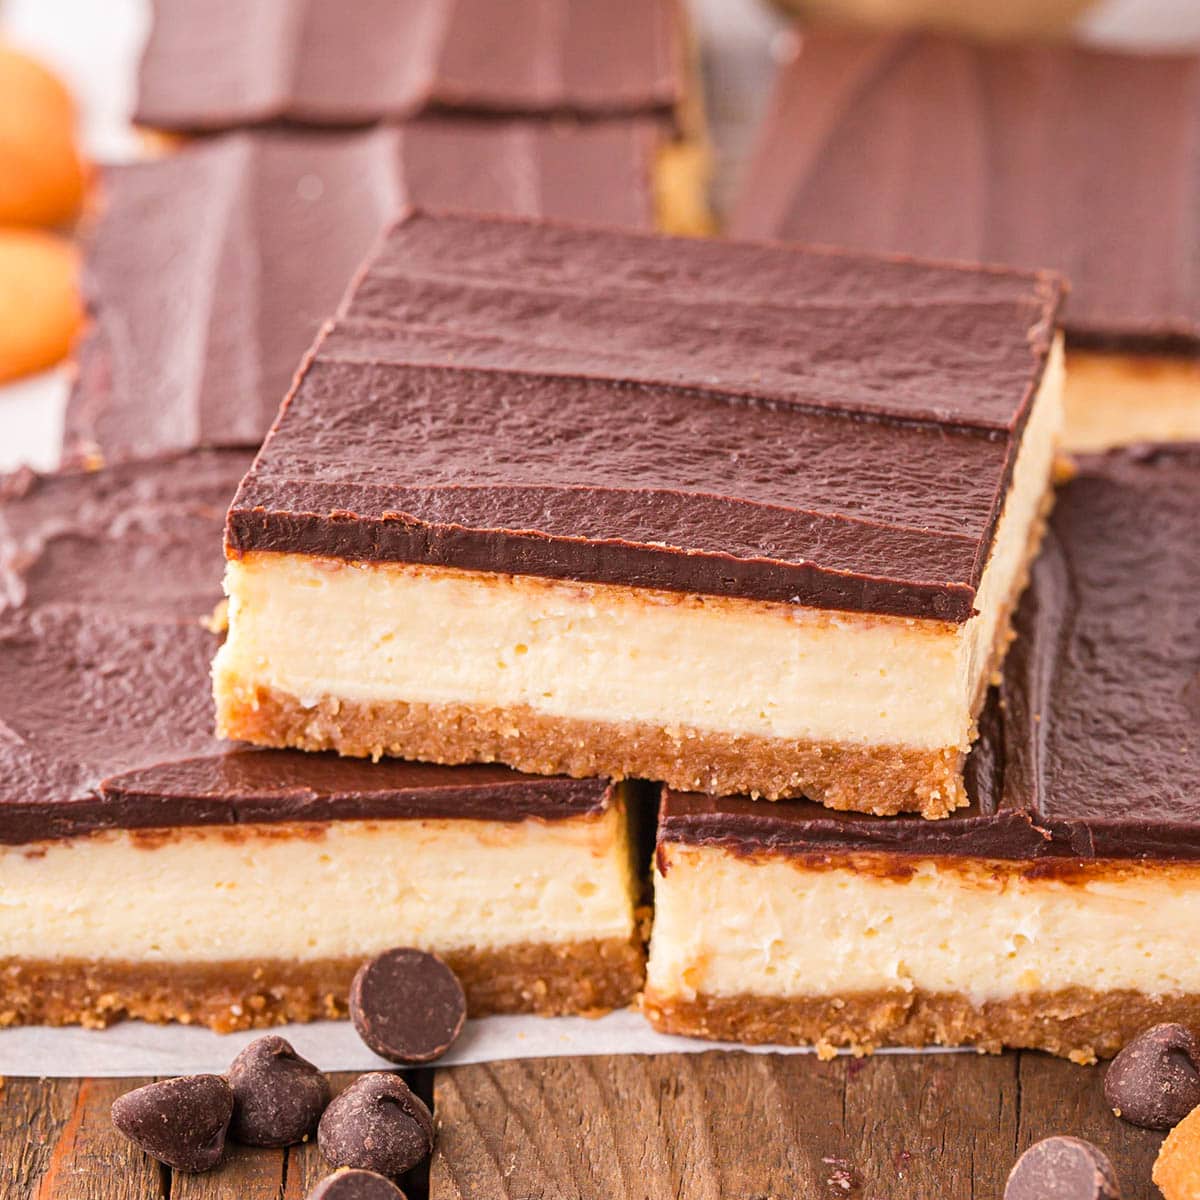
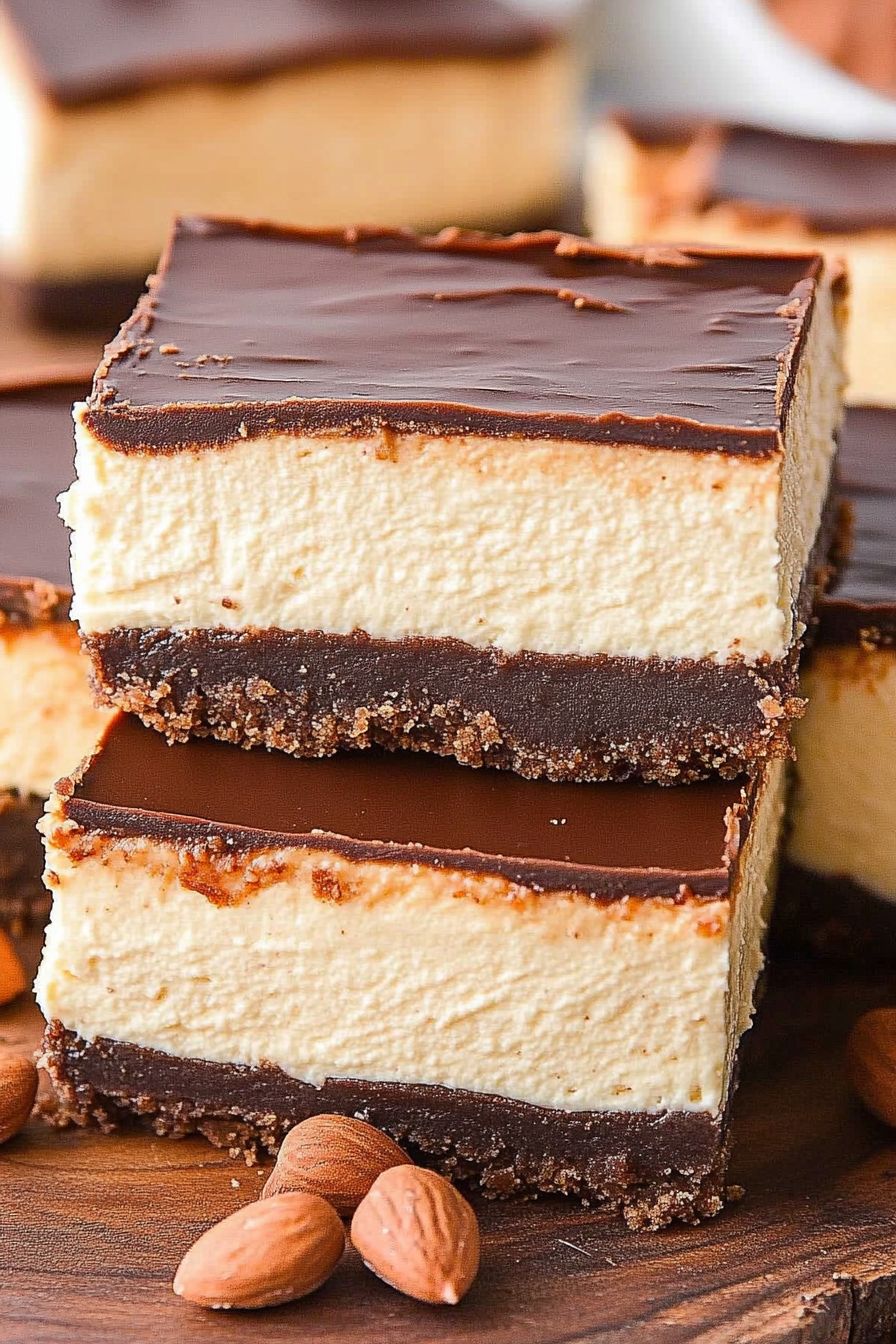
Cheesecake Bars
Ingredients
Method
- Preheat the oven to 325 degrees Fahrenheit and line a 9x13 inch baking pan with parchment paper or spray with baking spray.
- In a food processor, combine the vanilla wafer cookies and light brown sugar and process until well crumbled and combined.
- Pour in the melted butter and pulse to combine. The mixture should resemble wet sand, crumbly but able to pack.
- Transfer the mixture into the prepared baking pan and press firmly into an even layer on the bottom of the pan.
- Bake for 8-12 minutes or until golden and dry to the touch. Remove from the oven and allow to cool.
- In a large mixing bowl, use a hand or stand mixer to cream together the cream cheese and white sugar until light and fluffy.
- Mix in the sour cream and vanilla extract just until combined.
- On low speed, mix in the eggs, one at a time, just until incorporated. Use a spatula or spoon to scrape the bottom and sides of the bowl and mix everything until evenly distributed.
- Pour the cheesecake filling into the prepared crust and tap several times on the counter to pop any air bubbles.
- Bake for 40-42 minutes or until the cheesecake is set on the sides and just wobbly in the middle. You can use a digital thermometer to ensure that the internal temperature has reached 150 degrees Fahrenheit. If the cheesecake begins to crack on the edges, it is finished and should be removed from the oven.
- Allow the cheesecake bars to cool to room temperature, about 1 hour, and then wrap well with plastic wrap and transfer to the refrigerator for 5-6 hours or overnight.
- To make the ganache, place the chocolate chips in a medium sized, heat safe bowl.
- Heat the heavy cream over low on the stove or in 30 second increments in the microwave until hot and steaming but do not boil.
- Pour the hot cream over the chocolate chips and ensure that they are completely covered.
- Allow the mixture to sit for 5 minutes and then whisk together until thick, shiny and creamy.
- Pour the ganache over the cheesecake bars and spread into an even layer.
- Place back in the refrigerator for 8-12 minutes, just until set and then remove and slice into squares before serving.