Easy Dinners For Busy Nights
You know those recipes that just feel like a warm hug? The ones you find yourself coming back to again and again, not just because they taste incredible, but because they bring a little bit of sunshine into your day? Well, this zucchini bread is *that* recipe for me. Seriously, if I could bottle the smell of this baking, I would! It’s what I whip up when I have a sudden craving for something sweet but don’t want to deal with fussy steps, or when I’ve got a couple of zucchini hanging around that need a good home. My kids actually ask for this all the time, especially when they’re heading out the door for school – it’s the perfect portable, delicious breakfast or snack. It’s got all the comforting spiced notes of a classic quick bread, but with this incredible moistness from the zucchini that just makes it sing. Think of it as the upgrade your grandma’s banana bread always deserved, but honestly, it’s even better. If you’ve ever found zucchini bread a bit dry or bland, prepare to be amazed. This isn’t just *any* zucchini bread; this is the zucchini bread that will make you rethink everything you thought you knew about it.
What is Zucchini bread?
So, what exactly *is* this magical zucchini bread? At its heart, it’s a quick bread, meaning it doesn’t involve yeast or any complicated rising techniques. It’s a simple batter, packed with shredded zucchini, warm spices, and a touch of sweetness, baked into a moist, tender loaf. The name itself, “zucchini bread,” is pretty straightforward, but what makes it special is the secret ingredient: zucchini! Now, don’t let that scare you. You won’t taste the zucchini directly; what you’ll get is this incredible, almost creamy, moist texture that makes the whole loaf incredibly satisfying. It’s like the zucchini just melts away, leaving behind pure deliciousness. Think of it as a secret superpower for your baked goods! It’s essentially a vehicle for cinnamon, nutmeg, and that comforting baked goodness we all crave, but with an extra dose of moisture and goodness. It’s the kind of thing you can whip up on a Tuesday afternoon and have disappear by Wednesday morning. Simple, wholesome, and ridiculously tasty.
Why you’ll love this recipe?
Honestly, where do I even start with why this zucchini bread is a winner? First off, the flavor is just out of this world. It’s got that perfect balance of sweet and spice, with notes of cinnamon and nutmeg that just fill your kitchen with the most inviting aroma. It’s not overly sweet, which I really appreciate, allowing the natural goodness of the ingredients to shine through. But beyond the taste, it’s the texture that really sets it apart. It’s unbelievably moist and tender, thanks to the shredded zucchini. I’ve tested this with different types of zucchini, and as long as you get the moisture out, it works like a charm. You know how some quick breads can be a bit on the dry side? Not this one. This one is like a little slice of heaven. Plus, it’s surprisingly budget-friendly. Zucchini is often one of the more affordable vegetables, and the other ingredients are pantry staples for most bakers. It’s a lifesaver when you need a treat without breaking the bank. And talk about versatile! You can enjoy it warm with a slather of butter, as is, or even toast a slice for breakfast. It’s also fantastic as a simple dessert, especially with a dollop of whipped cream or a scoop of vanilla ice cream. What I love most about this recipe is how forgiving it is. Even if you’re new to baking, you’ll find this super straightforward. It’s a crowd-pleaser that works for any occasion, from a casual coffee break to a more festive brunch. Honestly, it’s one of those recipes that just makes you feel good about baking.
How do I make Zucchini bread?
Quick Overview
This recipe is all about simplicity and delicious results. You’ll basically mix your dry ingredients, then your wet ingredients, combine them gently, stir in the star – shredded zucchini – and bake until golden and fragrant. That’s it! No fancy equipment needed, just a bowl, a whisk, and a good old-fashioned baking pan. The key is not to overmix, which is a common mistake that can lead to a tough crumb. We’re going for tender and moist, and this method ensures just that. It’s truly a no-fuss, high-reward recipe that’s perfect for busy days or when you just need a little baking therapy.
Ingredients
For the Main Batter:
Here’s what you’ll need to get started. I always try to use fresh, good-quality ingredients, and it really does make a difference. For the flour, all-purpose is perfect, and I usually buy a big bag because I find myself baking so much! For the sugars, a mix of granulated and brown sugar gives it a lovely depth of flavor and tenderness. I find that using both really elevates the taste compared to just one. Don’t skip the salt; it’s essential for bringing out all those wonderful flavors. And of course, the leavening agents – baking soda and baking powder – work together to give it that perfect lift. The eggs bind everything together, and the oil keeps it incredibly moist. I’ve tried butter before, but oil really makes for a consistently tender crumb in quick breads like this.
For the Filling:
This is where the magic happens! You’ll need about two medium-sized zucchini. The most important part here is to grate them and then squeeze out as much excess moisture as possible. Seriously, this is the *secret* to perfectly moist, not soggy, zucchini bread. I usually use a cheese grater on the larger holes. And don’t forget the spices! Cinnamon is a must, and a little bit of nutmeg adds that extra cozy warmth. Some people like to add chopped nuts, like walnuts or pecans, for a bit of crunch. If you do, I’d say about a cup is a good amount. I’ve also tried adding chocolate chips, and let me tell you, that’s a divine combination. If you’re going the chocolate chip route, mini chips are great because they distribute more evenly.
For the Glaze:
This glaze is super simple and optional, but I highly recommend it! It adds a lovely touch of sweetness and a beautiful finish. It’s just powdered sugar mixed with a little milk or even a bit of lemon juice for a tang. You want to get it to a drizzly consistency – not too thick, not too thin. You can always add more liquid a teaspoon at a time until you get it just right. If you’re feeling fancy, you could even add a splash of vanilla extract or a pinch of cinnamon to the glaze.
Step-by-Step Instructions
Step 1: Preheat & Prep Pan
First things first, let’s get the oven preheated to 350 degrees Fahrenheit (175 degrees Celsius). This ensures the oven is nice and hot when your batter is ready. While the oven is heating up, you’ll want to prepare your baking pan. I usually use a standard 9×5 inch loaf pan. Grease it really well with butter or cooking spray, and then dust it lightly with flour. This helps prevent sticking and ensures your beautiful loaf comes out in one piece. I sometimes even line it with parchment paper, leaving some overhang on the sides, which makes lifting it out a breeze. Trust me, wrestling a stuck loaf is never fun!
Step 2: Mix Dry Ingredients
In a large bowl, whisk together your flour, granulated sugar, brown sugar, baking soda, baking powder, salt, and spices (cinnamon and nutmeg). Whisking them all together at this stage helps distribute the leavening agents evenly, which is super important for a consistent rise. Make sure there are no big clumps of brown sugar. Give it a good, thorough whisk until everything looks well combined and uniformly colored.
Step 3: Mix Wet Ingredients
In a separate medium bowl, whisk together your eggs, oil, and vanilla extract. Make sure the eggs are well beaten and fully incorporated into the oil and vanilla. This mixture will form the base for your moist crumb. I usually use vegetable oil, but a neutral-flavored oil like canola or even melted coconut oil (if you don’t mind a hint of coconut) works wonderfully too.
Step 4: Combine
Now, pour the wet ingredients into the bowl with the dry ingredients. Using a spatula or wooden spoon, gently fold everything together until *just* combined. It’s really important not to overmix here. A few streaks of flour are okay; they’ll disappear as you add the zucchini. Overmixing develops the gluten in the flour, which can lead to a tough, dense bread. We want light and tender, remember?
Step 5: Prepare Filling
This is where you add the star player! Take your grated zucchini (remember to squeeze out that excess water!) and fold it into the batter. If you’re adding nuts or chocolate chips, gently stir them in now too. Just fold until everything is evenly distributed throughout the batter. Again, be gentle and avoid overmixing.
Step 6: Layer & Swirl (Optional)
Spoon the batter into your prepared loaf pan, spreading it out evenly. If you like, this is where you can get creative with a swirl. For a simple chocolate swirl, I’ll sometimes reserve about 1/2 cup of batter, stir in a tablespoon of cocoa powder and a tablespoon of milk, then dollop it on top of the main batter and swirl gently with a knife or skewer. It adds a lovely visual appeal and an extra layer of flavor. For a cinnamon-sugar swirl, you can mix a few tablespoons of brown sugar with a teaspoon of cinnamon and sprinkle it over the batter, then swirl.
Step 7: Bake
Pop the pan into your preheated oven. Bake for about 50-65 minutes. The baking time can vary depending on your oven, so keep an eye on it. You’ll know it’s done when a wooden skewer or toothpick inserted into the center comes out clean, or with just a few moist crumbs attached (no wet batter!). If the top starts to brown too quickly, you can loosely tent it with aluminum foil.
Step 8: Cool & Glaze
Once baked, let the loaf cool in the pan for about 10-15 minutes. This allows it to set up properly. Then, carefully invert it onto a wire rack to cool completely. It’s really important to let it cool completely before glazing, otherwise the glaze will just melt and run right off. Once it’s completely cool, whisk together your powdered sugar and liquid until you have a smooth, drizzly consistency. Drizzle it all over the top of the loaf. It looks so pretty!
Step 9: Slice & Serve
Once the glaze has set a bit, you can slice into your masterpiece! I usually use a serrated knife for clean cuts. Serve it warm or at room temperature. It’s honestly delicious either way. Enjoy that amazing, moist, spiced goodness!
What to Serve It With
This zucchini bread is so versatile, it’s practically its own food group! For a simple, comforting breakfast, a slice lightly toasted and spread with butter is pure perfection. It pairs wonderfully with a hot cup of coffee or a glass of cold milk. My kids love grabbing a slice on their way out the door – it’s so much better than any processed cereal bar! For a more leisurely brunch spread, I love serving it alongside fresh fruit salad, maybe some scrambled eggs or a light quiche. A pretty arrangement of berries and a dollop of yogurt on the side makes it feel extra special. As a dessert, it’s lovely served warm with a scoop of vanilla bean ice cream or a drizzle of caramel sauce. It’s also fantastic with a dollop of freshly whipped cream. And for those cozy snack times, especially on a chilly afternoon, a slice of this bread with a cup of herbal tea is just divine. I sometimes cut it into little cubes and serve them on a platter for a more casual get-together, almost like mini sweet bites. It’s a guaranteed hit every single time!
Top Tips for Perfecting Your Zucchini Bread
I’ve made this countless times, and through trial and error (mostly delicious error!), I’ve picked up a few tricks that I think really make this recipe shine. First, about the zucchini prep: squeezing out the water is non-negotiable. I cannot stress this enough! Use a clean kitchen towel or cheesecloth to wring out as much liquid as humanly possible. This is the secret to that incredibly moist, tender crumb without any hint of sogginess. When it comes to mixing the batter, remember what I said about not overmixing. It’s better to have a few tiny streaks of flour than to end up with a tough loaf. Just mix until things are *almost* combined, and the rest will happen as you fold in the zucchini. The swirling technique is totally optional, but it adds such a lovely visual flair! Don’t go overboard with the swirling, though, or you’ll end up muddying the colors and flavors too much. For ingredient swaps, if you don’t have brown sugar, you can use all granulated sugar, but the brown sugar really adds to the moisture and flavor. If you want to make it dairy-free, I’ve had great success using almond milk or soy milk in the glaze, and using a neutral-flavored oil for the batter is already dairy-free. For baking, always keep an eye on your oven. If you notice the top is browning too quickly before the center is cooked through, just loosely tent it with aluminum foil. This simple step can save your loaf from a burnt exterior and an undercooked interior. And with the glaze, remember that consistency is key. If it’s too thick, add milk or lemon juice a teaspoon at a time until it’s perfect for drizzling.
Storing and Reheating Tips
One of the best things about this zucchini bread is how well it keeps! If you plan on eating it within a couple of days, storing it at room temperature is perfectly fine. Just make sure it’s completely cooled and wrap it tightly in plastic wrap or pop it into an airtight container. It will stay fresh and moist for about 2-3 days this way. If you think you’ll need it for longer, or if your kitchen is particularly warm, the refrigerator is your best bet. Wrapped well, it can last up to a week in the fridge. It might get a little firmer in the fridge, but don’t worry, it’s easily revived. For longer-term storage, freezing is an absolute lifesaver! Once the loaf is completely cool, wrap it very tightly in plastic wrap, then in aluminum foil, or place it in a freezer-safe bag. It can stay frozen for up to 2-3 months. When you’re ready to enjoy it, you can thaw it overnight in the refrigerator or at room temperature. If you want to reheat slices, just pop them in a toaster oven or a low oven (around 300°F/150°C) for a few minutes until warmed through. The glaze is best added *after* the bread has cooled completely and just before serving, especially if you plan to store it for more than a day or freeze it. This prevents the glaze from becoming sticky or weeping. Honestly, though, this bread rarely lasts long enough in my house to worry too much about long-term storage!
Frequently Asked Questions
Final Thoughts
This zucchini bread recipe has become such a staple in my kitchen, and I truly hope it becomes one in yours too. It’s more than just a recipe; it’s a little piece of comfort, a guaranteed success, and a fantastic way to use up those summer zucchini. The moist texture, the warm spice, and the simple joy of baking something delicious from scratch – it’s all here. If you love this recipe, you might also enjoy my [link to another recipe like a banana bread or apple crumble] – it’s got that same cozy, comforting vibe! Give this zucchini bread a try, and I’m pretty sure you’ll be hooked. I can’t wait to hear how yours turns out! Let me know in the comments below what you think, or if you have any special additions or variations you love to include. Happy baking!
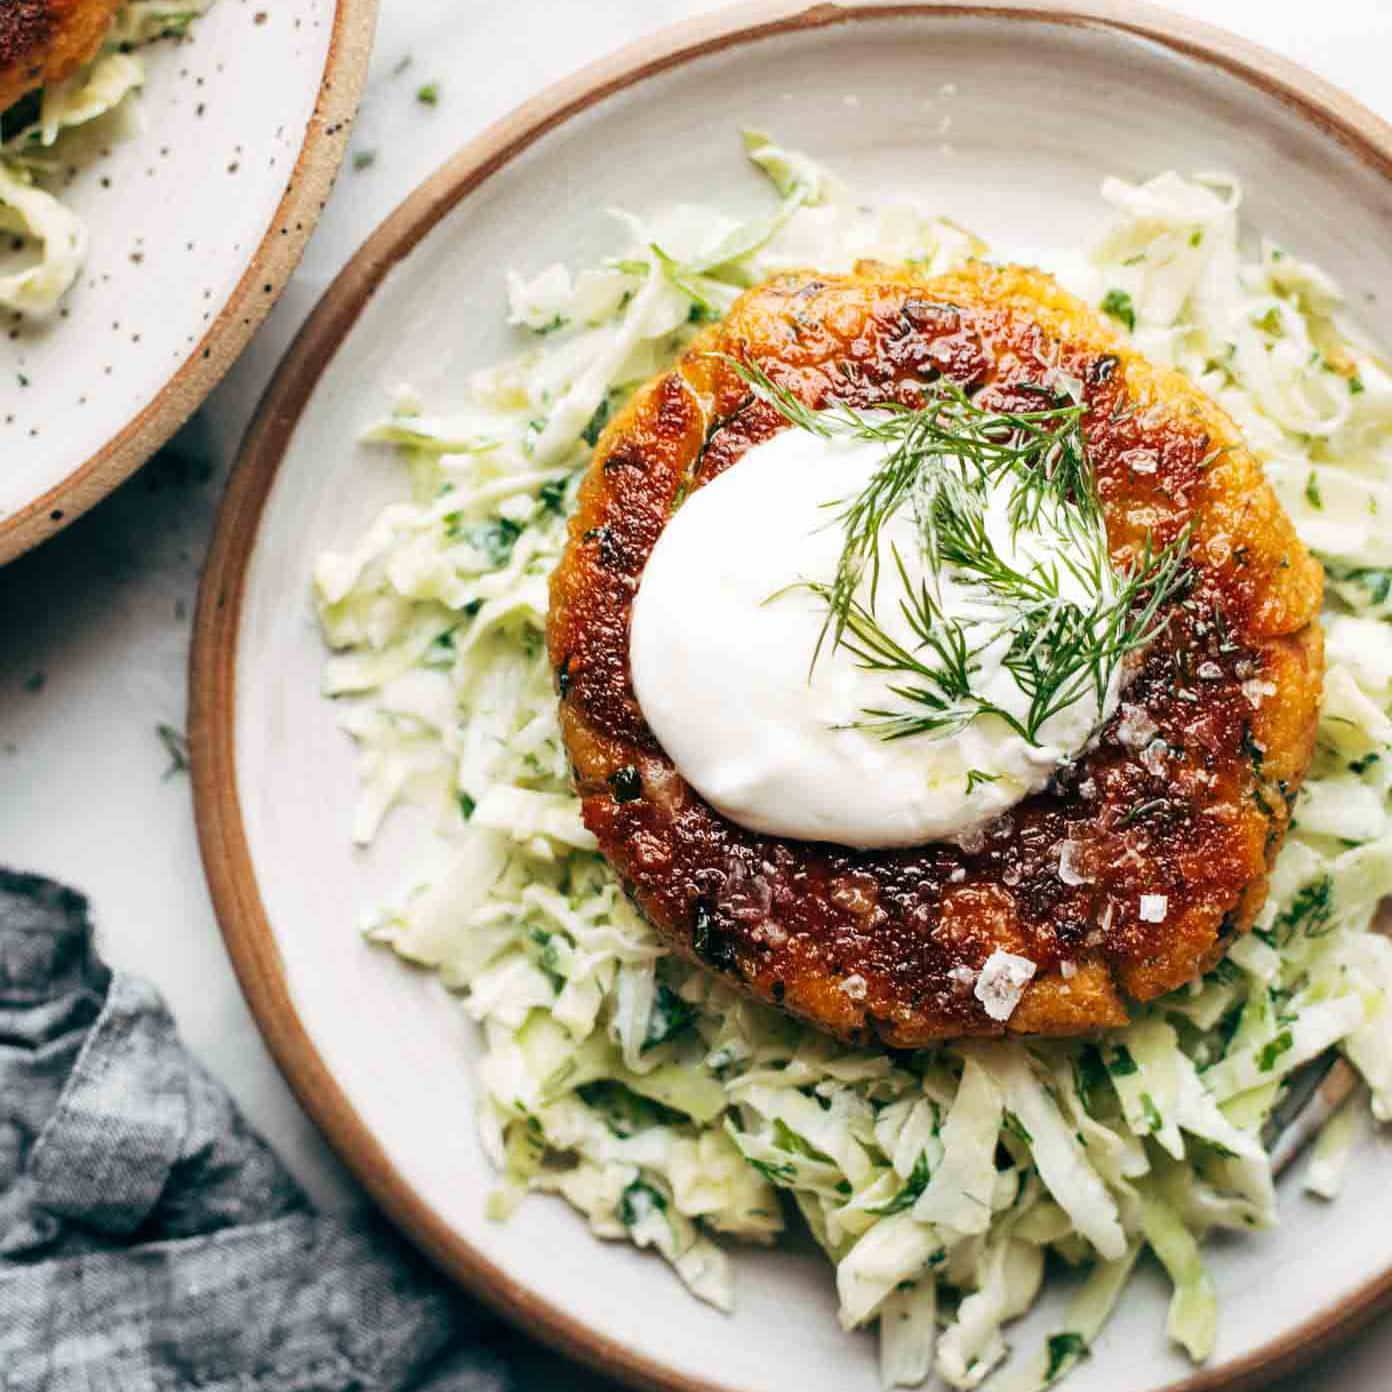
Easy Salmon Burgers for Busy Nights
Ingredients
Method
- Pat the salmon fillet dry. Flake the salmon into a medium bowl, ensuring no bones remain.
- Add breadcrumbs, egg, mayonnaise, chopped fresh dill, garlic powder, salt, and black pepper to the bowl with the salmon. Mix gently until just combined. Be careful not to overmix.
- Divide the mixture into 4 equal portions and form them into patties, about 1-inch thick.
- Heat a large non-stick skillet over medium heat. Add a tablespoon of olive oil if desired.
- Cook the salmon patties for 4-6 minutes per side, or until golden brown and cooked through (internal temperature should reach 145°F or 63°C).
- Serve the salmon burgers immediately on toasted burger buns with lettuce, tomato, onion, and a dollop of tartar sauce or your favorite spread.