
Easy Grilled Chicken Spinach Melt
Oh, hello there! Come on in, grab a mug. I was just about to tell you about my absolute favorite thing to bake, especially when I have a few zucchini hanging out in the fridge that need a good home. This isn’t just *any* zucchini bread, mind you. This is the zucchini bread that has saved me on countless weeknights when a craving strikes, the one that disappears in about five minutes when friends pop over unexpectedly, and the one my kids (who can be a bit picky, bless their hearts) actually ask for. It’s incredibly moist, perfectly spiced, and has this lovely, comforting flavor that just makes you feel… well, good. Think of it as a hug in cake form. If you’ve ever tried those other, drier, frankly disappointing zucchini breads out there, prepare to have your mind (and taste buds) changed. This is the real deal.
What Is This Zucchini Bread?
So, what exactly makes this zucchini bread so special? Well, at its heart, it’s a simple quick bread, meaning no fancy yeast rising or complicated steps. The “zucchini” part is key – it sounds a little out there, I know, especially if you’re not a huge fan of cooked zucchini. But trust me on this one! Grated zucchini acts like a secret weapon, adding incredible moisture and a tenderness that you just can’t achieve with other ingredients. It gets so soft and melty, you’d hardly know it was there, except for the amazing texture it gives. The name itself is pretty straightforward, but it’s the “best” part that really matters, right? This recipe is my perfected version, honed over years of baking, tweaking, and getting it just right. It’s essentially a wonderfully moist, subtly sweet, spiced cake that happens to have the goodness of zucchini baked right in.
Why you
Honestly, there are so many reasons why this zucchini bread has become a staple in my kitchen. For starters, the flavor is just spot on. It’s got that warm, comforting hug of cinnamon and a hint of nutmeg that makes it feel like autumn, even on a summer day. It’s not overly sweet, so it satisfies that craving for something delicious without feeling heavy. And speaking of sweet cravings, this is perfect for that 10 PM moment when you need something sweet but don’t want to commit to baking a whole cake. What I love most, though, is how surprisingly simple it is. I’m talking minimal fuss, one bowl for the wet ingredients, one for the dry, and then just a quick mix. It’s a lifesaver on busy weeknights when I still want to bake something homemade. Plus, it’s pretty budget-friendly! Zucchini is usually quite affordable, and the other ingredients are pantry staples for most bakers. And versatility? Oh yeah. I’ll get into that more later, but you can easily add nuts, chocolate chips, or even switch up the spices. It really stands out because it’s consistently moist, never dry, and has that perfect crumb that’s tender but still holds its structure. It’s worlds away from those dry, crumbly loaves you might have encountered elsewhere.
How to Make Zucchini Bread
Quick Overview
The process is refreshingly straightforward, which is a huge part of why I adore this recipe so much. You’ll basically be whisking together your wet ingredients, then your dry ingredients separately, and then gently combining them before folding in the star of the show: the zucchini! A quick swirl of a simple filling (optional, but highly recommended!) adds an extra layer of deliciousness. Then, it’s just a matter of baking until golden and fragrant. What makes this method special is how it guarantees that incredibly tender crumb. We’re talking about a beautiful, domed loaf that smells absolutely divine as it bakes. It’s genuinely one of the easiest breads I’ve ever made, and the results are always spectacular.
Ingredients
For the
You’ll need about 2 cups of all-purpose flour. Make sure it’s freshly scooped and leveled, not packed down. I always use all-purpose for this one, but I’ve heard you could experiment with a blend if you’re feeling adventurous! We’ll also add 1 teaspoon of baking soda and about 1/2 teaspoon of salt to give it structure and balance. For the spices, which are crucial for that warm, cozy flavor, I use 1 teaspoon of ground cinnamon and a generous 1/4 teaspoon of ground nutmeg. You can bump up the cinnamon if you’re a big fan! And then, the magic ingredient: 2 cups of grated zucchini. It’s important to grate it finely, and I’ll tell you why in a bit. And yes, you can use fresh zucchini from your garden or store-bought – just make sure it’s washed! For the wet ingredients, you’ll need 2 large eggs, whisked until they’re nice and frothy. Then, 1/2 cup of neutral oil, like vegetable or canola. I’ve even tested this with melted coconut oil, and it adds a lovely subtle flavor. A good splash of vanilla extract, about 1 teaspoon, is also essential for that classic baked goods aroma. And finally, about 3/4 cup of granulated sugar and 1/4 cup of packed brown sugar. The combination gives it a wonderful depth of sweetness.
For the Filling:
This is where we add a little extra something-something. I usually whip up a quick cinnamon-sugar swirl. It’s just 2 tablespoons of granulated sugar mixed with 1 teaspoon of ground cinnamon. So simple, but it makes such a difference! You can also add a handful of chopped nuts (walnuts or pecans are my go-to) or some chocolate chips here if you like. I’ve even tried adding a few berries, and they work beautifully.
For the Glaze:
This is totally optional, but I highly recommend it, especially if you’re serving this as a dessert or for a special occasion. It’s just 1 cup of powdered sugar, sifted if you want it super smooth, mixed with 2-3 tablespoons of milk (any kind works, I’ve used almond milk and it made it even creamier!) or lemon juice for a bit of tang. You want it pourable but not too thin. A tiny splash of vanilla extract in the glaze is nice too.
Step-by-Step Instructions
Step 1: Preheat & Prep Pan
First things first, let’s get that oven going. Preheat it to 350 degrees F (175 degrees C). While the oven is heating up, you’ll want to grab a standard 9×5 inch loaf pan. Grease it really well with butter or cooking spray, and then give it a light dusting of flour. This helps ensure your beautiful loaf doesn’t stick. I always do this step first, so by the time my batter is ready, the pan is too!
Step 2: Mix Dry Ingredients
In a large bowl, whisk together your all-purpose flour, baking soda, salt, cinnamon, and nutmeg. Give it a good whisk until everything is thoroughly combined. This ensures your leavening and spices are evenly distributed, which is super important for a consistent bake. You’ll want to see no lumps of baking soda or clumps of spice.
Step 3: Mix Wet Ingredients
In a separate, medium-sized bowl, whisk together your eggs until they’re light and frothy. Then, pour in your oil, granulated sugar, brown sugar, and vanilla extract. Whisk everything together until it’s well combined and looks nice and smooth. It should be a lovely, golden liquid.
Step 4: Combine
Now, pour the wet ingredients into the bowl with the dry ingredients. Using a spatula or a wooden spoon, gently fold them together until *just* combined. This is a crucial step: be careful not to overmix! A few streaks of flour are okay. Overmixing can develop the gluten too much, leading to a tough bread, and we definitely don’t want that. Once the dry and wet are mostly incorporated, gently fold in your grated zucchini. Mix until it’s evenly distributed throughout the batter.
Step 5: Prepare Filling
If you’re adding the cinnamon-sugar swirl, whisk together the 2 tablespoons of sugar and 1 teaspoon of cinnamon in a small bowl. If you’re using nuts or chocolate chips, have them ready.
Step 6: Layer & Swirl
Spoon about half of the batter into your prepared loaf pan, spreading it evenly. If you’re using the swirl, sprinkle half of the cinnamon-sugar mixture over the batter. Then, spoon the remaining batter on top and spread it gently. Sprinkle the rest of the cinnamon-sugar mixture (or nuts/chocolate chips) over the top. Now, for the swirl effect: take a butter knife or a skewer and gently swirl it through the batter. Don’t go too deep, just a few gentle passes to create those lovely marbled patterns. This makes it look so pretty!
Step 7: Bake
Place the loaf pan in your preheated oven. Bake for 50-60 minutes. The baking time can vary depending on your oven, so start checking around the 50-minute mark. The bread is done when a toothpick inserted into the center comes out clean, or with just a few moist crumbs attached (not wet batter!). The top should be golden brown and it should smell absolutely heavenly.
Step 8: Cool & Glaze
Once baked, take the loaf out of the oven and let it cool in the pan for about 10-15 minutes. This allows it to set up a bit. Then, carefully invert it onto a wire rack to cool completely. This is super important – if you try to glaze it while it’s hot, the glaze will just melt and drip everywhere. Once it’s completely cool, you can whip up your glaze. Whisk together the powdered sugar and milk (or lemon juice) until you reach a nice, drizzly consistency. Drizzle it over the top of the cooled bread, letting it drip down the sides. It looks so professional!
Step 9: Slice & Serve
Once the glaze has set a little (or if you’re skipping the glaze), it’s time to slice and enjoy! The best way to cut this is with a serrated knife for clean slices. I like to serve it slightly warm or at room temperature. It’s just divine!
What to Serve It With
This zucchini bread is so versatile, it can honestly fit into almost any meal or occasion. For a quick and easy breakfast, I love it toasted and served with a smear of butter and a hot cup of coffee. The warm spices and the moist texture are the perfect way to start the day. When I’m planning a weekend brunch, I’ll often include slices of this on the spread alongside some fresh fruit salad and maybe some scrambled eggs. It adds a lovely sweet element without being too heavy. For dessert, it’s fantastic on its own, especially with that drizzle of glaze. But sometimes, I like to serve a warm slice with a scoop of vanilla bean ice cream or a dollop of whipped cream – pure indulgence! And for those cozy, lazy afternoons or evenings when you just need a little something comforting, a slice of this with a glass of cold milk is absolute bliss. My family tradition is to have it with afternoon tea on a rainy day, and it always hits the spot. It’s also wonderful paired with a mild cheese, like a creamy goat cheese, if you’re feeling adventurous and want to play with sweet and savory notes.
Top Tips for Perfecting Your Zucchini Bread
Over the years of making this, I’ve picked up a few tricks that really make a difference. First, about the zucchini prep: I always use a box grater and grate the zucchini on the finer side. You don’t need to squeeze out all the moisture like you would for some savory dishes. A little bit of moisture is good – it’s what makes this bread so incredibly tender and moist. Just make sure you’re using fresh zucchini; older zucchini can sometimes be a bit watery and might make your bread soggy. For mixing, remember my earlier tip: don’t overmix! I learned this the hard way when I ended up with a bread that was a bit tough. Just mix until the dry and wet ingredients are *barely* combined. A few tiny flour streaks are fine. For the swirl, experiment with the pattern! You can create more intricate designs by dragging a skewer in zig-zag motions. Don’t be afraid to get creative with the swirl – it’s all about visual appeal. When it comes to ingredient swaps, I’ve had success using a good quality all-purpose gluten-free flour blend (though the texture might be slightly different). I’ve also found that using buttermilk instead of regular milk in the glaze can add a lovely tang. For baking, make sure your oven rack is in the center position. If your loaf is browning too quickly on top but is still raw inside, you can loosely tent it with aluminum foil for the last 15-20 minutes of baking. And for the glaze variations, a squeeze of fresh orange juice instead of milk adds a delightful citrus note. Or, for a chocolate lover, a tablespoon of cocoa powder whisked into the powdered sugar and milk glaze is divine!
Storing and Reheating Tips
Proper storage is key to keeping this zucchini bread delicious for days. If you’re planning to eat it within a day or two, it’s perfectly fine to store it at room temperature. Just wrap it tightly in plastic wrap or place it in an airtight container. It usually stays wonderfully moist for about 2-3 days this way. If you think you might not finish it that quickly, or if your kitchen tends to be warm, I recommend refrigerator storage. Pop it into an airtight container or wrap it well and it will keep beautifully for up to a week. The texture remains excellent, and it’s always there when you need a quick snack. For longer storage, freezing is your best friend. You can freeze the entire loaf or slice it first. Wrap individual slices or the whole loaf tightly in plastic wrap, then add another layer of aluminum foil or pop it into a freezer-safe bag. It will keep well in the freezer for up to 3 months. When you’re ready to enjoy it, you can thaw it at room temperature overnight or gently warm slices in a toaster oven or a low-temperature oven. I usually wait to add the glaze until *after* it’s cooled down if I’m storing it at room temperature or refrigerating it. If I’m freezing it, I usually bake it plain and then add the glaze once it’s thawed and reheated. This way, the glaze stays fresh and doesn’t get soggy or stick to the wrapping.
Frequently Asked Questions
Final Thoughts
So there you have it, my go-to recipe for zucchini bread that’s truly a keeper. It’s the kind of recipe that brings a smile to my face every time I bake it, and honestly, it’s the one that gets the most compliments from friends and family. It’s that perfect balance of comforting, delicious, and surprisingly easy. If you’re looking for a way to use up those extra zucchini or just want a reliably fantastic quick bread, give this one a try. I have a feeling it might become a favorite in your kitchen too! If you enjoyed this, you might also like my Classic Banana Bread or my Moist Blueberry Muffins – they share that same cozy, homemade vibe. I can’t wait to hear what you think, so please leave a comment below and let me know how your zucchini bread turns out! And if you have any of your own special tips or variations, I’d love to hear them. Happy baking!
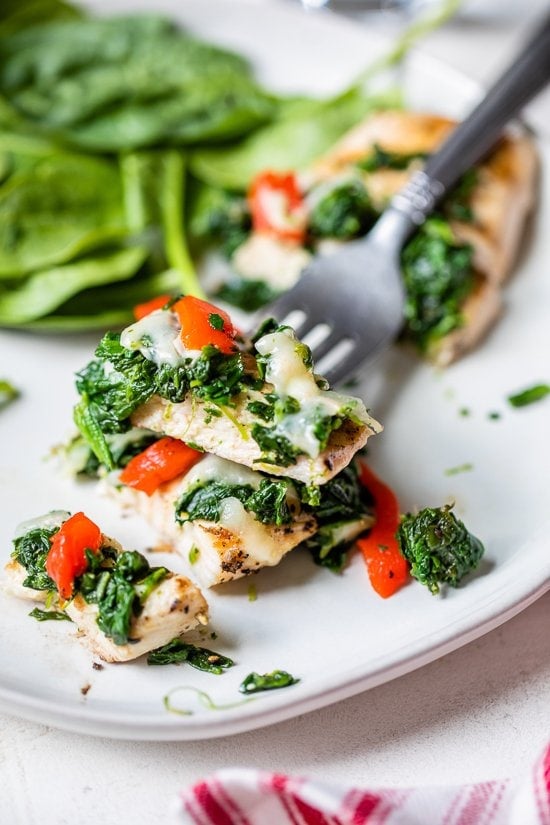
Grilled Chicken with Spinach and Mozzarella
Ingredients
Method
- Preheat oven to 400°F. Season chicken with salt and pepper. Lightly spray a grill or grill pan with oil. Cook chicken until no longer pink, about 2 to 3 minutes per side.
- Heat a skillet over medium heat. Add oil and garlic, sauté for 30 seconds, then add spinach, salt, and pepper. Cook until heated through, 2 to 3 minutes.
- Place chicken on a baking sheet, divide spinach evenly between the 6 pieces and place on top. Top each with 0.5 oz mozzarella, roasted peppers and bake until melted, about 3 minutes.