Easy Quesadilla Perfection The Barefoot Way
You know those recipes that just *feel* like home? The ones you can whip up without even looking at the recipe card, the ones that smell like pure comfort baking in the oven? This zucchini bread is exactly that for me. It’s been a constant in our kitchen for years, evolving slightly with each batch, but always holding onto that signature moist crumb and perfectly balanced sweetness. Honestly, I think it’s even better than my grandma’s famous apple pie, and that’s saying something! It’s the kind of treat that’s perfect for a spontaneous afternoon tea, a sweet breakfast on a slow weekend morning, or even a late-night craving when you just need something delicious but don’t want the fuss of a whole cake. This one’s a lifesaver on busy nights when the kids declare they’re starving and I need to pull something magical out of thin air. Seriously, the smell alone brings everyone running to the kitchen!
What is Zucchini bread?
So, what exactly is this magical zucchini bread? At its heart, it’s a quick bread, meaning it uses baking soda or baking powder for leavening instead of yeast, which is why it’s so wonderfully fast and easy to make. Think of it as a super moist, subtly sweet cake or muffin that happens to have grated zucchini baked right in. Don’t let the “zucchini” part fool you – you won’t taste it! The zucchini’s real superpower here is its ability to add incredible moisture, making the bread tender and fudgy without needing a ton of butter or oil. It’s often spiced with cinnamon, sometimes nutmeg, and studded with nuts or chocolate chips, but the base itself is a creamy, dreamy dream. It’s basically a delicious vehicle for those late-summer zucchini harvests!
Why you’ll love this recipe?
I love zucchini bread, and I know you will too. I love it. I love it. I love it. I love it. I love zucchiniflavor is just divine. It’s not overly sweet, which I really appreciate. You get that warm, comforting hug of cinnamon and a subtle, almost caramel-like sweetness that plays perfectly with the tender crumb. If you add chocolate chips, well, that’s just pure bliss! Then there’s the simplicityI’ve made this countless times, and it never fails. It’s the kind of recipe you can teach your kids to help with becausecost-efficient. Zucchini is usually pretty affordable, and the other ingredients are pantry staples. What I love most, though, is its versatility. You can have it for breakfast, snack, or dessert. It’s also a fantastic way to use up extra zucchini from the garden or farmer’s market before it goes bad. It truly is a win-win! Compared to other quick breads, like banana bread, I find this one has a lighter, more delicate crumb that just melts in your mouth.
How to Make My Ultimate Zucchini Bread
Quick Overview
The process for this zucchini bread is wonderfully simple. We’ll start by whisking together our dry ingredients, then separately combine the wet ingredients (including that star, the zucchini!), and finally, gently fold them together. A quick swirl of a complementary filling and then into the oven it goes! The whole process from start to finish, minus the baking time, is usually under 15 minutes. It’s so fuss-free, I often make it on a Tuesday afternoon just because!
Ingredients
For the Main Batter:
You’ll need about 2 cups of grated zucchini. I usually use medium-sized zucchini, and I don’t peel them – the skin adds a little extra color and fiber, and you honestly can’t tell it’s there once it’s baked. Make sure to squeeze out as much excess moisture as you can, though; that’s a crucial step for that perfect texture! You’ll also need 2 cups of all-purpose flour (but see my tips later for gluten-free!), 1 teaspoon of baking soda, 1/2 teaspoon of baking powder, 1 teaspoon of ground cinnamon, 1/4 teaspoon of ground nutmeg (optional, but I love it!), and a pinch of salt. For the wet ingredients, we’ll use 3 large eggs, 1 cup of granulated sugar (or a mix of granulated and brown sugar for extra depth), 1/2 cup of vegetable oil (or melted unsalted butter for a richer flavor), and 1 teaspoon of vanilla extract. If you’re feeling adventurous, a splash of almond extract is also amazing here!
For the Filling:
This is where you can really customize! My go-to is a simple mix of 1/2 cup of chopped walnuts or pecans and 1/2 cup of semi-sweet chocolate chips. But oh my goodness, you could do a cinnamon-sugar swirl, or even a layer of cream cheese frosting baked in! Sometimes, I’ll just mix a tablespoon of cocoa powder with a tablespoon of sugar and a tablespoon of melted butter for a chocolatey ribbon. For nuts, make sure they’re fresh; stale nuts can really throw off the flavor. And for the chocolate chips, I like to use a mix of regular and mini chips for different melting textures.
For the Glaze:
This is totally optional, but it adds a beautiful finish and an extra touch of sweetness. I usually whisk together 1 cup of powdered sugar with about 2-3 tablespoons of milk (or almond milk – it makes it extra creamy!) until it’s smooth and pourable but not too thin. You can also add a splash of vanilla or even lemon juice for a brighter flavor. The consistency is key here – you want it to drizzle, not run off.
Step-by-Step Instructions
Step 1: Preheat & Prep Pan
First things first, get your oven preheated to 350 degrees Fahrenheit (175 degrees Celsius). You’ll want to grease and flour a standard 9×5 inch loaf pan. I usually use a bit of butter or cooking spray, then dust it with flour, tapping out any excess. This step is super important to prevent your beautiful bread from sticking. You can also line it with parchment paper if you prefer, which makes lifting it out a breeze. I always give the parchment paper a little spray too, just in case!
Step 2: Mix Dry Ingredients
In a large bowl, whisk together your flour, baking soda, baking powder, cinnamon, nutmeg (if using), and salt. Whisking them all together thoroughly ensures that the leavening agents are evenly distributed, which means your bread will rise evenly. Nobody wants a dense spot in their zucchini bread! I like to give it a good whisk for about 30 seconds until everything looks uniformly combined.
Step 3: Mix Wet Ingredients
In a separate medium bowl, whisk together your eggs, sugar, oil (or melted butter), and vanilla extract until well combined and smooth. If you’re using melted butter, make sure it’s cooled slightly so it doesn’t cook the eggs. I like to taste a tiny bit of the wet mixture before adding it to the dry – just to make sure the vanilla is potent enough and the sweetness level is right for my liking. Then, stir in your squeezed, grated zucchini until it’s evenly distributed throughout the wet mixture.
Step 4: Combine
Now for the magic! Pour the wet ingredients into the bowl with the dry ingredients. Using a spatula or wooden spoon, gently fold them together until *just* combined. It’s really important not to overmix here. A few streaks of flour are totally fine; they’ll disappear as you bake. Overmixing develops the gluten too much, which can result in a tough, chewy bread instead of that light, tender crumb we’re after. Trust me, I’ve made that mistake before!
Step 5: Prepare Filling
If you’re using nuts and chocolate chips, now’s the time to gently fold them into the batter. Or, if you’re doing a swirl, have that mixture ready. I usually reserve a few chocolate chips or nuts to sprinkle on top for a pretty finish. If you’re doing a cinnamon-sugar swirl, mix about 2 tablespoons of sugar with 1 teaspoon of cinnamon. Then, when you add the batter to the pan, you’ll sprinkle about half of this mixture on top, add the rest of the batter, and then sprinkle the remaining cinnamon-sugar. You can then use a knife or skewer to swirl it through. I find this adds a lovely textural contrast and extra burst of flavor.
Step 6: Layer & Swirl
Pour about half of the batter into your prepared loaf pan. If you’re using a filling that’s not mixed in, dollop half of your filling over the batter. Then, add the remaining batter, followed by the rest of the filling. If you’re swirling, this is where you’d do your gentle swirling motion with a knife or skewer to create those beautiful patterns. You don’t want to over-swirl, or the colors will just blend together. Aim for elegant ribbons!
Step 7: Bake
Pop that loaf pan into your preheated oven. Bake for about 50-65 minutes. The exact time will vary depending on your oven, so start checking around the 50-minute mark. You’ll know it’s done when a toothpick inserted into the center comes out clean, or with just a few moist crumbs attached (not wet batter!). If the top starts browning too quickly, you can loosely tent it with foil for the last 15-20 minutes of baking. I’ve found my oven tends to run a little hot, so I often need to use foil.
Step 8: Cool & Glaze
Once it’s baked, carefully remove the loaf pan from the oven and let it cool in the pan for about 10-15 minutes. This allows it to set up properly before you try to remove it. Then, gently turn the loaf out onto a wire rack to cool completely. If you’re adding the glaze, make sure the bread is completely cool before you drizzle it on. If it’s still warm, the glaze will just melt and disappear!
Step 9: Slice & Serve
Once cooled and glazed (if you chose to do so!), slice your zucchini bread with a serrated knife for clean cuts. I like to serve it slightly warm or at room temperature. It’s absolutely delicious on its own, but a little pat of butter or cream cheese is never a bad idea!
What to Serve It With
This zucchini bread is so versatile, it fits into any meal or snack occasion. For a simple breakfast, a slice with a hot cup of coffee or tea is pure heaven. I often toast it lightly for a little crispness. For brunch, it feels a bit more elegant. I’ll arrange slices on a platter with some fresh berries and maybe a dollop of Greek yogurt or a light cream cheese frosting. It’s also a fantastic addition to a spread with quiches or frittatas. As a dessert, it’s a winner. Serve it slightly warmed with a scoop of vanilla bean ice cream or a drizzle of caramel sauce. And for those cozy snacks throughout the day, it’s perfect as is, maybe with a tall glass of cold milk. My kids particularly love it with a smear of peanut butter – a surprisingly delicious combination!
Top Tips for Perfecting Your Zucchini Bread
I’ve made this bread more times than I can count, and over the years, I’ve picked up a few tricks that I think really elevate it. For zucchini prep, seriously, don’t skip the squeezing! Grate your zucchini (medium grate is best) and then wrap it in a clean kitchen towel or paper towels and give it a good squeeze to remove as much liquid as possible. This is the number one secret to a non-soggy loaf. When it comes to mixing advice, remember that gentle is key. You’re just trying to combine the ingredients, not develop gluten. Overmixing leads to a tough, dense bread. If you see a few little streaks of flour, just leave them; they’ll bake out. For swirl customization, play around! You can use a chocolate ganache, a fruit jam, or even a spiced apple filling. Just make sure it’s not too wet. My favorite trick for a beautiful swirl is to use a skewer and make just a few figure-eights through the batter before baking. For ingredient swaps, I’ve tested this with almond milk for the glaze and it was unbelievably creamy! You can also swap half the oil for applesauce for a slightly healthier twist, though it might be a touch denser. And when it comes to baking tips, I always place my loaf pan on the middle rack of the oven. If you notice the top is browning too quickly, tenting with foil is your best friend. For glaze variations, try adding a little orange zest for a citrusy kick, or a dash of espresso powder for a mocha flavor. You can also skip the glaze entirely and just dust with powdered sugar once cooled for a simpler finish.
Storing and Reheating Tips
This zucchini bread is so good, you’ll want to enjoy it for days! Stored properly, it stays wonderfully moist. At room temperature, it’s best kept in an airtight container or wrapped tightly in plastic wrap for about 2-3 days. I usually find it’s at its best on day two, after the flavors have really melded. For refrigerator storage, it can last up to a week in an airtight container. It might feel a little firmer when cold, but that’s easily fixed. If you want to freeze portions, wrap individual slices tightly in plastic wrap, then in foil, and pop them into a freezer bag. It can last for up to 2-3 months this way. To thaw, just leave it on the counter for a bit, or pop a slice in the microwave for a few seconds. For glaze timing advice, if you’re storing at room temperature or in the fridge, I recommend adding the glaze just before serving. If you freeze it with glaze, the glaze can sometimes become a bit sticky or uneven when thawed, so it’s often best to glaze after thawing.
Frequently Asked Questions
Final Thoughts
I really hope you give this ultimate zucchini bread a try. It’s more than just a recipe to me; it’s a little bit of comfort, a reminder of happy times in the kitchen, and a guaranteed crowd-pleaser. The way it turns simple, everyday ingredients into something so incredibly delicious is just marvelous. It’s proof that you don’t need fancy techniques or exotic ingredients to create something truly special. If you love this recipe, you might also enjoy my spiced apple crumble or my easy banana bread muffins – they have that same homey, comforting vibe! I can’t wait to hear how yours turns out, so please leave a comment below and let me know what you think, or share any fun variations you tried. Happy baking!
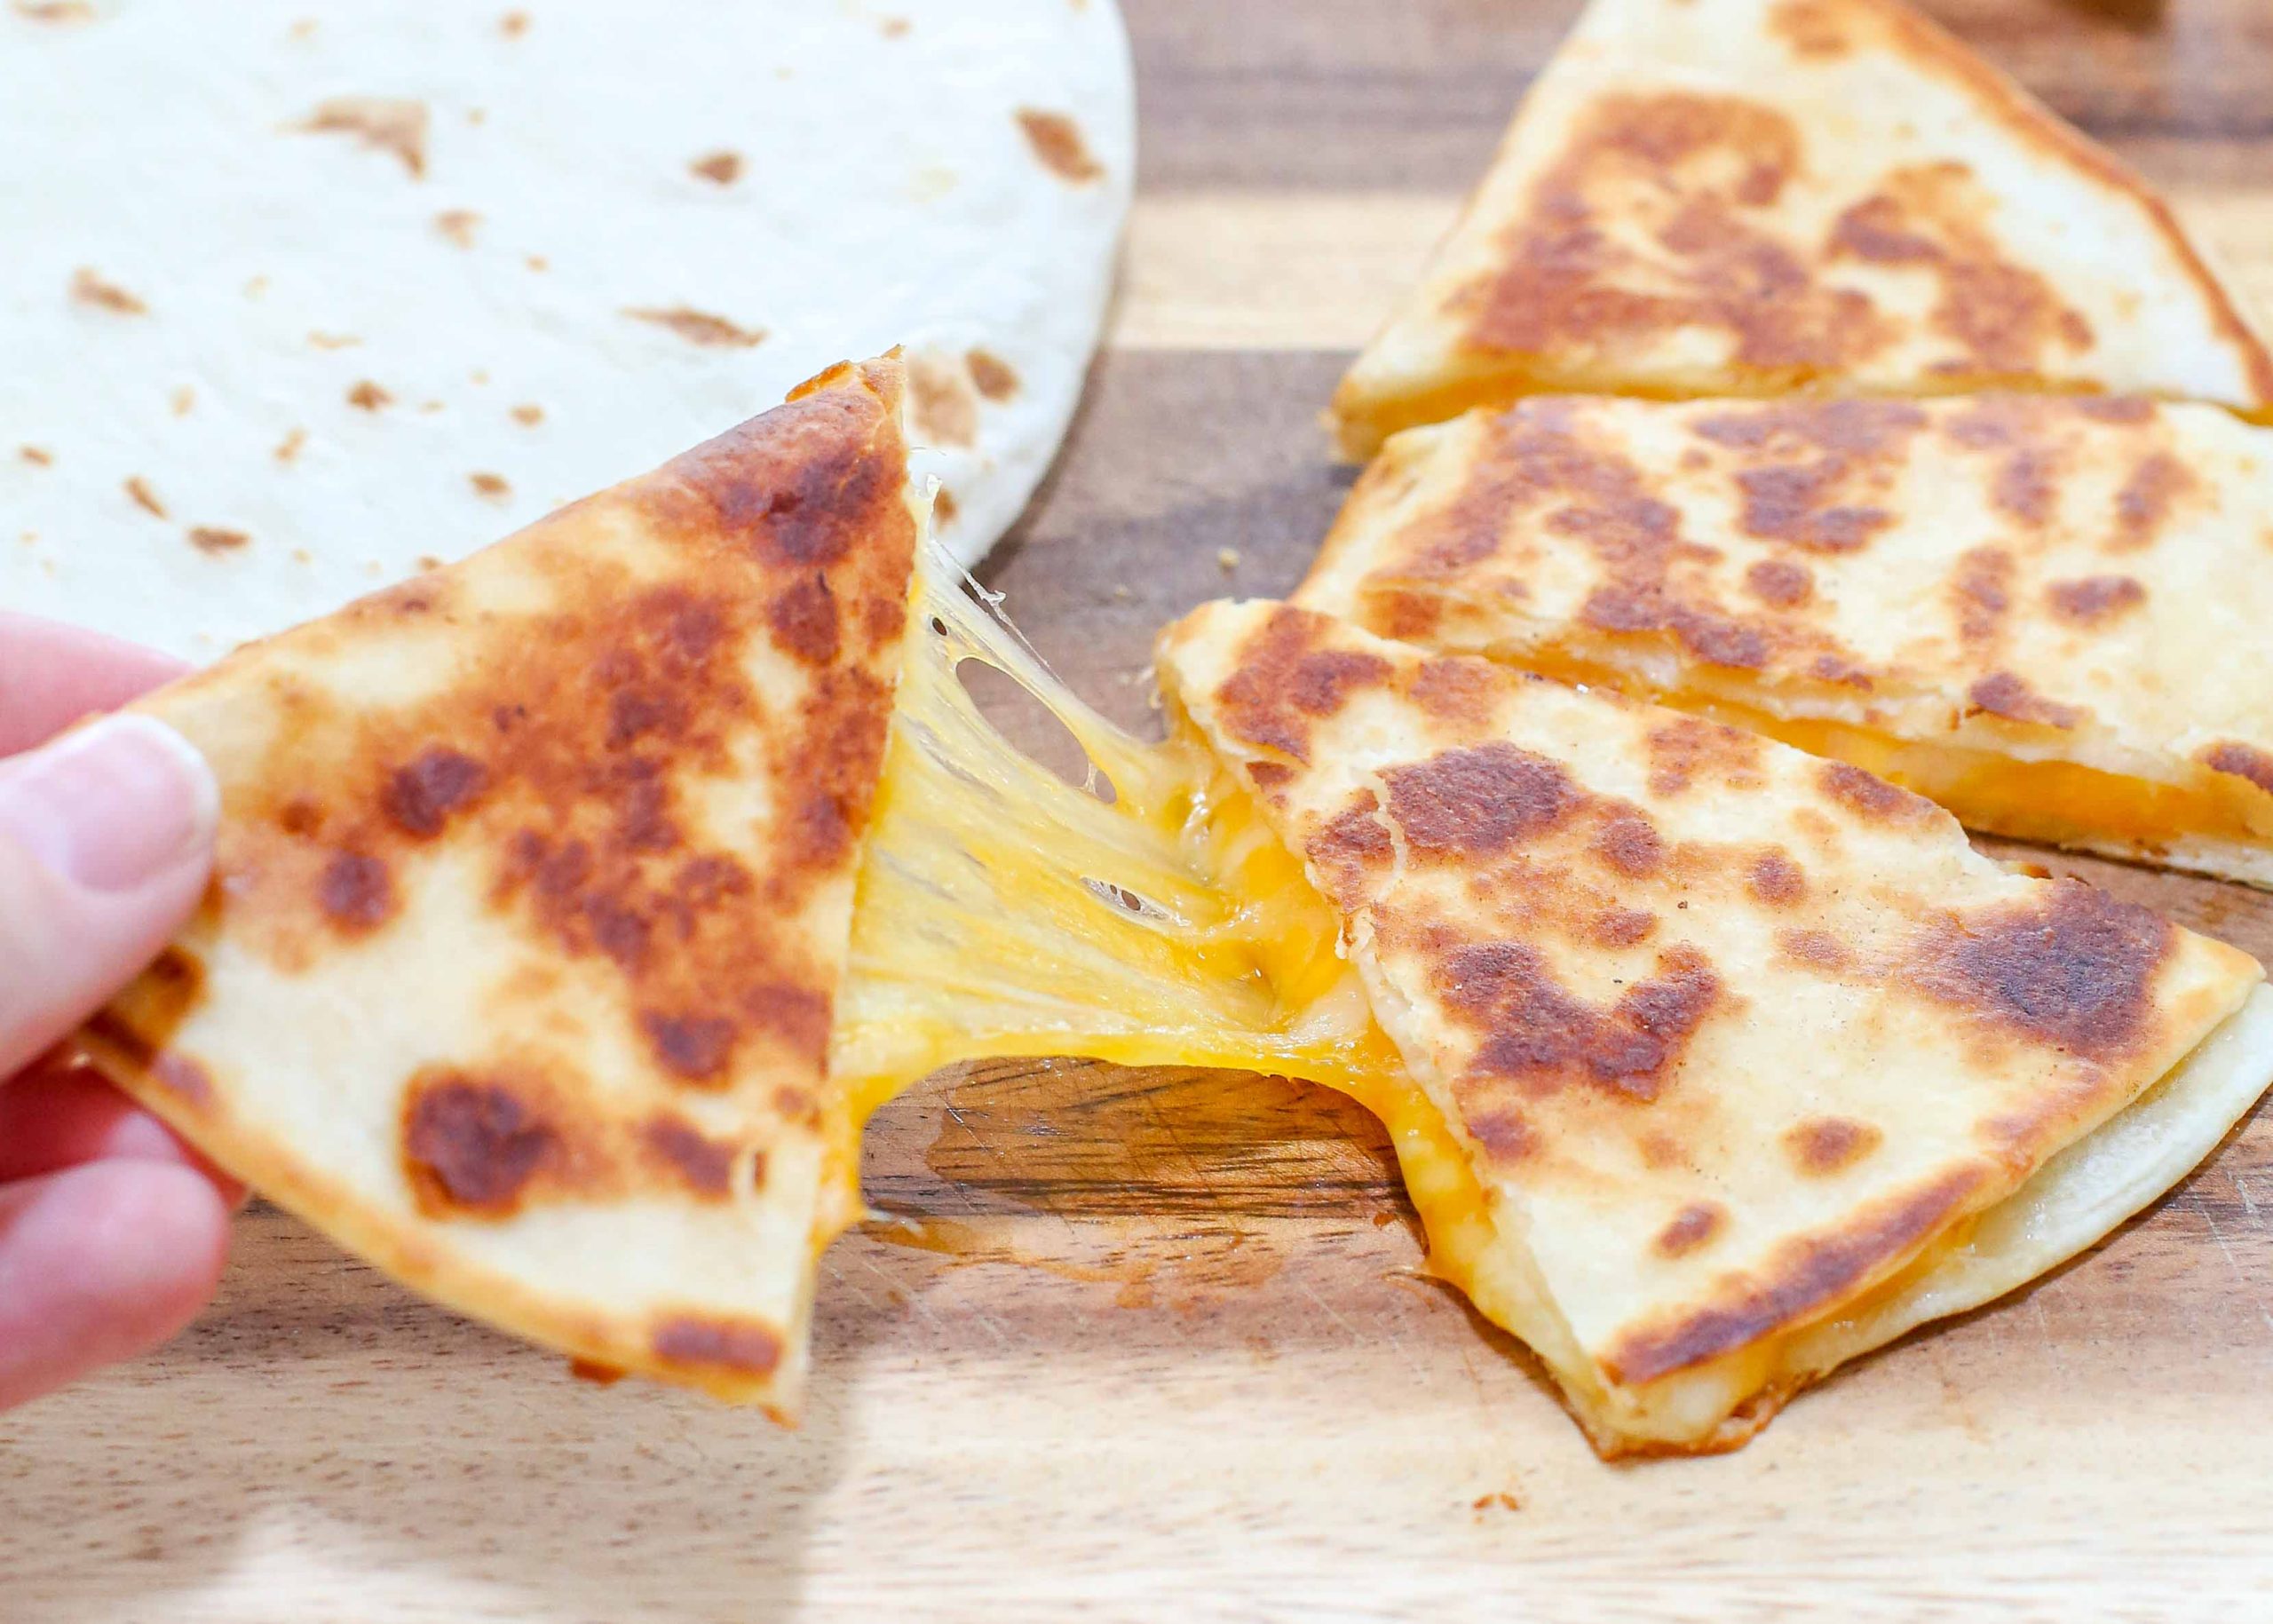
easy quesadilla
Ingredients
Method
- Preheat a large non-stick skillet to medium-high heat. Lightly butter a single side of one tortilla with about 0.5 a teaspoon of butter and place it in the hot pan. Sprinkle 3 tablespoons of cheese, 0.25 cup of your favorite filling, and an additional 2-3 tablespoons of cheese on just one half of the open tortilla. Fold the tortilla over on itself and let it cook for 2-3 minutes.
- When the cheese has begun to melt and the bottom tortilla is browning slightly, flip the folded quesadilla over to cook the other side. Continue to cook until all the cheese is melted and the tortilla is crisp around the edges.
- Using a spatula, transfer the quesadilla back to a cutting board and cut into wedges while it is hot and serve warm. Repeat as desired. Enjoy!