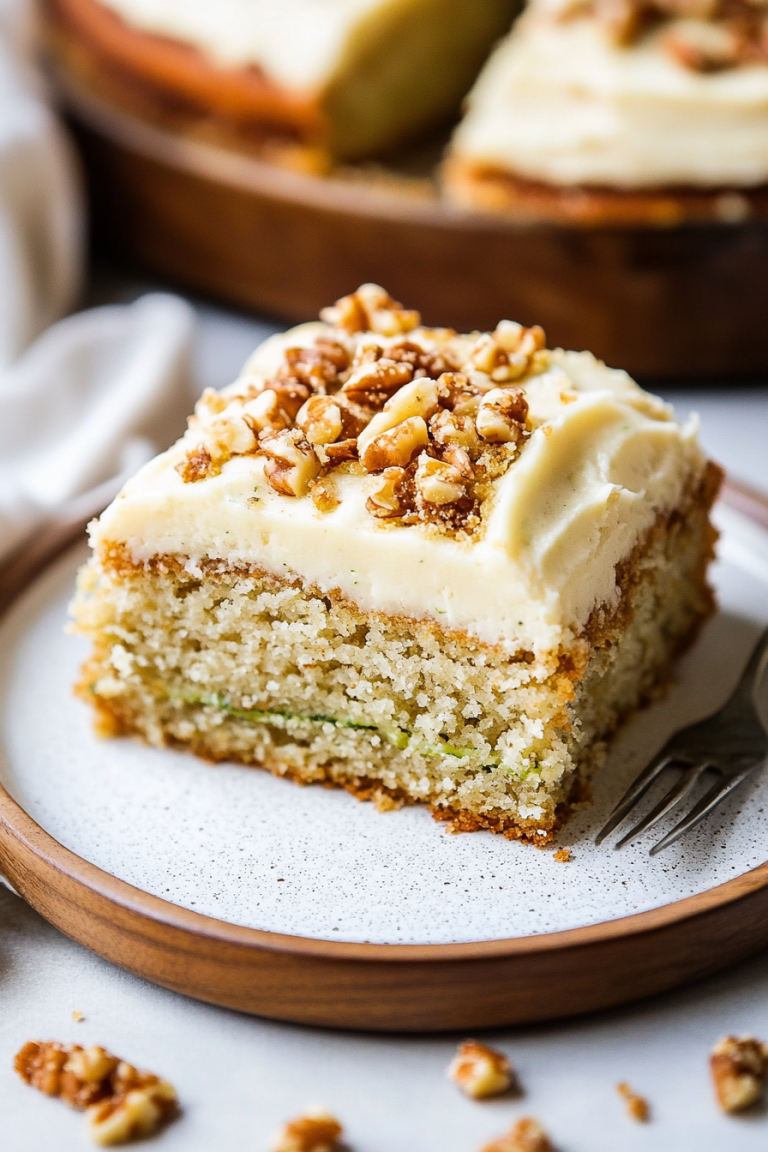
Simple Homemade Apple Pie Perfection
You know those recipes that just feel like a warm hug? The ones that instantly transport you back to your grandma’s kitchen or a lazy Sunday morning? This zucchini bread is absolutely one of those for me. I swear, the smell alone as it bakes can make even the most stressed-out day melt away. It’s not just any zucchini bread; it’s the one I always reach for when I need something utterly comforting, surprisingly easy, and guaranteed to disappear. Forget those dry, bland loaves you sometimes encounter; this one is incredibly moist, bursting with warm spices, and has just the right amount of sweetness. Honestly, if you’ve ever been intimidated by baking with vegetables, this recipe is your gateway. It’s like my secret weapon for busy weeknights when the craving for something sweet hits hard, but I don’t have hours to fuss. It’s so good, in fact, that it rivals my favorite chocolate chip cookies in terms of how often my family requests it.
What is Zucchini bread?
So, what exactly *is* zucchini bread? At its heart, it’s a quick bread that incorporates grated zucchini into the batter. Don’t let the “zucchini” part scare you – you can’t taste it! What the zucchini *does* do is work some real magic, making the bread unbelievably moist and tender. Think of it as a super-powered ingredient that adds a beautiful texture without altering the flavor profile. It’s essentially a delicious excuse to eat cake for breakfast (or any time, really!). The name itself is pretty straightforward – it’s bread, and it has zucchini in it. But oh, the deliciousness that comes from this simple combination is anything but basic. It’s the kind of treat that feels wholesome because of the hidden veggie, but utterly decadent thanks to the spices, sugar, and that lovely crumb. It’s the perfect happy medium, and I find myself making it more often than any other baked good in my repertoire.
Why you’ll love this recipe?
Honestly, there are so many reasons why this zucchini bread has earned a permanent spot in my recipe box, and I know you’re going to fall in love with it too. First off, let’s talk flavor. It’s perfectly spiced with cinnamon and a hint of nutmeg, giving it that cozy, autumnal vibe year-round. The sweetness is spot-on – not too much, not too little – with a tender, moist crumb that’s absolutely divine. And the texture? Oh, it’s just heavenly. You get that slight chew from the bread itself, combined with the tender crumb, and if you add nuts (which I highly recommend!), you get a lovely crunch. What I love most about this recipe is its sheer simplicity. It truly is a “quick bread,” meaning there’s no yeast involved and no long waiting times for dough to rise. You literally mix, bake, and voila! It’s a lifesaver on busy mornings when you need to whip something up for a school bake sale or just want a special treat with your coffee. It’s also incredibly budget-friendly, using common pantry staples and, of course, those humble zucchinis that are often abundant in the summer. Plus, it’s so versatile! You can add chocolate chips, nuts, or even a swirl of cream cheese for an extra decadent touch. I’ve made this for countless brunches and potlucks, and it’s always the first thing to go. It’s a crowd-pleaser that appeals to both kids and adults, and I can’t tell you how many times my kids have asked for this specific zucchini bread. It truly stands out because it’s consistently moist and flavorful, unlike some other recipes that can turn out a bit dry.
How do you make Zucchini bread?
Quick Overview
This recipe is all about simplicity and delicious results. You’ll be whisking together your dry and wet ingredients separately before combining them gently to create a moist batter. The star, grated zucchini, gets folded in, and then it’s a quick transfer to a loaf pan to bake until golden and fragrant. The whole process, from gathering ingredients to popping it in the oven, takes less than 20 minutes. It’s that easy! This method ensures a tender crumb and prevents overmixing, which is key to achieving that perfect, moist texture we all crave.
Ingredients
For the Main Batter:
Here’s what you’ll need to get started. I always make sure my zucchini is fresh, not mushy, for the best texture. And if you can get your hands on fresh cinnamon, the flavor is just unparalleled! I also find using good quality vanilla extract really makes a difference. You’ll need about 2 cups of finely grated zucchini, which usually comes from about two medium-sized zucchinis. Don’t worry about peeling them; the skins add extra nutrients and color. Also, have on hand: 1 ¾ cups all-purpose flour, 1 teaspoon baking soda, ½ teaspoon salt, 1 teaspoon ground cinnamon, ¼ teaspoon ground nutmeg, 2 large eggs, 1 cup granulated sugar (or a mix of granulated and brown for extra depth), ½ cup vegetable oil (or melted unsalted butter for a richer flavor), and 1 teaspoon vanilla extract.
For the Filling:
While this zucchini bread is fantastic on its own, sometimes I like to add a little something extra for a special occasion. For a chocolatey twist, you can use ½ cup of chocolate chips (mini or regular work great!). If you prefer a nutty crunch, ½ cup of chopped walnuts or pecans is amazing. For something a bit more decadent, you could even swirl in a few tablespoons of my favorite chocolate ganache or a sweetened cream cheese mixture. Just make sure whatever you add is spread relatively evenly throughout the batter before baking.
For the Glaze:
This is totally optional, but I *love* a simple glaze. It adds a touch of elegance and extra sweetness. For a classic lemon glaze, you’ll need 1 cup of powdered sugar and about 2-3 tablespoons of fresh lemon juice. Whisk them together until smooth and pourable. If you don’t have lemon, you can use milk or even a little orange juice for a different flavor. You can also just dust it with powdered sugar for a simpler finish. The key is a consistency that’s thick enough to coat but thin enough to drizzle nicely.
Step-by-Step Instructions
Step 1: Preheat & Prep Pan
First things first, let’s get your oven fired up to 350°F (175°C). This is the sweet spot for baking most quick breads, ensuring they cook through evenly without burning. While that’s warming up, grab a standard 9×5 inch loaf pan. I like to grease it really well with butter or cooking spray, and then dust it with a little flour. This is a crucial step for me – I’ve had a few sticky situations in my baking history, and a well-greased and floured pan means your beautiful loaf will slide right out like a charm, leaving it intact and looking perfect. If you’re feeling fancy or want to ensure an easy release every single time, you can also line the pan with parchment paper, leaving some overhang on the sides to act as “handles” for lifting it out later.
Step 2: Mix Dry Ingredients
In a medium-sized bowl, whisk together your all-purpose flour, baking soda, salt, ground cinnamon, and ground nutmeg. Give it a good whisk to make sure everything is evenly distributed. This step is important because it ensures that your leavening agents (baking soda) and spices are spread throughout the flour, so you don’t get any random pockets of baking soda taste or uneven spice distribution. You want a nice, uniform blend. The aroma of the spices at this stage is already starting to smell amazing, isn’t it?
Step 3: Mix Wet Ingredients
In a separate, larger bowl, crack in your two large eggs. Add your granulated sugar and vegetable oil (or melted butter if you’re going that route – it adds a lovely richness!). Now, whisk all of this together until it’s smooth and well combined. Stir in that teaspoon of vanilla extract. I always give it a little taste at this point – just a tiny lick off the whisk – to make sure the vanilla is prominent enough. This is where you really start building the flavor base for your delicious zucchini bread.
Step 4: Combine
Now comes the moment of truth: bringing the wet and dry ingredients together! You’ll want to add your dry ingredients to the wet ingredients. Now, here’s a little trick I learned: don’t overmix! Stir gently with a spatula or wooden spoon until just combined. It’s okay if there are a few small lumps; that’s actually a good sign. Overmixing can develop the gluten in the flour too much, which can result in a tough, dense loaf. We’re going for tender and moist here, remember? So, stir until you don’t see any streaks of dry flour anymore. Gently fold in your grated zucchini. Make sure it’s distributed evenly throughout the batter. If you’re adding chocolate chips or nuts, fold those in now as well.
Step 5: Prepare Filling
This step is for those who like a little extra flair! If you’re adding chocolate chips or nuts, make sure they are ready to go. For a chocolate chip zucchini bread, I usually just toss them with a tablespoon of the dry flour mixture before adding them to the batter. This little trick helps prevent the chips from sinking to the bottom during baking. If you’re feeling adventurous and want to do a swirl, prepare your filling now. For example, if you’re using a cream cheese filling, you’d typically mix softened cream cheese with a bit of sugar and an egg yolk. You’d dollop this mixture over the batter in the pan and swirl gently with a knife.
Step 6: Layer & Swirl
Pour about half of your zucchini batter into the prepared loaf pan and spread it evenly. If you’re adding a filling like chocolate chips or nuts, sprinkle half of them over this layer. Then, pour the remaining batter on top and spread it out. Sprinkle the rest of your chocolate chips or nuts over the top. If you’re doing a swirl, now’s the time to dollop your cream cheese or ganache mixture over the top layer of batter and use a butter knife or a skewer to gently swirl it through. Don’t over-swirl; you want distinct ribbons of filling, not a completely mixed mess. Aim for about 2-3 gentle swirls.
Step 7: Bake
Pop that beautifully prepared loaf pan into your preheated oven. Bake for about 50-65 minutes. Now, oven temperatures can vary, so this is where checking for doneness is key. About 50 minutes in, I like to gently insert a toothpick or a thin knife into the center of the loaf. If it comes out clean or with just a few moist crumbs attached, it’s done! If it comes out with wet batter, give it another 5-10 minutes and check again. If the top is browning too quickly before the inside is cooked, you can loosely tent it with aluminum foil. The aroma that fills your kitchen during this time is just heavenly – a mix of warm spices and sweet bread. It’s the best kind of indicator that deliciousness is on its way!
Step 8: Cool & Glaze
Once your zucchini bread is baked to perfection, carefully remove it from the oven. Let it cool in the loaf pan for about 10-15 minutes. This is important because it allows the bread to set up properly, making it easier to remove without breaking. After that initial cooling period, gently invert the loaf pan onto a wire cooling rack to release the bread. Let it cool completely on the rack before you even think about glazing it. If you try to glaze a warm loaf, the glaze will just melt off and become a runny mess. Once it’s completely cool, prepare your glaze (if using). Whisk together the powdered sugar and your chosen liquid until you reach a smooth, pourable consistency. Drizzle it generously over the top of the cooled loaf, letting it drip down the sides. It looks so pretty and tastes even better!
Step 9: Slice & Serve
The hardest part is waiting for it to cool completely, but trust me, it’s worth it for the best texture. Once it’s cooled and glazed (or just plain and beautiful!), use a serrated knife to slice the loaf into thick, inviting pieces. A serrated knife helps cut through the tender crumb without squishing it. Serve it at room temperature for the best flavor and texture. The glaze will have set slightly by then, giving you that perfect sweet bite with every slice. It’s truly a showstopper, and nobody will guess the secret ingredient is zucchini!
What to Serve It With
This zucchini bread is so wonderfully versatile, it fits into almost any meal or occasion. For a simple, comforting **Breakfast**, I love a thick slice served warm with a good cup of coffee. The spices in the bread pair beautifully with the bitterness of coffee. It’s also fantastic with a dollop of plain Greek yogurt or a smear of butter for a little extra richness. When it comes to **Brunch**, this bread shines. I like to present it on a pretty platter, maybe with a side of fresh berries or a fruit salad. It adds that homemade touch that always impresses. For an elegant touch, a drizzle of honey or a light dusting of powdered sugar can elevate it even further. As a delightful **Dessert**, it’s absolutely perfect. Serve a slice with a scoop of vanilla bean ice cream, or a dollop of whipped cream and a few fresh raspberries. The warm spices and tender crumb are divine with something cool and creamy. And for those **Cozy Snacks**, whether it’s an afternoon pick-me-up or a late-night craving, a simple slice is all you need. It pairs wonderfully with a glass of milk, a cup of tea, or even a warm mug of hot chocolate. My family often requests this for an after-school snack, and it’s gone in a flash. It’s just that satisfying!
Top Tips for Perfecting Your Zucchini Bread
I’ve made this zucchini bread more times than I can count, and over the years, I’ve picked up a few tricks that really help ensure it turns out perfectly every single time. Let’s dive into some of my best tips!
Zucchini Prep: The most crucial step for a moist, not soggy, loaf is dealing with the zucchini moisture. After you grate your zucchini (I use the large holes on a box grater), place it in a fine-mesh sieve over a bowl. Let it sit for about 15-20 minutes to drain excess liquid. Then, gently press down on it with the back of a spoon or your hands to squeeze out even more moisture. You’ll be surprised how much liquid comes out! This prevents the bread from becoming heavy or gummy. Also, make sure your zucchini is fresh; wilted zucchini has more water and less flavor.
Mixing Advice: As I mentioned, don’t overmix! It’s really the golden rule for quick breads. When you combine the wet and dry ingredients, stir only until the flour streaks disappear. A few lumps are perfectly fine. Overmixing develops the gluten in the flour, leading to a tough texture. It’s better to be slightly under-mixed than over-mixed. Gentle folding is key. I usually use a spatula for this, making sure to scrape the bottom and sides of the bowl to incorporate everything evenly without beating it.
Swirl Customization: If you’re adding a swirl, whether it’s chocolate chips, a cream cheese mixture, or even a cinnamon-sugar filling, the key is to create distinct layers. Don’t try to mix the filling completely into the batter. Dollop spoonfuls of your filling over the batter in the pan, then use a knife or skewer to gently swirl it through. Aim for about 2-3 gentle passes to create beautiful marbled effects. Too much swirling will just muddle the flavors and textures.
Ingredient Swaps: This recipe is pretty forgiving. If you don’t have vegetable oil, melted butter works beautifully and adds a richer flavor. For sugar, you can substitute half of the granulated sugar with brown sugar for a deeper, caramel-like sweetness. If you’re out of all-purpose flour, a good quality 1:1 gluten-free baking blend will work, though the texture might be slightly different. I’ve also experimented with different milks for the glaze – almond milk or even coconut milk can be used, and they add subtle notes of flavor. For the spices, feel free to adjust to your preference; a pinch of ginger or allspice can add a lovely complexity.
Baking Tips: Always preheat your oven thoroughly. A consistently hot oven is crucial for quick breads. Place your loaf pan on the center rack of your oven to ensure even heat distribution. If your oven tends to run hot, or if you notice the top browning too quickly before the center is cooked, don’t hesitate to loosely tent the loaf with aluminum foil for the last 15-20 minutes of baking. This protects the crust while allowing the inside to finish cooking through. Use the toothpick test religiously!
Glaze Variations: The classic lemon glaze is a winner, but don’t be afraid to get creative! For a chocolate glaze, mix powdered sugar with cocoa powder and a little milk or melted chocolate. A simple vanilla glaze made with powdered sugar and milk or cream is also delicious. If you prefer a less sweet topping, just dust the cooled loaf with a light coating of powdered sugar or sprinkle it with cinnamon sugar. The key is to ensure the loaf is completely cool before applying any glaze or topping.
Storing and Reheating Tips
Storing this glorious zucchini bread is actually pretty simple, and it keeps wonderfully, which is one of the reasons I love making a double batch! For the best flavor and texture, try to consume it within a few days.
Room Temperature: Once completely cooled, you can store the zucchini bread at room temperature. I usually wrap it tightly in plastic wrap or place it in an airtight container. It will stay fresh and moist for about 2-3 days. I always check for any signs of staleness or mold before serving after the first couple of days. If it seems a little dry, a quick zap in the microwave can help revive it.
Refrigerator Storage: If you live in a particularly warm or humid climate, or if you want it to last a bit longer, storing it in the refrigerator is a good option. Wrap it well in plastic wrap, then place it in an airtight container. It should keep well for up to a week in the fridge. When you’re ready to eat, let it sit at room temperature for about 15-20 minutes, or gently warm a slice in the microwave or toaster oven for a few seconds. This brings back that lovely soft texture.
Freezer Instructions: This zucchini bread freezes exceptionally well, which is perfect for whenever you get a sudden craving or want to have some on hand for unexpected guests. After it has completely cooled, wrap the entire loaf (or individual slices) tightly in a layer of plastic wrap, followed by a layer of aluminum foil. This double layer helps prevent freezer burn. Store it in the freezer for up to 2-3 months. To thaw, unwrap the loaf and let it sit at room temperature for a few hours, or thaw individual slices by leaving them on the counter or gently warming them. It’s like having homemade goodness ready whenever you need it!
Glaze Timing Advice: If you plan to store your zucchini bread at room temperature or in the refrigerator, it’s best to add the glaze just before serving or on the day you plan to eat it. If you glaze it and then wrap it tightly, the glaze can sometimes become sticky or even slightly weep onto the bread, especially in warmer conditions. For freezing, I highly recommend glazing *after* thawing. This ensures the glaze is fresh and vibrant, and you avoid any issues with the glaze during the freezing and thawing process. If you really want it glazed before freezing, just make sure it’s fully set and then wrap very carefully.
Frequently Asked Questions
Final Thoughts
So there you have it – my absolute favorite zucchini bread recipe! It’s more than just a recipe to me; it’s a little bit of comfort, a lot of happy memories, and a testament to how simple ingredients can create something truly magical. I really hope you give this a try. It’s the kind of recipe that makes you feel like a baking superstar, even if you’re a beginner. That incredibly moist crumb, the warm spice blend, and the fact that it’s hiding a healthy vegetable – what’s not to love? If you enjoy this recipe, you might also love my {{< recipeLink “Moist Blueberry Muffins” >}} or my {{< recipeLink “Easy Banana Bread” >}} which share that same homey, comforting vibe. I can’t wait to hear how yours turns out! Please leave a comment below and let me know your favorite additions or any creative twists you tried. And if you share it on social media, don’t forget to tag me – I’d love to see your delicious creations! Happy baking!
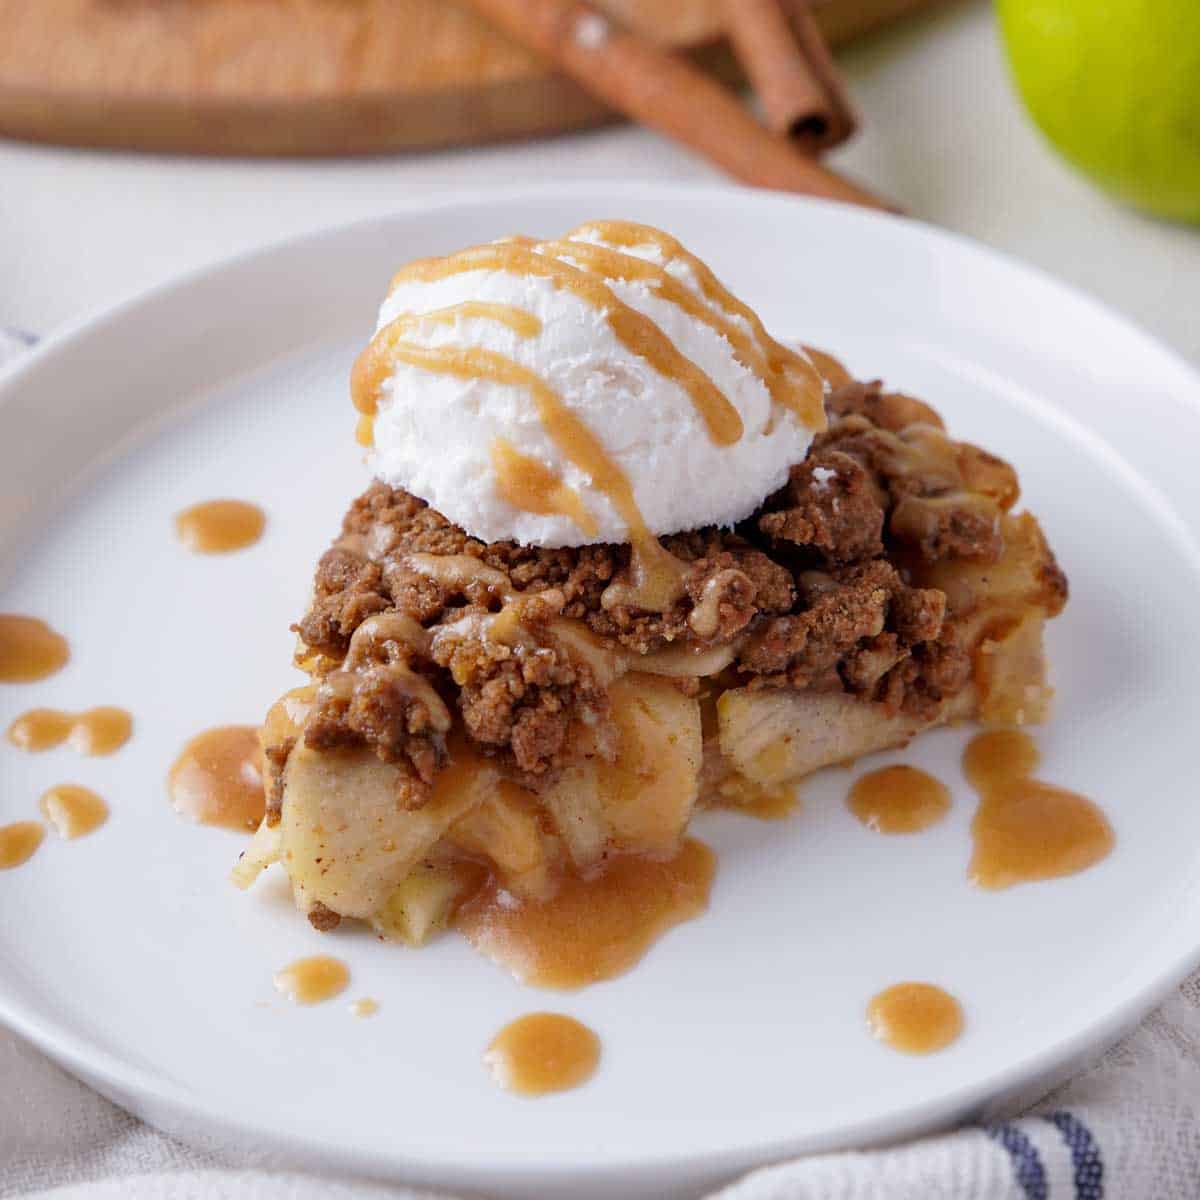
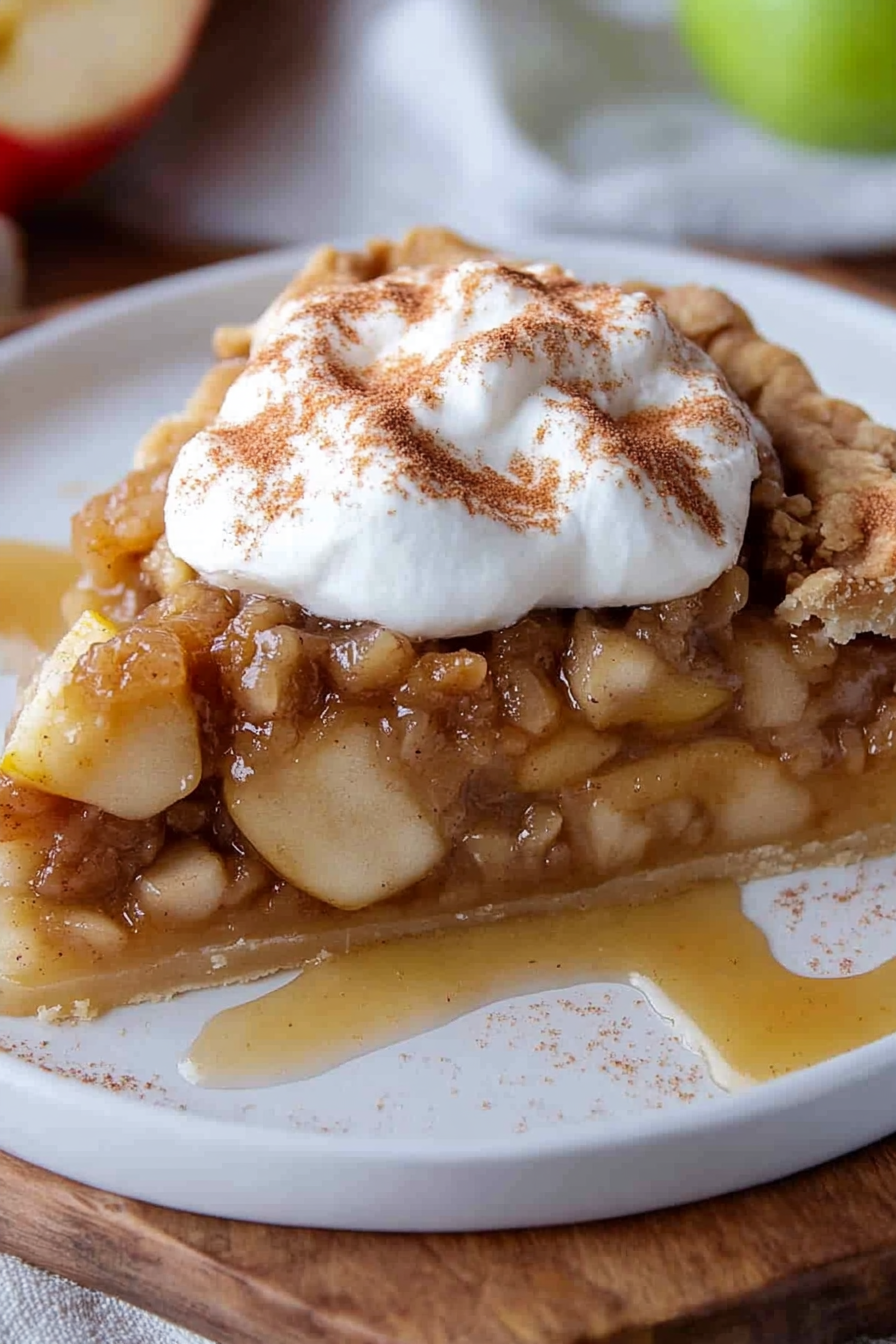
Homemade Apple Cinnamon Crumb Pie
Ingredients
Method
- Place your oven rack on the lowest level and preheat the oven to 400 degrees Fahrenheit (200 degrees Celsius).
- In a large bowl, combine the peeled, cored, and thinly sliced apples with granulated sugar, 1 tsp ground cinnamon, 0.25 tsp ground nutmeg, and salt. Mix well to coat the apples evenly.
- Spoon the apple filling mixture into the thawed prepared pie crust.
- To make the streusel topping, in a medium bowl, mix together the dark brown sugar, all-purpose flour, and 0.5 tsp ground nutmeg.
- Using a pastry blender or two knives, cut the chilled butter pieces into the brown sugar mixture until coarse crumbs form.
- Sprinkle the streusel crumble topping evenly over the apple filling in the pie crust.
- Bake the pie in the preheated oven for about 35 minutes, or until the topping is golden brown and the filling is bubbly. If the topping begins to over-brown, loosely cover the pie with aluminum foil.
- Transfer the baked pie to a wire rack and let it cool for at least 15 minutes before slicing.
- Serve warm, optionally with a scoop of vanilla ice cream.