Creamy Boston Fudge a Simple Treat
Oh my goodness, you are going to LOVE this. Seriously. This isn’t just any zucchini bread; this is *the* zucchini bread. The one that disappears from the counter faster than you can say “second slice.” I’ve been making variations of this for years, and this particular recipe is the one my family begs for, the one I bring to potlucks when I want to be the undisputed hero, and the one that has saved me countless times on busy weeknights when a craving strikes and I need something comforting and delicious without a huge fuss. It’s like a warm hug in cake form, and honestly, it’s so much easier than you might think. If you’ve ever hesitated about baking with zucchini, thinking it’ll taste… well, *green*, let me tell you, this recipe is the ultimate game-changer. It’s so moist and flavorful, you’d never guess the secret ingredient is actually a vegetable!
What is your favorite Zucchini bread recipe?
So, what exactly *is* this magical zucchini bread? At its heart, it’s a beautifully moist, tender quick bread that’s studded with pockets of sweet goodness and topped with a dreamy glaze. The zucchini, when grated and baked, practically melts into the batter, adding an incredible moisture and a subtle sweetness without any discernible veggie flavor. It’s the perfect canvas for warm spices like cinnamon and nutmeg, and if you’re feeling fancy, a little chocolate chip or walnut addition is always welcome. Think of it as a super-powered, incredibly delicious muffin or a loaf cake that just happens to be good for you (sort of!). It’s the kind of treat that feels both wholesome and utterly indulgent, a balance that’s often hard to find. This isn’t your grandma’s dry, bland loaf; this is a modern, crowd-pleasing version that’s sure to become a staple in your kitchen too.
Why you’ll love this recipe?
Okay, let’s talk about why this zucchini bread is going to become your new best friend in the kitchen. First off, the flavor is just out of this world. It’s perfectly spiced, wonderfully sweet but not overly so, and the texture is unparalleled – impossibly moist and tender. My husband always says he can just *smell* it baking and knows it’s going to be a good day! Then there’s the sheer simplicity of it all. You don’t need any fancy equipment, just a couple of bowls, a whisk, and a baking pan. It’s honestly a lifesaver when unexpected guests pop over or when that 3 PM snack attack hits. And the cost-efficiency? You probably have most of the ingredients in your pantry already, and fresh zucchini is usually super affordable. What I love most, though, is its versatility. Serve it warm for breakfast with a smear of butter, pack it in lunchboxes for a delightful surprise, or enjoy it as a comforting dessert after dinner. It’s fantastic on its own, but that simple glaze? Pure genius. It elevates it from good to absolutely divine. It’s a recipe that truly makes you feel like a baking rockstar, even on your most chaotic days. It’s miles better than those store-bought mixes, and honestly, it’s more foolproof than a lot of other baked goods out there. The texture and moisture it achieves are just next level.
How do I make Zucchini bread?
Quick Overview
This recipe is all about creating a moist, flavorful loaf with minimal fuss. We’ll start by combining our wet and dry ingredients separately, then gently bring them together. The grated zucchini is the secret weapon for that incredible texture. After a quick swirl of a simple filling (if you’re using one!) and a bake until golden and fragrant, we’ll finish it off with a sweet glaze. It’s surprisingly straightforward, and the results are consistently spectacular. Even if you’re new to baking, you’ve got this!
Ingredients
For the Main Batter:
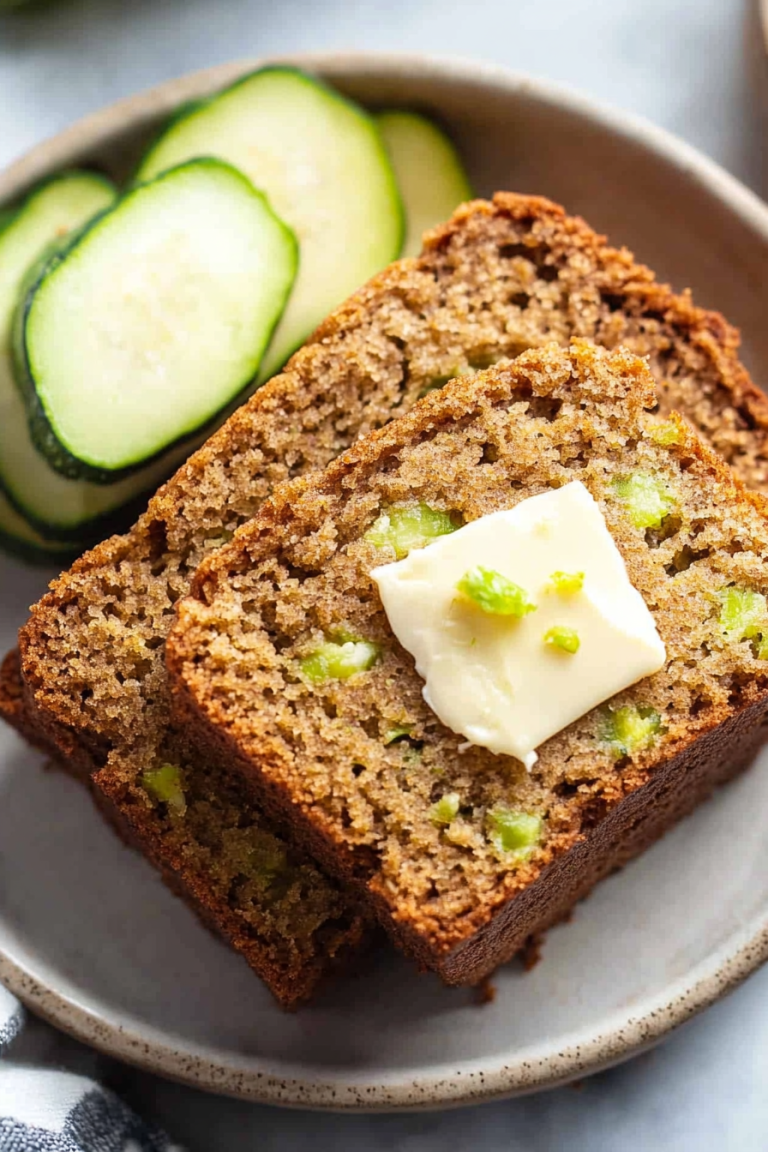
You’ll need about 2 cups of all-purpose flour. I usually just measure it out, but if you’re unsure, spoon it into your measuring cup and level it off – this prevents a dry loaf. A teaspoon of baking soda and half a teaspoon of baking powder ensure a good lift. For that classic cozy flavor, 1 teaspoon of ground cinnamon and a generous pinch of ground nutmeg are essential. A quarter teaspoon of salt helps balance the sweetness. For the wet ingredients, you’ll want 3 large eggs, beaten until they’re lovely and frothy. 1 cup of granulated sugar is standard, but if you prefer it a little less sweet, you can nudge it down to 3/4 cup – I’ve tested that and it’s still great! 1/2 cup of melted butter (unsalted, so you can control the salt better) or a neutral oil like canola or vegetable oil works beautifully; oil often yields an even moister crumb, so it’s a fun experiment. And the star, of course: 2 cups of finely grated zucchini. Make sure to squeeze out as much excess moisture as you can; this is key! I usually do this by hand or in a clean tea towel. One teaspoon of vanilla extract just rounds everything out.
For the Filling (Optional, but highly recommended!):
If you want to add an extra layer of deliciousness, this is your ticket! You’ll need about 1/4 cup of packed brown sugar, 1 teaspoon of cinnamon, and a tablespoon or two of chopped walnuts or pecans if you like a little crunch. You can even add a handful of chocolate chips here if that’s more your jam! Some people even swirl in a tablespoon of smooth peanut butter – trust me, it’s amazing.
For the Glaze:
This is what takes it over the top! It’s super simple: 1 cup of powdered sugar, about 2 tablespoons of milk (or a dairy-free alternative like almond milk for extra creaminess!), and 1/2 teaspoon of vanilla extract. You can adjust the milk for your desired consistency – I like it thick enough to drizzle but not so thin that it all runs off. If you want to get fancy, a pinch of lemon zest or a tablespoon of lemon juice can add a lovely brightness.
Step-by-Step Instructions
Step 1: Preheat & Prep Pan
First things first, let’s get that oven preheated to 350°F (175°C). While it’s warming up, grab a standard 9×5 inch loaf pan. I like to grease it really well with butter or cooking spray, and then lightly flour it. For extra insurance against sticking, I often line the bottom and sides with parchment paper, leaving a little overhang on the sides to make it super easy to lift the loaf out later. This step is a lifesaver, especially if you’re new to baking!
Step 2: Mix Dry Ingredients
In a large bowl, whisk together your all-purpose flour, baking soda, baking powder, cinnamon, nutmeg, and salt. Give it a good whisk until everything is thoroughly combined. This is important because it distributes the leavening agents evenly, so you don’t get little pockets of bitterness or uneven rising. Make sure there are no clumps of baking soda or powder.
Step 3: Mix Wet Ingredients
In a separate, medium-sized bowl, whisk together your beaten eggs, granulated sugar, melted butter (or oil), and vanilla extract until everything is smooth and well combined. I usually let the melted butter cool for a minute or two before adding it to the eggs so it doesn’t cook them!
Step 4: Combine
Now, pour the wet ingredients into the bowl with the dry ingredients. Use a spatula or wooden spoon to mix everything together until *just* combined. Seriously, do NOT overmix! A few streaks of flour are okay at this stage. Then, gently fold in your squeezed and grated zucchini. The batter will be thick, and that’s exactly what we want. Overmixing develops the gluten in the flour, which can lead to a tough, rubbery loaf, and nobody wants that!
Step 5: Prepare Filling
If you’re making the optional filling, now’s the time. In a small bowl, just mix together the brown sugar, cinnamon, and your chosen add-ins like walnuts or chocolate chips. Keep it simple!
Step 6: Layer & Swirl
Pour about half of the batter into your prepared loaf pan. Sprinkle the filling mixture evenly over the top. Then, spoon the remaining batter over the filling, making sure to cover it completely. If you’re not doing a filling, just pour all the batter into the pan. For a pretty swirl effect (if using filling), you can gently run a knife or a skewer through the batter a few times. Don’t overdo it, or you’ll mix the filling in too much. You want distinct layers and swirls!
Step 7: Bake
Pop the pan into your preheated oven and bake for 50-60 minutes. The best way to check if it’s done is to insert a toothpick or a thin knife into the center of the loaf. If it comes out clean (or with just a few moist crumbs attached, but no wet batter), it’s ready! If it’s still wet, give it another 5-10 minutes and check again. Ovens can be so finicky, so trust your toothpick test!
Step 8: Cool & Glaze
Once it’s baked, let the loaf cool in the pan for about 10-15 minutes. This allows it to set up a bit more. Then, carefully lift it out using the parchment paper overhang (or invert it onto a wire rack) and let it cool completely on a wire rack. This is crucial! If you try to glaze it while it’s still warm, the glaze will just melt off. Once it’s fully cooled, whisk together your powdered sugar, milk, and vanilla until smooth. Drizzle it generously over the top of the loaf. Let the glaze set for about 15-20 minutes before slicing.
Step 9: Slice & Serve
Once the glaze has set, you can slice into your masterpiece! Use a sharp knife for clean cuts. I love serving this slightly warm, but it’s equally delicious at room temperature. Slice it thick or thin – whatever your heart desires! It looks beautiful served on a simple wooden board. Enjoy every single crumb!
What to Serve It With
This zucchini bread is so versatile, it fits into almost any meal or occasion! For a quick and satisfying breakfast, I love serving a thick slice warm with a good dollop of butter. It’s also fantastic alongside a steaming mug of coffee or a creamy latte. My kids actually love having a slice for a special weekend breakfast, and it feels like such a treat for all of us. For a more leisurely brunch, it’s absolutely divine alongside a fresh fruit salad and perhaps some scrambled eggs or bacon. You could even do mini loaves for individual servings on a brunch buffet. As a dessert, it’s simply perfect. Serve it with a scoop of vanilla bean ice cream or a dollop of lightly sweetened whipped cream – it’s decadent without being overly heavy. And for those cozy afternoon or evening snacks? It’s pure comfort food. I often find myself reaching for a slice with a glass of milk after dinner when I’m craving something sweet but don’t want to commit to a whole dessert. It’s also fantastic alongside a cup of herbal tea. Honestly, the only bad time to eat this zucchini bread is never!
Top Tips for Perfecting Your Zucchini Bread
I’ve made this so many times, I’ve learned a few tricks that really make a difference. First, and I cannot stress this enough, properly prepping your zucchini is key. Grate it using the medium holes of your grater, and then squeeze out as much liquid as humanly possible. Seriously, get in there and wring it out like a dishcloth! This is the number one reason why some zucchini breads turn out gummy or overly moist. For mixing, remember my mantra: don’t overmix! As soon as you don’t see dry flour streaks, stop. A few lumps are fine. Overworking the batter develops gluten, leading to a tough texture. For that beautiful swirl (if you’re adding a filling), keep it relatively light. You want pockets of cinnamon sugar and nuts, not a homogenous mix. A gentle swirl with a knife or skewer is all it takes. If you want to experiment with ingredient swaps, I’ve found that using half whole wheat flour and half all-purpose flour works well, though it might make it slightly denser. For a dairy-free version, I’ve tested this with melted coconut oil instead of butter and almond milk in the glaze, and it was incredibly creamy! It’s also wonderfully moist with applesauce instead of some of the oil, though it can alter the flavor slightly. When it comes to baking, always trust the toothpick test. Ovens vary wildly, so don’t rely solely on the time. If your loaf is browning too quickly on top, you can loosely tent it with aluminum foil for the last 15-20 minutes of baking. And for the glaze, patience is a virtue! Make sure your loaf is completely cool before drizzling. If it’s too thin, just add more powdered sugar, a tablespoon at a time, until it thickens up. If it’s too thick, a tiny splash of milk will thin it out. A little goes a long way with the liquid!
Storing and Reheating Tips
This zucchini bread is incredibly forgiving when it comes to storage, which is another reason I love it so much. If you’ve glazed it, I generally recommend storing it at room temperature for up to 2 days. Make sure it’s well-covered in an airtight container or tightly wrapped in plastic wrap to prevent it from drying out. If it’s not glazed, it can stay at room temperature for 3-4 days, though it’s best enjoyed within the first couple of days for peak freshness. For longer storage, the refrigerator is your friend. Wrap the unglazed loaf tightly in plastic wrap, then in aluminum foil, or place it in an airtight container. It should keep well in the fridge for about a week. When you’re ready to enjoy a slice from the fridge, you can eat it cold, or for that “just-baked” warmth, I love to pop a slice in the toaster oven or a regular toaster for a few minutes until it’s warmed through. If you’ve glazed it, it’s best to store it at room temperature or freeze it unglazed, adding the glaze just before serving after thawing. You can also freeze the entire loaf (unglazed is best for freezing) or individual slices. Wrap them very tightly in plastic wrap, then in foil, and they’ll keep well in the freezer for up to 3 months. To thaw, transfer the wrapped loaf or slices to the refrigerator overnight. Once thawed, you can warm it up as described above. The key to freezing is to prevent any air from getting to the bread, which can cause freezer burn.
Frequently Asked Questions
Final Thoughts
So there you have it – my beloved zucchini bread recipe! It’s more than just a recipe to me; it’s a little bit of comfort, a dash of sunshine, and a whole lot of deliciousness wrapped up in one perfect loaf. I truly believe this is one of those recipes that will earn a permanent spot in your baking repertoire. It’s proof that simple ingredients can create something truly extraordinary, and it’s so rewarding to see how much everyone enjoys it. If you love this recipe, you might also enjoy my Spiced Apple Crumble Cake or my Lemon Blueberry Scones – they’re also family favorites that bring a lot of joy to my kitchen. I can’t wait to hear what you think once you try it! Please, please leave a comment below and tell me how yours turned out, or if you tried any fun variations. And if you snap a picture, tag me on social media! Happy baking, my friends!

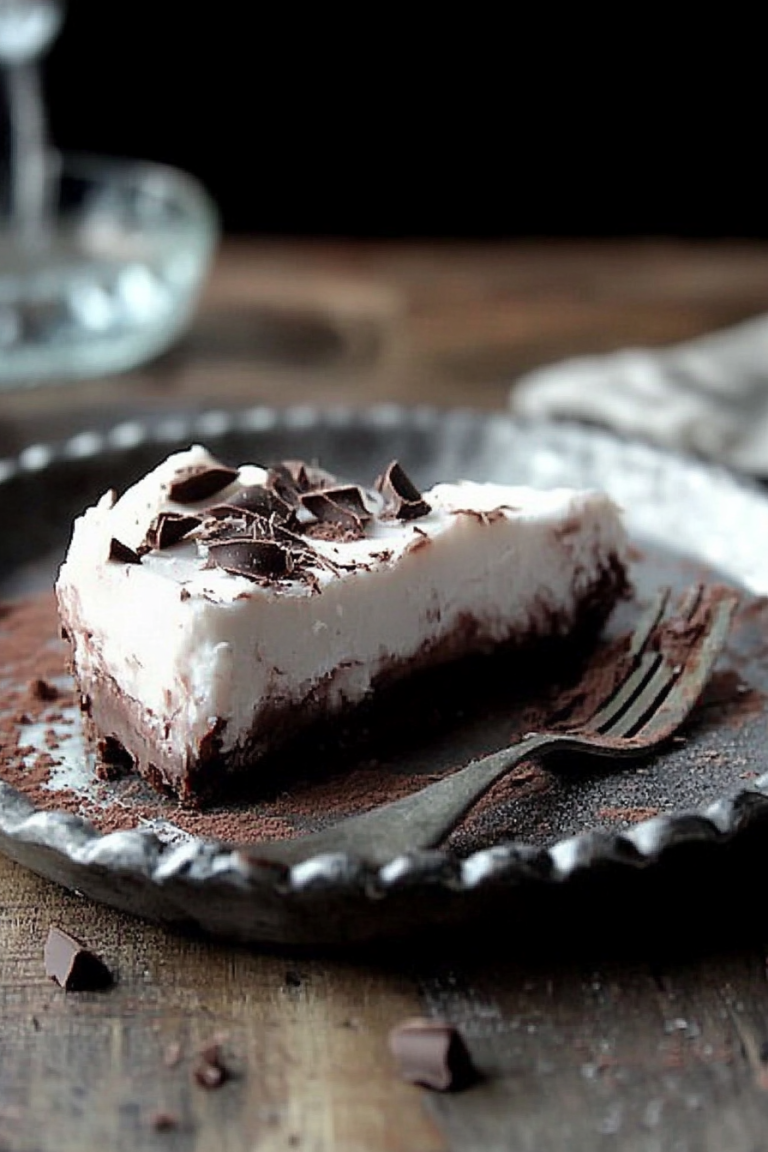
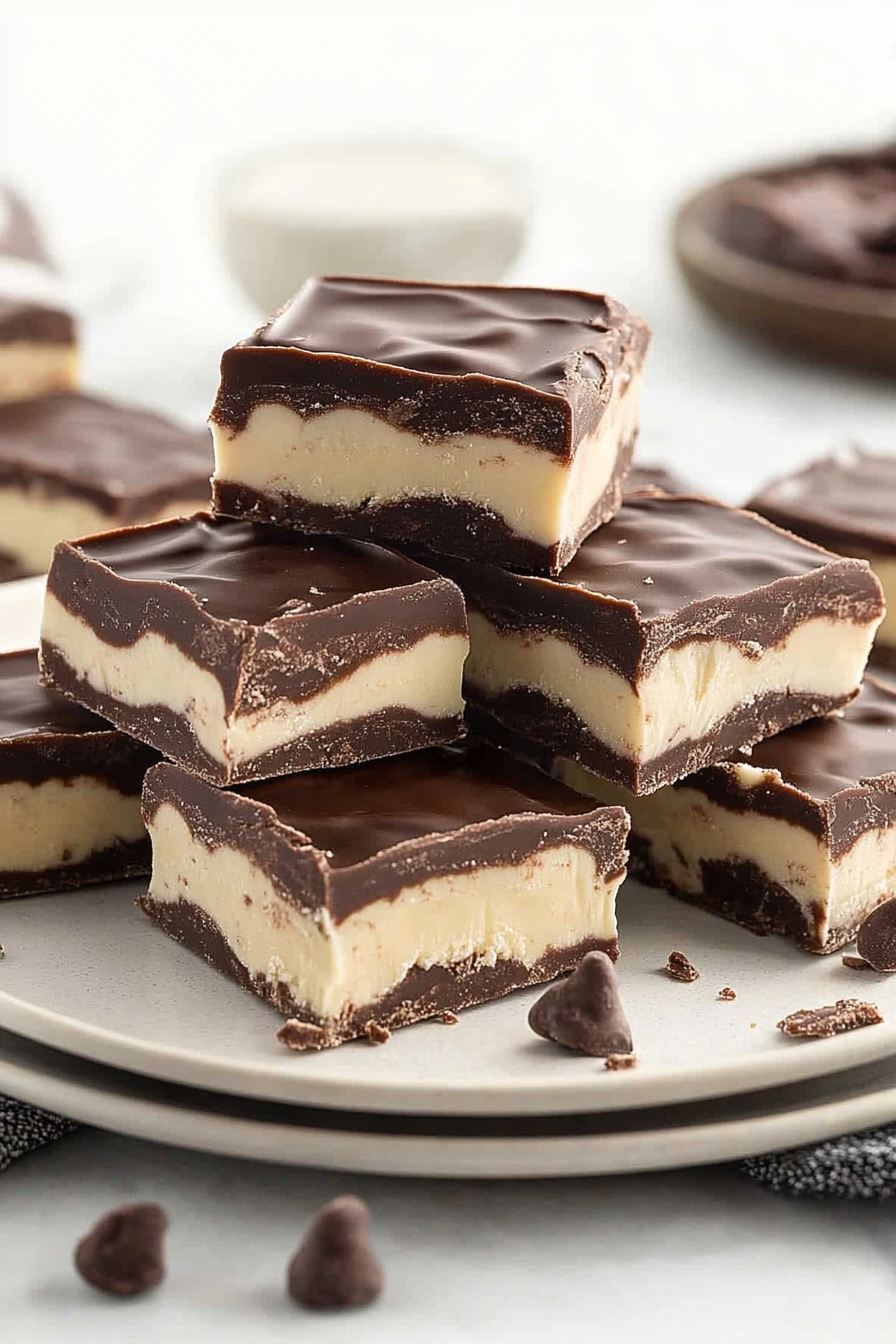
boston cream fudge
Ingredients
Method
- Prepare an 8x8-inch baking pan by lining it with parchment paper, leaving an overhang to pull the fudge out of the pan. Very lightly spray the parchment paper with nonstick cooking spray.
- Combine the sugar, butter, heavy cream, and corn syrup in a heavy-bottomed saucepan. Cook over medium heat, stirring constantly, until the mixture reaches a rolling boil.
- Once boiling, continue stirring and allow it to boil for about 4-5 minutes, or until a candy thermometer registers around 235-240°F (soft-ball stage).
- Remove the saucepan from heat and stir in the chopped white chocolate until it's completely melted and smooth.
- Add the marshmallow cream and vanilla extract to the mixture, stirring until well combined.
- Pour ¾ of the fudge mixture into the prepared baking dish.
- Add the unsweetened cocoa powder to the remaining fudge. Whisk until fully incorporated.
- Carefully spoon the cocoa-flavored fudge mixture on top of the white layer.
- Use a toothpick or skewer to swirl the two layers, creating a marbled effect.
- Let the fudge cool at room temperature for about 1 hour. Cover with aluminum foil. Then, chill in the refrigerator for 1 hour or until firmly set. (If your kitchen is on the colder side, you can allow the fudge to finish setting on the counter)
- Once set, lift the fudge from the pan using the parchment paper overhang. Use a sharp kitchen knife to slice the fudge 5 x 5 slices. (You can also cut the fudge 6 x 6 slices)
- Add the chocolate chips and vegetable oil to a microwave-safe bowl. Heat on high for 30 seconds, stir, and heat in 15-second intervals until the chocolate is completely melted.
- Dip the tops of the fudge in the melted chocolate. Allow the chocolate to completely set before serving.