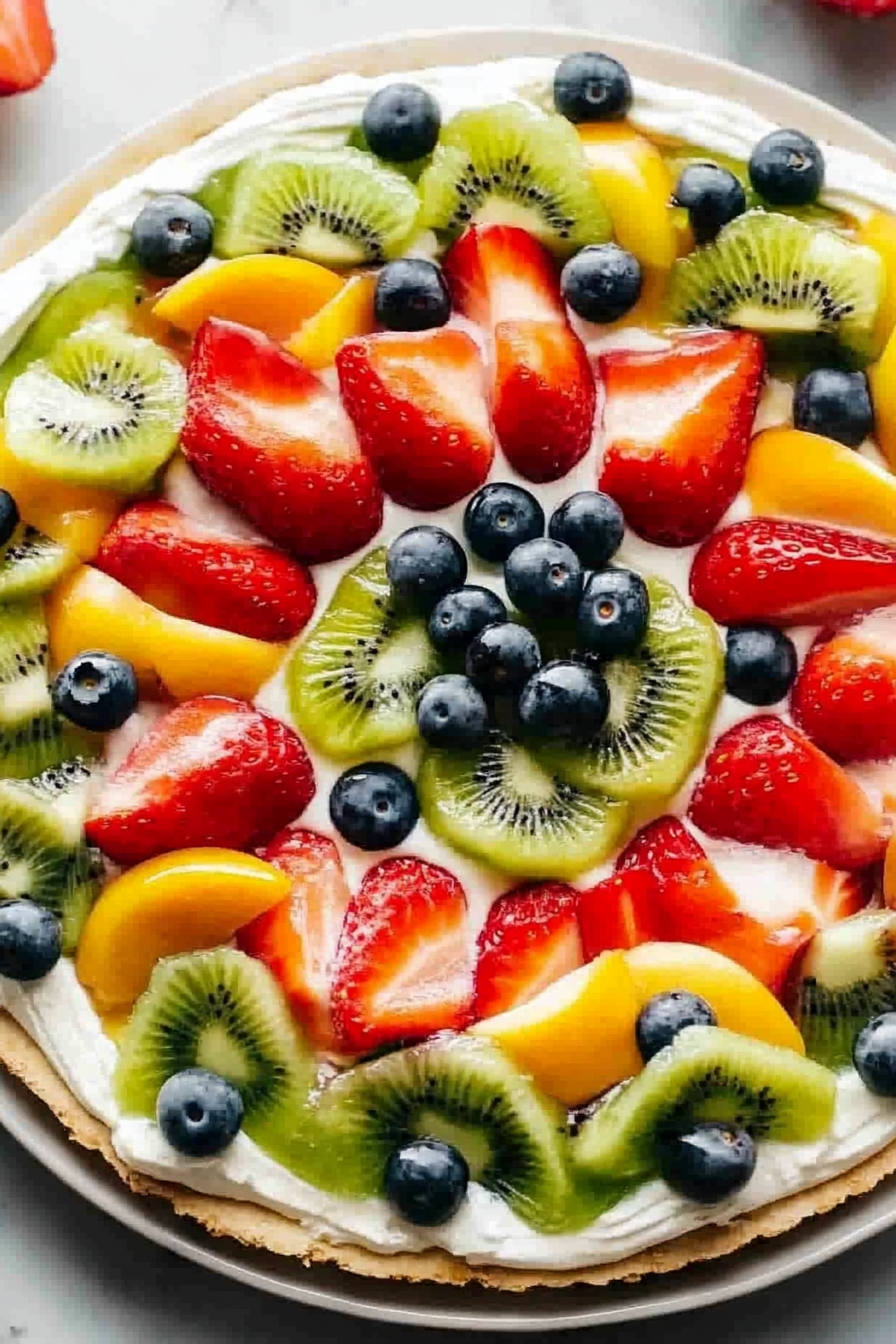
Easy Fruit Pizza That Tastes Amazing
Okay, so let me tell you about this zucchini bread. It’s not just any zucchini bread, my friend. This is *the* zucchini bread. The one that vanished from the cooling rack in under an hour at my last family get-together. You know how sometimes you bake something, and it’s… fine? This is the opposite of fine. This is *spectacular*. It’s that perfect balance of moist, tender, and just sweet enough, with those little pockets of flavor that make you close your eyes in pure bliss. Honestly, when I first started tinkering with zucchini bread recipes, I was a bit skeptical. Would it taste like a vegetable? Would it be dry and crumbly? Spoiler alert: absolutely not. This recipe has a magical way of transforming humble zucchini into something truly divine. It’s the kind of thing that makes my kids ask for seconds (and thirds!), which, let’s be real, is the ultimate parent win. And if you’re like me and always looking for ways to sneak a little extra goodness into baked goods without anyone noticing, well, you’ve come to the right place. This one’s a lifesaver on busy weeknights when you need a little sweet treat but don’t have time for a whole production. It’s pretty much my go-to for potlucks, bake sales, or just a Tuesday afternoon pick-me-up.
What is Zucchini bread?
So, what exactly *is* zucchini bread? Well, on the surface, it’s a quick bread where shredded zucchini is a key ingredient. Think of it like a muffin or a coffee cake, but even better because of that secret ingredient. The zucchini doesn’t actually make it taste like zucchini, not at all! Instead, it adds this incredible moisture and tenderness that’s just out of this world. It’s essentially a delicious way to use up that extra zucchini from your garden or farmers’ market haul. The name itself might sound a little… healthy. And while it *does* have a vegetable in it, making it a smidge more virtuous than, say, a plain old chocolate chip pound cake, it’s still a wonderfully indulgent treat. It’s that perfect sweet spot where you can feel *slightly* good about what you’re eating, while still utterly enjoying every single bite. It’s a testament to how simple ingredients, when combined with a little love and a good recipe, can create something truly special.
Why you’ll love this recipe?
There are so many reasons why this zucchini bread has earned a permanent spot in my recipe binder, and I’m betting it will for you too! First off, the flavor. Oh. My. Goodness. It’s got this warm, comforting cinnamon-spiced sweetness that is just pure happiness in bread form. The texture is what truly sets it apart, though. It’s incredibly moist, almost melt-in-your-mouth tender, thanks to the zucchini. It’s never dry or crumbly, which is a common pitfall with quick breads. And speaking of pitfalls, this recipe is surprisingly simple to whip up, even if you’re not a seasoned baker. It’s a one-bowl (mostly!) wonder that comes together in a flash. I’ve tested this with almond milk and it actually made it even creamier! Seriously, the ingredients are all pretty standard pantry staples, so it’s also super budget-friendly. No fancy or expensive items needed here, which is always a win in my book. Plus, it’s incredibly versatile! I’ve added chocolate chips, nuts, and even a swirl of cream cheese filling, and each time it’s been a huge hit. What I love most about this is that it’s perfect for almost any occasion. Need a quick breakfast treat? Check. A delightful dessert after dinner? Check. A cozy afternoon snack? Double check. It’s just that good, that reliable, and that darn delicious. It reminds me a bit of my grandmother’s apple cake, in the sense that it’s a crowd-pleaser that always brings smiles to faces. But this one has that extra special moistness that makes it truly unforgettable.
How do you make Zucchini bread?
Quick Overview
The process is refreshingly straightforward. You’ll basically mix your dry ingredients, then your wet ingredients, combine them gently, fold in the star (the zucchini!), and bake it until it’s golden and fragrant. The secret to its incredible texture lies in not overmixing and letting the zucchini work its magic. It’s designed to be easy, meaning you can whip this up even on a hectic day. Just a few simple steps and you’ll have a warm, comforting loaf that smells absolutely divine. Trust me, the aroma alone is worth it!
Ingredients
For the Main Batter:
This is where the magic starts! I always try to use fresh, firm zucchini for the best moisture content. You’ll need about 2 cups of finely shredded zucchini. Don’t worry about peeling it; the peel adds extra nutrients and color. Make sure to squeeze out as much excess water as you can after shredding – this is a crucial step to avoid a soggy bread! You’ll also need all-purpose flour (around 2 cups), baking soda and baking powder for lift, a good pinch of salt to balance the sweetness, and plenty of warm spices like cinnamon and a touch of nutmeg. My favorite part is the sugar – a mix of granulated and brown sugar gives it that perfect caramel-y depth and extra moistness. And for the fat, a good quality unsalted butter, melted, or a neutral oil like vegetable or canola oil works beautifully. And don’t forget the eggs – they bind everything together.
For the Filling:
This is optional, but highly recommended for an extra layer of decadence! A simple mix of softened cream cheese, a tablespoon or two of sugar, and a dash of vanilla extract is fantastic. You could also do a simple cinnamon-sugar swirl if you prefer something a little less rich. Some people love adding chopped walnuts or pecans here for a nice crunch, which is also a wonderful idea!
For the Glaze:
This is the crown jewel! It’s a simple confectioners’ sugar glaze. You’ll whisk together powdered sugar with a liquid – milk, buttermilk, or even a little lemon juice for a tangy kick. I find that adding the liquid a tablespoon at a time is key to getting the perfect drizzly consistency. You want it thick enough to coat the bread but thin enough to drip beautifully down the sides. A splash of vanilla extract in the glaze is a must for me.
Step-by-Step Instructions
Step 1: Preheat & Prep Pan
First things first, get your oven preheated to 350°F (175°C). Grab a standard loaf pan (9×5 inches is perfect) and grease it really well. I like to grease it and then lightly flour it, or even better, use parchment paper to line the bottom and sides. This ensures your beautiful loaf slides right out with no drama. If you’re using parchment, leave a little overhang on the sides to act as handles for easy removal later. This step might seem small, but it’s a lifesaver and prevents those frustrating moments of a stuck loaf!
Step 2: Mix Dry Ingredients
In a large bowl, whisk together your flour, baking soda, baking powder, salt, cinnamon, and nutmeg. Whisking them together ensures everything is evenly distributed, so you don’t get random pockets of baking soda or spice. You want a homogenous mixture. Give it a good whisk until it looks uniform and fluffy. This aeration helps create a lighter crumb.
Step 3: Mix Wet Ingredients
In a separate medium bowl, whisk together your eggs, granulated sugar, brown sugar, melted butter (or oil), and vanilla extract. Whisk until everything is well combined and looks smooth. If you’re using buttermilk or milk, add it here too. The brown sugar will give it a lovely slightly caramel color.
Step 4: Combine
Now, pour the wet ingredients into the bowl with the dry ingredients. Using a spatula or wooden spoon, gently fold them together until *just* combined. It’s really important not to overmix here! A few streaks of flour are okay; they’ll disappear during baking. Overmixing develops the gluten too much, which can lead to a tough bread. We want tender, tender, tender!
Step 5: Prepare Filling
If you’re making the cream cheese filling, this is the time to mix your softened cream cheese, sugar, and vanilla in a small bowl until smooth and creamy. For the cinnamon-sugar swirl, simply mix some granulated sugar with cinnamon in a tiny bowl.
Step 6: Layer & Swirl
Gently fold the squeezed, shredded zucchini into the batter. Now, pour about half of the batter into your prepared loaf pan. If you’re using a filling, dollop spoonfuls of the cream cheese mixture over the batter. Then, spoon the remaining batter on top, covering the filling. If you’re doing a cinnamon-sugar swirl, sprinkle about half of the cinnamon-sugar mixture over the first layer of batter before adding the second half of the batter, then sprinkle the rest on top. For a marbled effect with the cream cheese, you can gently drag a knife or skewer through the batter to create swirls. Don’t over-swirl, or you’ll lose the definition.
Step 7: Bake
Place the loaf pan in the preheated oven. Bake for about 50-65 minutes. The exact time can vary depending on your oven and the pan. You’ll know it’s done when a wooden skewer or toothpick inserted into the center comes out clean, or with just a few moist crumbs attached. If the top starts browning too quickly, you can loosely tent it with foil. Resist the urge to open the oven door too early!
Step 8: Cool & Glaze
Once baked, take the loaf out of the oven and let it cool in the pan for about 10-15 minutes. This allows it to set up properly. Then, carefully invert it onto a wire rack to cool completely. This is important! Trying to glaze a warm loaf will just result in a melted mess. Once it’s completely cool, whisk together your glaze ingredients until smooth. Drizzle it generously over the top of the cooled bread, letting it drip down the sides. Let the glaze set for a few minutes before slicing.
Step 9: Slice & Serve
Use a serrated knife for clean slices. The best way to serve this is at room temperature. The glaze will have firmed up just enough to make clean cuts. Admire your handiwork – that beautiful swirl, that golden crust. Then, slice it up and enjoy the fruits of your labor!
What to Serve It With
This zucchini bread is so versatile, it really shines on its own, but I do love pairing it with a few things! For a simple, delicious breakfast, a warm slice with a steaming mug of coffee or a glass of cold milk is pure comfort. I sometimes toast a slice lightly in the toaster for an extra crispy edge, and it’s just heavenly. When I’m feeling a bit fancy for brunch, I’ll serve it alongside a fresh fruit salad or a platter of scrambled eggs and crispy bacon. It adds a lovely sweet element to the meal without being too heavy. For dessert, it’s a fantastic standalone option, especially with that glaze. But if you want to go all out, a small scoop of vanilla bean ice cream or a dollop of lightly sweetened whipped cream is divine. For those moments when you just need a little something sweet, a slice of this bread is perfect for cozy snacks. I love it with a cup of herbal tea in the afternoon. My family also loves it slightly warmed up with a smear of butter – it’s like a warm hug in food form!
Top Tips for Perfecting Your Zucchini Bread
I’ve made this recipe more times than I can count, and through trial and error, I’ve picked up a few tricks that I think are worth sharing. These little nuggets of wisdom have saved me from more than one baking mishap!
Zucchini Prep: The most crucial step for tender, not-soggy zucchini bread is squeezing out the moisture. After shredding your zucchini, place it in a clean kitchen towel or cheesecloth and wring out as much liquid as humanly possible. Seriously, wring it like you mean it! You’ll be amazed at how much water comes out. This ensures the bread bakes properly and doesn’t become dense or gummy. Also, using fresh zucchini makes a difference; older zucchini can be more watery.
Mixing Advice: Remember that thing I said about not overmixing? It’s so, so important. Gently fold the wet into the dry ingredients just until they come together. A few little streaks of flour are absolutely fine. The batter should be thick, but not stiff. If it looks too dry, it’s probably because your zucchini was very dry; you might need a tablespoon or two more of milk or yogurt. Conversely, if it seems too wet, you might have not squeezed enough water out. I learned this lesson the hard way after a few dense loaves!
Swirl Customization: If you’re adding a swirl, don’t go overboard with the filling, especially the cream cheese. Too much filling can make the bread difficult to bake through evenly. For the cream cheese swirl, I like to drop spoonfuls and then use the back of a spoon to spread them slightly before layering the top batter. For marbling, a gentle zig-zag with a knife works best. You want distinct ribbons, not a muddy mess!
Ingredient Swaps: I’ve experimented with this a lot! For a dairy-free version, I’ve successfully used a neutral oil (like grapeseed or melted coconut oil) instead of butter and unsweetened almond milk or oat milk instead of dairy milk in the batter and glaze. I also tried using a mix of all-purpose and whole wheat flour (about a 50/50 split) and it worked well, though the bread was a bit denser. For a sweeter glaze, you can add a tiny bit more powdered sugar. For a tangier glaze, a splash of lemon juice is fantastic.
Baking Tips: Always use the middle rack of your oven for the most even heat distribution. If your oven tends to run hot, you might need to reduce the temperature slightly or shorten the baking time. A good rule of thumb is to start checking for doneness around the 50-minute mark. If the top is browning too quickly but the center isn’t done, loosely tent the loaf pan with aluminum foil. The toothpick test is your best friend here!
Glaze Variations: Don’t feel limited to just a vanilla glaze! For a chocolate lover, whisk in a tablespoon of unsweetened cocoa powder into your powdered sugar before adding liquid. A lemon glaze is also wonderful, using lemon juice as the liquid and perhaps adding a little lemon zest for extra punch. A maple glaze made with powdered sugar and pure maple syrup is another delicious option, especially for fall. Just remember to add liquid gradually to achieve the right consistency.
Storing and Reheating Tips
This zucchini bread is so delicious, it rarely lasts long in my house, but knowing how to store it properly ensures you can enjoy it for a few days. For the best freshness, it’s important to store it correctly.
Room Temperature: Once completely cool, you can store the bread at room temperature for about 2-3 days. I usually wrap it tightly in plastic wrap or place it in an airtight container. This keeps it from drying out. I find it’s best eaten within the first two days when it’s at its absolute peak of moistness.
Refrigerator Storage: If you live in a particularly warm or humid climate, or if you want it to last a bit longer (up to a week), storing it in the refrigerator is a good option. Wrap it very well in plastic wrap, and then place it in an airtight container. The texture might become slightly firmer in the fridge, but it will still be delicious.
Freezer Instructions: This bread freezes beautifully! Once completely cooled and glazed (or unglazed, if you prefer to glaze it after thawing), wrap it tightly in a layer of plastic wrap, followed by a layer of aluminum foil, or place it in a freezer-safe airtight container. It will keep well in the freezer for up to 2-3 months. To thaw, unwrap it and let it sit at room temperature for a few hours, or gently reheat it in a low oven. If unglazed, glaze it after thawing and letting it come to room temperature.
Glaze Timing Advice: I strongly recommend glazing the bread only when it’s completely cool. If you freeze the bread with the glaze on, the glaze can sometimes become a little sticky or uneven when thawed. It’s usually best to glaze it after it has thawed and come back to room temperature, or if it’s a room-temperature loaf, just before serving. If you plan to refrigerate it, the glaze should hold up fine.
Frequently Asked Questions
Final Thoughts
There you have it, my friend! This zucchini bread recipe is truly one of my all-time favorites. It’s a comforting, delicious, and surprisingly simple way to enjoy a homemade treat. It’s that perfect blend of wholesome goodness and pure indulgence that just makes life a little bit sweeter. The fact that it uses up extra zucchini is just a bonus! Whether you’re making it for a special occasion or just because, I promise it will be a hit. It’s the kind of recipe that becomes a staple, the one you’ll be asked to bring to every gathering. If you love this recipe, you might also enjoy my [link to another recipe, e.g., “Classic Banana Bread”] or my [link to another recipe, e.g., “Moist Chocolate Cake”]. They share that same spirit of simple, delicious baking. I truly hope you give this zucchini bread a try. I can’t wait to hear how yours turns out and what your favorite additions are! Happy baking!
Easy Fruit Pizza
Ingredients
Method
- Make the Crust: In a large bowl, mix the softened butter, granulated sugar, egg, and vanilla extract until well combined and creamy. (An electric mixer works best, but you can mix with a spoon if butter is very soft or slightly melted). Add the flour, baking powder, and salt. Mix until just combined to form a soft dough. Chill the dough in the refrigerator for at least 30 minutes.
- Bake the Crust: Preheat your oven to 350°F (175°C). Line a large round baking stone or a 12-inch pizza pan with parchment paper. Roll the chilled dough out onto the prepared surface into a 1/4 to 1/2-inch thick layer, leaving a small border around the edge. Bake for 20-25 minutes, or until the edges are lightly golden. The center should be slightly soft. Let the cookie crust cool completely on a wire rack.
- Make the Cream Cheese Frosting: While the crust cools, using an electric mixer, combine the softened cream cheese, softened butter, powdered sugar, and vanilla extract until smooth, light, and creamy. Spread this frosting evenly over the cooled cookie crust. Chill the frosted crust in the refrigerator for at least 30 minutes to allow the frosting to firm up.
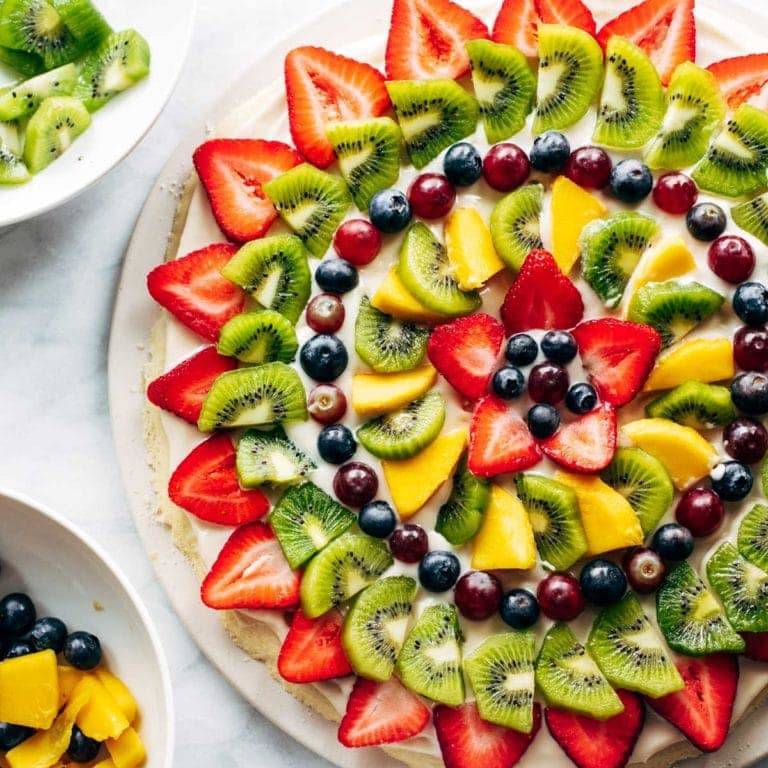
- Assemble the Fruit Pizza: Arrange the sliced strawberries, kiwis, mango, blueberries, and halved grapes decoratively over the chilled cream cheese frosting. Get creative with your design! Serve immediately or keep chilled until ready to serve.