Easy Chocolate Truffle Delights Homemade
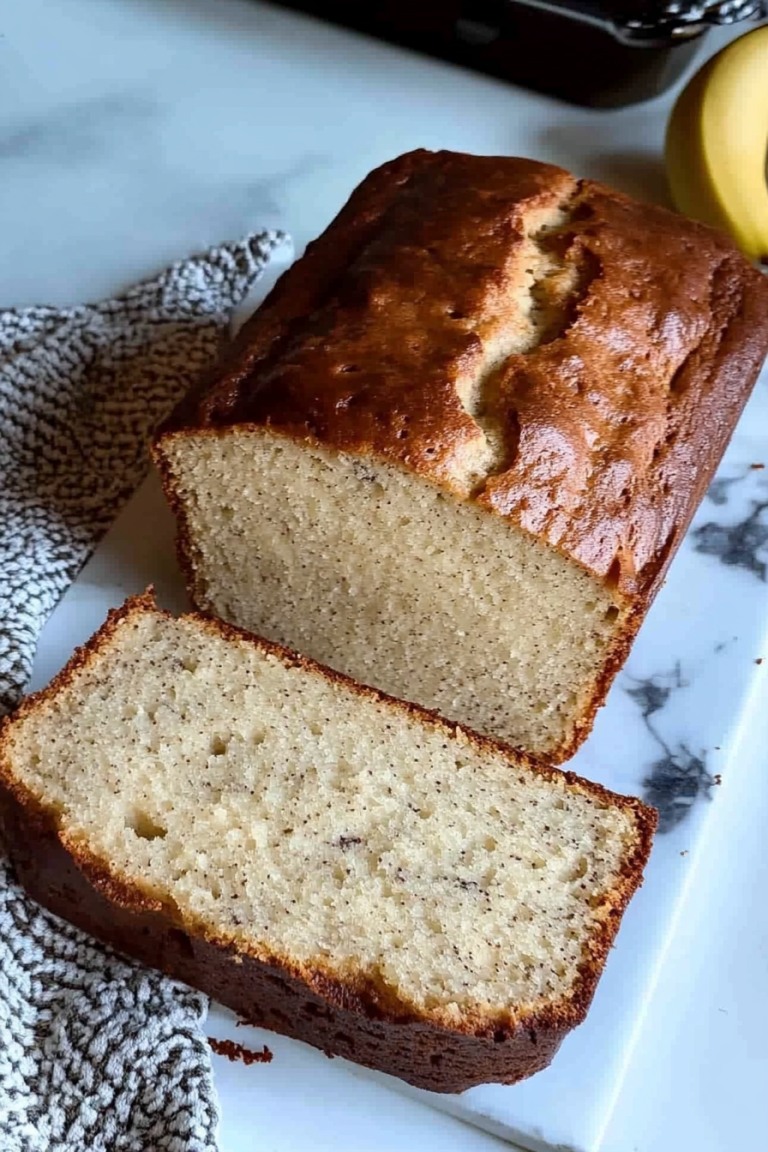
You know those recipes that just feel like a warm hug? The ones you come back to again and again, even when you know you probably shouldn’t be having a third slice? Well, this chocolate zucchini bread is *that* recipe for me. It’s the kind of thing my mom used to make when I was a kid, and the smell would just fill our whole house, making us all gather in the kitchen, practically vibrating with anticipation. It’s so ridiculously moist and fudgy, you’d never guess the secret ingredient hiding inside. And honestly, it’s so easy, I often whip it up on a Tuesday night when the sweet craving hits hard and I don’t have the patience to bake a whole cake. If you love a good quick bread, but you’re looking for something a little more… extra, then you’ve found your match. Forget your average banana bread; this chocolate zucchini bread is about to become your new obsession.
What is chocolate Zucchini bread?
So, what exactly *is* this magical creation? At its heart, it’s a tender, moist quick bread loaded with cocoa powder and chocolate chips, with grated zucchini secretly mixed into the batter. Now, don’t let the “zucchini” part scare you! You can’t taste it, I promise. The zucchini’s job is purely to add an incredible amount of moisture and a super soft texture, making it far superior to any dry, crumbly baked good. Think of it as your favorite chocolate muffin’s more sophisticated, grown-up cousin who also happens to be incredibly health-conscious (well, almost!). The “chocolate” part comes from good quality cocoa powder and plenty of melty chocolate chips that create little pockets of pure bliss throughout the loaf. It’s essentially a fudgy chocolate cake disguised as bread, and who can argue with that?
Why you’ll love this recipe?
Honestly, where do I even begin with why this recipe is a total winner? First off, the FLAVOR. It’s intensely chocolatey, rich, and perfectly sweet without being cloying. The chocolate chips melt into gooey little pockets, and the cocoa powder gives it that deep, dark chocolate taste that just satisfies your soul. It’s a symphony of chocolatey goodness! Then there’s the TEXTURE. This is where the zucchini truly shines. It bakes up incredibly moist and tender. I’ve made this with almond milk and it actually made it even creamier! It’s never dry or dense; it’s always just… perfect. And the SIMPLICITY! Seriously, if you can stir things together in a bowl, you can make this. It’s a one-bowl wonder for the dry ingredients, and then you just mix in the wet. No fancy equipment needed, no complicated steps. It’s a lifesaver on busy nights when you need a homemade treat without all the fuss. Plus, it’s surprisingly COST-EFFECTIVE! Zucchini is usually pretty affordable, and the other ingredients are pantry staples for most bakers. Finally, its VERSATILITY is unmatched. I love it plain, but it’s also fantastic with a smear of cream cheese frosting, a drizzle of ganache, or even just a dusting of powdered sugar. It’s perfect for a quick breakfast on the go, a delightful afternoon snack, or even a sneaky dessert when you’re craving something sweet but don’t want to bake a whole cake. It’s one of those recipes that makes everyone happy, from picky kids to discerning adults.
How do I make Zucchini bread?
Quick Overview
This recipe is all about bringing together simple, wholesome ingredients to create something truly special. We’ll start by whisking together our dry ingredients, then combine the wet, and finally bring it all together with grated zucchini and plenty of chocolatey goodness. The key is not to overmix, which keeps the bread wonderfully tender. It bakes up into a gloriously moist, deeply chocolatey loaf that’s perfect for sharing (or not!). You’ll be amazed at how quickly this comes together, making it an ideal treat even on the busiest of days.
Ingredients
For the Main Batter:
2 cups all-purpose flour
3/4 cup unsweetened cocoa powder (I love a good Dutch-process for deeper flavor!)
1 1/2 teaspoons baking soda
1/2 teaspoon baking powder
1/2 teaspoon salt
1 3/4 cups granulated sugar (you can go down to 1 1/2 cups if you prefer it less sweet, but I love the sweetness with the chocolate)
2 large eggs, at room temperature
1 cup buttermilk, at room temperature (if you don’t have buttermilk, you can make your own by adding 1 tablespoon of lemon juice or white vinegar to 1 cup of milk and letting it sit for 5-10 minutes)
1/2 cup vegetable oil (or a neutral-flavored oil like canola)
1 teaspoon vanilla extract
2 cups grated zucchini (from about 2 medium zucchinis), squeezed dry
1 cup chocolate chips (I use a mix of semi-sweet and dark chocolate chips for the best flavor)
For the Filling:
(This is optional, but adds another layer of chocolatey heaven!)
1/2 cup chocolate chips
2 tablespoons unsweetened cocoa powder
1/4 cup granulated sugar
For the Glaze:
1 cup powdered sugar, sifted
2-3 tablespoons milk (or buttermilk for a little tang)
1/2 teaspoon vanilla extract
A pinch of salt
Step-by-Step Instructions
Step 1: Preheat & Prep Pan
First things first, get your oven preheated to 350°F (175°C). I always grease and flour a 9×5 inch loaf pan really well, or you can line it with parchment paper for super easy removal. This step is crucial to prevent sticking, and trust me, you don’t want to be trying to salvage a beautiful loaf from a burnt pan!
Step 2: Mix Dry Ingredients
In a large bowl, whisk together the flour, cocoa powder, baking soda, baking powder, salt, and granulated sugar. Give it a good whisk to make sure everything is evenly distributed and there are no clumps of cocoa. This ensures a consistent texture and flavor throughout the bread.
Step 3: Mix Wet Ingredients
In a separate medium bowl, whisk together the eggs, buttermilk, oil, and vanilla extract until well combined. The buttermilk really helps with that tender crumb, so don’t skip it if you can help it!
Step 4: Combine
Pour the wet ingredients into the bowl with the dry ingredients. Stir gently with a spatula or wooden spoon until *just* combined. It’s really important not to overmix here. A few streaks of flour are perfectly fine; they’ll disappear as you add the zucchini. Overmixing develops the gluten too much, which can make your bread tough.
Step 5: Prepare Filling
If you’re doing the optional filling, just grab a small bowl and mix together the chocolate chips, cocoa powder, and sugar. This creates a concentrated chocolate layer that’s just divine.
Step 6: Layer & Swirl
Gently fold in the grated, squeezed-dry zucchini and the 1 cup of chocolate chips into the batter. Now, here’s where the magic happens. Pour about half of the batter into your prepared loaf pan. Sprinkle the filling mixture evenly over the batter. Then, pour the remaining batter on top, making sure to cover the filling. If you want a swirl effect, you can gently run a knife or skewer through the batter a few times, but don’t overdo it.
Step 7: Bake
Bake for 55-70 minutes, or until a wooden skewer or toothpick inserted into the center comes out clean (or with a few moist crumbs, but no wet batter). Baking times can vary depending on your oven, so start checking around the 55-minute mark. If the top is browning too quickly, you can loosely tent it with foil.
Step 8: Cool & Glaze
Let the bread cool in the pan for about 15-20 minutes before inverting it onto a wire rack to cool completely. This is the hardest part – waiting! Once it’s totally cool, you can whip up the glaze. Whisk together the powdered sugar, milk, vanilla, and salt until you have a smooth, pourable glaze. Drizzle it over the top of the cooled bread and let it set. For the glaze, I usually start with 2 tablespoons of milk and add more a teaspoon at a time until I get the consistency I like – thick enough to coat but not so thin that it all runs off.
Step 9: Slice & Serve
Once the glaze has set a little, slice this beauty up and enjoy! It’s best when served at room temperature. The texture is just out of this world.
What to Serve It With
This chocolate zucchini bread is so delicious on its own, but it also plays really nicely with a few other things, depending on the occasion. For a simple BREAKFAST, I love it toasted with a thin schmear of butter or cream cheese. A hot cup of coffee is its perfect companion. For a more elaborate BRUNCH, you could serve a slice alongside some fresh berries or a dollop of whipped cream. It feels a bit more special that way. As a DESSERT, it’s amazing! You could even warm up a slice slightly and serve it with a scoop of vanilla bean ice cream – pure indulgence. And for those COZY SNACKS, when you just need a little something comforting, a thick slice of this bread with a glass of cold milk is pure bliss. My kids ask for this all the time, especially for after-school snacks, and it always disappears in minutes at my house!
Top Tips for Perfecting Your Chocolate Zucchini Bread
After making this recipe countless times, I’ve picked up a few tricks that really make a difference. First, ZUCCHINI PREP is key. You *must* grate your zucchini and then squeeze out as much excess moisture as possible using a cheesecloth or a clean kitchen towel. This is non-negotiable for achieving that moist, tender crumb without making the bread gummy. Just wrap the grated zucchini in the towel and wring it out like you mean it! For MIXING ADVICE, remember my earlier warning about overmixing. It’s better to have a few tiny flour streaks than a tough loaf. Stir until just combined, and the zucchini will do the rest. When it comes to SWIRL CUSTOMIZATION, if you’re adding the optional filling, a gentle swirl with a knife is great for visual appeal, but don’t go crazy – you want distinct layers of chocolatey goodness, not a muddy mess. For INGREDIENT SWAPS, I’ve experimented a lot! You can use whole wheat flour, but you might need a tiny bit more liquid. Using a mix of semi-sweet and dark chocolate chips is my go-to, but feel free to use milk chocolate if that’s your jam. For BAKING TIPS, keep an eye on your oven. Ovens can be fickle! Every oven bakes a little differently, so the time range is just a guideline. Use a skewer test to be sure. If the top is getting too dark, tent it with foil. And for GLAZE VARIATIONS, if you’re not a fan of a sweet glaze, you could dust it with powdered sugar once it’s cooled, or even skip the glaze altogether. A drizzle of melted chocolate or a simple cream cheese frosting is also delicious!
Storing and Reheating Tips
This chocolate zucchini bread is wonderfully forgiving when it comes to storage. At ROOM TEMPERATURE, it will stay fresh in an airtight container for about 3-4 days. Make sure it’s completely cooled before storing, though, otherwise, you’ll get condensation and a soggy bottom. If you want to keep it longer, REFRIGERATOR STORAGE is your best bet. Wrap it tightly in plastic wrap or place it in an airtight container. It should last well for up to a week, and sometimes even longer! The texture might firm up slightly in the fridge, but it’s still delicious. If you want to FREEZER INSTRUCTIONS, this bread freezes beautifully. Wrap the cooled loaf (or individual slices) tightly in plastic wrap, then in a layer of foil or a freezer bag. It can be stored in the freezer for up to 2-3 months. To thaw, let it come to room temperature on the counter, or gently reheat slices in the oven or toaster oven. For the GLAZE TIMING ADVICE, I always wait until the bread is completely cool before adding the glaze. If you add it to a warm loaf, it will just melt off and be a sticky mess. If you’re freezing it with glaze, the glaze might get a little soft when thawing, but it usually firms back up. Sometimes, I prefer to freeze the bread plain and glaze it *after* thawing for the best appearance.
Frequently Asked Questions
Final Thoughts
This chocolate zucchini bread really is a special recipe. It’s proof that sometimes the most unexpected ingredients can lead to the most delicious results. It’s moist, it’s rich, it’s packed with chocolate, and it’s incredibly easy to make. It’s the kind of recipe that makes you feel like a baking superstar, even if you’re just throwing things into a bowl. It’s perfect for when you need a little bit of comfort and a lot of chocolate. If you enjoyed this recipe and love a good quick bread, you might also want to check out my Lemon Blueberry Bread or my Classic Banana Bread for more cozy baking inspiration!
I can’t wait to hear what you think of this chocolate zucchini bread! If you make it, please leave a comment below and tell me how it turned out. And if you share a picture on social media, be sure to tag me! Happy baking!

homemade chocolate truffles
Ingredients
Method
- Place finely chopped semi-sweet chocolate in a medium heat-proof mixing bowl.
- Heat heavy cream in a small saucepan over medium-high heat. Bring just to a simmer, do not boil.
- Pour the hot cream over the chocolate in the bowl. Let rest for 5 minutes to allow the chocolate to melt.
- Add vanilla extract and stir the mixture until the chocolate is completely melted and the ganache is smooth.
- Chill the mixture in the refrigerator for 2 to 3 hours, or until it has firmed up enough to be easily scooped and rolled.
- Scoop the mixture out, about 1 tablespoon at a time (a 1 tablespoon cookie scoop works well), and transfer to a 13 by 9-inch baking dish lined with parchment paper.
- Roll the scooped portions into smooth balls. Wearing food-safe gloves can help reduce sticking.
- Place your coating of choice (cocoa powder, shredded coconut, sprinkles, chopped nuts, etc.) in a small bowl. Roll each truffle through the coating until evenly covered. Return to the parchment-lined pan.
- Keep truffles stored in the refrigerator for up to 2 weeks (or until the cream's expiration date, whichever comes first). For an even softer texture, let them rest at room temperature for about 20 minutes before serving.