Oh, hi there! Come on in, grab a mug of coffee – or maybe some tea? I was just thinking about this recipe, and honestly, it’s the one I pull out more than any other, especially when I need a little something sweet but don’t have hours to spend in the kitchen. You know those days, right? The ones where you’re juggling work, kids, errands, and suddenly, you get this craving for something warm, comforting, and utterly delicious. That’s precisely when this incredible zucchini bread comes to the rescue. It’s not just any zucchini bread, mind you. This one is unbelievably moist, bursting with spice, and has this perfect, tender crumb that just melts in your mouth. If you’ve ever tried other zucchini breads that turned out a bit dry or bland, prepare to be amazed. This is the kind of recipe that makes people ask for the secret ingredient, and spoiler alert: it’s just a little bit of love and a few key techniques that make all the difference. Honestly, it’s like sunshine in loaf form, and I can’t wait to share it with you.
What is Zucchini bread?
So, what exactly *is* this glorious loaf of happiness? At its heart, it’s a quick bread – meaning no yeast, no fuss, just a simple batter that bakes up beautifully. Think of it as the most comforting hug you can bake. The “zucchini” part, well, that’s the magic! Grated zucchini adds this incredible moisture and tenderness that you just can’t achieve with other ingredients. It disappears into the batter, so even picky eaters won’t know it’s there, but they’ll definitely notice how wonderfully moist and tender the bread is. The name itself, “Zucchini Bread,” is pretty straightforward, but what it represents is pure comfort and simple goodness. It’s the perfect way to use up those extra zucchini from the garden (or the grocery store when they’re on sale!). It’s essentially a vehicle for cinnamon, nutmeg, and a hint of sweetness, all held together by that magical zucchini. It’s less about the vegetable and more about the incredibly satisfying outcome.
Why you’ll love this recipe?
What are the reasons why I love zucchini bread?flavor is just out of this world. It’s perfectly spiced with cinnamon and a touch of nutmeg, giving it that warm, cozy aroma that fills the house the moment it starts baking. It’s sweet enough to satisfy a dessert craving but not so sweet that you feel guilty having a slice (or two!) for breakfast. And speaking of breakfast, this is *the* thing to have with your morning coffee. Then there’s the simplicity. I’m not exaggerating when I say this is ridiculously easy to make. You basically just mix the dry ingredients, mix the wet ingredients, combine them, and bake. No fancy techniques required! I’ve whipped this up on a busy Tuesday morning before work and had it cooling by the time I got home. It’s a lifesaver. And let’s talk about Cost-efficiency: What is the best way to measure cost-efficiency?. Flour, sugar, eggs, oil, spices – these are all pantry staples, and zucchini itself is usually quite affordable. This recipe gives you a big, impressive loaf for pennies on the dollar compared to buying a fancy bakery loaf. Lastly, its versatility is a huge plus. You can enjoy it plain, toasted with butter, or even topped with a cream cheese frosting. It’s a fantastic base for adding nuts or chocolate chips if you want to jazz it up, though I honestly love it just as it is. What I love most about this specific recipe, compared to others I’ve tried over the years, is that guaranteed moisture. I’ve tested it with different types of oil, and while vegetable oil is great, I’ve found that using a good quality canola oil or even a light olive oil really amplifies that tender crumb. Plus, I once accidentally used almond milk instead of regular milk in a similar recipe, and while it was good, this zucchini bread thrives on the richness of whole milk or even buttermilk!
How to Make My Favorite Zucchini Bread
Quick Overview
This recipe is all about ease and amazing results. In just a few simple steps, you’ll have a moist, tender, and perfectly spiced zucchini bread ready to impress. We’ll whisk together our dry ingredients, combine our wet ingredients separately, then gently mix them together. The grated zucchini is the secret to its incredible texture. Once it’s in the pan, it bakes up beautifully, developing a gorgeous golden-brown crust. It’s foolproof, I promise!
Ingredients
For the Main Batter:
2 cups all-purpose flour (I love King Arthur’s for a consistent bake)
1 teaspoon baking soda (make sure it’s fresh!)
1/2 teaspoon baking powder (this little duo gives it the best lift)
1 teaspoon ground cinnamon (you can never have too much!)
1/2 teaspoon ground nutmeg (just a whisper of warmth)
1/4 teaspoon salt (enhances all those lovely flavors)
1 1/2 cups granulated sugar (you can reduce this slightly if you prefer, but I find this is the perfect balance)
2 large eggs, at room temperature (this helps them incorporate smoothly)
1 cup vegetable oil or canola oil (for ultimate moisture; I’ve even used melted coconut oil in a pinch and it was divine!)
1/4 cup milk (whole milk or buttermilk for extra richness; tested this with almond milk once and it was surprisingly creamy too!)
1 teaspoon vanilla extract (the classic comfort flavor)
For the Zucchini Goodness:
2 cups finely grated zucchini (about 2 medium zucchini; squeeze out excess moisture – this is key!)
For the Optional Glaze (Trust me, you want this!):
1 cup powdered sugar
2-3 tablespoons milk (start with 2 and add more until you reach desired consistency)
1/2 teaspoon vanilla extract (optional, but lovely)
Step-by-Step Instructions
Step 1: Preheat & Prep Pan
First things first, get your oven preheating to 350 degrees Fahrenheit (175 degrees Celsius). This is crucial for an even bake. While that’s heating up, grab a standard 9×5 inch loaf pan. I like to grease it really well with butter or baking spray, and then dust it with a little flour. This guarantees your beautiful loaf won’t stick. You can also line it with parchment paper for extra insurance, leaving some overhang on the sides to help you lift it out later – super helpful!
Step 2: Mix Dry Ingredients
In a large mixing bowl, whisk together the all-purpose flour, baking soda, baking powder, cinnamon, nutmeg, and salt. Give it a good whisk until everything is really well combined and there are no clumps of baking soda or powder. This ensures even leavening and flavor distribution throughout your bread. This step might seem simple, but it’s a little trick I learned after a few dense loaves: make sure your leavening agents are evenly dispersed!
Step 3: Mix Wet Ingredients
In a separate medium bowl, whisk together the granulated sugar, eggs, vegetable oil, milk, and vanilla extract. Whisk until everything is smooth and well incorporated. You’ll notice the mixture will look slightly thick and glossy. This combination of wet ingredients is what makes the bread so tender and moist. Make sure your eggs are at room temperature for the best emulsion.
Step 4: Combine
Now, pour the wet ingredients into the bowl with the dry ingredients. Using a spatula or a wooden spoon, gently fold the ingredients together. Mix *just* until no dry streaks of flour remain. Seriously, don’t overmix! Overmixing develops the gluten in the flour, which can lead to a tough, dense bread. A few small lumps are perfectly fine. Remember, we want tender, not tough!
Step 5: Prepare Filling (aka The Zucchini!)
This is the most important part for moisture! Take your finely grated zucchini and, I cannot stress this enough, squeeze out as much excess liquid as possible. You can do this by wrapping it in a clean kitchen towel or cheesecloth and wringing it out, or just by squeezing it firmly with your hands over the sink. You want to remove about half the liquid. Then, gently fold the squeezed zucchini into the batter until it’s just combined. Don’t go crazy mixing it in; just a few folds will do.
Step 6: Layer & Swirl (Optional, but fun!)
Pour the batter into your prepared loaf pan. Smooth the top gently with your spatula. If you’re feeling fancy, you can now add some extra cinnamon and sugar on top before baking, or even swirl in a tablespoon or two of melted chocolate or a dollop of jam for a little surprise inside. But honestly, the plain version is heavenly.
Step 7: Bake
Pop that loaf pan into your preheated oven. Bake for about 50-65 minutes. Now, oven temperatures can vary wildly, so start checking around the 50-minute mark. The best way to tell if it’s done is to insert a toothpick into the center of the loaf. If it comes out clean, it’s ready! If it has moist crumbs, give it a few more minutes and check again. If the top is browning too quickly, you can loosely tent it with aluminum foil.
Step 8: Cool & Glaze
Once it’s out of the oven, let the zucchini bread cool in the loaf pan for about 10-15 minutes. This allows it to firm up a bit. Then, carefully invert the pan onto a wire rack to remove the loaf. Let it cool completely on the wire rack. I know it’s tempting to slice into it right away, but trust me, waiting until it’s fully cooled makes it easier to slice and allows the flavors to meld. While it’s cooling, whisk together the powdered sugar, milk, and vanilla for the glaze. You want a thick, but pourable consistency. Drizzle it over the cooled loaf. The glaze adds a lovely sweetness and a professional touch!
Step 9: Slice & Serve
Once the glaze has set a little (or if you skipped the glaze!), slice your beautiful zucchini bread. I like to use a serrated knife for a clean cut. Serve warm or at room temperature. It’s truly perfect any way you slice it!
What to Serve It With
This zucchini bread is so versatile, it’s practically its own food group! For a simple breakfast, a slice toasted with a smear of butter is pure bliss. Pair it with a steaming mug of your favorite coffee or a glass of fresh orange juice. It’s quick, satisfying, and the perfect way to start your day. For a more elegant brunch spread, cut thicker slices and arrange them on a tiered stand. It pairs wonderfully with fruit salads, quiches, or even a side of scrambled eggs. A mimosa or a fancy iced tea would be lovely beverages to accompany it. When I serve it as dessert, I love to warm it up slightly and perhaps add a tiny scoop of vanilla bean ice cream on the side – talk about decadent! It’s also wonderful on its own after dinner when you’re just craving something sweet. And for those cozy snacks, whether it’s an afternoon pick-me-up or a late-night treat, a thick slice with a glass of cold milk is simply unbeatable. My kids always ask for seconds when it’s a “snack emergency,” and this bread always saves the day.
Top Tips for Perfecting Your Zucchini Bread
I’ve made this zucchini bread more times than I can count, and along the way, I’ve picked up a few tricks that make a world of difference. For zucchini prep, that squeezing step is non-negotiable! If you skip it, your bread can end up heavy and gummy. I’ve found that grating the zucchini on the medium-sized holes of a box grater works best – not too fine, not too coarse. Fresh zucchini is always ideal, but if you’re using frozen, make sure it’s thoroughly thawed and squeezed dry. When it comes to mixing advice, remember my mantra: don’t overmix! Seriously, once the wet and dry ingredients are *just* combined, stop. A few tiny lumps are way better than a tough loaf. For the swirl customization, if you want to add chocolate chips or nuts, gently fold them into the batter *after* you’ve added the zucchini, but before pouring into the pan. For a marbled effect with something like cinnamon sugar or cocoa powder, sprinkle it over the batter in the pan and use a knife or skewer to swirl it gently. For ingredient swaps, if you’re out of eggs, you can try a flax egg (1 tablespoon flaxseed meal + 3 tablespoons water, let sit for 5 minutes) per egg, but the texture might be slightly different. If you want to make it dairy-free, you can use a non-dairy milk and ensure your oil is suitable. For baking tips, always use the middle rack of your oven for the most even heat distribution. If your oven runs hot, a few degrees lower or a slightly shorter baking time might be necessary. Don’t be afraid to test for doneness multiple times towards the end of baking. And for glaze variations, if you prefer a lighter touch, a simple dusting of powdered sugar through a sieve is lovely. You can also add a tiny bit of lemon zest to the glaze for a brighter flavor, or use a different extract like almond or orange. Experimentation is half the fun!
Storing and Reheating Tips
This zucchini bread is fantastic for making ahead, and it stays wonderfully moist. For room temperature storage, once completely cooled, I like to wrap the loaf tightly in plastic wrap or place it in an airtight container. It should stay fresh and delicious for about 2-3 days at room temperature, especially if your kitchen isn’t too warm. If you live in a humid climate or it’s a warmer time of year, you might want to opt for refrigerator storage. For refrigerator storage, wrap it well in plastic wrap, then foil, or use an airtight container. It can last for up to a week in the fridge. When you want a slice, it’s delicious straight from the fridge, or you can give it a quick zap in the microwave for about 10-15 seconds to warm it up. For freezer instructions, this bread freezes beautifully, which is a lifesaver for me! Wrap the cooled loaf (or individual slices) tightly in plastic wrap, then in a layer of aluminum foil, and finally, place it in a freezer-safe bag or container. It will keep its quality for up to 3 months. To thaw, simply unwrap it and let it come to room temperature, or thaw overnight in the refrigerator. If you froze it with the glaze, it’s best to re-glaze or dust with powdered sugar after thawing to refresh its appearance. For glaze timing advice, I always recommend glazing *after* the bread has completely cooled. If you glaze a warm loaf, the glaze will melt and run off, making a sticky mess. If you plan to freeze it with glaze, make sure it’s fully set before wrapping.
Frequently Asked Questions
Final Thoughts
So there you have it – my absolute favorite zucchini bread recipe! It’s the kind of recipe that just makes life a little bit sweeter and a whole lot easier. It’s proof that simple ingredients, combined with a little bit of know-how, can create something truly magical. It’s perfect for when you need a quick breakfast, a satisfying snack, or a comforting dessert. If you’re a fan of cozy, spiced baked goods, you absolutely have to give this a try. And if you’re new to baking with zucchini, this is the perfect recipe to start with because it’s so forgiving and delivers incredible results every time. For those of you who love this, you might also enjoy my moist banana bread recipe or my easy apple crumble – they have that same comforting vibe! I really can’t wait to hear what you think of this zucchini bread. Please, please leave a comment below and let me know how yours turned out, or if you tried any fun variations. Happy baking, everyone!
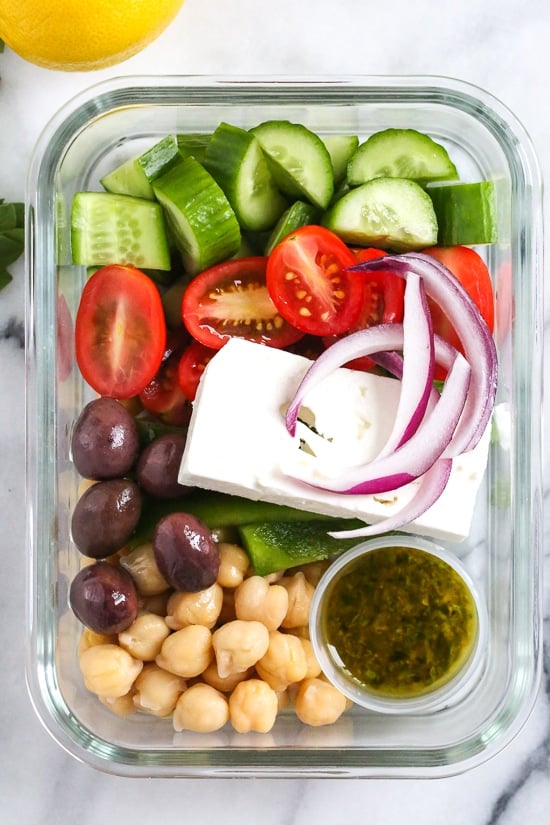
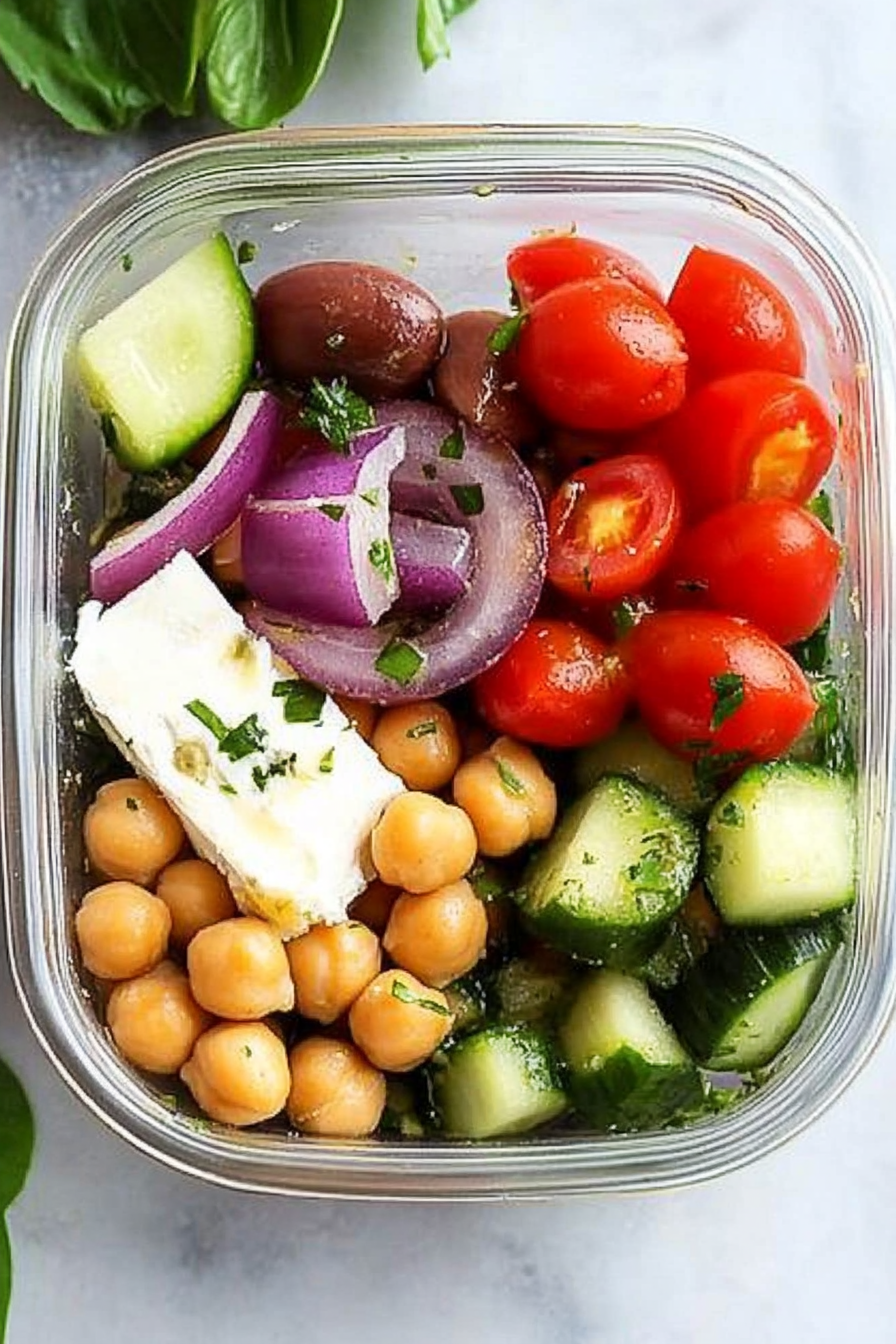
mediterranean chickpea salad
Ingredients
Method
- In each of 4 (4-cup) containers or bowls, arrange 0.33 cup chickpeas, 0.5 cup cucumber, 0.25 green bell pepper, 0.33 cup tomato, olives, and red onion. Top each with sliced Feta cheese.
- In a small bowl, whisk together the fresh lemon juice, extra virgin olive oil, minced fresh oregano, kosher salt, and freshly ground black pepper until well combined.
- Serve each prepared salad with about 1.5 tablespoons of the lemon-oregano dressing. For meal prep, store the dressing separately and add just before eating.