Easy Pinwheel Lasagna Recipe
You know that feeling when you find a recipe that’s secretly a lifesaver on busy mornings or those lazy weekend afternoons? That’s exactly how I feel about this zucchini banana bread. It’s like a warm hug from the oven that fills the whole house with the scent of cinnamon and ripe bananas. I’ve made this more times than I can count, tweaking it here and there, and each time it gets better. My kids ask for this all the time—sometimes I joke that it’s our family’s secret weapon for sneaking vegetables into their diet! The best part? It’s so easy to throw together with ingredients I always keep on hand, making it perfect for those days when I need something comforting but don’t want to spend hours in the kitchen. Plus, I tested this with almond milk, and honestly, it made the bread even creamier. Trust me on this one: if you love moist, flavorful baked goods that the whole family adores, you’re going to love this zucchini banana bread. It’s a little bit indulgent, a little bit healthy, and utterly delicious.
What is Zucchini Banana Bread?
This zucchini banana bread is a cozy, moist loaf that combines the sweetness of ripe bananas with the subtle, fresh flavor of zucchini. Think of it as a sneaky way to get your veggies in without anyone noticing — because, honestly, the zucchini melts into the batter, adding tons of moisture and a tender crumb. The name might throw you off at first glance, but it’s really just a simple, homey baked good that’s perfect for breakfast, brunch, or a cozy afternoon treat. Essentially, it’s a hybrid between banana bread and zucchini bread — a comforting, wholesome loaf that tastes like a celebration of ripe, sweet fruits and fresh garden produce. I love that it’s versatile and forgiving — you can add walnuts, chocolate chips, or even blueberries depending on what you have in the kitchen. It’s a recipe I always keep in my back pocket, especially when I want to make something that feels special but actually takes no time or effort.
Why you’ll love this recipe?
What I love most about this zucchini banana bread is how forgiving and adaptable it is. It’s a real hit in my house because of the incredible flavor — the bananas add a natural sweetness that makes it so satisfying, while the zucchini keeps it insanely moist and tender. And let’s be honest, there’s something so comforting about the smell of baking bread that fills your entire home. Plus, it’s super simple to make. I’ve made this countless times and never had a failure — in fact, I’ve tested it with different flours, and it’s always a winner. Budget-wise, it’s fantastic because the ingredients are staples: bananas in the freezer, zucchini from last week’s grocery haul, and pantry basics like flour and sugar. The versatility of this loaf is another reason I keep making it — I love mixing in extras like nuts or chocolate chips when I want to feel a little indulgent. And emergency snack? It’s perfect for that, too. Honestly, I think everyone should have a recipe like this—it’s wholesome, it’s cozy, and it makes the house smell like love.
How do you make Zucchini Banana Bread?
Quick Overview
This zucchini banana bread is surprisingly easy to whip up, even on busy mornings. You’ll start by mashing ripe bananas and grating fresh zucchini, then mixing everything with a handful of pantry staples. The batter comes together quickly, and I usually throw some chopped nuts or chocolate chips in for extra fun. Pour it into a loaf pan, bake until golden and a toothpick comes out clean, and you’re basically done. Once out of the oven, I love to cool it just enough before glazing, which gives it that irresistible shine and a little extra sweetness. It’s the kind of recipe that you can make in one bowl, with minimal fuss, and still end up with something that looks like it’s from a bakery. The best part? It freezes beautifully, so you can enjoy slices anytime you need a cozy pick-me-up.
Ingredients
For the Main Batter:
– 3 ripe bananas, mashed (make sure they’re super ripe for maximum sweetness)
– 1 cup grated zucchini (squeeze out excess moisture to prevent sogginess)
– 2 cups all-purpose flour (or a blend of whole wheat for a heartier touch)
– 1 teaspoon baking soda
– 1 teaspoon baking powder
– ½ teaspoon salt
– 1 teaspoon ground cinnamon
– 1 cup granulated sugar (or coconut sugar for a little extra warmth)
– ½ cup vegetable oil or melted butter
– 2 large eggs
– 1 teaspoon vanilla extract
For the Filling:
– Optional: ½ cup chopped walnuts or chocolate chips (add in last, gently folded)
For the Glaze:
– ½ cup powdered sugar
– 1-2 teaspoons lemon juice or milk
– Optional: a few drops vanilla or almond extract for extra flavor
Step-by-Step Instructions
Step 1: Preheat & Prep Pan
Set your oven to 350°F (175°C). Grease a standard loaf pan with butter or line it with parchment paper—it makes life easier when you’re slicing later. I always do this first so I don’t forget once I get into mixing — because, honestly, the smell of baking just makes me want to get everything ready ASAP.
Step 2: Mix Dry Ingredients
In a medium bowl, whisk together the flour, baking soda, baking powder, salt, and cinnamon. Combining these first ensures everything bakes evenly and avoids clumps. I’ve learned not to skip this step because it helps distribute the leaveners properly, giving you that perfect rise and tender crumb.
Step 3: Mix Wet Ingredients
In a large bowl, mash the bananas well until smooth — I use a fork or potato masher. Add the grated zucchini and mix until combined. Then stir in the sugar, oil, eggs, and vanilla. I find it’s easiest to use a whisk or hand mixer here — just make sure everything looks smooth and velvety. Nothing worse than lumpy batter!
Step 4: Combine
Pour the dry ingredients into the wet, and gently fold everything together using a spatula. Don’t overmix — just until the flour disappears. Overmixing can make the bread dense, and nobody wants that. If you’re adding nuts or chocolate chips, fold them in now.
Step 5: Prepare Filling
If you’re using nuts or chips, sprinkle them on top or fold them into the batter. For a swirled effect, you can dollop some extra mashed banana or chocolate in layers and give it a gentle swirl before baking.
Step 6: Layer & Swirl
Pour the batter into your prepared loaf pan. If you want to get fancy, add dollops of extra banana or a spoonful of Nutella, then swirl it with a skewer or toothpick for a marbled look. I love doing this because it makes the bread look like it’s got a little surprise inside.
Step 7: Bake
Pop it into the oven and bake for about 50-60 minutes. Every oven is different, so start checking around 50 minutes — insert a toothpick in the center; if it comes out clean, it’s ready. The top should be golden and slightly crackly. The smell alone is enough to make everyone come running!
Step 8: Cool & Glaze
Let the bread cool in the pan for about 15 minutes, then transfer to a wire rack. Once cooled just a bit, mix up your glaze — a simple powdered sugar and lemon juice combo is my favorite. Drizzle it on while the bread is still warm so it soaks in a little, creating that shiny, irresistible topping.
Step 9: Slice & Serve
Use a serrated knife for neat slices. I like to serve this slightly warm or at room temperature, with a pat of butter or a dollop of yogurt on the side. It’s perfect with coffee or tea and looks beautiful plated with just a few fresh berries or a sprig of mint. Honestly, it disappears faster than I can say “homemade bread.”
What to Serve It With
This zucchini banana bread is so cozy, I see it fitting perfectly in various moments of the day. For breakfast, I love to serve it with a hot cup of coffee or a glass of cold milk — especially if I’ve added in chocolate chips for a little extra treat. It’s honestly the kind of thing my kids ask for on weekend mornings, and I sometimes sneak in an extra banana or zucchini just to make it a little more wholesome. For brunch, I slice thick pieces and top with whipped cream or a smear of cream cheese, pairing it with fresh fruit and a pot of good tea. It’s also fabulous as a dessert — just add a dusting of powdered sugar or a drizzle of caramel. And on casual days, I slap a little butter on a warm slice for a quick snack with zero guilt. Over years of making this, I’ve found that it holds up beautifully in lunchboxes and freezer bags, making it my go-to snack when I’m craving something sweet but don’t want to turn on the oven.
Top Tips for Perfecting Your Zucchini Banana Bread
Honestly, I’ve learned a few tricks over the years that make all the difference. First, when grating zucchini, I always squeeze out the excess moisture with a clean dish towel — otherwise, the batter can get watery, and you risk a soggy loaf. Ripe bananas are key—they should be heavily speckled or even just slightly overripe for maximum flavor and sweetness. If you want to cut down on sugar, try swapping some of it with honey or maple syrup, but keep in mind it may slightly change the texture. When mixing, I avoid overworking the batter because that’s how you get dense bread; gentle folds are best. Want your swirls to look prettier? Use a toothpick to softly drag through layered dollops of batter, maintaining contrasting streaks. Feel free to experiment with insides — chopped walnuts give a lovely crunch, and mini chocolate chips boost that cozy, dessert-like vibe. Honestly, I learned all of this piecing it together over years of baking. Each tweak makes the recipe more forgiving and more delicious. Keep an eye on your oven, because baking times can vary, especially if your loaf pan is smaller or larger. And don’t skip the glaze — it really elevates the look and taste, making it feel a bit more special.
Storing and Reheating Tips
Once cooled, this bread is a breeze to store. For short-term, keep it covered in plastic wrap or foil at room temperature — it stays moist and fabulous for about 2-3 days. After that, I usually wrap individual slices in plastic and pop them into a sealed container or zip-top bag to keep them fresh longer. Your fridge is a good option if you want it to last a little more than a week — just be sure to eat it within 5 days for the best texture. If you’ve made a big batch, the freezer is your friend. Wrap the loaf tightly in plastic, then foil, and store for up to 3 months. To reheat, I recommend thawing at room temperature and reheating slices briefly in the microwave or oven—nothing beats the smell of warm bread. I usually glaze it just before serving — if I’ve frozen the bread, I add the glaze fresh, so it doesn’t soak in too much during storage. This preserves the shiny, gooey topping, which is half the reason I love this bread so much.
Frequently Asked Questions
Final Thoughts
This zucchini banana bread is one of those recipes I keep coming back to because it’s so forgiving and versatile. Every time I make it, I feel like I’m giving my family a little gift of warmth and nostalgia—plus, it’s practically foolproof. Whether I’m sneaking in extra zucchini or adding chocolate chips on a whim, it always turns out moist, flavorful, and comforting. I love that it makes my house smell amazing, and the best part? It’s so easy that even on the busiest mornings, I can whip up a batch with just a few ingredients. If you’re tired of the same old banana bread, give this a try—I think you’ll find it becomes a new favorite, too. Happy baking! I can’t wait to hear how yours turns out, so don’t forget to leave a comment below or share your favorite variations. Remember, food made with love always tastes better, and this bread is packed with plenty of it.
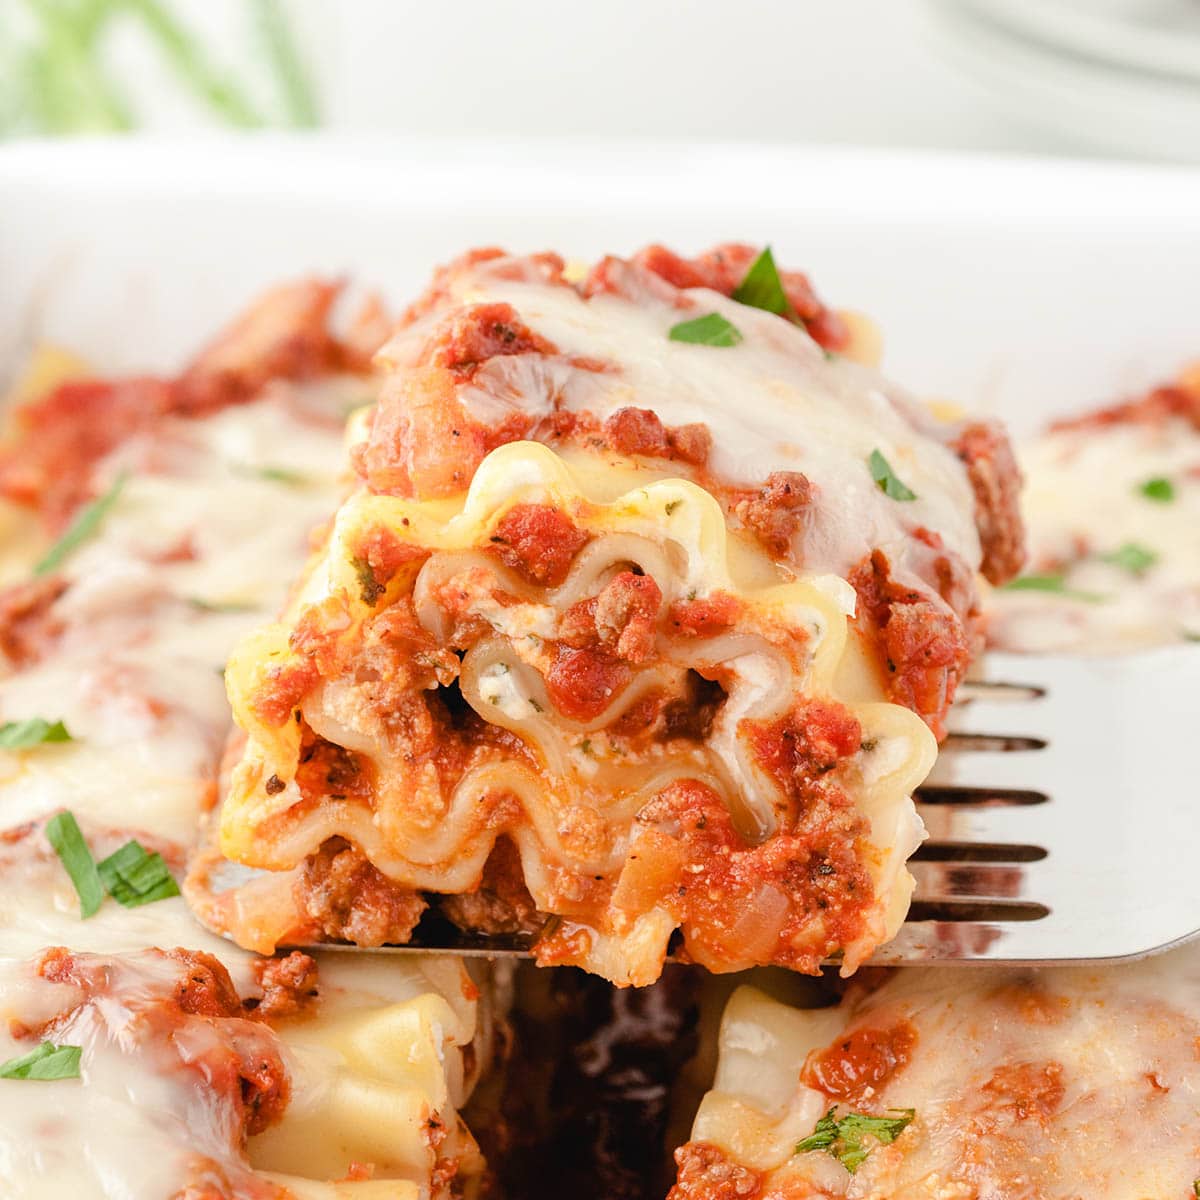
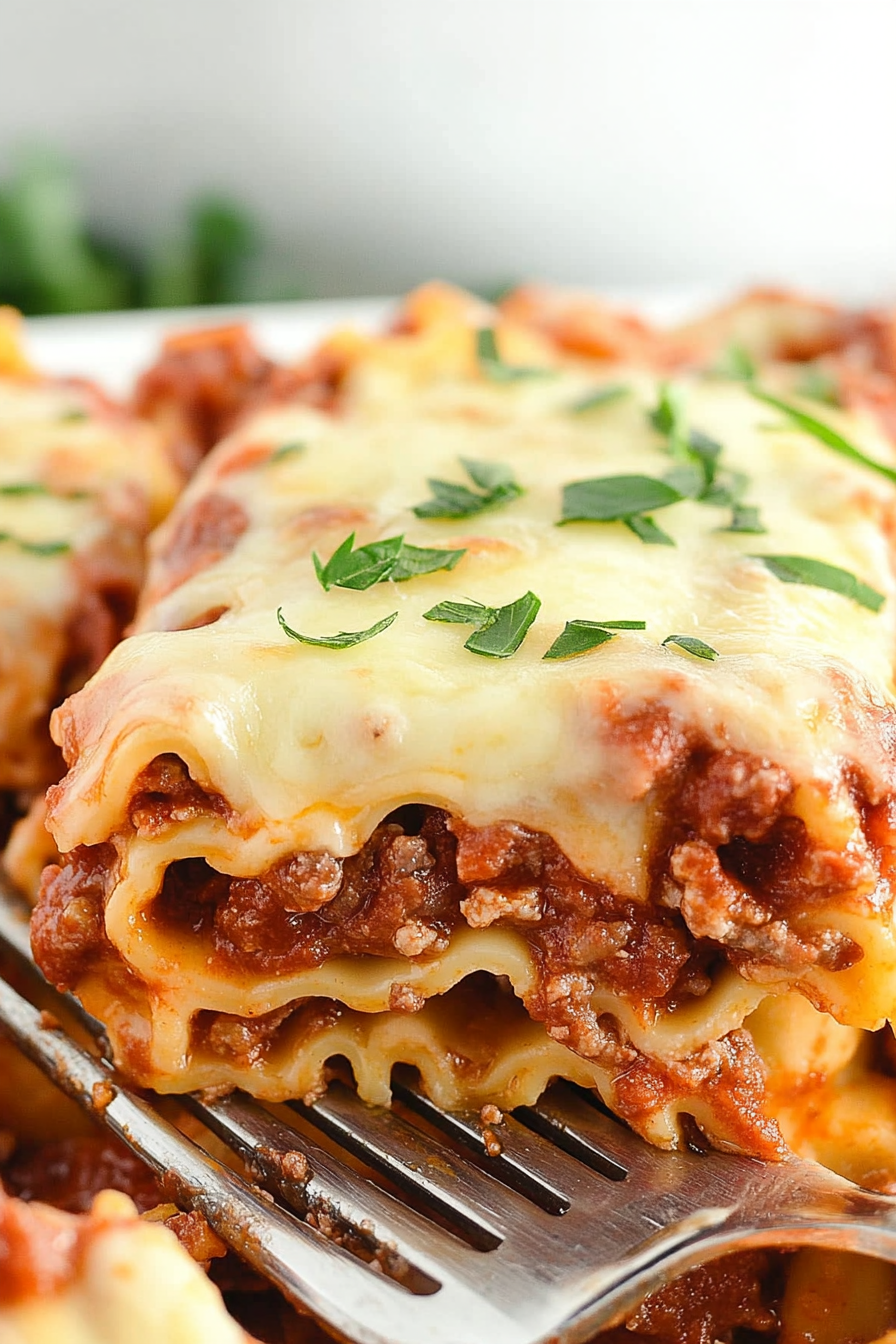
Lasagna Roll Ups
Ingredients
Method
- In a large pot cook noodles according to package directions. Once the noodles are soft and cooked, drain hot water. With noodles still in the pot, add cold water to the noodles to stop the cooking process and to keep noodles from sticking together.
- In a large deep sided skillet cook ground beef until no longer pink. Drain grease and return beef to skillet. Add onion, Italian seasonings, garlic salt, minced garlic, salt, and ground black pepper.
- Stir and let cook for 5-7 minutes, or until onions are soft and tender.
- Add marinara sauce to the meat mixture and stir well. Bring the sauce to a simmer. Cover with a lid and let simmer for 5 minutes then remove from the heat.
- In a separate large mixing bowl combine ricotta cheese, egg, Parmesan cheese, ¾ of the mozzarella cheese, and dried parsley flakes. Stir to combine.
- On a large baking sheet lay out 5 lasagna noodles. Spread 0.25 cup of ricotta filling on the lasagna noodle. Use a rubber spatula to spread mixture the entire length of the noodle. Add 3 tbsp meat sauce to each lasagna noodle on top of the ricotta mixture. Use a rubber spatula to spread the meat sauce the entire length of the noodle.
- Preheat the oven to 375 degrees and spray a 9x13 baking dish with cooking spray. Add 0.5 cup of meat sauce on the bottom of the baking dish and use the rubber spatula to spread evenly across the bottom of the dish.
- Gently roll each lasagna noodle from one end to the other, and place in the baking dish. Repeat the process with the remaining 5 noodles and place them in the baking dish.
- Top the rolled lasagna noodles with the remaining meat sauce. Add remaining mozzarella cheese to the top of each lasagna roll.
- Cover with tin foil and place in the oven. Cook at 375 degrees for 40 minutes. Remove tin foil and broil for 2-3 minutes, or until cheese is lightly browned.
- Serve immediately.