Bright Citrus Soap How to Make It
There’s something about the smell of freshly baked banana bread wafting through the house that instantly feels like a warm hug. But lately, I’ve been playing around with zucchini in my baking — not because I’m trying to sneak in more veggies (though that’s a bonus), but because it adds this incredible moistness and a subtle flavor that pairs like a dream with ripe bananas. I always do this when I have a bunch of zucchinis sitting lonely in the fridge, and honestly, this zucchini banana bread has become a bit of a family favorite over here. My kids ask for it all the time, and I love that I can make something so delicious without cranking the oven for hours. Plus, it’s a great way to use up those extra zucchinis before they turn—I promise, it’s way easier than it sounds, and the result is irresistibly tender, sweet, and just a little fancy with that glossy glaze on top. It’s essentially a cozy hug in bread form, and I bet you’ll fall for it just like I did.
What is Zucchini Banana Bread with Sweet Glaze?
Think of this as a twist on your classic banana bread—smooth, flavorful, but with a secret ingredient: zucchini. The zucchini keeps the bread incredibly moist, almost like a cakey texture, without overpowering the banana sweetness. It’s light, a little nutty, and has a subtle veggie boost that makes you feel like you’re sneaking in good stuff, even if you’re not. It’s called “banana bread,” but it really could be a brunch staple, a cozy afternoon snack, or even a dessert—especially once you drizzle that shiny glaze on top. The name is simple because it’s a mashup of comfort and cleverness: sweet, moist, and just a little unexpected. Think of it as baking magic — a loaf that’s moist and fluffy, with a hint of sweetness and a beautiful shimmer that makes it irresistible. It’s essentially a recipe that comes from my own kitchen, built for those mornings when I want something quick and satisfying or a treat that feels special but needs minimal fuss.
Why you’ll love this recipe?
What I love most about this zucchini banana bread is how versatile and forgiving it is — trust me, I’ve made this countless times, and it never fails. The flavor is absolutely magical; those ripe bananas give it that deep, caramelized sweetness, while the zucchini adds moisture without any weird taste—just a subtle, almost nutty undertone that elevates the whole thing. Plus, it’s super simple to whip up on a lazy weekend or during busy weekday mornings. I often throw it together when I’m short on time but want something satisfying to grab. Budget-wise, it’s a win—the ingredients are staples you probably already have in your pantry or fridge. And the best part? Once baked, I like to drizzle a simple glaze over it — just powdered sugar and a splash of milk or lemon juice — which makes it look fancy enough for brunch but utterly easy to make. My kids love to help with the layering and swirling, and honestly, this dish is a win for everyone. It’s a cozy, delicious reminder that sometimes, the simplest recipes can be the most memorable.
How do you make Zucchini Banana Bread with a Sweet Glaze?
Quick Overview
This bread comes together quickly—no complicated techniques here! The key is to grate the zucchini, mash the bananas, and then gently mix everything together without overworking the batter. Once combined, I pour half of the batter into a loaf pan, spread a simple cinnamon-spiced filling (which you can customize!), then layer the rest on top and swirl to create a beautiful marbled effect. Bake until golden and a little domed, then let it cool just enough before drizzling with that shiny glaze. It’s almost too pretty to cut at first, but trust me — slicing it reveals an irresistibly moist crumb that melts in your mouth. This method keeps the bread tender and fluffy, with a moist center that’s just *perfect*. Honestly, I like to bake this in the morning and have it ready for the week — it’s that good.
Ingredients
For the Main Batter:
– 2 cups all-purpose flour (you can swap in a little almond flour if you like)
– 1 teaspoon baking soda
– 1 teaspoon baking powder
– 1/2 teaspoon salt
– 1 teaspoon cinnamon (because everything’s better with cinnamon)
– 1/2 cup granulated sugar
– 1/2 cup brown sugar
– 1/3 cup vegetable oil or melted butter
– 2 large eggs
– 1 teaspoon vanilla extract
– 3 ripe bananas, mashed
– 1 medium zucchini, grated and squeezed to remove excess moisture
For the Filling:
– 1/2 cup chopped nuts (walnuts or pecans work beautifully)
– 1/4 cup dark chocolate chips (optional but totally indulgent)
– 1 teaspoon cinnamon (for a warm kick)
For the Glaze:
– 1 cup powdered sugar
– 2 tablespoons milk, lemon juice, or maple syrup
– A splash of vanilla (optional, for extra flavor)
Step-by-Step Instructions
Step 1: Preheat & Prep Pan
Set your oven to 350°F (175°C). Grease your loaf pan generously with butter or line it with parchment paper. This step is crucial because nothing’s worse than a stuck bread! I always like to run a toothpick around the edges once it’s done—makes slicing so much easier and keeps it looking pretty.
Step 2: Mix Dry Ingredients
In a large bowl, whisk together the flour, baking soda, baking powder, salt, and cinnamon. Doing this first distributes everything evenly, so your bread bakes uniformly. It’s one of those small tricks that save a lot of frustration later.
Step 3: Mix Wet Ingredients
In another bowl, mash the bananas really well—trust me, smoother bananas give a more consistent flavor. Add the sugars, oil or melted butter, eggs, and vanilla. Whisk until the mixture looks smooth and slightly frothy. I’ve tested this with almond milk, and honestly, it made the batter a touch creamier, but regular milk works just fine.
Step 4: Combine
Pour the wet ingredients into the dry ones and gently fold together. Don’t overmix — a few lumps are okay! The key is just until everything is barely combined. Overmixing can make the bread dense, and we want fluffy here.
Step 5: Prepare Filling
If you’re adding nuts and chocolate chips, toss them in a little flour first to prevent sinking. Mix them into the batter gently, so they’re evenly distributed. This step is totally optional but adds that delightful crunch and richness.
Step 6: Layer & Swirl
Pour half the batter into the pan, then sprinkle on your filling. Cover with the remaining batter and swirl with a toothpick or skewer to create those pretty marbled patterns. My kids love helping with this part—saying they’re “making art.”
Step 7: Bake
Bake for about 50-60 minutes, or until the top is golden and a toothpick inserted in the center comes out clean. Keep an eye on it after 45 minutes; if the top browns too quickly, tent it with foil. Every oven is different, so start checking around the 45-minute mark.
Step 8: Cool & Glaze
Let the bread cool in the pan for 10-15 minutes, then transfer to a wire rack. Meanwhile, mix your glaze ingredients until smooth. Drizzle generously over the cooled bread — the shine on this makes it feel extra special. I like to wait until it’s only just warm—otherwise, the glaze melts right into the bread.
Step 9: Slice & Serve
Using a serrated knife, cut into thick slices. The loaf stays moist for days, but honestly, it disappears in minutes around here. Serve with a cup of coffee or tea, or I sometimes spread a little extra jam for a breakfast toast-inspired treat.
What to Serve It With
This zucchini banana bread is so versatile that it lends itself to all kinds of occasions. For breakfast, I love pairing it with a strong black coffee or a latte—something about that pairing just makes my morning feel special. My family enjoys it as a weekend brunch centerpiece, especially when I’ve added a handful of chopped nuts or a sprinkle of cinnamon on top before baking. A slice warmed and served with butter or a dollop of Greek yogurt feels like a little slice of heaven. It’s also an incredible dessert—serve it with a scoop of vanilla ice cream or a drizzle of extra glaze for an added treat. And on cozy nights, it’s perfect for just grabbing a piece with a mug of tea and settling in for a good movie. Over the years, I’ve also used this bread as a fantastic “take-along” snack for picnics or road trips—the moist texture holds up well, and it keeps its flavor for days.
Top Tips for Perfecting Your Zucchini Banana Bread with a Sweet Glaze
There are a few little tricks I’ve learned over the years that make all the difference. First, always squeeze out as much moisture as you can from the grated zucchini. If you skip this step, your bread might turn out a bit soggy, and nobody wants that! I usually do this by pressing the grated zucchini in a clean dish towel or paper towel—patting it dry gently but thoroughly. Also, avoid overmixing once you add the wet and dry ingredients; it’s tempting to keep stirring until smooth, but overmixing develops gluten that can make the bread dense. Trust me, gentle folding is all you need. When swirling the batter, don’t worry about perfect patterns — just aim for that lovely marbling look; it makes the slices so pretty! If you want to switch things up, try swapping chocolate chips for dried cranberries or adding a splash of orange zest for a citrusy twist. I tested this with coconut oil instead of vegetable oil, and it was subtly better—plus, it made the bread even more flavorful. Baking tips? Keep your oven racks in the middle, and don’t open the door too often during baking — that temp change can throw off your timing. For the glaze, start with less liquid—add more if you want a thinner drizzle. It’s so flexible, so play with it until you get the consistency you love. And honestly? Don’t stress about perfection — this bread is forgiving, and every batch seems to turn out better than the last.
Storing and Reheating Tips
Once cooled, I like to store this zucchini banana bread in an airtight container at room temperature for up to 2 days. Cover it loosely with a paper towel or keep it in a cake dome — it stays moist and fresh. If you want it to last beyond that, I’d pop it in the fridge wrapped tightly with plastic wrap or in a resealable bag; it can last about a week that way. To freeze, I wrap slices individually in plastic wrap, then pop them into a freezer-safe bag—this way, I can grab a piece whenever the craving hits. When reheating, I usually do a quick 15-20 seconds in the microwave until warm; the moisture stays beautifully intact. If you’re reheating the whole loaf, just a gentle 10-minute bake at 350°F keeps it soft and fresh. About the glaze—if you want to add it later, just re-whisk your icing ingredients and drizzle over cooled slices, so it stays shiny and appealing. This bread ages well, and every day it seems to taste more developed, so don’t hesitate to make it ahead of time. Trust me, it’s one of those recipes that actually improves after a day or two.
Frequently Asked Questions
Final Thoughts
If you love a quick, cozy loaf that’s packed with flavor, this zucchini banana bread with a sweet glaze is just what you need. It’s a foolproof recipe that hides a little veggie magic while delivering huge flavor. Over the years, I’ve adapted it to suit different tastes, and every time, it’s a hit. I love how versatile and forgiving it is — perfect for breakfast, snacks, or a simple piece of comfort after a long day. Plus, the glaze? It’s a little polished touch that makes it feel extra special, whether I serve it to friends or enjoy a slice alone with my morning coffee. Do give it a try — I can’t wait to hear how yours turns out! And if you have any variations or tips, I’d love to read about them in the comments. Happy baking!
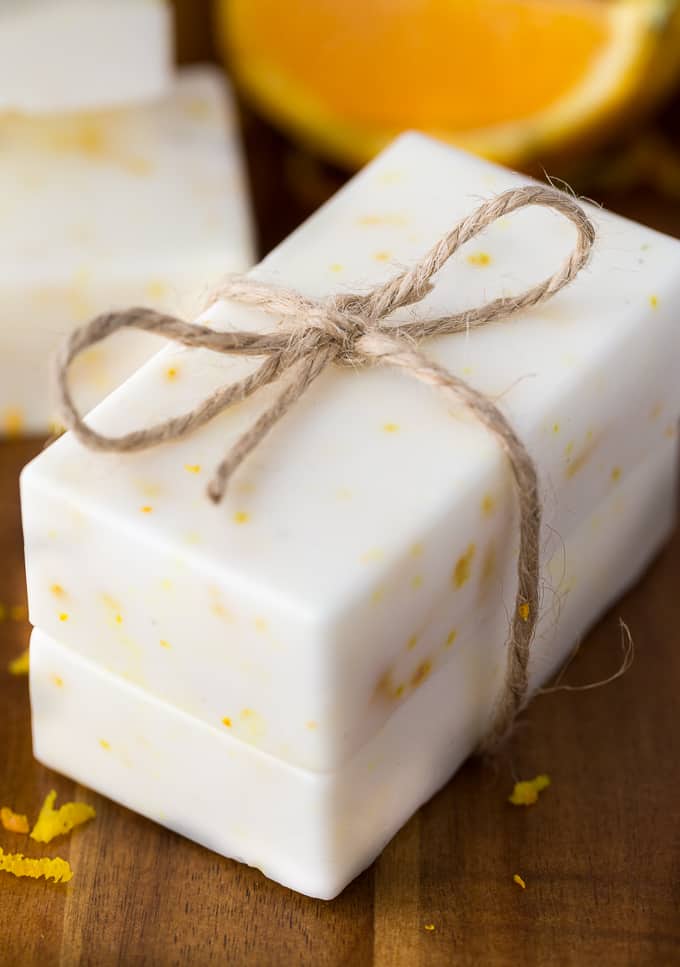
Orange Creamsicle Soap
Ingredients
Method
- Add soap to a microwaveable bowl. Microwave on high for 30 seconds. Then microwave at 10 second intervals, stirring in between, until soap is melted.
- Quickly stir in orange essential oil, vanilla soap fragrance and orange zest. Pour into a silicone soap mold. Let sit at room temperature for at least 40 minutes. To remove, turn over soap mold and carefully push on the bottom to pop out the soaps.