Greek Baked Pasta How to Make It Easy
If you’ve ever stood in your kitchen, crumbs on your pajamas, just sniffing the warm air, you know that the smell of baking bread is pure magic. I remember helping my grandma bake zucchini bread as a kid — it was always the highlight of summer, especially when our garden was overflowing with glossy green zucchini. Over the years, I’ve tweaked that recipe a ton—adding chocolate, because let’s be honest, who doesn’t need a little extra sweetness? This zucchini chocolate swirl bread is one of those recipes I keep coming back to. It’s like a cozy hug in bread form, packed with tender zucchini and rich chocolate swirls that taste almost too indulgent for breakfast but are totally justified because… well, zucchini, right? Honestly, I’ve made this so many times, I’ve lost count. It disappears in minutes at my house—and I’ll bet it will at yours too once you try it. It’s incredibly forgiving, too; perfect for busy mornings or lazy weekends. Plus, it’s so simple that even if you’re not a pro baker, you’ll look like one. Trust me on this — it’s a total crowd-pleaser and a sneaky way to get veggies in during snack time.
What is Zucchini Chocolate Swirl Bread?
This bread is basically a lovely mash-up between classic zucchini bread and a chocolate lover’s dream. Think of it as a moisture-packed loaf with a surprise swirl of fudgy chocolate running through the middle. The name is pretty much what it sounds like: soft bread speckled with grated zucchini—my little secret to keeping it insanely moist—plus a generous swirl of chocolate that’s almost like a hidden treasure. It’s very much like a cross between banana bread and a decadent treat, but with a healthier twist thanks to the zucchini. The idea started from my grandma’s recipe box—she always made her zucchini bread with walnuts, but I swapped those out for smooth, melty chocolate. The result? Something that’s as cozy and nostalgic as it is perfectly indulgent. And don’t worry if you’ve never baked with zucchini before — it’s so subtle that your family won’t even notice the veggies, just the heavenly flavor and moist crumb.
Why you’ll love this recipe?
What I love most about this zucchini chocolate swirl bread is how it manages to be both indulgent and secretly healthy. The zucchini adds a beautiful tenderness and keeps the bread from getting dry—something I always do when I bake quick breads because I hate ending up with a crumbly slice. Plus, the chocolate swirl? It’s a game-changer. I’ve tested this with dark chocolate, semi-sweet, and even a dash of white for fun — all equally delicious. This bread is a lifesaver on busy nights when you want something sweet without the fuss of making a full cake. It’s perfect as an afternoon snack, breakfast start, or cozy dessert. The ingredients are simple and budget-friendly: just zucchini, flour, sugar, a few pantry staples, and chocolate chips or bars. What I really love about it, apart from how moist and flavorful it is, is how adaptable it can be. I often throw in pecans, coconut flakes, or even a splash of coffee to tweak the flavor. It’s one of those recipes that makes you feel like a wizard, whipping up something so impressive with barely any effort. And let me tell you — once your friends taste this, they’ll ask for the recipe every time. It’s become a household staple for us, especially during the summer zucchini bounty.
How do you make Zucchini Chocolate Swirl Bread?
Quick Overview
This bread comes together faster than you think — no fancy techniques needed. You start by grating the zucchini and mixing your dry ingredients, then whisk together wet ingredients. The trick is to not overmix, so the bread stays tender. You layer the batter in your baking pan, add your chocolate swirl by dolloping it in, then swirl gently with a knife. Bake until the top is golden and a toothpick inserted comes out clean. Let it cool slightly, spread with a quick glaze or dust with powdered sugar, and you’ve got a showstopper on your hands. It’s super forgiving — I’ve tested this with gluten-free flour, different sweeteners, and even almond milk — it always turns out moist and flavorful. The best part? That swirl of chocolate inside is what makes this so irresistible. You’ll love how cozy, beautiful, and downright delicious this loaf is from the very first bite.
Ingredients
For the Main Batter:
– 2 cups all-purpose flour (or gluten-free blend if needed)
– 1 teaspoon baking soda
– ½ teaspoon salt
– 1 teaspoon cinnamon (optional but adds a lovely warmth)
– 1 cup granulated sugar (you can reduce this to ¾ cup if you like less sweet)
– ½ cup vegetable oil or melted coconut oil
– 3 large eggs
– 1 teaspoon vanilla extract
– 1 cup grated zucchini (squeeze out excess moisture with a clean towel)
– ¼ cup milk (dairy or almond milk work great)
For the Filling:
– ¾ cup chocolate chips or chopped chocolate bars
– 1 tablespoon butter or coconut oil (melted)
– 1 tablespoon heavy cream or milk (to thin the chocolate for easier swirl)
For the Glaze:
– ½ cup powdered sugar
– 1 tablespoon milk or cream
– Splash of vanilla (optional)
Step-by-Step Instructions
Step 1: Preheat & Prep Pan
Heat your oven to 350°F (175°C). Grease a loaf pan with butter or non-stick spray, then line it with parchment paper if you want extra easy removal. I often do this because it keeps the bread from sticking, especially when it’s fresh out of the oven. Once preheated, set your pan aside and gather your ingredients. Picking a light-colored loaf pan helps you see when it’s golden and baked perfectly.
Step 2: Mix Dry Ingredients
In a large bowl, whisk together the flour, baking soda, salt, and cinnamon. This ensures everything is evenly distributed and your bread rises nicely. It also prevents clumps, which can cause uneven texture. I always do this step first — it’s just a habit and it really pays off.
Step 3: Mix Wet Ingredients
In another bowl, beat the eggs, sugar, and oil until smooth. Add the vanilla and milk. You want the mixture to look a little frothy and well combined. The smell at this stage—vanilla and a hint of sweetness—is so comforting. Here’s a little tip: I tested this with almond milk once, and it made the bread even creamier. It’s a small tweak but adds a lovely nutty flavor.
Step 4: Combine
Pour the wet mixture into the dry ingredients and gently fold with a spatula or wooden spoon. Be careful not to overmix — you want a slightly lumpy batter. Overmixing can make the bread dense, and that’s not what we’re aiming for. Just mix until it’s almost combined, then add the grated zucchini and fold in gently. The zucchini should be evenly distributed without deflating the batter.
Step 5: Prepare Filling
In a small bowl, melt the chocolate with butter and heavy cream until smooth. You can do this in short bursts in the microwave or over a double boiler. The consistency should be thick but pourable — if it’s too runny, add a touch more melted chocolate or let it cool slightly before spooning. This chocolate filling is what makes the swirl so luscious; I sometimes add a pinch of sea salt or espresso powder to deepen the flavor.
Step 6: Layer & Swirl
Pour half of the batter into your prepared pan. Drop spoonfuls of the chocolate mixture over the batter. Then add the rest of the batter on top. Using a butter knife or skewer, gently swirl the chocolate into the batter — don’t overdo it; a few gentle zig-zags are enough to create that beautiful marbled look.
Step 7: Bake
Place in your preheated oven and bake for about 50–60 minutes. Start testing at around 50 minutes—insert a toothpick into the center, and if it comes out clean, you’re good. The top should be golden brown, and when you gently press it, it should bounce back slightly. Every oven is a little different, so I advise setting a timer and checking early if yours runs hot.
Step 8: Cool & Glaze
Let the bread cool in the pan for about 15 minutes, then transfer to a wire rack. While it’s still warm, mix your powdered sugar with milk and vanilla, then drizzle over the top. The glaze adds a lovely sweetness and a glossy finish — trust me, it makes it look bakery-worthy! If you prefer a less sweet finish, a dusting of powdered sugar works just as beautifully.
Step 9: Slice & Serve
Use a serrated knife for clean cuts—warm bread tends to crumble if you try to slice it too early. I love serving this slightly warm with a pat of butter or a dollop of whipped cream. It’s fantastic with coffee, tea, or even a glass of cold milk. The slices stay fresh for 2–3 days in an airtight container, but honestly, they rarely last that long around here. My kids ask for seconds, and I don’t blame them — it’s truly addictive.
What to Serve It With
This bread is such a versatile treat. For breakfast, I love it toasted with a smear of cream cheese or honey — the warm, fudgy ribbons of chocolate make every morning feel extra special. My family enjoys it as a brunch centerpiece alongside fresh fruit and a hot cup of coffee. When I make it as a dessert, I’ll dust it with extra powdered sugar or serve it warm with vanilla ice cream on the side, which my kids think is just decadent enough to be a true treat. It also makes a cozy snack in the afternoon — perfect for munching while watching a movie or sitting outside on the porch. I’ve even sliced it into small squares for picnics or to pack in school lunchboxes (not that they last long before being snatched up!). The rich chocolate swirls add such a delightful surprise element—my friends always ask for the recipe, and I love sharing this little slice of comfort.
Top Tips for Perfecting Your Zucchini Chocolate Swirl Bread
Over the years, I’ve learned a few tricks that make this bread turn out even better every time. First, when grating zucchini, I always do it on the fine side and then squeeze out all excess moisture—this step is crucial for avoiding a soggy crumb. I tested this with different zucchinis from the garden and store-bought—they can vary in water content, but squeezing out that water keeps everything moist without making the bread heavy. Second, don’t overmix the batter — it’s tempting to keep stirring until smooth, but resist! Overmixing develops glutens, which makes the bread dense and chewy rather than tender. Just fold until combined is perfect. When making the chocolate swirl, I’ve experimented with different chocolates; I find that using a bar chopped into small pieces gives a better melt and swirl than chips, but both work. If your chocolate mixture seems too thick, a splash of milk makes it pourable without thinning out too much.
Baking can be tricky if your oven runs hot or cool—I always place a baking thermometer inside to monitor. Also, rotating my bread halfway through baking ensures an even golden crust. My last little pro tip? Let the bread cool completely before glazing — the chocolate setting process works best when it’s not still warm. And finally, avoid opening the oven door during the last 15 minutes — sudden temperature drops can mess with your rise. With practice, you’ll find your perfect baking rhythm. Oh, and I’ve tested this with coconut sugar for less refined sweetness, which turned out just as moist—so feel free to play with the sweeteners to suit your taste. It’s truly a forgiving recipe, especially once you get the hang of the swirl technique. That visual marbling? It’s worth every little swirl—and I promise, your family’s eyes will light up when they see that beautiful layered effect.
Storing and Reheating Tips
This bread is best enjoyed within the first couple of days, but with proper storage, it stays pretty tasty for up to 4 days. I usually wrap slices tightly in plastic wrap or pop the whole loaf into an airtight container. If you want to keep it longer, freezing slices individually works great — just wrap then pop into a zip-top bag, label, and freeze for up to 3 months. When you’re ready, thaw at room temperature or warm slices briefly in the microwave — I recommend a gentle 15-20 seconds so they stay soft and moist. The glaze can be added before freezing or after thawing, just keep it simple. If you’ve added a powdered sugar glaze, best to do it fresh for that glossy, just-baked look. When reheating, a quick stint in the microwave or toaster oven revitalizes that warm, gooey chocolate goodness. I find that this bread actually gets better the next day once the flavors meld a bit — so don’t be afraid to make it ahead, especially for weekend brunches or a cozy breakfast at home. Just keep an eye on the moisture level — if it’s feeling a little dry, a quick microwave blast can restore softness. And remember, the key to keeping that moist crumb is not leaving it out in the open for too long—air is the enemy of fresh-baked goodness.
Frequently Asked Questions
Final Thoughts
This zucchini chocolate swirl bread is one of those recipes that feels like a little gift—something you make when you want to bring comfort, warmth, and a touch of indulgence. It’s easy enough for a weeknight treat but impressive enough to serve to friends. The best part? The sneaky zucchini keeps it moist and healthy (well, healthier) without sacrificing flavor. Every time I bake this, I get that same nostalgic feeling — the kitchen fills with the smell of chocolate and spices, and I remember childhood afternoons spent helping my grandma. No matter how many times I make it, I’m still wowed by how simple ingredients turn into something so special. I hope you give it a try and share it with the people you love — because, honestly, nothing beats a warm slice of homemade bread, especially when it’s this good. Happy baking, and I can’t wait to hear how yours turns out! Leave a comment, share your twists, and enjoy every delicious, moist, chocolatey bite.
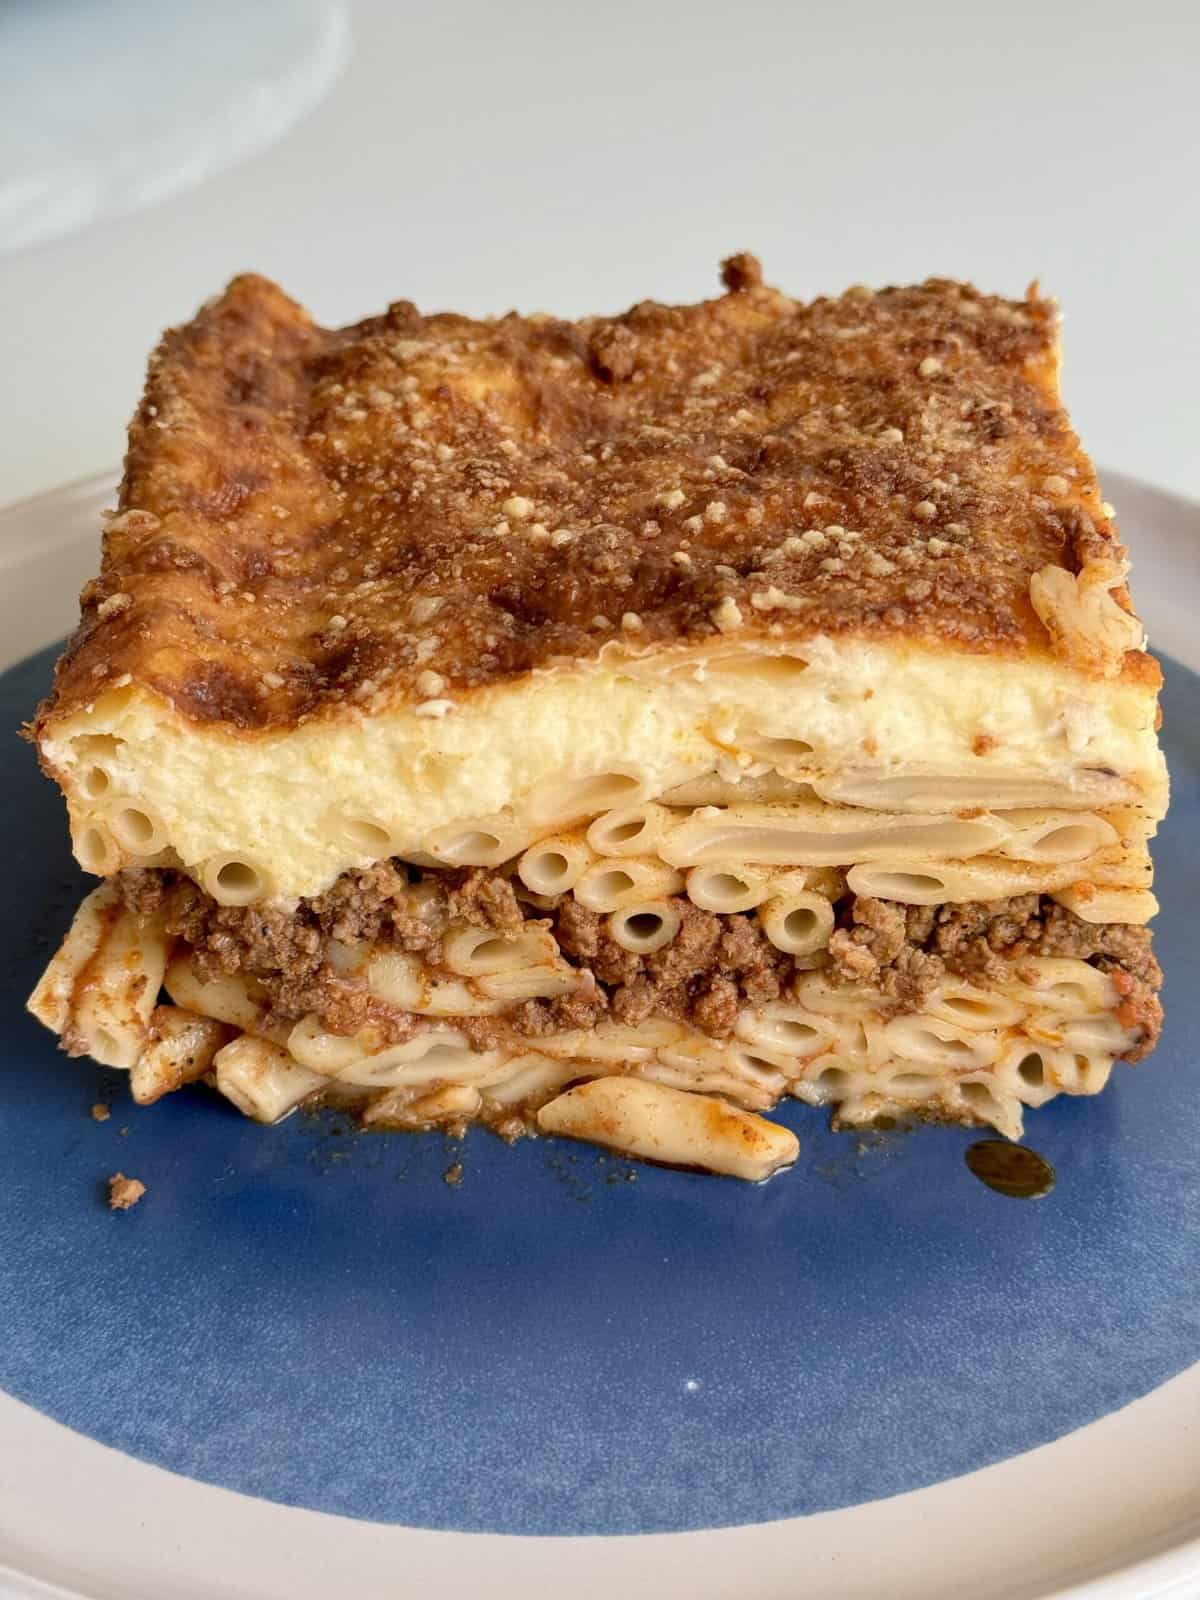
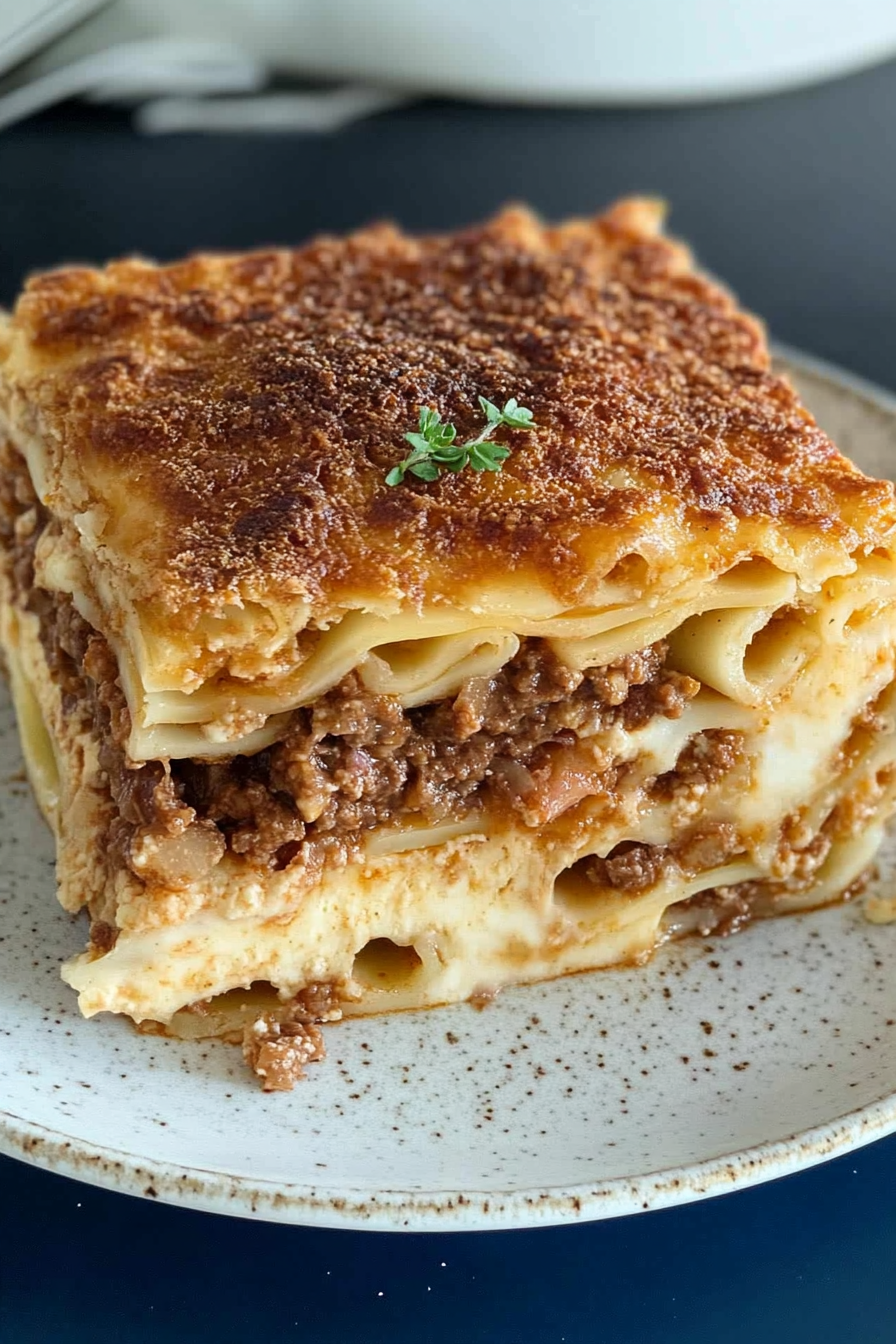
Pastitsio (Greek Lasagna)
Ingredients
Method
- Cook your pasta just almost al dente in salted water. RESERVE 2 CUPS PASTA WATER FOR THE MEAT SAUCE. Transfer the pasta to a large bowl and toss with the parmesan, nutmeg and eggs. Coat all of the pasta thoroughly.
- In a large pot, heat your oil. Add the onion and sauté until translucent, about 3 minutes.
- Add the ground meat to the pot and break up the meat with a wooden spoon, until finely minced and no longer pink.
- Next add the tomato paste and mix into the meat. Stir in the diced tomatoes, spices, sugar and salt and pepper to taste.
- Add in 2 cups of the pasta water from your spaghetti pot. Bring to a boil and then lower heat to a simmer. Stir your sauce occasionally until it thickens - about 30 minutes. If your sauce gets dry, add more pasta water.
- In a medium pot, melt your butter over medium high heat. Whisk in the flour until all is incorporated.
- Gradually add in the warm milk, 2 cups at a time, whisking CONSTANTLY. Season with salt. Bring to a boil, cook and stir constantly, 2 minutes, until it starts to thicken.
- Add the beaten eggs while whisking constantly. Bring to boil, cook and stir another 2 minutes.
- Preheat your oven to 420°F.
- Transfer HALF of the pasta to a 9x13” baking dish and spread out evenly. Then add all of the meat sauce on top and spread out gently. Next add the remaining pasta and spread out.
- Evenly pour the béchamel onto the baking dish, gently spread with a spatula if needed.
- Lastly, sprinkle the top evenly with the grated parmesan cheese.
- Bake for 45-50 minutes or until golden brown on top. Allow to cool at least 20 minutes prior to slicing.