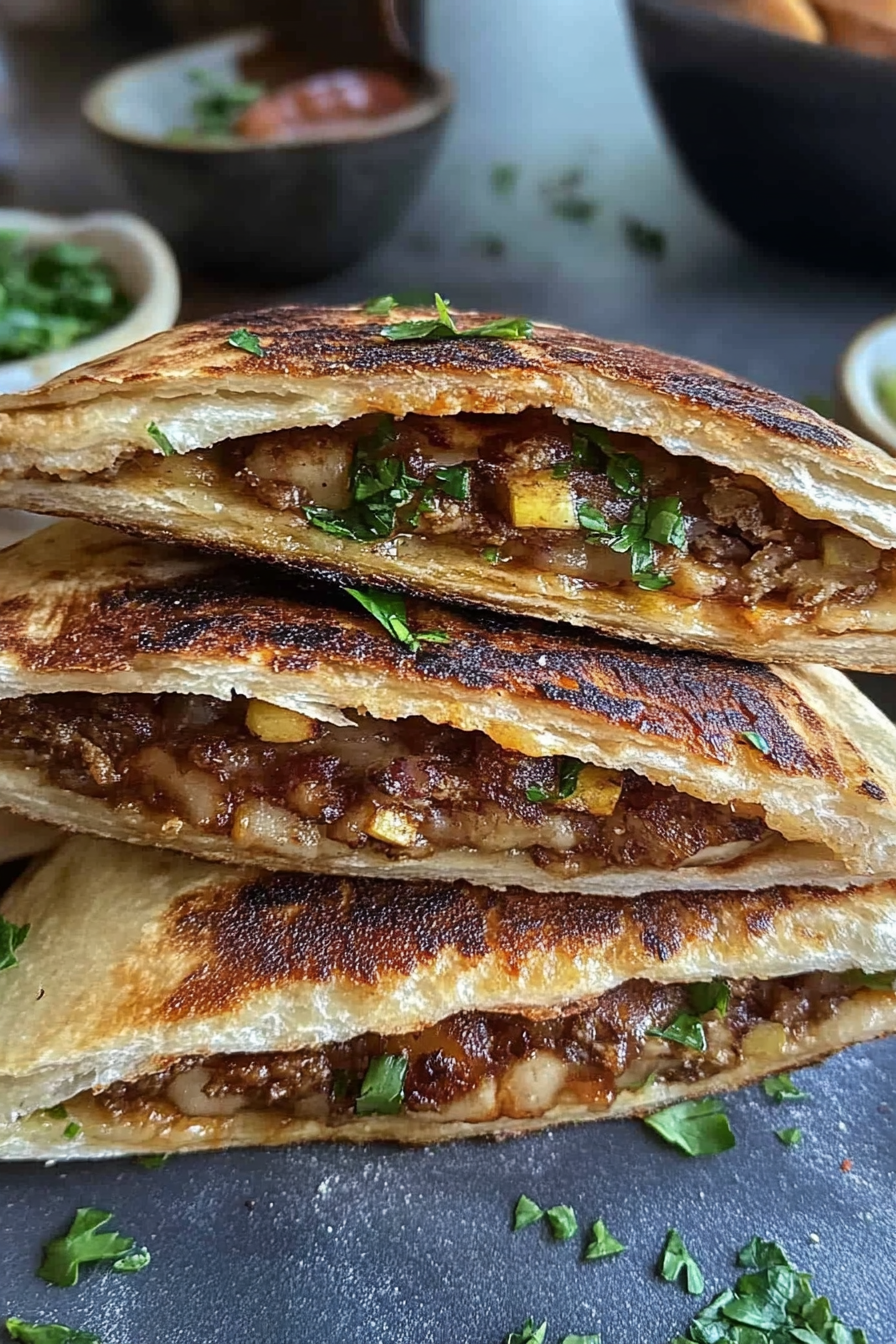
Crispy Stuffed Pitas How to Make Arays
There’s something about baking that feels like a warm hug from the past. I remember helping my grandma in her tiny kitchen, the smell of bananas and fresh zucchini filling the air, and that calming hum of her old mixer. This recipe for zucchini banana mini loaves is one I’ve made countless times, especially on hectic mornings or when I want a sweet treat without going overboard. I always keep a batch in the freezer—trust me, they disappear in minutes at my house! It’s a little bit wholesome, a little bit indulgent, and totally satisfying with a cup of coffee or a glass of cold milk. What I love most about this is how it combines the moisture of bananas with the subtle earthiness of zucchini—plus, the crunch of walnuts and that sweet glaze on top make all the difference. Honestly, it’s become one of those recipes that feels like a warm secret I can’t wait to share, especially when friends pop over. It’s not just a treat; it’s a hug in baking form, and I can’t wait for you to try it!
What is a Zucchini Banana Mini Loaves?
Think of zucchini banana mini loaves as a cozy twist on the classic banana bread, but in smaller, adorable loaf sizes. The name might sound fancy, but really, it’s just a simple, homey bake that’s perfect for sharing or keeping for yourself when those bananas and zucchinis are sitting on your counter, looking a little too ripe. It’s essentially a blend of sweet bananas, mild zucchini, and crunchy walnuts all baked into a tender crumb. The mini loaves are a great way to get that delicious flavor without making an entire cake, and they’re perfect for portion control—one’s just enough to satisfy that sweet craving. The secret is how the zucchini keeps the bread moist and adds a sneaky vegetable punch, so I always feel better about sneaking a slice at 10 pm. Plus, the leftover loaves make excellent breakfast with a smear of butter or a drizzle of that irresistible walnut glaze. It’s comfort food with a little healthy twist that my family asks for all the time.
Why you’ll love this recipe?
What I love most about this zucchini banana mini loaf recipe is how versatile and forgiving it is. First, the flavor—moist, sweet, with just a hint of nuttiness from those walnuts, making it undeniably cozy. The bananas give it that rich, caramel-like sweetness, while the zucchini keeps everything super moist—no dry slices here! It’s honestly one of those “pantry staple” recipes because I always keep ripe bananas and zucchinis on hand, and it comes together so quickly, I almost can’t believe how easy it is. Plus, because it makes mini loaves (and you can double, triple, or even freeze leftovers), it’s budget-friendly. I’ve tested this with almond milk, and I swear it made the crumb even creamier—so feel free to swap ingredients to suit your diet or taste. The recipe’s forgiving enough that if you’re running low on walnuts or want to toss in some chocolate chips instead, it still turns out fantastic. My kids ask for this all the time, especially when they see me slicing into those little loaves and sneaking bites before I even get the glaze on. It’s a comfort food that feels like a little gift—sweet, satisfying, and just a little bit special.
How do I make Zucchini Banana Mini Loaves?
Quick Overview
This recipe is all about simple, straightforward steps. You start by preheating your oven and preparing your mini loaf pans, then mix together the dry ingredients to keep things fluffy. Separately, mash the bananas and grate the zucchini—fresh or frozen, both work fine—and then combine everything with a touch of oil and sweetener. Layering a bit of that rich filling in the mini loaves with swirls of extra batter is my favorite part—so pretty! Bake until golden, let them cool a bit, then slather on that walnut glaze. It’s honestly foolproof, and the whole process takes under an hour. What makes it special is how forgiving it is—you really can mix and match ingredients or tweak the sweetness to suit your mood. It’s perfect for baking on a lazy Saturday, or a quick weeknight treat, with leftovers that taste just as good the next day. Promise, once you try this, it’ll become a go-to in your little baking arsenal.
Ingredients
For the Main Batter:
- 2 ripe bananas, mashed well (my personal trick: I always do this when they’re perfectly spotted and sweet)
- 1 cup grated zucchini (about 1 small zucchini), squeezed slightly to remove excess moisture
- 1/2 cup melted unsalted butter or neutral oil (I tested with coconut oil, worked beautifully)
- 1/2 cup brown sugar (or coconut sugar for a healthier twist)
- 2 large eggs, at room temperature
- 1 teaspoon vanilla extract
- 1 1/2 cups all-purpose flour (gluten-free works with a good blend)
- 1 teaspoon baking soda
- 1/2 teaspoon baking powder
- 1/2 teaspoon ground cinnamon (because everything’s better with a hint of cinnamon)
- 1/4 teaspoon salt
- 1 cup chopped walnuts (or pecans), toasted if you like extra crunch
For the Filling:
- Extra banana batter for layering (or just reserve some before mixing fully)
- Optional chocolate chips or dried fruit for added fun
For the Glaze:
- 1 cup powdered sugar
- 2-3 tablespoons milk or almond milk
- 1 teaspoon vanilla extract
- Chopped walnuts for garnish (if you want extra crunch)
Step-by-Step Instructions
Step 1: Preheat & Prep Pan
Set your oven to 350°F (175°C). Grease your mini loaf pans well—trust me, this is key to getting them out in one piece. You can line them with parchment if you prefer. I like to prepare a few because I never know exactly how many I’ll want to bake at once. If you’re using muffin tins, that’s just as easy—adjust the baking time for muffins (about 25-30 minutes). Keep a rack nearby for cooling; these loaves are best when they’re just warm and slightly cooled.
Step 2: Mix Dry Ingredients
In a big bowl, whisk together the flour, baking soda, baking powder, cinnamon, and salt. Mix thoroughly—I’ve learned through many batches that even distribution makes for an even rise and fluffy crumb. Sift if you want to avoid lumps, but honestly, a good whisk does the trick for me.
Step 3: Mix Wet Ingredients
In a separate bowl, mash your bananas really well until smooth. I use a fork or a potato masher for this—trust me, the mushier, the better for sweetness and moisture. Then add the melted butter, sugar, eggs, and vanilla, whisking until everything’s nicely combined. You want it to look glossy and smooth, like a thick custard.
Step 4: Combine
Pour the wet into the dry ingredients, mixing gently just until combined—overmixing makes these a bit dense, and nobody wants that. Fold in the grated zucchini and walnuts at this stage, saving a few walnuts aside for topping if you like. The batter will be thick but moist. If it feels too stiff, a splash of milk can loosen it up a little.
Step 5: Prepare Filling
If you’re layering, scoop some of the batter into the mini loaf pans first, then dollop a spoonful of extra banana mixture on top, and swirl slightly. Repeat the layering—don’t worry if it’s not perfectly neat; it’s homemade! The swirls give it that beautiful marbled look, and the flavor surprise in every bite.
Step 6: Layer & Swirl
This part is optional but fun. Using a toothpick or skewer, drag through the batter to create pretty swirls. It makes each loaf feel special and adds that homemade touch everyone loves.
Step 7: Bake
Pop the loaves into the oven. Bake for about 35-40 minutes, or until a toothpick inserted in the center comes out clean. If the tops start browning too fast, tent them with foil for the last 10 minutes. The smell alone will draw everyone into the kitchen!
Step 8: Cool & Glaze
Let the mini loaves cool in the pans for about 10 minutes—then transfer to a wire rack. For the glaze, whisk together powdered sugar, vanilla, and milk until smooth. Drizzle generously over the warm loaves. I actually like doing this while they’re still a little warm—the glaze seeps into the cracks, creating a glossy, irresistible finish.
Step 9: Slice & Serve
Once cooled completely, slice with a serrated bread knife for neat edges. Serve with a cup of coffee or tea, or just on their own—they’re pretty perfect either way. My friends say it’s like a little piece of home I baked just for them. These stay good at room temp for a day, or in the fridge for a few days. Reheat gently in the microwave or oven if you want that just-baked warmth again.
What to Serve It With
This loaf pairs beautifully with so many things. For breakfast, I love a smear of cream cheese or a dollop of Greek yogurt alongside—that richness balances the sweetness perfectly. If you’re serving it at a brunch, a fresh fruit salad or a cold glass of milk makes a lovely addition. As an afternoon treat, I find a hot cup of coffee or a drizzle of honey over a slice makes it feel extra indulgent. When we have guests over, I like to heap some extra walnuts on top of the glaze for that crunch factor. Honestly, my family will just grab a slice, no matter what time of day—it’s become a little tradition. And if I have leftovers, I slice and freeze them individually—perfect grab-and-go snacks, and they taste just as good toasted with butter.
Top Tips for Perfecting Your Zucchini Banana Mini Loaves
Making this recipe a true hit isn’t just about measurements—it’s those little tricks I’ve learned after countless baking sessions. First, always choose ripe, spotty bananas—they’re sweeter and mash easier, giving your bread that lush flavor. When grating zucchini, squeeze out as much moisture as possible—this prevents sogginess and keeps your loaves light. I’ve tested with frozen zucchini—just thaw and squeeze—and it works beautifully, saving you a trip to the farmer’s market. Be cautious not to overmix once you combine the wet and dry ingredients; overmixing can make the crumb dense, not tender. I also like to swirl the filling for a marbled look and personality, but you could skip that if you prefer a uniform texture. Want to switch it up? Add chocolate chips, dried cranberries, or chopped pecans—whatever makes your heart sing. When baking, keep an eye on the oven. Every oven is different, so start checking around 35 minutes—trust me, a dry toothpick is your best friend here. And if you want a glaze that’s thicker or thinner, adjust the powdered sugar or milk accordingly. Concise, but impactful—these small adjustments have made all the difference for me over the years.
Storing and Reheating Tips
This loaf stays fresh pretty well, especially if you store it properly. At room temperature, wrap the mini loaves tightly in plastic wrap or store in an airtight container—about 2 days before it starts to dry out. If you want to keep them longer, pop them in the fridge, where they’ll last up to 4 days; just bring them to room temp or give them a quick warm-up in the microwave. Freezing is my favorite method—I slice the loaves before freezing so I can grab a piece whenever the craving hits. Wrap each slice tightly in plastic, then slip into a zip-top freezer bag—this keeps freezer burn away and preserves moisture. They keep well for up to 3 months, and thaw in a quick minute in the microwave or at room temp. As for the glaze, I recommend adding it just before serving—this keeps that shiny, sweet finish perfect and fresh. Trust me, these little tips will make your baking experience easier and more rewarding, and I promise your family will thank you!
Frequently Asked Questions
Final Thoughts
This zucchini banana mini loaf recipe is one of those hidden gems that feels like a warm secret shared among friends. It’s cozy, wholesome, and just a little indulgent—perfect for busy mornings, casual afternoons, or whenever you need a sweet pick-me-up. The combination of ripe bananas and zucchini keeps it moist and tender, while the walnuts add that satisfying crunch. And the walnut glaze? Oh, it’s the perfect finishing touch—sweet, nutty, and glossy. I’ve made this so many times that I’ve lost count, and each batch has been a little bit better than the last. It’s become a favorite not just because of how delicious it is, but because it’s so forgiving and versatile—you can tweak the ingredients, add extras, or keep it simple. Whether you’re baking for yourself, family, or friends, I promise this will become a staple in your home too. Happy baking, and I can’t wait to hear how yours turns out! Don’t forget to leave a comment or share your variations—I love hearing your stories in the kitchen.
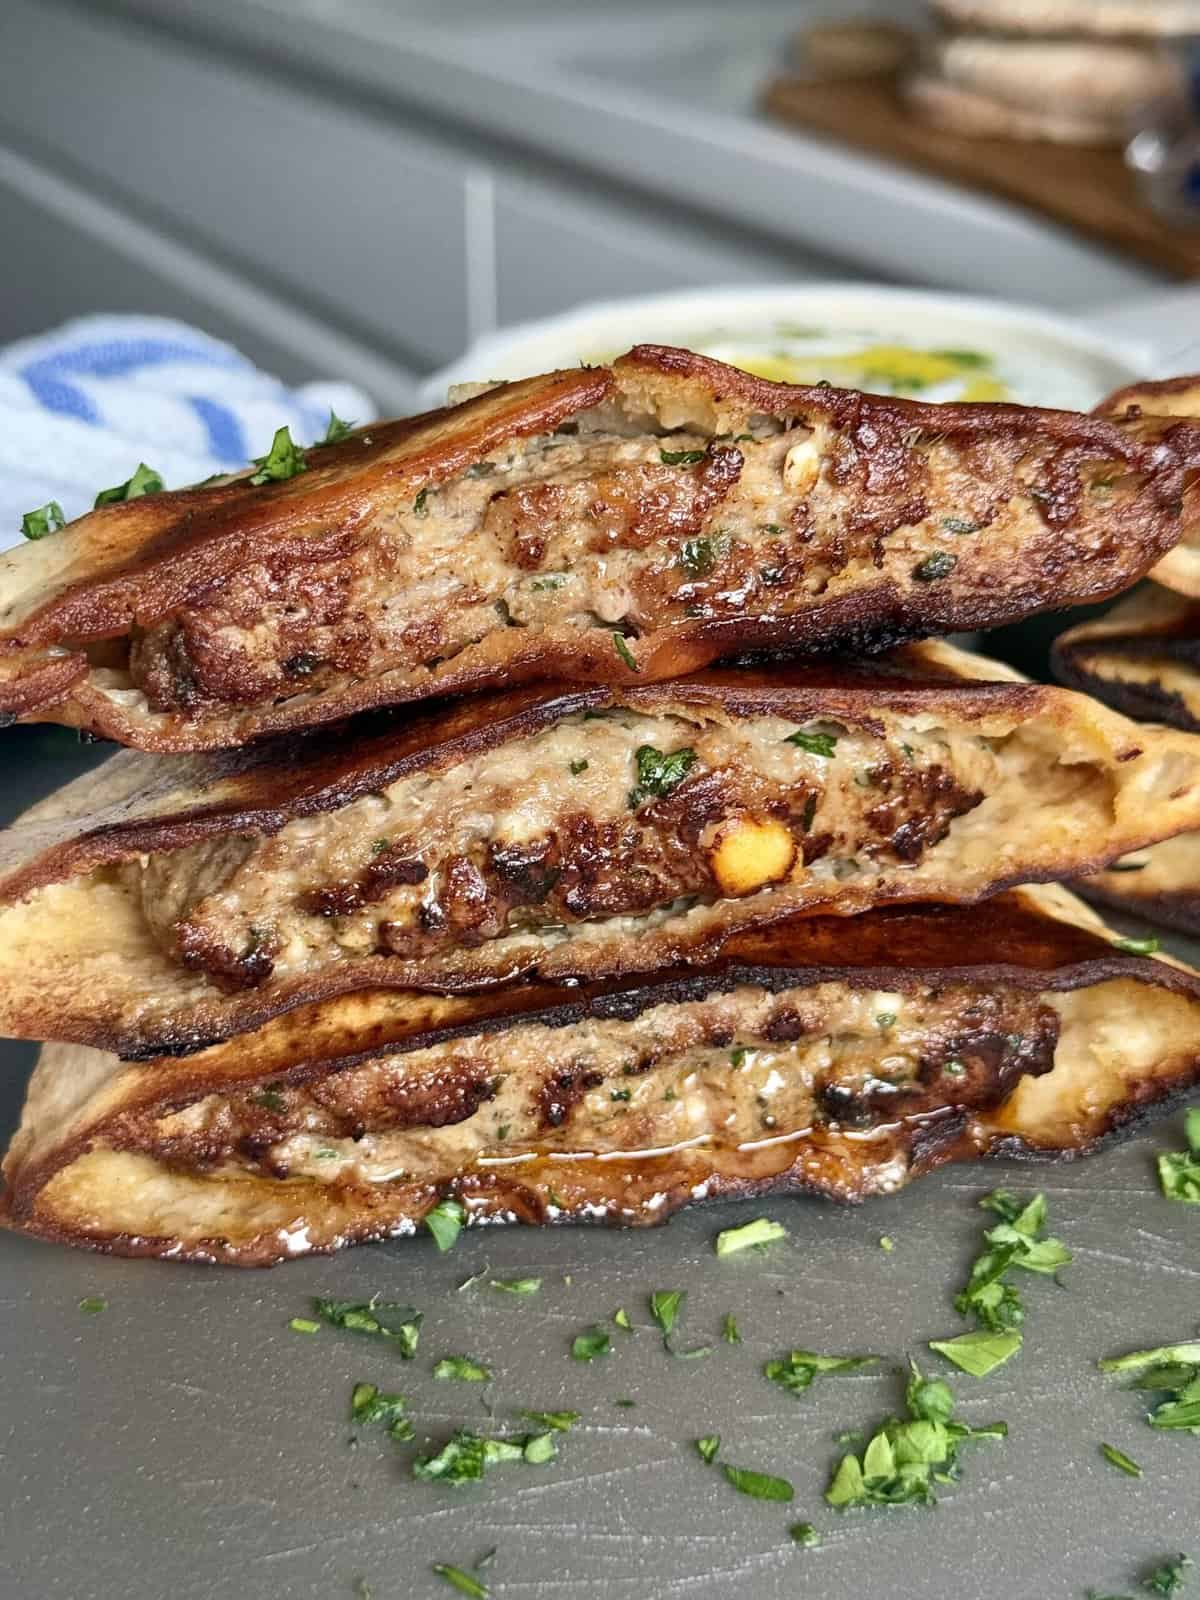
stuffed pitas
Ingredients
Method
- To a large bowl, add the ground beef, crumbled feta, garlic, olive oil, all the spices and parsley and mix together with your hands until combined. Form 8 equal half moon shaped thin 'patties'. Cut the pitas in half, fill with the meat patties and spread out evenly.
- Preheat a skillet over medium heat and add in a drizzle of olive oil. Cook the arayes for 4-5 minutes per side, or until the meat is cooked through. Don't forget to sear the open meat side too! Make sure to keep the heat on medium or medium low.