Easy Peach Skillet Cake Recipe
There’s something about the smell of freshly baked cake that instantly takes me back to my grandma’s kitchen, especially when it’s infused with the delicate sweetness of zucchini. This cake has become a family favorite—my kids ask for it all the time, and honestly, it’s become my go-to when I want something sweet that’s not overly indulgent. It’s so moist and tender, with the perfect hint of vegetable goodness sneaking in without anyone noticing. One of the best parts? It’s surprisingly easy to make, even on busy weeknights. I always do this when I want a quick treat that feels special but took almost no effort. Trust me on this one—your friends and family are going to love it. Plus, it’s a sneaky way to get some veggies into the kids’ snacks without any fuss. I’ve tested this with almond milk, and it actually made the cake even creamier—so feel free to swap ingredients based on what you have on hand. Now, grab your zucchini, and let’s get baking this irresistible cake that’s better than any store-bought version!’
What is Zucchini cake?
Think of this zucchini cake as a cozy, moist layer cake that’s secretly packed with shredded zucchini, giving it a tender crumb and a little boost of veggie goodness. It’s essentially a sweet, baked treat that’s kind of like a cross between a quick bread and a cake—perfect for whenever you need a slice of comfort. The name might sound a little unusual, but the zucchini disappears into the batter, leaving behind only the moist texture and subtle, almost floral flavor. It’s a recipe that’s become a staple in my house, especially when I want to serve something homemade, flavorful, and a little bit sneaky—because no one guesses the secret ingredient! This dish originated from those humble zucchini bread recipes, but I like to think of it as a fancy cake dressed up with a luscious filling and a shiny glaze. Think of it as a little slice of home with a modern twist—perfect for everything from breakfast to an afternoon treat, or even as a dessert.
Why you’ll love this recipe?
What I love most about this zucchini cake is how it combines simple ingredients into something unexpectedly special. The flavor is subtly sweet with a delicate vegetable backdrop that makes this feel a little healthier—though I’d never tell the kids that! The moist, fluffy crumb is a real lifesaver on busy nights when you want something quick but satisfying. The batter comes together in minutes, and baking is a breeze—no fancy techniques needed. Plus, this recipe is budget-friendly; most of what you need is probably already sitting in your pantry and fridge. You can also get creative with the fillings and glazes—think whipped cream, mascarpone, or even a fruit compote on top. It’s versatile enough to serve at breakfast, brunch, or as a fancy dessert after dinner. I’ve made this countless times, and it never fails to wow. The way the zucchini melts into the batter, keeping the cake super moist, is just magic. And trust me, the entire house smells divine while it bakes—it’s impossible not to sneak a piece warm from the oven. Honestly, what I love most is how adaptable this recipe is. You can jazz up the flavor with spices like cinnamon or nutmeg, add chopped nuts for crunch, or even layer it with jam instead of filling. It’s truly a recipe that encourages you to make it your own.
How do I make Zucchini cake?
Quick Overview
This zucchini cake comes together faster than most from-scratch desserts. You’ll start by shredding the zucchini, then mixing your dry ingredients while your oven preheats. In a separate bowl, whisk together your wet ingredients — don’t forget to squeeze out any excess moisture from the zucchini, I’ve learned that helps it stay fluffy and tender. Then, gently fold everything together, stir in your filling (my favorite is a sweet cream cheese mixture), layer it all in a prepared pan, and bake. The best part? While it bakes, you can prep your glaze—simple powdered sugar and lemon juice or vanilla work like a charm. Once cooled, drizzle the glaze, slice, and enjoy. It’s foolproof, moist, and tastes like a special treat, even though it’s really just made with everyday ingredients.
Ingredients
For the Main Batter:
– 2 cups grated zucchini (about 1 medium zucchini)
– 1 3/4 cups all-purpose flour (or a mix of gluten-free flours if you prefer)
– 1 teaspoon baking soda
– 1 teaspoon baking powder
– 1/2 teaspoon salt
– 1 teaspoon cinnamon (optional but recommended)
– 1/2 cup granulated sugar
– 1/2 cup brown sugar (for a richer flavor)
– 1/2 cup vegetable oil or melted butter
– 3 large eggs
– 1 teaspoon vanilla extract
For the Filling:
– 8 ounces cream cheese, softened
– 1/4 cup powdered sugar
– 1 teaspoon vanilla
– A handful of chopped nuts or fruit (optional but fun)
For the Glaze:
– 1 cup powdered sugar
– 1-2 tablespoons fresh lemon juice or milk
– Vanilla or other flavorings if you like
Step-by-Step Instructions
Step 1: Preheat & Prep Pan
Set your oven to 350°F (175°C) and grease a 9-inch round cake pan or line it with parchment paper. I always do this first because it’s the kind of step that makes sure everything goes smoothly later. If you’re layering, you can double the recipe and use a larger pan or two pans.
Step 2: Mix Dry Ingredients
In a large bowl, whisk together the flour, baking soda, baking powder, salt, and cinnamon. This step ensures that your leavening agents are evenly distributed, which gives you that perfect rise and fluffy texture. I always sift my dry ingredients if I remember — it just makes everything blend smoother, especially with whole wheat or gluten-free flours.
Step 3: Mix Wet Ingredients
In another bowl, beat the eggs with the sugars, then add the oil and vanilla. I like to do this with a whisk, and I always make sure my eggs are at room temperature — it helps everything emulsify better. Grate your zucchini fine and squeeze out any excess moisture with a clean kitchen towel or cheesecloth. Too much water, and your cake can turn out dense or gummy. Once squeezed dry, fold in the zucchini gently—this keeps the batter fluffy.
Step 4: Combine
Add the wet mixture into the dry ingredients. Stir gently with a spatula or wooden spoon until just combined—don’t overmix! Overmixing can make the cake dense, which I learned after a few too many dense disappointments. The batter should be thick but pourable. If it’s too dry, add a splash of milk or almond milk to loosen it up.
Step 5: Prepare Filling
In a small bowl, blend the softened cream cheese with powdered sugar and vanilla until smooth. For a fun twist, stir in chopped nuts, fruit preserves, or citrus zest. My kids love when I swirl in some raspberry jam—adds a lovely pop of color and flavor!
Step 6: Layer & Swirl
Pour about half of the batter into your prepared pan. Spread the cream cheese filling evenly over this layer, then top with remaining batter. Use a knife or skewer to swirl gently—this creates a beautiful marbled effect that’s totally Instagram-worthy and makes each slice look fancy.
Step 7: Bake
Pop it into the oven for about 40-45 minutes. The top should be golden and a toothpick inserted into the center should come out clean or with a few moist crumbs. Every oven is a little different; I’ve found starting to check around 38 minutes helps prevent overbaking. Cover loosely with foil if the top browns too quickly—I learned that trick after a few burnt edges!
Step 8: Cool & Glaze
Let the cake cool in the pan for about 15 minutes, then transfer to a wire rack to cool completely. Once cooled, mix your glaze and drizzle it over the top. I prefer it thin and shiny rather than thick—guided by the way it flows naturally over the cake. The glaze makes the whole thing look picture-perfect and adds just the right hint of sweetness.
Step 9: Slice & Serve
Use a serrated knife to cut your cake for neat slices. Wait until it’s at room temperature for the best texture. I love serving this with a dollop of whipped cream or a side of fresh berries. It’s especially pretty on a brunch table or as a dessert after a cozy dinner. And honestly, it’s so moist, it’s good for days—if it lasts that long! Wrap leftovers tightly in plastic, and I find it’s just as delicious on day two as on fresh-out-of-the-oven day.
What to Serve It With
This cake is incredibly versatile, and I usually adapt how I serve it depending on the occasion. For breakfast, I like pairing a slice with a good cup of coffee—the flavors of cinnamon and vanilla make it feel like a treat but still totally day-appropriate. It’s also lovely on a brunch table with fresh fruit, a little dollop of Greek yogurt, or even a drizzle of honey. When served as dessert, consider dollops of fresh whipped cream or a scoop of vanilla ice cream. My family loves jazzing it up with a sprinkle of crushed nuts or toasted coconut on top, especially when I want to make it more festive. And if I’m feeling extra indulgent, I add a drizzle of chocolate or caramel over the glaze—because, hey, why not?
Top Tips for Perfecting Your Zucchini Cake
Having made this more times than I can count, I’ve gathered a few tricks that might help you get the best result:
- Zucchini Prep: Always squeeze out the excess moisture after shredding. I use a clean dish towel or a cheesecloth—I’ve learned this from experience, or else your cake will be dense and watery.
- Mixing Advice: Be gentle when mixing the wet and dry ingredients. Overmixing is the enemy of fluffiness. Fold rather than stir vigorously, and your cake will turn out light and tender.
- Swirl Customization: When layering your filling and batter, swirl as little or as much as you like. A simple zig-zag pattern with a skewer gives that lovely marbled look. For a more dramatic swirl, add dollops of jam or fruit compote in between.
- Ingredient Swaps: Want to make it healthier? Swap half the flour for oats or almond flour. Looking for richer flavor? Add a splash of bourbon or rum to the batter. I’ve experimented with many variations, and each one has its charm.
- Baking Tips: Keep an eye on the cake near the end of baking. Every oven is different! Use a toothpick to check doneness, and start checking a few minutes early if your oven runs hot.
- Glaze Variations: Feel free to add a splash of liqueur, vanilla extract, or citrus zest to your glaze. The consistency should be pourable but not runny—if it’s too thick, add more liquid; if too thin, add more powdered sugar.
Honestly, every time I make this cake, I find a little new way to tweak it. That’s part of what makes baking so fun—learning as you go and making it your own. I’ve learned that a little patience in the mixing and baking process pays off, giving you that moist, tender crumb that’s hard to beat. Oh, and don’t forget—to taste the batter! Even with all the modifications, I’ve learned that a little taste test checks for sweetness and seasoning. Trust your nose and intuition. You’ll get your perfect leftover-free, flavorful zucchini cake every time.
Storing and Reheating Tips
This cake keeps well, which is good because you’ll find yourself sneaking slices for days. If you’re planning to save leftovers, here’s what I do:
- Room Temperature: Covered with a clean kitchen towel, it stays fresh for about 1-2 days. I don’t recommend leaving it out longer, especially in warm weather, because the filling can spoil.
- Refrigerator Storage: Wrap it tightly with plastic wrap or store in an airtight container. It will last 4-5 days and stays moist and flavorful. I’ve found that the filling and glaze taste even better the next day after resting.
- Freezer Instructions: Wrap slices individually in plastic wrap and place in a zip-top bag. Freeze for up to 3 months. To defrost, leave in the fridge overnight or warm gently in the microwave. Just keep in mind, adding or reapplying the glaze or a dusting of powdered sugar after reheating makes it look freshly baked again.
- Glaze Timing: If you’re making the cake ahead, I suggest adding the glaze just before serving so it stays shiny and runny for that pretty finish. If you’re freezing or refrigerating, do the same—add the glaze at the last minute for best presentation and texture.
From experience, the moist crumb holds up beautifully in storage, and the flavors deepen slightly overnight. No matter how you store it, I bet you’ll find a slice is just as tasty as the first day—though I warn you, it’s hard to resist that first warm, glazed slice!
Frequently Asked Questions
Final Thoughts
This zucchini cake has become one of those recipes I keep coming back to because it’s just so reassuring—moist, flavorful, and forgiving. It’s the kind of dessert that makes your kitchen smell like heaven and leaves everyone asking for seconds. Every time I make it, I’m reminded that simple ingredients, when combined with a little love and patience, can create something truly special. Whether you serve it for breakfast, brunch, or dessert, I promise it’ll bring a smile to your face. Don’t be afraid to experiment with fillings, glazes, or toppings—this is your canvas. So, get those zucchinis shredded, and let’s turn them into a slice of happiness! I’d love to hear how yours turns out—drop a comment or share a photo. Happy baking!
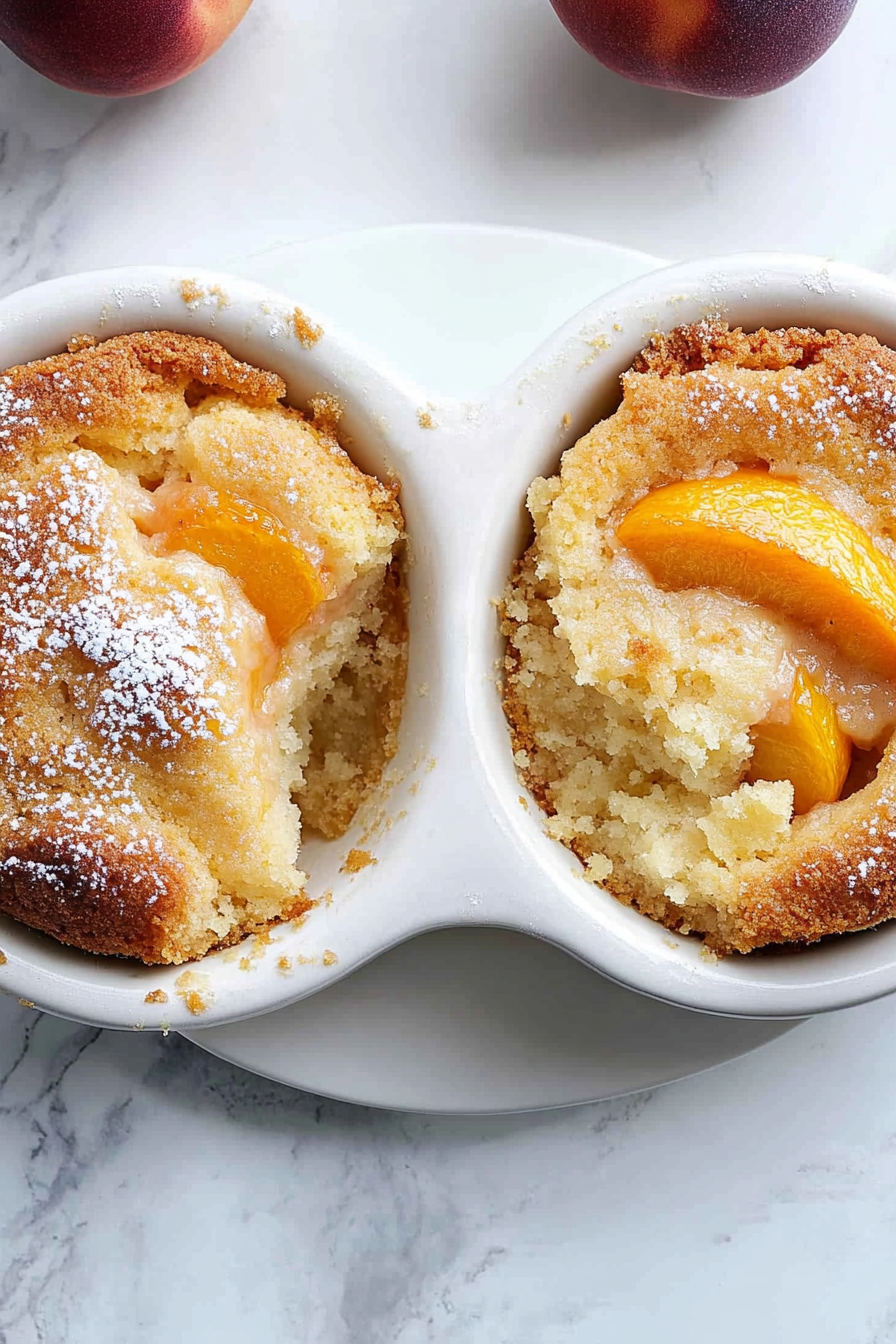
Peach Skillet Cake
Ingredients
Method
- Preheat the oven to 350°F (175°C). Spray a 10-inch cast-iron skillet with nonstick cooking spray. (Alternatively, you can use a 9x13-inch baking dish.)
- In a medium bowl, combine the granulated sugar, all-purpose flour, baking powder, kosher salt, and milk. Slowly whisk in the melted butter until just combined. Pour the batter into the prepared skillet.
- In a separate saucepan, combine the sliced peaches, brown sugar, cornstarch, and cinnamon. Cook over medium heat, stirring occasionally, for 2-3 minutes until the sugar is dissolved and the peaches are slightly softened. Spoon the peach mixture evenly over the top of the batter in the skillet.
- Bake for 45 minutes. To catch any potential drips, you can place a baking sheet lined with aluminum foil on the rack below the skillet.
- After 45 minutes, sprinkle the turbinado sugar evenly over the top of the cake. Return the skillet to the oven and bake for an additional 10-15 minutes, or until the cake is golden brown and cooked through.
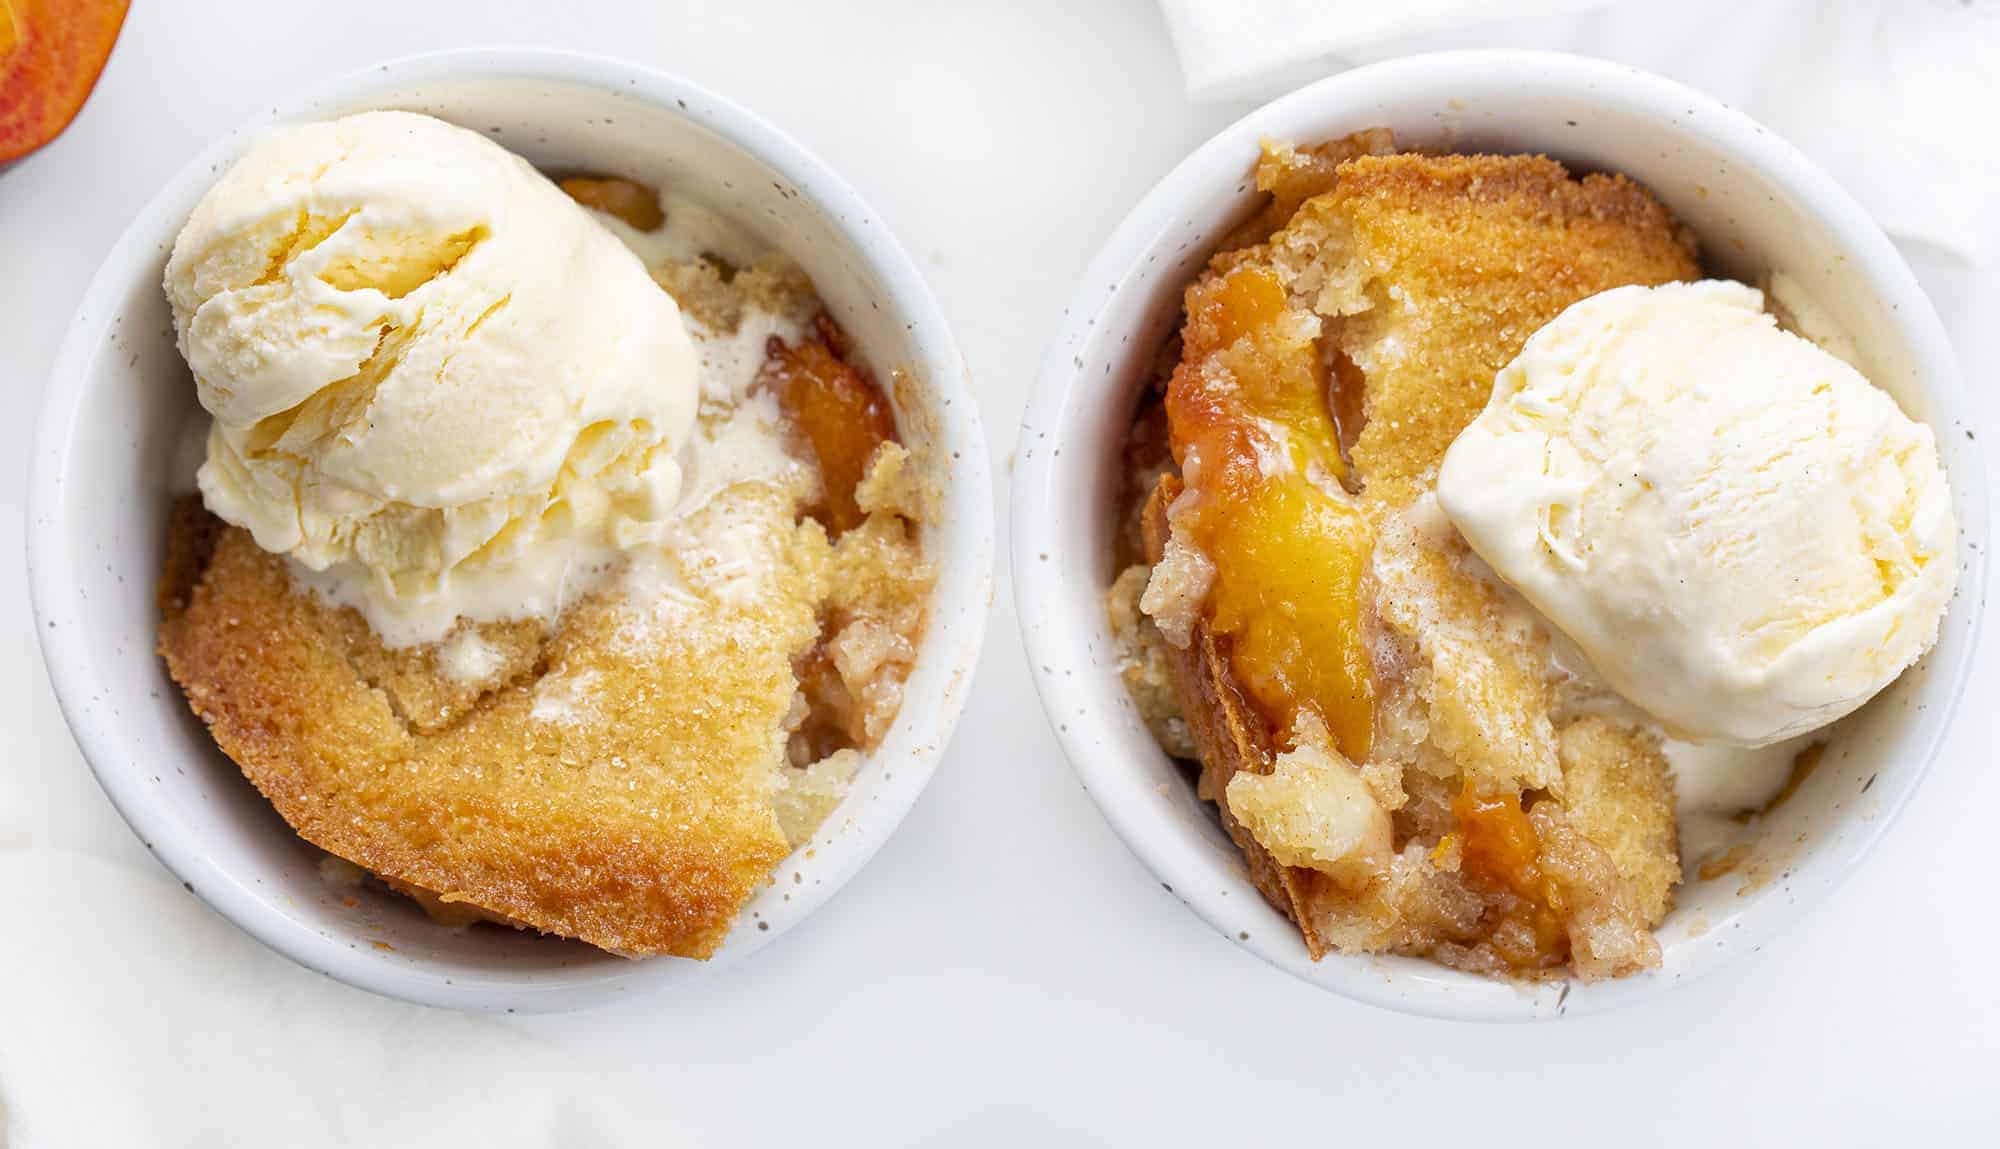
- Let the cake cool slightly before serving. Serve warm, optionally topped with whipped cream or ice cream.