Bubbly Strawberry Tart Recipe
There’s something about waking up on a lazy Sunday morning, the smell of something warm baking in the oven, that just feels like home to me. I remember as a kid, my mom would always whip up her famous coffee cake, and I’d sneak a piece still warm from the pan—sweet, moist, and with that perfect gooey swirl running through the middle. Years later, I’ve played around with her recipe, trying to make it a bit healthier and stay true to that nostalgic feeling. And let me tell you, this zucchini swirl coffee cake hits all the right notes. It’s incredibly flavorful, moist without being heavy, and honestly, it’s so forgiving—an easy bake I always keep in my back pocket. My kids actually ask for this all the time now, especially when I have a zucchini sitting lonely in the fridge. It’s my little secret, the sort of treat you can make on a weeknight when you’re craving something sweet but want to avoid turning on the oven for hours. Trust me, this one’s a lifesaver on busy nights—plus, it’s sneaky healthy with all that zucchini sneaking in. Grab a cup of coffee, and let’s get baking! I promise, you’ll want this in your recipe rotation forever.
What is Zucchini Swirl Coffee Cake?
Think of it as a cozy, cinnamon-scented cake, but with a little veggie twist—zucchini! It’s essentially a moist, tender coffee cake with a beautiful, marbled swirl of cinnamon-spiced zucchini running through the middle. The name might sound fancy, but it’s actually super simple—a humble cake turned unforgettable thanks to that cozy swirl. The “coffee cake” part harks back to the idea that this can be served anytime—morning, brunch, or even as an afternoon snack with friends. What’s so great about this dish is that it combines familiar flavors—warm cinnamon, sweet vanilla, a hint of nutmeg—with the surprise element of zucchini. My favorite part? That luscious, slightly caramelized swirl that makes every bite more exciting. It’s a celebration of textures and flavors that’s perfect whether you’re cooking for family or just craving a little slice of comfort. And because we’re sneaking in zucchini, it’s almost like getting away with a treat that’s a little kinder on the waistline. It’s truly one of those recipes that feels like a big warm hug—something you’ll want to make again and again.
Why you’ll love this recipe?
Honestly, what I love most about this zucchini swirl coffee cake is how it balances comfort and cleverness. The flavor—oh, it’s just heavenly. The warm cinnamon and ripe zucchini create such a moist, tender crumb that just melts in your mouth. Plus, that cinnamon swirl—so pretty, so inviting—gives every slice that perfect little surprise. And get this: it’s insanely easy to make. No fancy tools or techniques required; I always do this when I need a quick, satisfying treat. It’s practically foolproof, which, as a busy mom, I can totally appreciate. My wallet also loves how budget-friendly the ingredients are—just basic staples from the pantry and some fresh zucchini from the garden (or the store). You can also customize it endlessly—swap out the cinnamon for nutmeg, add chopped nuts for crunch, or even mix in some blueberries for a fruity twist. I’ve tested this with almond milk and it actually made it even creamier! What’s more, it’s versatile enough to serve at breakfast, brunch, or as a cozy snack any time of day. Whatever mood I’m in, this cake always delivers that warm, nostalgic feeling that makes my home smell like childhood love. It’s a guaranteed crowd-pleaser that my friends ask for every time I visit. The best part? It disappears in minutes at my house. Trust me, once you try it, you’ll want to keep making it forever.
How do I make Zucchini Swirl Coffee Cake?
Quick Overview
This recipe is all about keeping it simple and tasty. You start by grating fresh zucchini—no need to squeeze out every drop—then mix up a tender batter with just a handful of pantry staples. The zucchini gets folded into the batter along with cinnamon, creating a beautifully marbled swirl when layered in the pan. You pour the batter into a greased pan, spoon on the cinnamon-sugar-zucchini mixture, swirl it gently, and bake until golden. In under an hour, you have a fragrant, moist coffee cake ready to slice and enjoy. It’s the kind of dessert that tastes impressive but is totally doable even on a weeknight. The key is not overmixing, so it stays fluffy, and not overbaking, so it’s still moist. Plus, the smell alone will make everyone gather around the kitchen—trust me on that. This cake is perfect when you want something warm and sweet but don’t want hours of fuss.
Ingredients
For the Main Batter:
– 1 ½ cups all-purpose flour (or a mix of whole wheat + all-purpose)
– 1 cup granulated sugar
– 1 teaspoon baking powder
– ½ teaspoon baking soda
– ¼ teaspoon salt
– 1 teaspoon ground cinnamon
– ½ teaspoon vanilla extract
– ¾ cup milk (dairy or plant-based)
– ⅓ cup vegetable oil or melted butter
– 2 large eggs
– 1 cup grated zucchini (squeeze out a little moisture if it’s extra watery)
For the Filling:
– ½ cup packed brown sugar
– 1 teaspoon ground cinnamon
– 1 cup grated zucchini (second batch or leftover from batter)
– Optional: handful of chopped walnuts or pecans for crunch
For the Glaze:
– ½ cup powdered sugar
– 1-2 teaspoons milk or lemon juice
– A dash of vanilla (optional)
Step-by-Step Instructions
Step 1: Preheat & Prep Pan
First, preheat your oven to 350°F (175°C). Grease a 9-inch round or square baking pan generously—trust me, this cake can stick if you’re not careful. I also like to line the bottom with parchment paper for extra easy removal. Set it aside while you prepare your batter. The kitchen will start smelling amazing early on, so don’t rush this step!
Step 2: Mix Dry Ingredients
In a large mixing bowl, whisk together the flour, sugar, baking powder, baking soda, salt, and cinnamon. This step ensures everything is evenly distributed and takes just a minute. I’ve learned that truly mixing the dry ingredients well prevents clumps and makes the batter uniform, which is key to a fluffy crumb. Plus, your batter will come together much easier when all the leaveners are evenly spread out.
Step 3: Mix Wet Ingredients
In another bowl, whisk the eggs, milk, vanilla, and oil until smooth. I always do this first; it makes folding everything together so much easier. When you add the zucchini, make sure it’s grated and a little bit moist but not swimming in water—extra moisture can make your cake dense. A quick squeeze or blot with a paper towel works wonders if your zucchini release lots of water.
Step 4: Combine
Pour the wet mix into the dry ingredients and gently fold together. The goal is to just combine—avoid overmixing or your cake might turn out heavy. A few lumps are okay; they’ll bake out and give you that nice, tender crumb. Patience is key here. Also, fold in the grated zucchini last, so it’s evenly distributed.
Step 5: Prepare Filling
In a small bowl, mix the brown sugar and cinnamon. Fold in the zucchini, and if you’re feeling crunchy, sprinkle in chopped nuts. This filling is what gives your coffee cake that signature swirl and sweet flavor burst in every bite. It’s just the right amount of gooey—think of it as the juice that makes each slice irresistible.
Step 6: Layer & Swirl
Pour about half of the batter into your prepared pan, then evenly spread the zucchini filling over the top. Carefully spoon the remaining batter over the filling, smoothing the top gently. Now, take a butter knife or skewer and swirl through the batter, creating beautiful marbled lines. I’m obsessed with this step—it looks so pretty when you’re finished, almost like a work of art, but it’s also fun to do.
Step 7: Bake
Pop it into the oven and bake for 40-45 minutes. Keep an eye on it after 40—you want it golden and a toothpick inserted into the center to come out clean. Different ovens vary, so it’s good to start checking around the 40-minute mark. If it’s browning too quickly, tent it loosely with foil. The smell will be incredible—cinnamon, zucchini, vanilla—your kitchen will smell like a cozy bakery!
Step 8: Cool & Glaze
Once baked, let it cool in the pan for at least 15 minutes. I know tempting, but patience is the secret to clean slices. For the glaze, whisk together powdered sugar and a little milk or lemon juice until smooth—thick but pourable. Drizzle it over the warm cake, letting it set slightly as it cools down so it doesn’t slide off.
Step 9: Slice & Serve
Use a sharp knife to cut into squares or slices—clean cuts make all the difference. Serve it warm with a dollop of yogurt or a splash of cream, or enjoy it plain with a cup of coffee. This cake is even better the next day—if it lasts that long! I love serving this for breakfast or brunch, but honestly, it’s a perfect anytime treat. The kids love it, the adults do too, and it’s always a hit at potlucks.
What to Serve It With
This zucchini swirl coffee cake is so versatile—it pretty much goes with anything. For an easy breakfast, pair it with your favorite coffee blend—maybe a strong French roast or a light, bright pour-over. I love serving it with a side of fresh fruit or some Greek yogurt topped with honey for added richness. On brunch days, I’ll scoop some whipped cream or vanilla ice cream on top—yes, I cheat just a little for dessert vibes!
As a dessert, it’s lovely with a cup of tea or a glass of cold milk. Warm, topped with a drizzle of honey, or even with a little dusting of powdered sugar—so cozy. If you’re feeling extra indulgent, a scoop of vanilla ice cream melts beautifully right into that hot swirl in the middle. My family loves this with a cup of hot chocolate in the winter, and honestly, any time of year, it feels like a warm hug.
Top Tips for Perfecting Your Zucchini Swirl Coffee Cake
Over the years, I’ve picked up a few tricks that make this cake turn out perfectly every time. First, grate the zucchini finely—larger chunks won’t blend as well into the swirl and might make the batter watery. I swear by giving it a quick squeeze to remove excess moisture, which keeps the crumb tender, not soggy. You don’t need to peel the zucchini unless you want a uniform color; the green speckles just add to the rustic charm.
When mixing the batter, go easy on the overmixing—this keeps your cake fluffy. As you layer the filling, try to create a little ripple with the swirl, but don’t overdo it—that marbled look is what makes this cake pretty. I also recommend baking on the middle rack to ensure even baking, and keep an eye toward the end of the baking time so it doesn’t overbrown.
For the glaze, I like to keep it thick enough to hold its shape but thin enough to drizzle easily. A tip? Add a teaspoon of lemon juice or vanilla to flavor it up—kind of my signature move. If you prefer a less sweet cake, reduce the sugar a bit in the batter or use natural sweeteners. Adjusting the cinnamon and sugar in the filling can also personalize this cake perfectly.
Finally, I learned that letting the cake cool completely before slicing helps it hold together beautifully. Transfer slices carefully with a thin spatula if needed. This cake gets better with a day or two, so don’t be afraid to make it ahead—just store it in an airtight container to keep it fresh and moist.
Storing and Reheating Tips
This cake stays fresh quite well, which is a blessing since it often gets better after a day or two. If you have leftovers, store slices in an airtight container at room temperature for up to two days—cover loosely with plastic if you want to keep the crust crispy. For longer storage, refrigerate for up to 4 days; just be sure to bring it to room temp before serving, or warm it up gently in the microwave for a few seconds—trust me, that’s the way to go for maximum moistness. Freezing is also a good option: Wrap individual slices tightly in plastic wrap, then nestle in a zip-top bag. They’ll keep for up to 3 months. When ready to serve, defrost at room temperature or warm in the microwave for 10-15 seconds. I also recommend adding the glaze after reheating if you want that shiny, sweet finish.
Just a heads up: the glaze can become runny if the cake is too warm, so wait until it’s cooled a bit. This way, you get that perfect glossy look and sticky-sweet finish each time. I’ve tested this method over and over, and it stays delicious and fresh—my trick is to keep it covered loosely to prevent it from drying out. It’s honestly one of those recipes that makes you feel like a kitchen hero—and your whole house will smell like a bakery!
Frequently Asked Questions
Final Thoughts
This zucchini swirl coffee cake has become a staple in my house. It’s that rare recipe that feels special but is so easy you’ll turn to it all the time. The flavors are warm and inviting, and the sneaky zucchini makes it feel a little healthier—but honestly, no one ever complains about that. It’s perfect for breakfast, brunch, or that sweet craving at 10pm when you want something comforting without the guilt. Over the years, I’ve tweaked this recipe to suit our tastes, adjusting the sweetness, experimenting with toppings, and trying different fillings—I promise, it’s so adaptable. If you give it a try, I’d love to hear how it turns out! I bet your family will ask for seconds, just like mine does. Baking this feels like a little act of love, and I know it’ll bring a smile to your face. Happy baking—let your kitchen fill with that irresistible cinnamon aroma, and enjoy every warm slice!
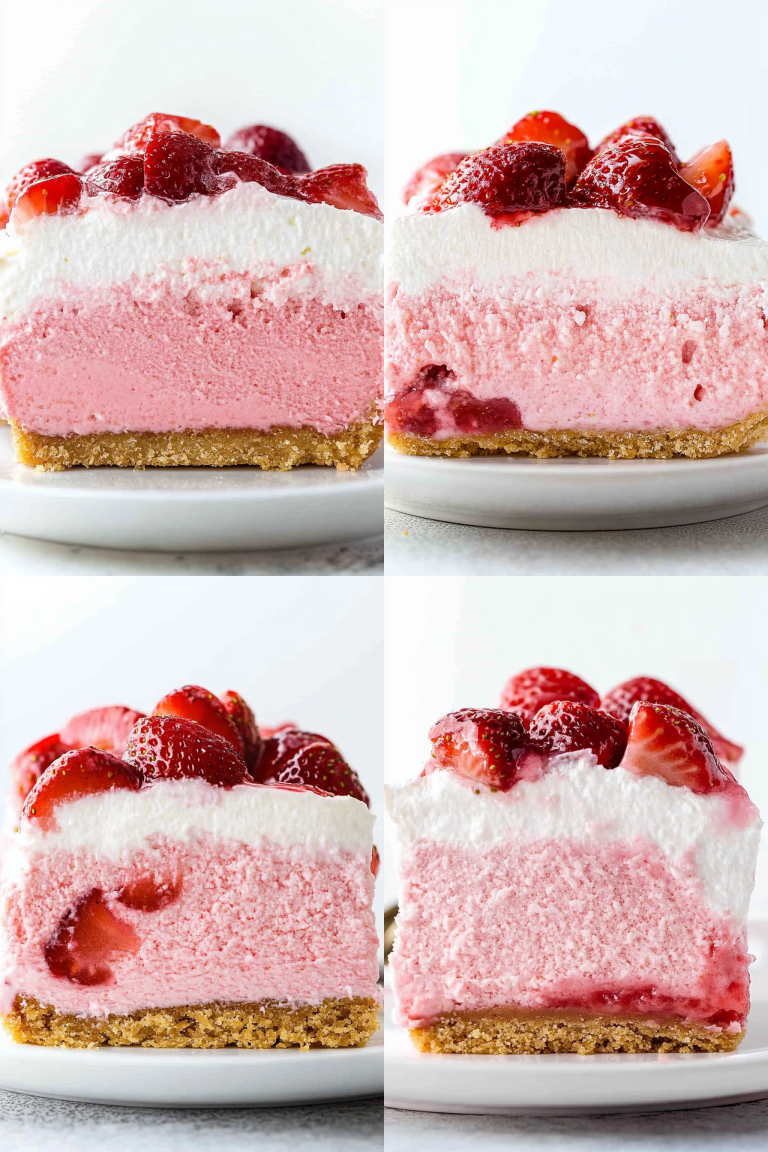
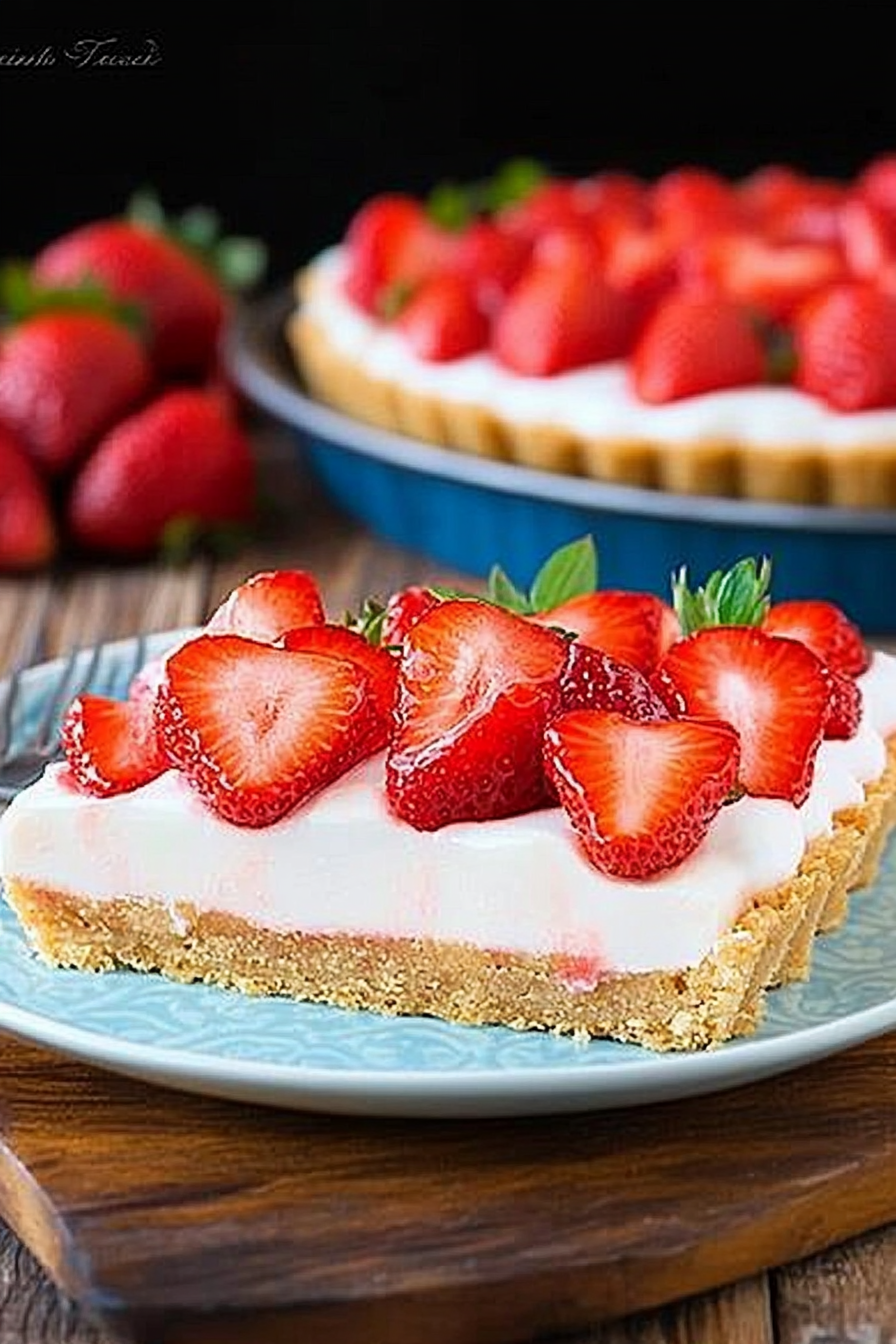
Strawberry Tart
Ingredients
Method
- Spray a 9-inch tart pan with non-stick baking spray and preheat oven to 325°F.
- Combine vanilla wafer crumbs and sugar in a medium bowl. Add melted butter and stir until well combined.
- Press the crumb mixture firmly into the bottom and up the sides of the tart pan. Use a measuring cup or glass for the bottom and your fingers for the sides.
- Bake for 7 minutes, then remove from oven and let cool completely. You can refrigerate or freeze to speed up cooling.
- In a small bowl, sprinkle gelatin over cold water. Stir to moisten and let stand for 5 minutes.
- In a saucepan, whisk cornstarch and sugar. Add champagne and heat over medium heat, stirring constantly, until the mixture just begins to boil. Remove from heat.
- Heat the gelatin mixture for about 10 seconds until melted, then whisk into the champagne mixture until smooth. Let cool to room temperature.
- In another bowl, whip heavy whipping cream and powdered sugar until thickened.
- Add mascarpone cheese and whip on low speed until incorporated, then increase to medium speed until the whipped cream thickens and holds its shape.
- Carefully fold the cooled champagne mixture into the mascarpone mixture in two additions until well combined.
- Spread the filling evenly into the cooled crust and refrigerate for 2-3 hours, or until firm.
- Combine champagne, cornstarch, and sugar for the glaze in a small bowl. Microwave in 10-second increments until it boils and thickens, about 30-40 seconds. Let cool slightly.
- Layer the sliced strawberries on top of the tart filling. Brush the cooled glaze onto the strawberries with a pastry brush.
- Refrigerate the tart for 30 minutes to an hour, or until the glaze is cool, then serve.