Hazelnut Chocolate Cake How to Bake It
There’s something about baking that just graces the house with this irresistible warmth that makes everything feel cozy—like a big hug from your grandma or that childhood smell of Saturday mornings. I remember sneaking bites of my mom’s zucchini bread when I was little, secretly loving how the sweet and earthy aroma filled the house. Fast forward a few years, and I’ve turned that nostalgic flavor into a loaf that’s perfect for anytime you want a bit of comfort. This zucchini chocolate swirl loaf isn’t just delicious—it’s surprisingly easy to make, even on busy weekdays. Plus, it’s a sneaky way to get some greens into your family’s diet without anyone noticing. Trust me, this one’s a lifesaver on busy nights when you need something homemade that everyone raves about — and my kids actually ask for seconds. It’s moist, rich, with a beautiful chocolate swirl that looks almost too pretty to eat. And the best part? It comes together in a bowl, no fancy equipment, and bakes up in under an hour. So grab that zucchini from the fridge—let’s make magic!
What is Zucchini Chocolate Swirl Loaf?
This zucchini chocolate swirl loaf is basically what happens when you combine the wholesome goodness of zucchini bread with a decadent chocolate twist. Think of it as a healthier-ish treat — where the zucchini keeps the loaf super moist and tender, while swirls of gooey chocolate make each bite feel indulgent. It’s essentially a cross between a classic zucchini bread and a marble cake, but one that you can whip up quickly and still feel good about. The name might sound fancy, but really, it’s just a straightforward loaf that gets jazzed up with swirls of melted chocolate, making it look like bakery-level luxury. I love that it’s so versatile — perfect for breakfast, a midday snack, or even dessert paired with a scoop of vanilla ice cream. It’s the kind of recipe that’s rooted in tradition but has a little modern twist that makes it fun to serve and even more fun to eat.
Why you’ll love this recipe?
What I love most about this zucchini chocolate swirl loaf is how it hits all the right notes — sweet, moist, with a hint of earthiness from the zucchini and a rich chocolate surprise running through it. The flavor profile is just balanced enough to satisfy a cookie craving but wholesome enough that I don’t feel guilty about it. Plus, it’s super easy to make. Trust me, I’ve tested it with different flours, like almond or whole wheat, and it always turns out beautifully—so it’s fantastic whether you’re gluten-sensitive or just want to cut back on refined flour. Another reason I keep coming back to this is its versatility — simple enough for a weeknight treat but special enough for brunch or to share at a potluck. The cost is minimal too, since most ingredients are pantry staples or things I usually keep around. And honestly? It’s a sneaky way to get kids to eat veggies—they love the chocolate swirls, and I get the healthy boost I want. It’s become a staple in my kitchen, especially when I need something homey but impressive—all in one loaf!
How do you make Zucchini Chocolate Swirl Loaf?
Quick Overview
This loaf comes together in just a few simple steps: grate your zucchini, whip up a straightforward batter, melt some chocolate, and then layer and swirl. The key is to use freshly grated zucchini—moisture control is everything, so I always squeeze out a little excess water after grating. The batter is rich with warm spices and vanilla, cradling tender zucchini pieces, and then you get to create those gorgeous chocolate swirls that make the loaf look almost too pretty to cut. Once baked until golden and a toothpick comes out clean, you’ll let it cool slightly before glazing or serving as is. It’s the kind of recipe that makes your kitchen smell like a dream, and I promise, it’s foolproof once you get the hang of layering and swirling. It’s perfect for when you want a little something sweet on hand but don’t want to fuss over complicated baking.
Ingredients
For the Main Batter:
- 1 1/2 cups all-purpose flour (whole wheat works well, too; I like to add a splash of almond flour for extra richness)
- 1 teaspoon baking powder
- 1/2 teaspoon baking soda
- 1/2 teaspoon salt
- 1 teaspoon cinnamon (optional but I always do this—adds cozy flavor)
- 1/2 cup brown sugar (or coconut sugar for a healthier touch)
- 1/4 cup honey or maple syrup
- 1/3 cup vegetable oil or melted coconut oil
- 2 large eggs
- 1 teaspoon vanilla extract
- 1 1/2 cups grated zucchini (about 1 medium zucchini, squeezed dry)
For the Filling:
- 1/2 cup semi-sweet chocolate chips or chopped chocolate (choose good quality for the best flavor)
For the Glaze (optional but pretty):
- 1/2 cup powdered sugar
- 1-2 teaspoons milk or cream
- 1/4 teaspoon vanilla (or almond extract)
Step-by-Step Instructions
Step 1: Preheat & Prep Pan
Set your oven to 350°F (175°C). Grease a loaf pan—trust me, I always do this with butter or non-stick spray—and line it with parchment paper if you’re worried about sticking. This loaf is a bit delicate when hot, so proper prep makes slicing a breeze later.
Step 2: Mix Dry Ingredients
In a large bowl, whisk together the flour, baking powder, baking soda, salt, and cinnamon. Sifting isn’t necessary but it helps keep everything light and airy. I’ve made the mistake of not mixing my dry ingredients well enough — then you get pockets of baking soda or flour, which isn’t fun. Whisk until evenly combined, and set aside.
Step 3: Mix Wet Ingredients
In another bowl, beat the eggs, then add the sugar, honey, or maple syrup, and oil. Whisk until smooth. I like using room-temperature eggs because they blend easier and help keep the batter nice and even. Then stir in the vanilla. The smell of vanilla mixed with warm spices is one of my favorite parts.
Step 4: Combine
Add the wet ingredients to the dry, and gently fold until just combined. Overmixing can make your loaf dense, so I always do this by hand with a spatula — stop when everything’s just about incorporated. Now, fold in the grated zucchini, squeezing out any excess water beforehand — too much moisture can make the batter runny. I’ve tested with 2 tablespoons of lemon zest before, and it adds a lovely brightness, so feel free to experiment.
Step 5: Prepare Filling
Gently melt the chocolate chips in a microwave-safe bowl, stirring every 20 seconds until smooth. Let it cool just a little — hot chocolate can cause your batter to seize up or cook unevenly. Stir the chocolate into a small portion of the batter set aside, or drizzle it on top for layered swirl effect.
Step 6: Layer & Swirl
Pour half of the batter into your prepared pan. Dollop spoonfuls of melted chocolate, then add the rest of the batter on top. Using a skewer or a knife, swirl the chocolate through in a figure-eight or gentle zigzag motion. The key is to create those beautiful marbled swirls without overmixing—trust me, the visual impact is worth it!
Step 7: Bake
Place in the oven and bake for about 45-50 minutes. The top should turn golden, and a toothpick inserted in the center should come out with a few moist crumbs. If the top starts browning too quickly, tent it loosely with foil — I’ve learned this trick after a few over-baked loaves that turned dark before being cooked through.
Step 8: Cool & Glaze
Once out of the oven, let the loaf cool in the pan for about 10 minutes. Then transfer it to a wire rack. If you want the pretty glaze, mix the powdered sugar with vanilla and just enough milk to get a drizzle-able consistency. Pour or drizzle over the warm loaf. If you prefer, just dust with a little powdered sugar for a simpler look.
Step 9: Slice & Serve
Let it cool a bit more—hot bread can mess up your slices—and then cut with a serrated knife. The texture should be moist and tender, and the chocolate swirls will look stunning. I love serving it slightly warm or at room temperature, maybe with a cup of coffee or tea. And trust me, this loaf disappears pretty quickly at my house!
What to Serve It With
This loaf is incredibly versatile. For breakfast, it pairs beautifully with a latte or a steaming mug of herbal tea. My kids love it toasted with butter and a drizzle of honey — I swear, it’s almost like a dessert then. During brunch, I drizzle a little extra glaze or dust with powdered sugar for a prettier presentation. It’s also fantastic as a dessert—serve slices with a scoop of vanilla ice cream or a dollop of whipped cream, and you’ve got a lovely finish for a casual dinner. And on cozy nights, I like to cut thick slices, warm them up slightly, and pair with a glass of cold milk or hot cocoa. Honestly, this loaf has become a household favorite because it feels like a treat but keeps things feeling wholesome. My family always asks for it when I need a quick dessert or a sweet snack to get us through busy days.
Top Tips for Perfecting Your Zucchini Chocolate Swirl Loaf
After making this a dozen times, I’ve picked up a few tricks. First, squeeze out as much moisture as possible from the zucchini — it’s the secret to avoiding a soggy loaf. I do this by pressing the grated zucchini in a clean kitchen towel or paper towel; it’s a small thing that makes a huge difference. When mixing, I always fold gently; overmixing can make the batter dense and heavy, and I want this loaf light and fluffy. Swirling the chocolate is a fun step — I recommend setting aside a small spoonful of batter to dollop on top of the chocolate swirl to create more pronounced marble effects. Substitutions work nicely too: coconut oil instead of vegetable oil, coconut sugar instead of brown sugar, even mashed bananas if you’re out of eggs. Just keep the ratios roughly the same, and you’ll be fine. Temperature-wise, I switch my oven to bake on the middle rack for even heat, and I test doneness by inserting a toothpick — if it comes out with a few moist crumbs, it’s ready. If your chocolate isn’t melting smoothly, microwave it in short bursts and stir—stirring is key for that glossy, smooth drizzle. I’ve also tried adding a pinch of sea salt or chili flakes to the chocolate for a little kick, and wow — game changer! Experimenting with flavor enhances the loaf without complicating the process. And remember, every oven bakes just slightly differently, so keep an eye on it around the 45-minute mark. Trust me, the smell alone is worth the effort in the kitchen.
Storing and Reheating Tips
This loaf stays fresh for a good 2-3 days at room temperature, wrapped loosely in foil or stored in a cake dome. Just make sure it’s completely cooled before wrapping – warm bread can cause condensation, making it soggy. For longer storage, I prefer to refrigerate individual slices in an airtight container — they’re perfect for grabbing on busy mornings or afternoon sweet cravings. To keep the moisture intact, I recommend wrapping slices in plastic wrap before refrigerating. If you want to stash it for a week, freezing is your best bet—wrap it tightly in plastic wrap, then foil, or pop slices into a zip-top bag. When ready to eat, I’d recommend thawing at room temperature, then warming slices in the microwave for about 10-15 seconds. The chocolate swirl might firm up slightly, but a quick warm-up restores that gooey texture. You can also reheat the whole loaf in a low oven (around 325°F) for about 10 minutes if it’s been frozen. As for the glaze, I style it freshly just before serving—but if it’s already on the loaf and you want to reheat, just do it gently to prevent melting the glaze too much. This way, you get fresh-tasting slices no matter when you indulge.
Frequently Asked Questions
Final Thoughts
This zucchini chocolate swirl loaf has become one of my absolute favorites — it’s comforting, surprising, and just a little special. The way the chocolate and zucchini come together in each moist, tender slice makes it almost magical. It’s a testament to how simple ingredients can turn into something memorable when treated with love. My kids ask for this all the time—sometimes I sneak a handful of walnuts or a sprinkle of sea salt into the batter for extra flair, and it always elevates the flavor. If you’re looking for an easy, no-fuss bake that’s guaranteed to impress, give this a try. I promise, once you get the swirl down, you’ll be making this weekly. And don’t forget—baking is all about having fun, so feel free to get creative with add-ins and toppings. Happy baking! I can’t wait to hear how yours turns out—tag me, comment, or send a pic. Enjoy every crumb, friend!
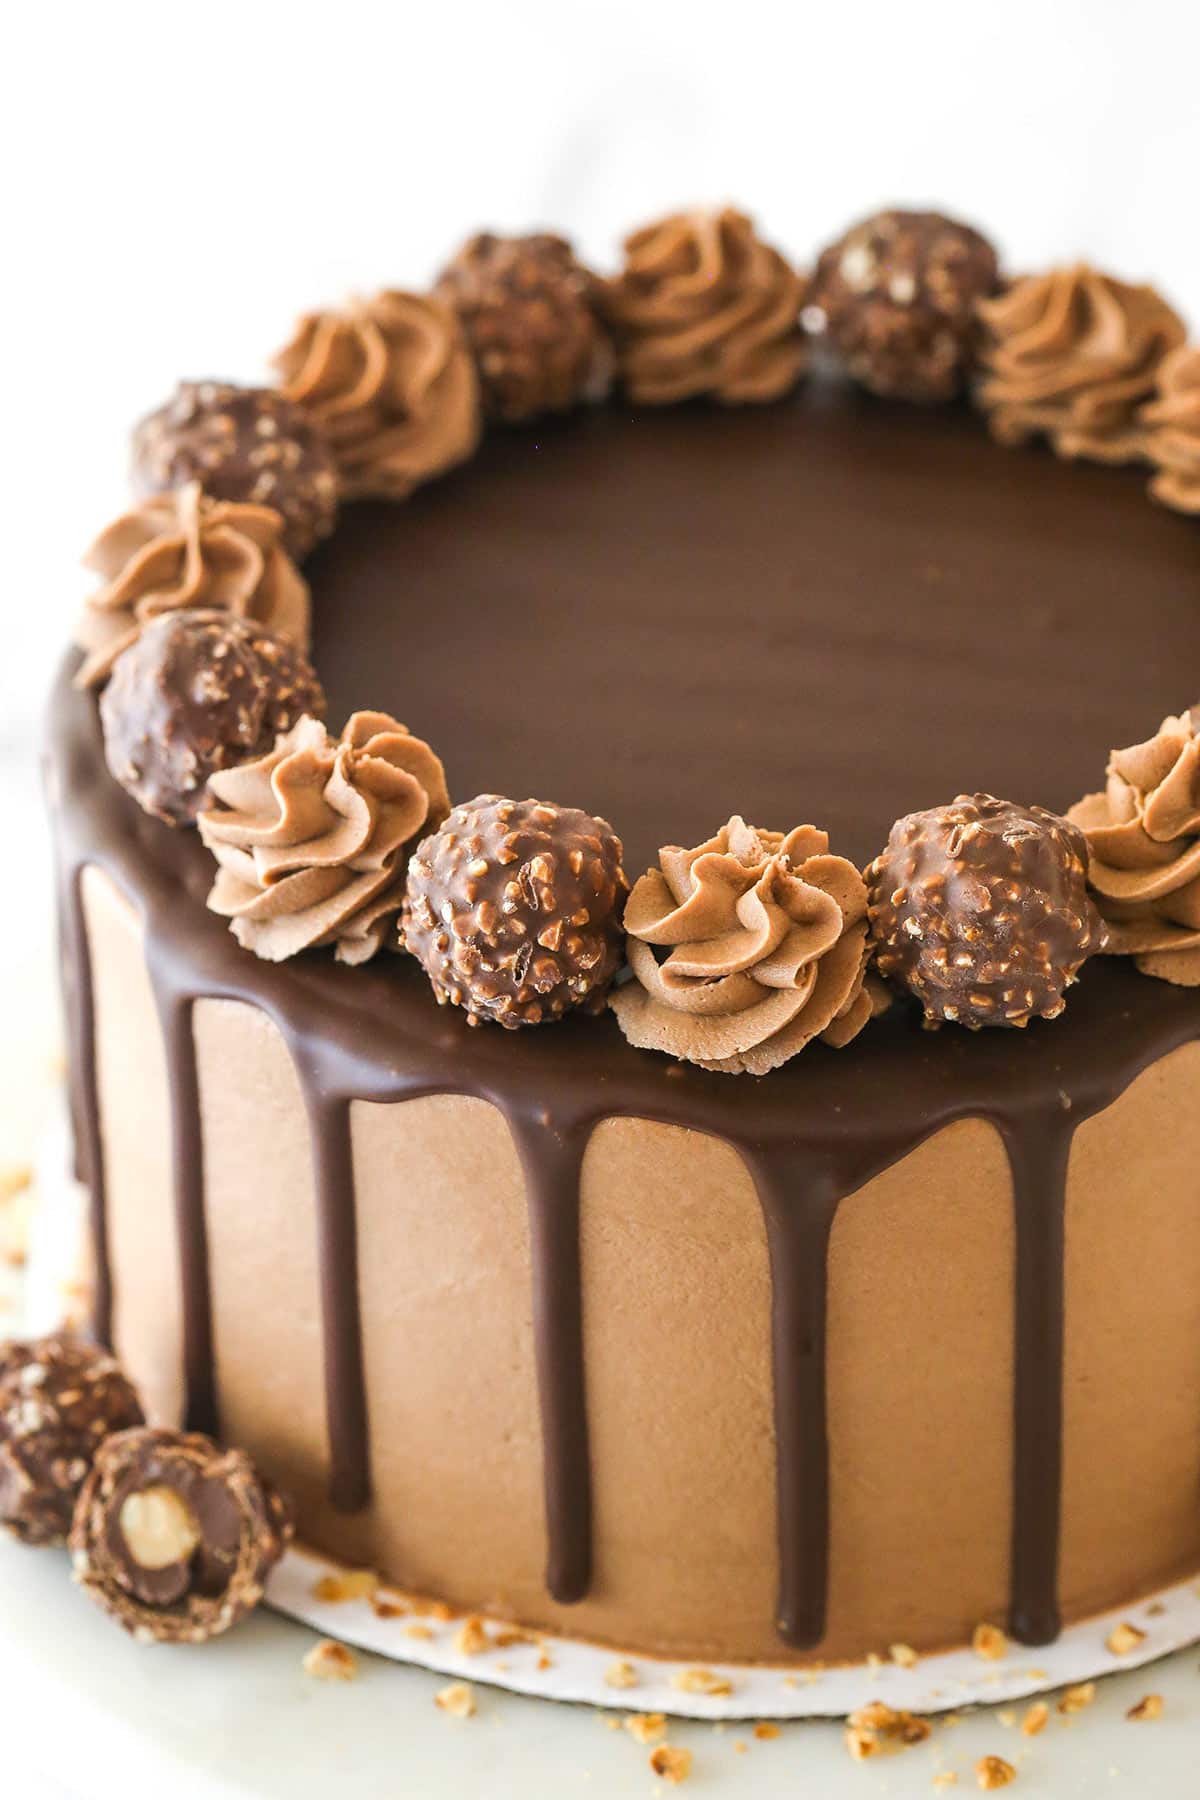
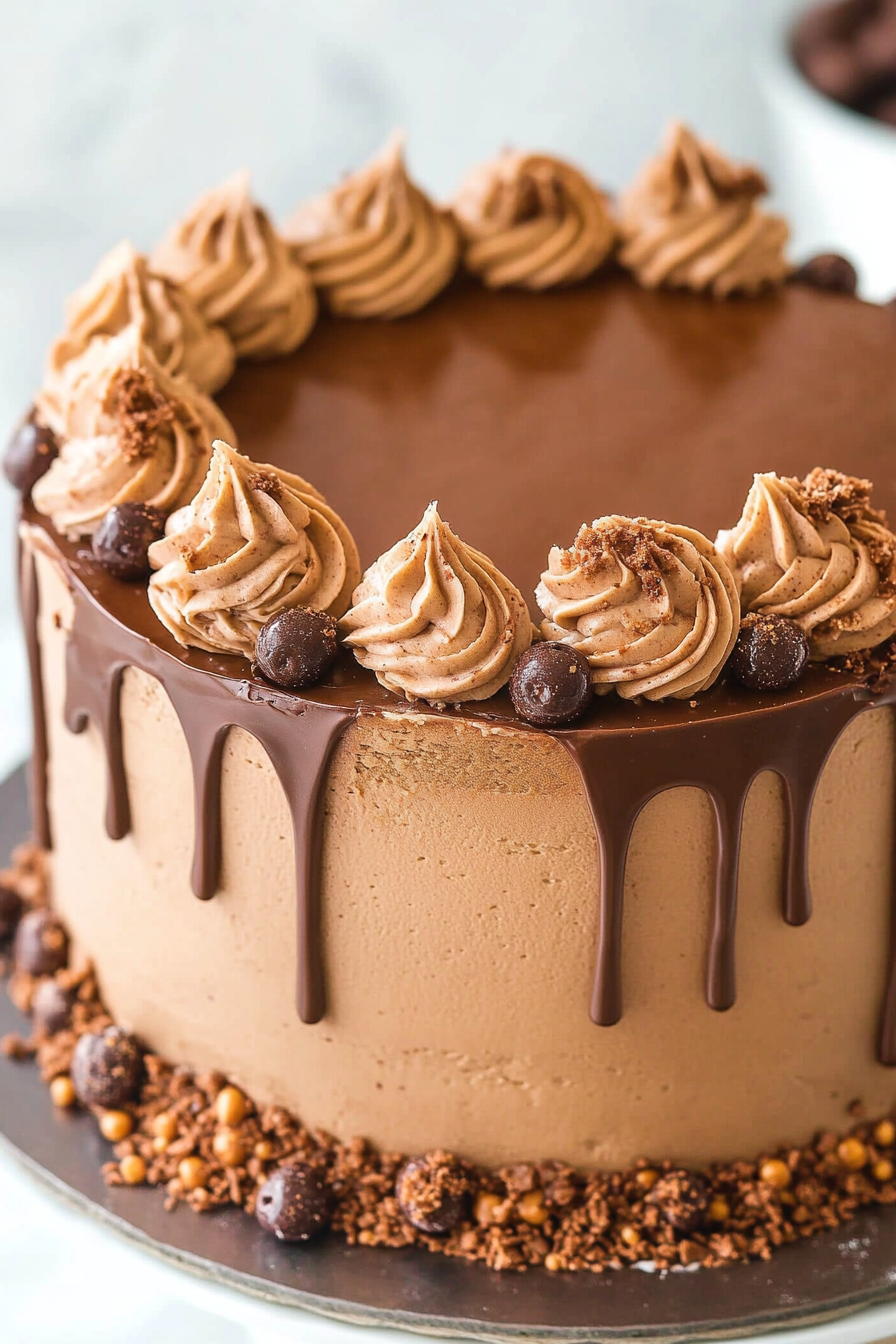
Nutella cake
Ingredients
Method
- Preheat oven to 300°F. Prepare three 8-inch cake pans with parchment paper and grease the sides.
- In a large bowl, whisk together flour, sugar, cocoa powder, baking soda, and salt.
- Add eggs, milk, vegetable oil, and vanilla to the dry ingredients and mix until smooth.
- Stir in water until the batter is thin and smooth.
- Divide batter evenly among the pans and bake for 30-33 minutes. Cool completely.
- Beat butter and Nutella until creamy. Gradually add powdered sugar and heavy cream, beating until smooth.
- Level the cakes, layer with buttercream, and frost the outside.
- Make ganache by heating Nutella, chocolate chips, and heavy cream until melted and smooth.
- Drizzle ganache on the cake, then pipe remaining frosting around top edge. Decorate with Ferrero Rocher candies.
- Serve once ganache has set. Store leftovers in an airtight container.