Easy Italian Sub Salad Recipe
There’s something about baking a cake that instantly makes any house feel warmer, cozier, almost like a hug from my grandma. I remember helping her in the kitchen when I was a kid, sneaking bites of raw batter while she wasn’t looking. Years later, I still get that same thrill whenever I whip up my zucchini chocolate swirl cake. It’s surprising, really — a cake that sneaks in healthy veggies and still manages to taste decadent. That’s what I love most about this recipe; it’s like a little secret that turns into a family favorite in no time. Plus, it’s incredibly forgiving — I’ve tested this with different kinds of chocolate and even almond milk, and it always turns out beautifully. Honestly, this one’s a lifesaver on busy nights when I need something homemade but don’t want to spend hours in the kitchen. And the smell alone? It’s pure magic, filling the house with warm, chocolatey goodness that draws everyone to the kitchen. Trust me, once you try this, it’s going to become your go-to comfort dessert too! It’s sweet, a little sneaky with the veggies, and downright addictive.
What is Zucchini Chocolate Swirl Cake?
Think of this as a way to sneak in healthy veggies without sacrificing the indulgence of a rich, moist chocolate cake. It’s essentially a layered cake where a luscious chocolate batter gets paired with a hidden component — grated zucchini. The zucchini keeps the crumb incredibly tender and moist, almost like a magic trick that adds moisture without altering the flavor too much. The “swirl” part is where the fun begins: I pour the batter into my pan, dollop teaspoons of rich chocolate, then swirl it around with a toothpick or skewer to create gorgeous marbled patterns before baking. It’s like a little piece of art in every slice — a dessert that’s pretty AND delicious. Over the years, I’ve adapted this recipe a thousand times, trying different chocolates and even swapping in different spices, but the core has remained a comforting, fail-proof classic. It’s definitely a recipe I keep in my back pocket, especially when I want to impress friends or just treat my family to something special. The best part? Everyone loves it — kids ask for seconds, and even the pickiest eaters are surprised to find vegetables hiding in their cake!
Why you’ll love this recipe?
There are so many reasons why I keep coming back to this zucchini chocolate swirl cake — I honestly can’t get enough. First off, the flavor. It’s rich, chocolatey, and deeply satisfying, but the twist of zucchini keeps it surprisingly light and moist. It’s the kind of cake that melts in your mouth, and I swear the zucchini makes it taste even more decadent by adding a subtle earthiness that pairs beautifully with the dark cocoa. What I love most about this is how simple it is to make. You don’t need fancy equipment or a lot of time — just a decent mixing bowl, a loaf pan or cake pan, and a whisk, and you’re good to go. Plus, this recipe is budget-friendly, relying on pantry staples like cocoa powder, flour, sugar, and vegetables you probably already have in your fridge. Versatility-wise, this cake works for everything — a quick weekday treat, a show-stopping holiday dessert, or even a brunch addition if you cut it into smaller squares. I’ve made this countless times, and each time I do, I’m reminded how comforting and endlessly adaptable it is. It’s perfect when you want something homemade but don’t want to fuss or spend hours in the kitchen. Honestly, once you’ve tried it, you’ll be hooked, just like me!
How do I make Zucchini Chocolate Swirl Cake?
Quick Overview
This cake is a real winner because of its simplicity and gorgeous swirl design. You start by grating zucchini and squeezing out excess moisture — trust me, it makes all the difference. Then, you mix up a rich chocolate batter with a few pantry staples, spoon in the zucchini, and swirl in some melted chocolate or cocoa for that marbled effect. It all bans together in one bowl, poured into your chosen pan, and baked until just set. The trick is not overmixing once the wet and dry ingredients come together — that’s what keeps it moist and tender. Once out of the oven, I let it cool slightly before glazing or dusting with powdered sugar. This cake isn’t just straightforward to make; it’s honestly fun, especially when you get to swirl the chocolates all pretty on top. And the best part? The smell that wafts through the house while it bakes — warm, cocoa, with just a hint of zucchini freshness — it’s irresistible.
Ingredients
For the Main Batter:
– 1 1/2 cups all-purpose flour (I like using organic or unbleached for better flavor)
– 1/2 cup unsweetened cocoa powder (Quality cocoa makes all the difference)
– 1 teaspoon baking powder
– 1/2 teaspoon baking soda
– 1/4 teaspoon salt
– 1 cup granulated sugar
– 1/2 cup vegetable oil or melted coconut oil
– 2 large eggs
– 1 teaspoon vanilla extract
– 1 cup grated zucchini (squeezed dry, I use a microfiber cloth or paper towel to remove excess moisture)
For the Filling:
– 1/2 cup melted dark chocolate (I like semi-sweet for balance, but go full dark if you prefer)
– Optional: a dash of cinnamon or espresso powder to boost the flavor
– A pinch of sea salt for contrast
For the Glaze:
– 1/2 cup powdered sugar mixed with 1-2 teaspoons milk or cream (add a splash of vanilla or almond extract for extra flavor)
– Or, simply dust with cocoa powder or sprinkles for a more casual look
Step-by-Step Instructions
Step 1: Preheat & Prep Pan
Preheat your oven to 350°F (175°C). Grease your favorite loaf or round cake pan with butter or non-stick spray, then lightly dust with flour or line with parchment paper so the cake releases easily once baked. I always do this because I hate wresting with a stuck cake — trust me, a little prep saves so much trouble later.
Step 2: Mix Dry Ingredients
In a large bowl, whisk together the flour, cocoa powder, baking powder, baking soda, salt, and sugar. This is your foundation — make sure everything is well combined so you don’t get clumps of baking soda or cocoa in one bite.
Step 3: Mix Wet Ingredients
In a separate bowl, whisk the eggs, oil, and vanilla until smooth. I find that room temperature eggs blend better, but honestly, I’ve made this with cold eggs from the fridge and it still works — no big deal. Add the grated zucchini and fold gently, making sure it’s evenly distributed.
Step 4: Combine
Poor the wet mixture into the dry ingredients and stir with a spatula just until almost combined. Be careful not to overmix — that’s the fastest way to make a dense, tough cake. Stop mixing once you see no large pockets of flour.
Step 5: Prepare Filling
Melt the dark chocolate in a microwave-safe bowl in 20-second bursts, stirring between each until smooth. Cool just slightly before drizzling it over the batter, so it doesn’t sink too far, creating beautiful swirls. You can also add a pinch of espresso powder here for an extra coffee kick or a dash of cinnamon for warmth.
Step 6: Layer & Swirl
Pour about half of the batter into your prepared pan. Dollop small spoonfuls of melted chocolate on top, then repeat with the rest of the batter and chocolate. Use a toothpick or skewer to gently swirl the chocolate into the batter — a few twists going back and forth will create gorgeous marbling without becoming a muddy mess. I love making sure the chocolate is visible on the swirl — it’s like a little piece of art in each slice.
Step 7: Bake
Bake in the preheated oven for about 35-40 minutes, or until a toothpick inserted in the center comes out with a few moist crumbs (not wet batter). Oven times can vary, so start checking at 35 minutes. The smell when it’s done? Oh my goodness, it’s like chocolate heaven waking up your whole house.
Step 8: Cool & Glaze
Allow the cake to cool in the pan for about 15 minutes, then transfer to a wire rack. Drizzle with your prepared glaze while it’s still slightly warm — it spreads beautifully and adds a lovely shiny finish. If you prefer no glaze, a light dusting of powdered sugar looks adorable too.
Step 9: Slice & Serve
Once completely cooled, slice with a sharp knife and serve. I love slicing this into neat squares, but honestly, if you’re in a hurry, just go for rustic wedges — the taste is what counts. Serve it as is, or with a dollop of whipped cream or a scoop of vanilla ice cream for extra indulgence.
What to Serve It With
This cake is pretty versatile and pairs beautifully with several accompaniments. For breakfast or brunch, a mug of latte or a scoop of mascarpone cheese on the side makes it feel special. If you’re serving this as a dessert, a drizzle of caramel sauce or a scatter of crushed nuts adds a lovely crunch and richness. I often serve it with a side of fresh berries or sliced strawberries because the tartness complements the chocolate perfectly. My kids love it with a glass of cold milk or a warm cup of hot cocoa — it’s practically a family tradition now! It also makes a cozy snack with a cup of tea or coffee on a lazy Sunday afternoon. Honestly, whatever your mood, this cake can do it all.
Top Tips for Perfecting Your Zucchini Chocolate Swirl Cake
Over the years, I’ve picked up a few tricks that make this cake even better. First, always squeeze out excess moisture from your zucchini! Too much water can make the batter runny or cause it to sink in the middle. A clean microfiber cloth or a few paper towels work wonders. I learned this the hard way — moist zucchini, when unchecked, can turn your masterpiece into a soggy disaster. Second, don’t overmix once you add the wet ingredients. It’s tempting to keep stirring to get everything combined, but that’s how gluten develops, and then your cake gets dense and tough. Instead, fold gently until just combined. For the swirl, I like to use a toothpick or skewer because it creates those gorgeous, natural marble patterns without blending everything into one muddy color. As for ingredient swaps, I’ve experimented with coconut oil, which makes it even more tender, and almond milk, which added a subtle nuttiness I adored. I also swap in dairy-free dark chocolate chips when I want a vegan-friendly version. The key is taste as you go — I always do a little taste test of the batter for sweetness and adjust accordingly. Sometimes, I add a pinch more salt or a dash of cinnamon to hit just the right flavor note. Trust me on this: baking is part art and part science, and with a little patience, you’ll have a showstopper every time.
Storing and Reheating Tips
This cake stays fresh for several days if stored properly. Once it’s cooled completely, store leftovers in an airtight container at room temperature for up to 2 days — just keep it away from direct sunlight or heat sources. If you want it to last longer, pop it in the refrigerator in a well-sealed container; I find it keeps beautifully for up to 5 days and still stays moist. To reheat, I usually give slices a quick 10-15 second zap in the microwave, just enough to warm through without drying out the cake. If you’re into freezing, wrap individual slices tightly in plastic wrap, then slip into a freezer-safe bag. It’s perfect for those times when you want a sweet treat on a busy day — just thaw at room temperature or pop straight into the microwave. About the glaze — I usually add it after reheating, so it stays shiny and fresh, but if you bake the cake ahead of time, it’s easy to add the glaze just before serving for that extra touch of sweetness and visual appeal. No matter how you store or reheat, this cake will still feel like a warm hug, just like it did the first time I baked it.
Frequently Asked Questions
Final Thoughts
This zucchini chocolate swirl cake has become a staple in my home, not just because of its effortless charm but because of the warm memories tied to it. It’s a treat that screams homemade comfort while sneaking in a veggie that my kids actually ask for — true win-win in my book. Every time I bake it, I’m reminded how simple ingredients can come together to create something magical. Whether you’re baking for a family gathering, a casual weekend snack, or just because you need a little happiness, this cake delivers big on flavor, warmth, and love. Don’t be afraid to make it your own — switch out the chocolate for white, sprinkle in some nuts, or experiment with different fillings. Most importantly, have fun with the process. I can’t wait to hear how yours turns out! Happy baking, and remember — the best recipes are the ones made with love and a dash of mischief.
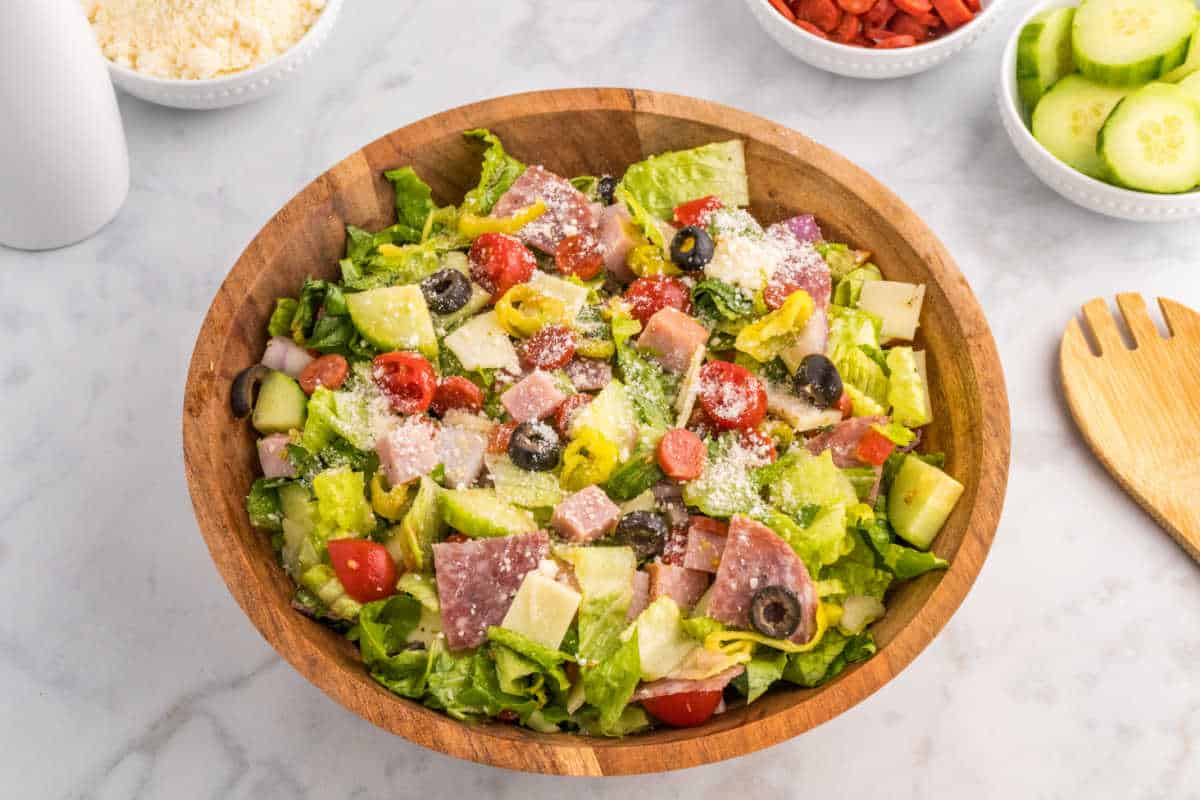
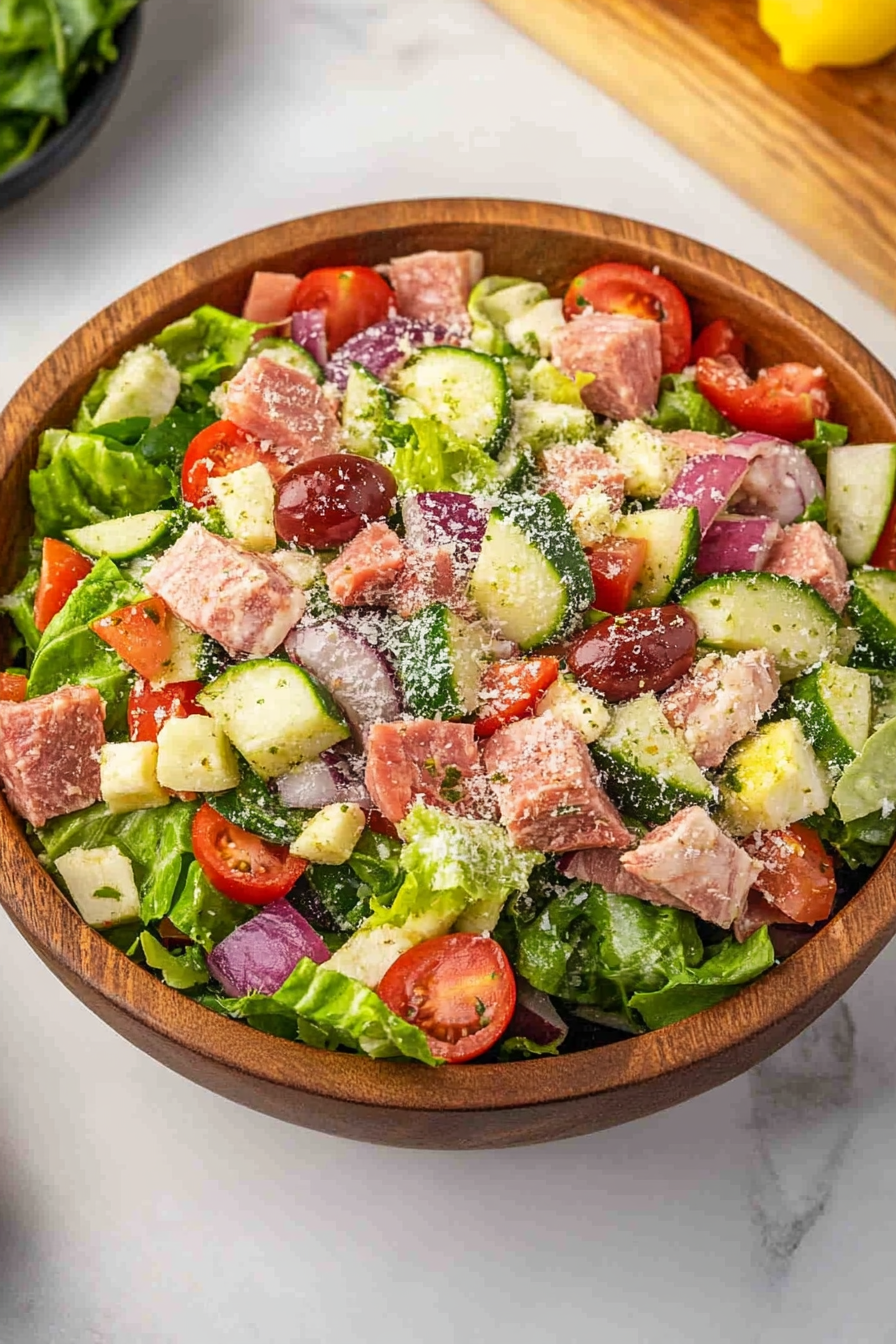
Italian sub salad
Ingredients
Method
- Wash and dry the salad greens thoroughly. Tear or chop them into bite-sized pieces and place them in a large salad bowl.
- Add the rest of the salad ingredients except for the Parmesan cheese into the bowl with the salad and mix.
- In a small bowl, whisk together the extra-virgin olive oil, red wine vinegar, minced garlic, Dijon mustard, dried oregano, salt, and black pepper until well combined.
- Drizzle the dressing over the salad and gently toss everything together until the ingredients are evenly coated with the dressing.
- Sprinkle the grated Parmesan cheese over the top of the salad. This adds a burst of flavor and a touch of saltiness.
- Divide the Italian Sub Salad among serving plates. It's ready to be enjoyed as a satisfying meal or a side dish. You can also serve it with some crusty Italian bread or garlic bread on the side for an extra treat.