Lemon Fizz Cake How to Bake It
There’s something about a warm slice of zucchini swirl loaf that instantly takes me back to childhood Sundays spent baking with my grandma. The way the kitchen would fill with the smell of cinnamon, nutmeg, and just a touch of sweetness — it’s like a warm hug in bread form. I always do this when I want a treat that’s not too heavy but still hits that sweet spot. It’s actually become my go-to for that mid-afternoon pick-me-up, especially when I don’t want to bake a whole cake or buy something store-bought. My kids ask for this all the time, and honestly, I don’t mind sneaking a slice myself with a cup of coffee. It’s incredible how something so simple can turn into a family favorite. Plus, it’s surprisingly easy to whip up — I promise, no complicated techniques here. Just real ingredients, a little love, and a loaf that disappears in minutes at my house. Let me share the magic — I think you’re going to love it just as much as we do.
What is Zucchini Swirl Loaf?
Think of zucchini swirl loaf as a cozy twist on classic banana or zucchini bread, but with a gorgeous marbled look and a hint of spiced sweetness. It’s essentially a moist, tender loaf dotted with shredded zucchini and a swirl of cinnamon-spiced batter that makes the whole thing look extra pretty when sliced. The name “swirl” comes from that beautiful marbled pattern you get when you gently swirl the plain batter with the cinnamon goodness, creating a visual that’s just as tempting as the taste. It’s like a baker’s secret masterpiece — simple to make but stunning enough to impress anyone. I love calling it a “secret weapon” when I need a sweet snack but don’t want to go full-on cake. Plus, the zucchini adds moisture and a sneaky dose of veggies, which makes me feel a bit better about the sugar rush! If you’re new to baking with zucchini, don’t worry — it’s practically foolproof and turns out perfectly every single time.
Why you’ll love this recipe?
What are some of my favorite recipes for zucchini swirl loaf?
- Flavor: The warm spices — cinnamon, nutmeg, a splash of vanilla — make each bite feel like fall in your mouth, even if it’s the middle of summer. The zucchini keeps it unbelievably moist, and the swirl of cinnamon adds just enough sweetness and visual appeal.
- Simplicity: This recipe is honest to goodness straightforward. No fancy equipment, no complicated steps. I always do this when I want a cozy treat but don’t have hours to spare. It’s a one-bowl wonder that’s perfect for busy mornings or relaxing afternoons.
- Cost-efficiency: What is the best way to measure cost-efficiency?: Honestly, most of the ingredients are pantry staples — flour, sugar, spices, and a zucchini I usually have at hand. It’s budget-friendly comfort food that makes me feel smart for turning a humble veggie into something special.
- Versatility: Want to make it gluten-free? Swap the flour for a gluten-free blend. Love a crunch? Toss in some chopped nuts or chocolate chips. Feeling a little fancy? Dust it with powdered sugar or serve with a dollop of whipped cream. That’s what I love most about this loaf — it’s like a blank canvas you can tweak to your mood or what’s in your kitchen.
What I’ve found over the years is that this loaf is more than just dessert — it’s a breakfast classic, a brunch showstopper, and even a sneaky way to get kids (and grown-ups) eating veggies. Trust me, once you try it, you’ll keep coming back for more.
How to Make Zucchini Swirl Loaf
Quick Overview
This loaf comes together in a few simple steps — grate your zucchini, blend your batter, swirl in the cinnamon mixture, and bake! The magic happens when you gently layer and swirl the cinnamon batter into the plain, creating those beautiful marbled patterns. The oven does most of the work, baking this into a fragrant, tender loaf that pretty much sells itself. I love how forgiving it is — don’t worry about overmixing or perfect layer technique. As long as you swirl gently, you’ll get that gorgeous marble. The key is patience while it bakes (and then resisting slicing into it too early). It’s the kind of recipe that’s perfect for lazy weekends or quick weekday treats — you can even prep the batter the night before and bake in the morning.
Ingredients
For the Main Batter:
– 2 cups all-purpose flour (or gluten-free mix)
– 1 cup sugar (you can reduce this slightly if you prefer less sweet)
– 1 teaspoon baking powder
– 1 teaspoon baking soda
– 1 teaspoon ground cinnamon
– ½ teaspoon ground nutmeg
– ½ teaspoon salt
– ½ cup vegetable oil or melted butter
– 3 large eggs
– 1 teaspoon vanilla extract
– 1 ½ cups shredded zucchini (about 1 medium zucchini, grated and excess moisture squeezed out)For the Filling:
– 3 tablespoons brown sugar
– 1 teaspoon ground cinnamon
– 1 tablespoon all-purpose flour (or gluten-free alternative)For the Glaze:
– ½ cup powdered sugar
– 1-2 teaspoons milk (or almond milk)
– A tiny splash of vanilla (optional)
– A pinch of cinnamon for sprinkling (optional)Step-by-Step Instructions
Step 1: Preheat & Prep Pan
Start by preheating your oven to 350°F (175°C). Grease your loaf pan generously — I love using butter or a non-stick spray, and then I could even line it with parchment for easy removal. This helps you get perfect slices without sticking. Set it aside while you prepare your batter.
Step 2: Mix Dry Ingredients
In a large mixing bowl, whisk together the flour, sugar, baking powder, baking soda, cinnamon, nutmeg, and salt. This step ensures that everything is evenly distributed and gives you that tender rise without lumps. Trust me, this simple step makes a big difference in how fluffy and evenly baked your loaf turns out.
Step 3: Mix Wet Ingredients
In a separate bowl, beat the eggs, then add the oil (or melted butter), vanilla, and shredded zucchini. Mix well until combined. The zucchini should be evenly coated with the wet mixture. I’ve tested this with almond milk instead of oil, and it actually made it even creamier — but oil keeps it super moist and rich.
Step 4: Combine
Pour the wet ingredients into the dry and gently fold everything together. The bit of overmixing is okay here — just stop as soon as there are no dry flour streaks. This keeps your bread tender, not tough. The batter will be thick but pourable.
Step 5: Prepare Filling
In a small bowl, mix together the brown sugar, cinnamon, and flour. This will be your cinnamon swirl. If you want a richer flavor, add a pinch of nutmeg or even some chopped nuts or chocolate chips here. I like to keep it simple so the cinnamon really shines through.
Step 6: Layer & Swirl
Pour half of the batter into your prepared loaf pan. Even it out with a spatula. Sprinkle the cinnamon mixture evenly over this layer. Then add the remaining batter on top, smoothing it gently. Take a butter knife and swirl it through the batter — go back and forth gently to create that marbled effect. Don’t overdo it — just a few swirls are enough to get that beautiful pattern.
Step 7: Bake
Pop it into the oven and bake for around 50-60 minutes. The top should be golden, and a toothpick inserted into the center should come out clean. I’ve found that ovens vary, so start checking around the 50-minute mark. If the top browns too quickly, tent it with foil and let it finish baking.
Step 8: Cool & Glaze
Once out of the oven, let it cool in the pan for about 10 minutes. Then transfer to a wire rack to cool completely — this helps set the swirl pattern beautifully. Mix the powdered sugar with milk and vanilla to make a simple glaze. Drizzle it over when the loaf is completely cooled, or skip the glaze if you prefer a more rustic look.
Step 9: Slice & Serve
Use a serrated knife to cut into perfect slices — expect a slight marbled look and a fragrance that makes everyone’s mouth water. Serve warm or room temperature; I love it with a dollop of butter or a swipe of cream cheese. That sweet, spicy aroma will draw everyone to the kitchen — I swear, it’s addictive.
What to Serve It With
This loaf is so versatile and homey, it practically makes itself look good. Here are some ideas to serve it up:
For Breakfast: Pair it with a steaming cup of black coffee or a chipped mug of vanilla latte. Toasted slices with a smear of butter or honey are also divine in the mornings. My kids love it with a glass of milk, and honestly, I do, too. It’s the perfect start to a busy day without feeling overly indulgent.
For Brunch: Serve thick slices alongside a fresh fruit salad or Greek yogurt for a little extra freshness. I like to sprinkle a dash of extra cinnamon on top and add a side of crispy bacon or sausage for a hearty brunch vibe. It’s casually elegant and totally satisfying.
As Dessert: Warm slices with a scoop of vanilla or caramel ice cream make an irresistible finale. Add a drizzle of caramel sauce or a sprinkle of chopped nuts on top. This transforms your loaf into a fancy dessert you’d happily serve to guests.
For Cozy Snacks: Cut into smaller pieces, warm slightly, and enjoy with a cup of tea or hot chocolate. It’s exactly what I crave during rainy weekends or after a long day — cozy and fulfilling.
Honestly, I’ve made this so many times that I’ve lost count. It’s become my “go-to” for lazy Sunday mornings, unexpected guest visits, or just when I need a little comfort. And because you can adapt it with nuts, chocolate, or even gluten-free flour, it’s really a baking blank canvas. Plus, the smell alone fills the house with warmth, inviting everyone to gather around the kitchen table.
Top Tips for Perfecting Your Zucchini Swirl Loaf
Over the years, I’ve picked up a few tricks that make this loaf turn out even better every time — I want you to skip the trial and errors I went through! Here are some tips:
- Zucchini Prep: Always squeeze out excess moisture after shredding — wet zucchini can make your batter too loose or cause the loaf to be dense. I like using a clean kitchen towel or cheesecloth to gently squeeze out the liquid. Fresh zucchini is best, but if yours is a little tired, it still works — just make sure to drain well.
- Mixing Advice: When combining wet and dry, gentle folding is key. Overmixing can make the bread tough, which is the opposite of what we want here. If your batter feels too thick, a splash of milk can loosen it up, but don’t go overboard.
- Swirl Customization: The swirl pattern is more about finesse than skill — a few gentle twists with a butter knife is enough. If you want a more dramatic look, layer and swirl more carefully, but I find a few casual swirls give just the right marbled effect.
- Ingredient Swaps: I’ve experimented with honey instead of sugar, applesauce instead of oil, and chocolate chips for extra decadence. All work great, just adjust the quantities slightly if needed. Trust your taste buds — that’s what makes baking fun!
- Baking Tips: If your loaf browns too quickly on top, tent with foil. To test doneness, insert a toothpick in the center — it should come out clean or with just a few moist crumbs. Every oven is different, so keep an eye on it after 45 minutes.
- Glaze Variations: For a richer look, try a cream cheese glaze or a sprinkle of chopped nuts instead of sugar. You can also add a splash of lemon juice or vanilla to your glaze for extra flavor. It’s all about customizing to your mood!
This recipe has been tweaked and perfected over years, and I still get excited every time I bake it. The best part? Seeing my kids devour slices faster than I can cut them. Oh, and don’t be surprised if you find yourself sneaking another piece after everyone’s gone to bed — it’s just that good.
Storing and Reheating Tips
This loaf stays wonderfully moist and flavorful for a few days, and I’ve got a few secrets for storing it just right:
- Room Temperature: Keep it wrapped tightly in plastic wrap or an airtight container for up to 2 days. I prefer it slightly warm or at room temp, which keeps that fresh-baked feel intact.
- Refrigerator Storage: Wrap it well or keep in an airtight container. It’s good for up to 5 days and still tastes great — I sometimes toast a slice in the mornings to revive the aromas.
- Freezer Instructions: Wrap tightly in plastic wrap, then foil, and slide into a freezer bag. It’s best used within 2-3 months. Thaw at room temperature or warm slices in the microwave for a quick snack.
- Glaze Timing: Apply the glaze once the loaf has cooled completely — if you do it too early, it can melt or cause sogginess. I usually glaze just before serving or when I want that extra special touch.
Personally, I find that the loaf freezes beautifully and is as good as fresh once thawed. Just slice what you need and keep the rest wrapped up tight. It’s a handy treat to stash away for when the craving hits! The smell during reheating is almost as delightful as fresh out of the oven — you’ll want to pin down the exact moment to open the freezer so it’s fresh as can be.
Frequently Asked Questions
Can I make this gluten-free?Absolutely! Replace the all-purpose flour with a good gluten-free baking blend (around 2 cups). Keep an eye on the batter’s consistency — it might need a splash of milk to loosen it up. The texture will be a bit different — a touch denser but still moist and flavorful. Trust me, it’s worth experimenting, and your gluten-free friends will thank you!Do I need to peel the zucchini?Not at all! I usually leave the skin on for added texture and nutrients. Just make sure to rinse the zucchini well and shred it finely. Peeling isn’t necessary and might even make the loaf a little dull-looking — the green flecks are part of its charm!Can I make this as muffins instead?Definitely! Line a muffin tin with paper liners or grease well, fill each about ¾ full, and bake at the same temperature — 350°F. Check around 20-25 minutes; they should be golden and a toothpick inserted into the center should come out clean. This gives you individually portioned treats that are perfect for on-the-go snacking.How can I adjust the sweetness level?Easy! Reduce the sugar to ¾ cup or even half a cup for a less sweet version. Using natural sweeteners like honey or maple syrup works, too — just reduce the liquid slightly to keep the batter’s consistency. Taste the batter before baking and add more cinnamon or vanilla if you want the flavor to shine through.What can I use instead of the glaze?If you want to skip the glaze, no problem! A dusting of powdered sugar, a smear of cream cheese frosting, or even a handful of chopped nuts makes a lovely alternative. For a tart twist, a drizzle of lemon icing works well too. The loaf is sweet enough on its own, but those extras really elevate it if you’re feeling fancy.Final Thoughts
Honestly, this zucchini swirl loaf has become a cornerstone of my baking repertoire. It’s one of those recipes that feels like a warm secret — simple enough to make on a weekday, but special enough to serve at brunch or after dinner. Every time I bake it, I’m reminded of how comforting and versatile good bread can be. The picture-perfect marbled pattern? It’s just a bonus that I love to show off to guests or snap a photo of for my Insta stories. Whether you’re a seasoned baker or a total beginner, I promise this will become a new favorite — trust me on this one. So go ahead, grab that zucchini, turn on some music, and let the magic happen. I can’t wait to hear how yours turns out! And please, share your variations or tips — I love swapping ideas and hearing about your baking adventures. Happy baking, my friend!
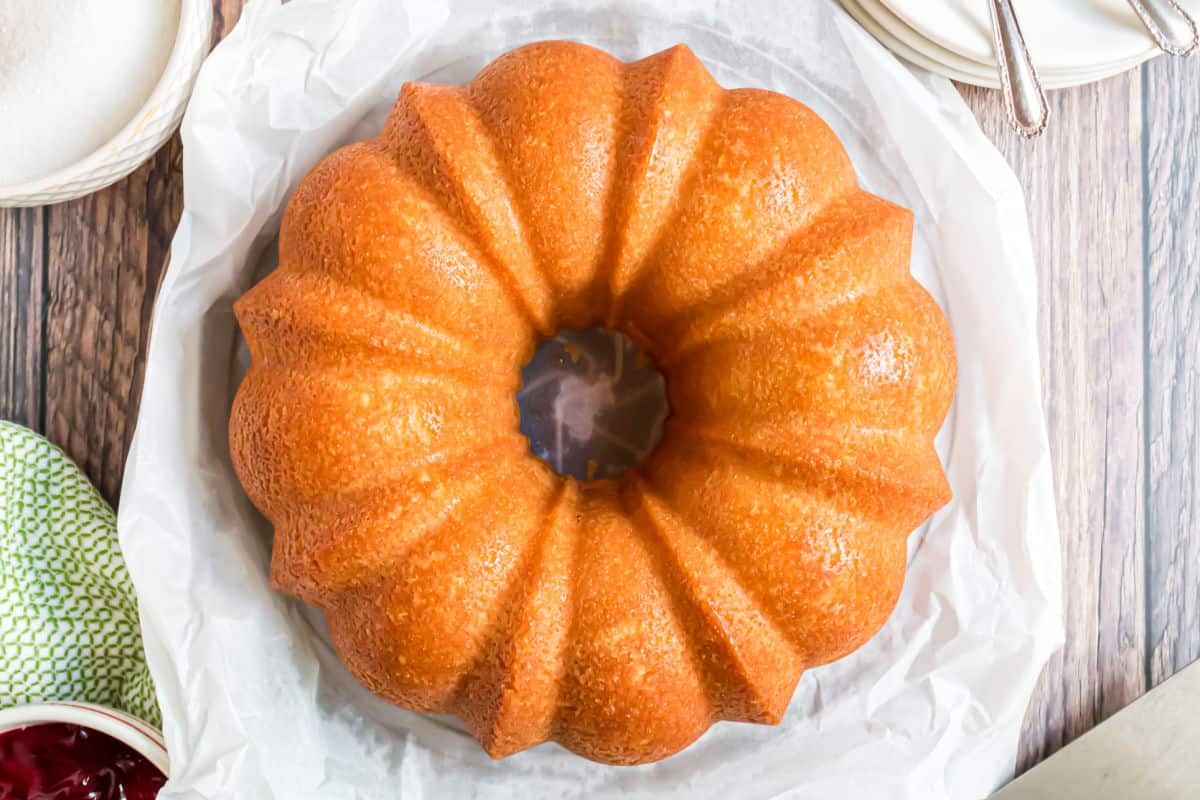
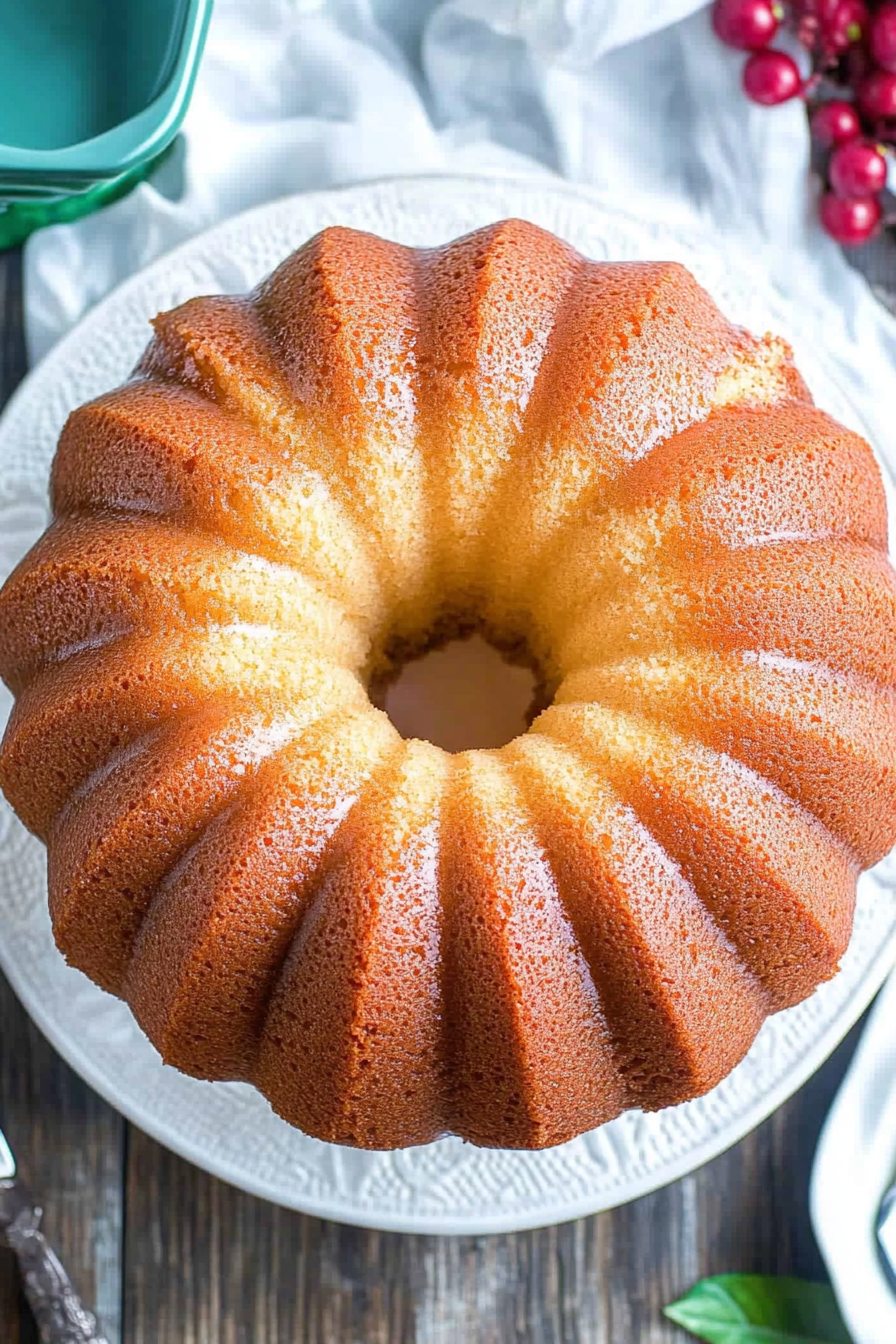
7-Up Pound Cake
Ingredients
Method
- Preheat oven to 315 F. Prepare a 16 cup bundt pan with homemade cake release, or with nonstick baking spray.
- In a large mixing bowl, attached to a stand mixer fitted with a whisk attachment, beat the butter for 2 minutes on high until pale in color. Add in sugar and salt and cream together for an additional 5-7 minutes, scraping down the sides of the bowl a couple times. Mixture will be very pale yellow and fluffy.
- Add in the eggs, one at a time, beating well after each addition.
- Slowly add in flour, being careful not to over beat (turn the mixer down to low at this time). Pour in 7 Up and mix just until combined.
- Pour batter into prepared pan and bake for 75-85 minutes, or until a toothpick inserted into the center comes out clean. Allow the cake to cool in pan for about 10 minutes, then invert on wire rack. Cool completely on a wire rack.