Tropical Icebox Cake Recipe
There’s a special kind of magic in discovering a baked treat that feels both indulgent and sneaky—like you’re indulging in chocolate without the guilt. I remember the first time I made this zucchini chocolate chip loaf — I was skeptical at first, honestly. I mean, zucchini in bread? It sounds so simple yet surprisingly gourmet when you think about it. But as soon as I took that first bite, I was hooked. The bread is so moist, almost like it’s been secretly baked with a hug, and the little pockets of melty chocolate make my kids ask for seconds before they even finish their first slice. It’s one of those recipes I always keep in my back pocket — perfect for sneaking some greens into the kids’ diet without any fuss. Plus, it’s insanely easy to whip up, even on busy weekday mornings. I’ve tested it with almond milk and coconut oil, and honestly, it just gets better. Trust me on this one — you’ll want to add it to your regular rotation.
What is Zucchini Chocolate Chip Loaf?
Think of this zucchini chocolate chip loaf as the lovechild of a classic banana bread and a decadent chocolate cake. It’s essentially a moist, tender bread that gets its subtle veggie goodness from grated zucchini — which, by the way, disappears entirely once baked. The name might sound fancy, but it couldn’t be simpler: shredded zucchini folded into a buttery batter, studded with chocolate chips. The zucchini adds moisture and a touch of healthiness, but it’s the chocolate that really steals the show. It’s a cozy, family-friendly bake I’ve made countless times, especially when I want something sweet but don’t want to spend hours in the kitchen. Plus, it’s perfect for breakfast, snack time, or even dessert with a splash of cream. When I call it a loaf, I mean it’s the kind of treat that feels like a little slice of homemade happiness every time.
Why you’ll love this recipe?
What I love most about this zucchini chocolate chip loaf is how it hits all the right notes—delicious, simple, and surprisingly healthy for a sweet treat. First, the flavor profile — the rich, melted chocolate combined with the tender zucchini gives every bite a deeply satisfying sweetness that’s not overly heavy. It’s like comfort food that sneaks in a few veggies, making me feel a little better about indulging. I also adore that it’s such a straightforward recipe — I always do this when I’m short on time but still crave something homemade and special. The ingredients are budget-friendly and pantry staples, so I can toss it together on a whim. And, oh, the versatility! You can swap out chocolate chips for nuts or dried berries, or even add a dash of cinnamon or vanilla for extra depth. My kids ask for this all the time, especially when we have friends over; it’s a guaranteed crowd-pleaser. The best part? It stays moist and flavorful for days, which makes it perfect for breakfast or a quick snack. Trust me, once you try this, it’s going to be a staple in your home too.
How do you make Zucchini Chocolate Chip Loaf?
Quick Overview
This zucchini chocolate chip loaf is so easy you’ll wonder why you haven’t made it sooner. It’s a one-bowl wonder — just grate the zucchini, mix everything together, fold in chocolate chips, and bake. The secret is not overmixing the batter so it stays super tender. In about an hour, you’ll be slicing into a loaf that smells like chocolate heaven. It’s great for lazy weekends, breakfast, or even last-minute gifting. The result? A moist, flavorful bread that’s as pretty as it is delicious.
Ingredients
For the Main Batter:
– 1 ½ cups all-purpose flour (or a mix of almond and oat flour for gluten-free friends)
– 1 teaspoon baking soda
– ½ teaspoon baking powder
– ½ teaspoon salt
– ½ cup granulated sugar (or honey for a natural touch)
– ½ cup brown sugar (adds depth and moisture)
– ½ cup vegetable oil (can substitute with melted coconut oil)
– 2 large eggs
– 1 teaspoon vanilla extract
– 1 cup grated zucchini (squeeze out excess moisture with a paper towel)
– ½ cup whole milk or almond milk (I tested with both — both work beautifully)
For the Filling:
– ¾ cup semi-sweet chocolate chips (or dairy-free chocolate if you prefer)
– Optional: ¼ cup chopped nuts or dried berries for variation
For the Glaze:
– ½ cup powdered sugar
– 1-2 teaspoons milk (adjust for desired consistency)
– A splash of vanilla or a squeeze of lemon juice for extra zing
Step-by-Step Instructions
Step 1: Preheat & Prep Pan
Set your oven to 350°F (175°C). Grease a standard 9×5-inch loaf pan with butter or non-stick spray, then line it with parchment if you want an easier release. I always do this when I want a perfectly clean slice. This loaf is a little sticky when hot, so proper prep makes a difference.
Step 2: Mix Dry Ingredients
In a large mixing bowl, whisk together the flour, baking soda, baking powder, salt, and sugars. This ensures everything is evenly distributed and helps prevent clumps. I used to forget this step and end up with uneven pockets of baking soda — lesson learned.
Step 3: Mix Wet Ingredients
In a separate bowl, beat the eggs, then stir in vanilla, milk, and oil until well combined. I like to do this gently with a fork or whisk until it’s all smooth. The key is not to overmix once you add the wet to the dry — just enough to combine.
Step 4: Combine
Pour the wet mixture into the dry ingredients and mix with a spatula or wooden spoon. Don’t overmix! A few lumps are okay — this keeps the loaf tender. Gently fold in the grated zucchini last; this is what keeps the bread so moist. If your batter feels too thick, a splash more milk does the trick.
Step 5: Prepare Filling
Stir most of the chocolate chips into the batter, saving a handful for sprinkling on top or mixing into the swirl pattern later. If you’re adding nuts or berries, fold them in now.
Step 6: Layer & Swirl
Pour half of the batter into the loaf pan. Sprinkle or dollop half of the remaining chocolate chips. Add the rest of the batter, then sprinkle the top with the remaining chocolate chips or swirl the batter slightly with a toothpick for a marbled look. It’s a little messy, but that’s part of the fun.
Step 7: Bake
Pop it into the oven for about 50-60 minutes. Keep an eye on it after the first 45 minutes; if the top is getting too dark, cover loosely with foil. Use a toothpick inserted into the center — if it comes out clean, you’re good to go. Trust me, every oven is different, so start checking around 50 minutes.
Step 8: Cool & Glaze
Let the loaf cool in the pan for at least 15 minutes — patience, I know! Then transfer to a wire rack. Once cooled, whisk your glaze ingredients and drizzle over the top. The glaze is just enough to add a little extra sweetness and shine.
Step 9: Slice & Serve
Use a serrated knife to cut neat slices, and watch that moist crumb as you serve. This loaf is fantastic slightly warm with a pat of butter or at room temperature on its own. For a fancy touch, dust with powdered sugar or add a dollop of whipped cream.
What to Serve It With
This loaf is so versatile, I usually serve it in a million different ways depending on the occasion. For breakfast, it’s perfect with a cup of black coffee or a frothy latte. I like to warm a slice and top it with a bit of butter or jam — the melt-in-your-mouth texture makes everything better. When we have friends over for brunch, I pair it with fresh fruit and yogurt — it feels fancy but is really fuss-free. As a dessert, I drizzle a little caramel or melted white chocolate on top, and it turns into an indulgent treat. Sometimes, I toast slices lightly and spread with cream cheese for a cozy snack. Honestly, when my kids ask for seconds, I know I’ve nailed it. It’s a recipe that feels homemade and a little bit special every time I make it.
Top Tips for Perfecting Your Zucchini Chocolate Chip Loaf
After making this loaf more times than I can count, I’ve picked up a few tricks I want to share. First, when grating zucchini, I always squeeze out the excess moisture with a clean dish towel or paper towels — too much liquid, and the bread can turn out dense or soggy. I learned this the hard way. As for mixing, be gentle with the batter; overmixing tends to make the bread tougher rather than tender. If you want a prettier swirl, try swirling the batter with a toothpick in a figure-eight pattern before baking. For ingredient swaps, I’ve tested coconut sugar and melted butter instead of oil — both work beautifully, just tweak the baking time a little. When it comes to baking, oven calibration varies, so start checking around 50 minutes — I’ve had to cover the loaf with foil halfway through before. And the glaze? Feel free to spice it up with a touch of cinnamon or citrus zest for extra flavor. This recipe is forgiving, so don’t stress if it’s not perfect on your first try. The key is to enjoy the process and taste as you go. The best tip I can give? Trust your nose and eyes — if it smells like chocolate heaven and a toothpick comes out clean, you’re all set.
Storing and Reheating Tips
This loaf stays just as moist and yummy if kept properly. If you plan to eat it within a day or two, wrap it tightly in plastic wrap or store in an airtight container at room temperature. It’s best consumed within 2-3 days, especially if it’s warm outside because the zucchini can make it a little perishable. When refrigerating, I recommend wrapping it well and slicing only what you need — that way, it doesn’t dry out. It keeps well for about a week in the fridge, but I prefer to eat it sooner for that fresh, homemade goodness. For freezing, wrap the loaf tightly in plastic wrap, then foil, and stash it in the freezer for up to a month. When you’re ready, let it thaw at room temperature — I sometimes pop slices in the microwave for 15 seconds for an almost instant warm treat. If you’re adding glaze, I suggest doing it fresh after reheating. Just drizzle over the slices and enjoy that warm, melty chocolate experience again. Proper storage makes all the difference — it keeps that tender crumb and rich flavor intact, so every bite feels like a little gift.
Frequently Asked Questions
Final Thoughts
This zucchini chocolate chip loaf has become one of my absolute favorite recipes to make when I want something cozy yet a little bit fancy. It’s a classic in our house — moist, chocolatey, and surprisingly healthy for a treat. The fact that you can toss everything in one bowl and have it baking in under an hour? Total win. I love how flexible it is; I’ve played with ingredients, added different toppings, and it always turns out perfect. Plus, the smell alone — that warm, cocoa-infused aroma — fills the entire house. Every time I slice into it, I feel like I’ve just unlocked a little piece of happiness. Whether you’re making this for breakfast, brunch, or an afternoon snack, I promise it’ll bring a smile. So go ahead, grab your zucchini, and let’s bake! I can’t wait to see how yours turns out. Feel free to leave a comment or share your own tweaks—happy baking!
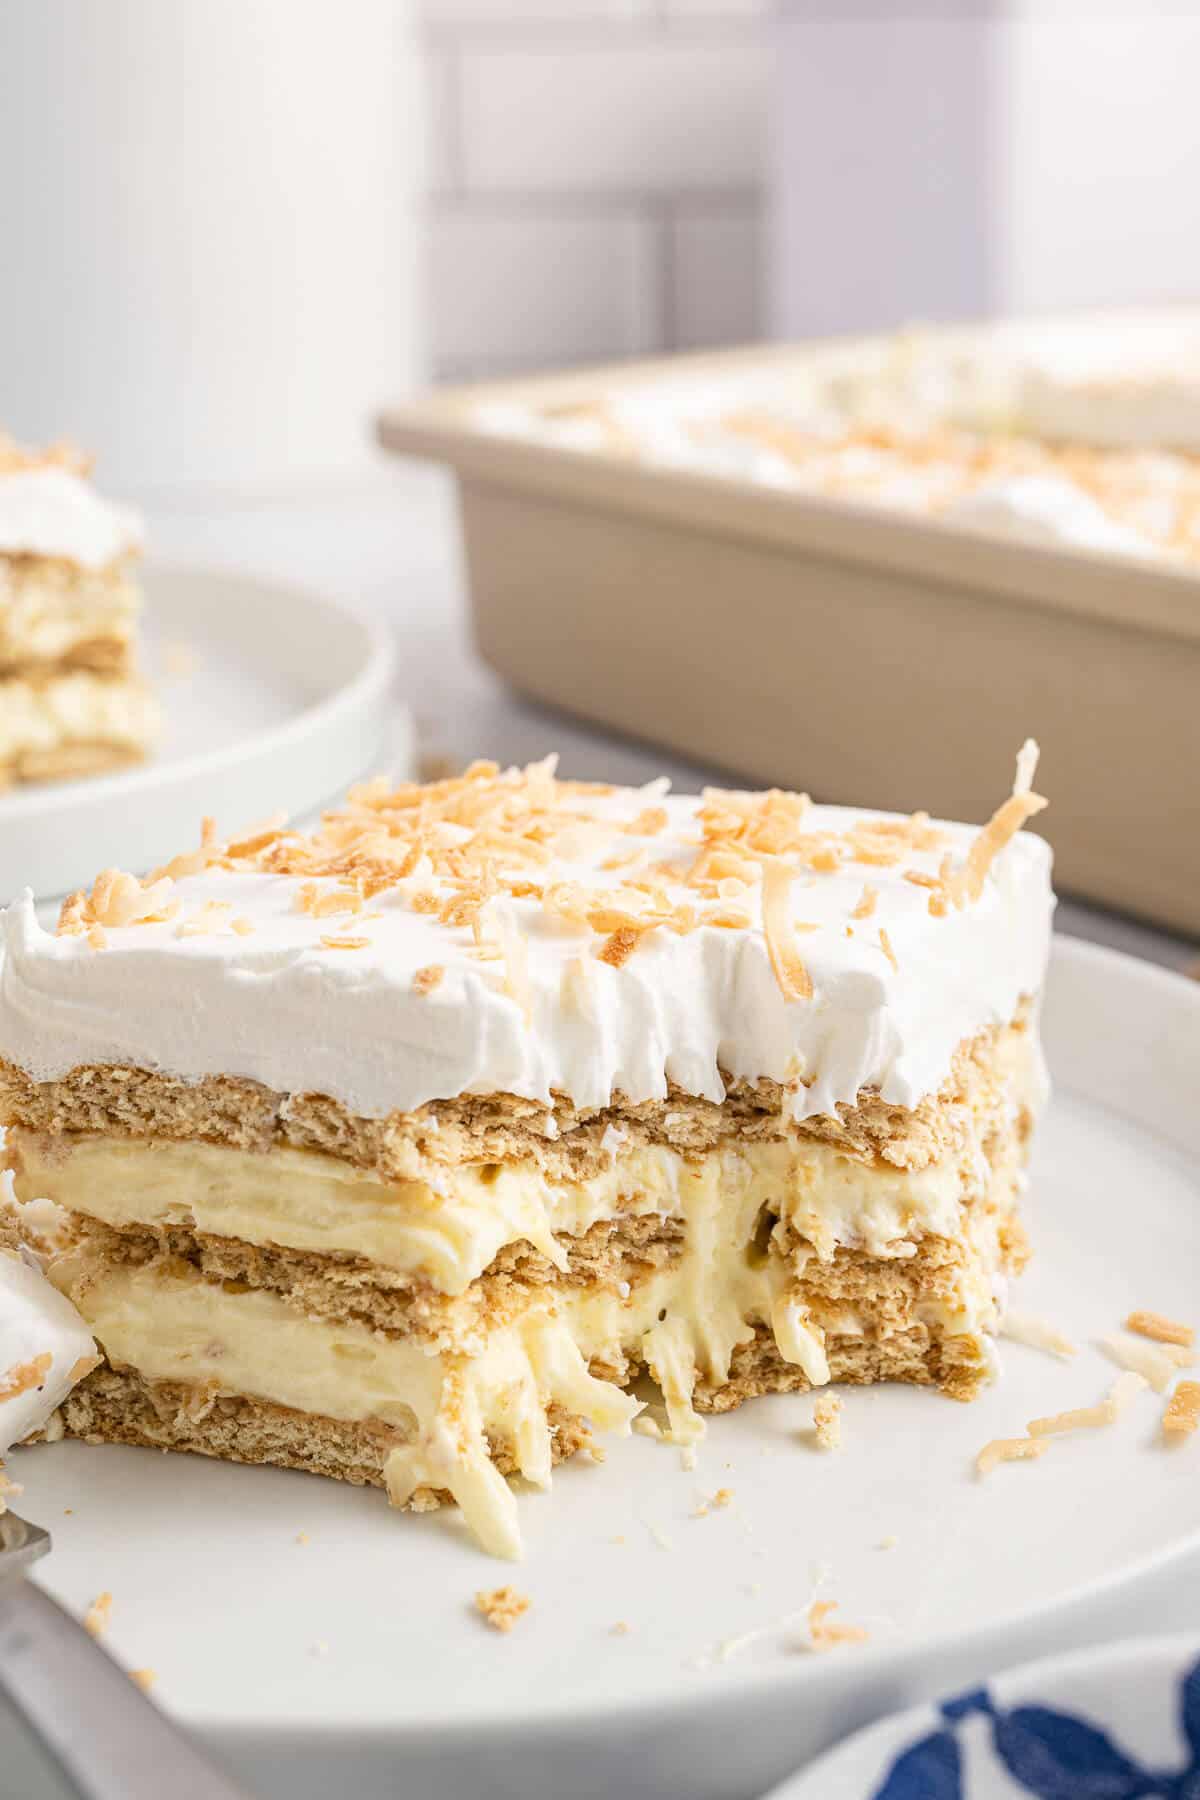
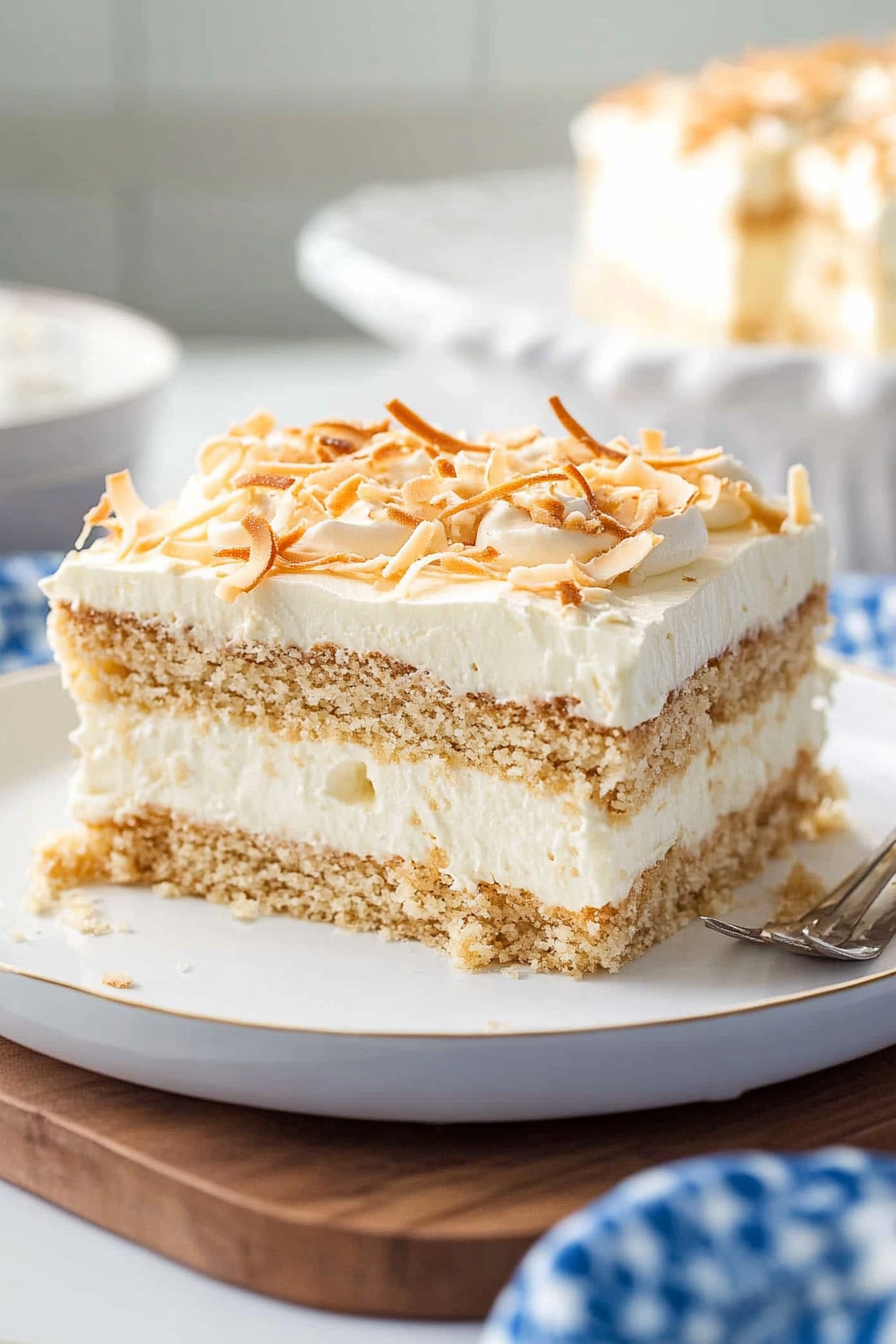
Coconut Icebox Cake
Ingredients
Method
- In a large bowl, whisk together the vanilla pudding mix, milk and coconut extract for about 1 to 2 minutes until the pudding mix is dissolved and the mix has thickened.
- Add the coconut flakes and stir.
- Fold in one 8oz container of thawed whipped topping until well-mixed.
- Line the bottom of a 9x13-inch baking dish or pan with 8 to 9 graham crackers. You can break the graham crackers apart to make sure the whole bottom is covered.
- Spoon about half the pudding mixture over the graham crackers and smooth it out with a spoon or spatula.
- Layer another 8 to 9 graham crackers over the pudding mix, then cover those with the other half of the pudding mixture.
- Do one more layer of graham crackers then spread the second 8oz container of thawed whipped topping over the top.
- Refrigerate for at least 4 hours, but chilling overnight is best.
- Sprinkle the toasted coconut on top, and serve chilled.