Easy Sautéed Chicken Breasts for Dinner
There’s something about the smell of freshly baked cake that instantly makes my house feel like a hug in the kitchen. I remember my grandmother baking something similar when I was little—her kitchen always filled with that nostalgic warmth and a hint of cinnamon. As a busy mom now, I’m always on the lookout for recipes that are not only delicious but uncomplicated enough to whip up on a moment’s notice. This zucchini carrot swirl cake? It’s my go-to when I want something sweet that my kids ask for all the time, but I also love it on lazy weekend mornings. Trust me, this one’s a lifesaver on busy nights when I need a treat that’s beautiful, wholesome, and — most importantly — easy to make. If you like the idea of a moist, tender cake with a surprise swirl of veggies and sweetness, you’re really going to love this. Plus, it’s a sneaky way to get some veggies in without anyone really noticing—my secret weapon! I’ve made this countless times, and every single batch disappears in minutes at my house. I can’t wait to share it with you because I know it’ll become a staple in your kitchen, just like it is in mine.
What is Zucchini Carrot Swirl Cake?
Think of this zucchini carrot swirl cake as a cozy, flexible dessert that’s a little bit rustic and a whole lot of comforting. It’s essentially a moist, tender cake that’s flavored with grated zucchini and carrots, which add moisture and natural sweetness. The “swirl” part? That’s where I usually swirl a little bit of buttery cinnamon sugar or sometimes cream cheese for extra flair—kind of like a mini ribbon of deliciousness running through the batter. Its roots are simple—think muffin meets classic quick bread, but transformed into a pretty, layered cake. The name might sound fancy, but it’s honestly one of the easiest, most forgiving recipes I make. It’s perfect when you want something that’s healthy enough to call breakfast but sweet enough to satisfy your afternoon craving. And the best part? It’s endlessly adaptable—swap nuts, add raisins, or switch up the glaze to make it uniquely yours. Every time I bake this, I feel like I’m giving my family a little edible hug.
Why you’ll love this recipe?
What I love most about this zucchini carrot swirl cake is how it strikes the perfect balance between wholesome and indulgent. The flavor? Oh, it’s just heavenly. The natural sweetness of the carrots and zucchini complements the warm cinnamon and a hint of vanilla—so comforting, you’ll want to keep a piece for yourself. Plus, zucchini keeps the cake insanely moist—seriously, I’ve tested this with and without it, and the zucchini version wins hands down for moistness. The carrots add a subtle crunch and color that make it look as pretty as it tastes. But here’s the best part: it’s foolproof! I’ve made this with just a whisk and a spoon, no fancy gadgets needed. It’s a total lifesaver on busy weeknights when I want something homemade but don’t want to spend hours in the kitchen. It’s budget-friendly, using ingredients I always have on hand—flour, sugar, eggs, veggies, and a little spice. And because it’s so adaptable, I can make it for breakfast, snack, or dessert. What I love most about this is that it’s a recipe I can count on, that makes my house smell incredible, and that my family always asks for seconds of.
How do I make Zucchini Carrot Swirl Cake?
Quick Overview
This cake comes together in just a few simple steps. Grate the zucchini and carrots, mix your batter in one big bowl, then pour half into a prepared pan. Swirl in your cinnamon sugar or cream cheese filling, top with the remaining batter, and swirl again for a beautiful effect. Bake until golden and a toothpick comes out clean. It’s honestly so straightforward — the hardest part is waiting for it to cool enough to slice! The smell alone is worth every minute of baking. My secret? I always do the initial mixing by hand, which keeps the batter tender, and I use a toothpick test to avoid overbaking. This recipe is designed for home cooks who want a dessert that feels special but is really just thrown together with love and a few basic ingredients.
Ingredients
For the Main Batter:
– 2 cups all-purpose flour (I recommend unbleached for richer flavor)
– 1 cup sugar (can reduce to ¾ cup if you want a less sweet cake)
– 1 teaspoon baking powder
– ½ teaspoon baking soda
– ½ teaspoon salt
– 1 teaspoon ground cinnamon
– ½ teaspoon ground nutmeg
– ½ cup olive oil or melted butter (I tested both—olive oil makes it lighter)
– 3 large eggs
– 1 teaspoon vanilla extract
– 1 cup grated zucchini (squeeze out excess moisture—trust me, this keeps it from getting soggy!)
– 1 cup grated carrots (preferably organic for better flavor and sweetness)
For the Filling:
– ¼ cup brown sugar (or coconut sugar for a healthier twist)
– 1 teaspoon cinnamon
– 2 tablespoons softened butter or coconut oil
– Optional: chopped nuts or cranberries for extra texture
For the Glaze:
– ½ cup powdered sugar
– 1-2 tablespoons milk or cream (adjust for desired consistency)
– A few drops of vanilla or lemon zest for extra brightness
Step-by-Step Instructions
Step 1: Preheat & Prep Pan
Set your oven to 350°F (175°C). Grease a standard 9-inch round cake pan or line it with parchment paper—trust me, this cake is sticky when fresh out of the oven. Spray or butter the pan generously, especially around the edges, so nothing sticks. And don’t skip this step, or you might end up with a stubborn piece stuck to the pan, which is no fun when you’re trying to serve up something pretty!
Step 2: Mix Dry Ingredients
In a large bowl, whisk together the flour, sugar, baking powder, baking soda, salt, cinnamon, and nutmeg. This step ensures everything is evenly distributed and gives your cake that consistent rise and flavor. I always do this first, especially since I hate lumps in my batter—makes every slice perfect!
Step 3: Mix Wet Ingredients
In another bowl, beat the eggs, then stir in the oil, vanilla, and a pinch of gratitude for how easy life is sometimes. Fold in the grated zucchini and carrots—be sure to squeeze out as much moisture as possible; wet veggies can mess with the texture. I like using a clean kitchen towel to squeeze out the moisture, which saves me from soggy batter.
Step 4: Combine
Add the wet mixture to the dry ingredients and stir gently until just combined. Don’t overmix — you want it to be tender, not tough. If some flour streaks remain, that’s fine; it’s better to undermix than overmix here. The batter will be thick but pourable—don’t worry.
Step 5: Prepare Filling
Mix the brown sugar, cinnamon, and softened butter in a small bowl. If you’re feeling fancy, sprinkle in some chopped nuts or dried cranberries. This filling is what adds that lovely swirl effect—think of it as a little surprise in every bite.
Step 6: Layer & Swirl
Pour half the batter into your pan. Drop spoonfuls of the cinnamon sugar mixture on top. Then add the rest of the batter over that, and using a spoon or knife, gently swirl it through to create a marbled look. I love swirling in loose circles—a little bit rustic, a little bit artful. Don’t overdo it, or it turns into a muddy mess. I aim for gentle zigzags or figure eights.
Step 7: Bake
Pop it into the oven and bake for about 35-40 minutes. You want it golden around the edges and a toothpick inserted into the center to come out clean. The house will smell like cinnamon heaven, and that alone is reason enough to bake this. Timing can vary depending on your oven, so start checking around the 35-minute mark. If the top is browning too fast, lightly tent with foil.
Step 8: Cool & Glaze
Let the cake cool in the pan for about 15 minutes, then transfer it to a wire rack. I love the smell of it cooling—it’s like springtime in the kitchen. Once completely cooled (or just warm enough to indulge), drizzle the glaze over the top. I like to make the glaze a little runny for a pretty waterfall effect. The glaze adds just the right sweetness and a little glossy finish that everyone loves.
Step 9: Slice & Serve
Use a sharp knife to slice clean pieces. If the cake is still warm, might as well do it straight from the fridge—I promise, the texture stays perfect. Serve with a cup of tea or a glass of milk, and watch how quickly it disappears. My kids ask for this as their morning breakfast, and honestly, I don’t mind. It’s got enough veggies to feel a little healthy, but the sweetness keeps it special. Make extra because I guarantee—you’ll want leftovers.
What to Serve It With
Because this cake is so versatile, I usually just slice it up and serve it with whatever I have on hand. For breakfast, a simple black coffee or a latte pairs beautifully. I’ve also served slices alongside a fresh fruit salad or Greek yogurt for a brunch that feels fancy but is totally doable. When I bake it as dessert, I love adding a dollop of whipped cream or a scoop of vanilla ice cream because, honestly, who can resist a hot-and-cold combo? Sometimes I dust it with powdered sugar if I want a more delicate look. On casual days, a glass of cold milk or a cozy cup of tea does the trick. This cake just feels like a warm hug any time of day.
Top Tips for Perfecting Your Zucchini Carrot Swirl Cake
After making this dozens of times, I’ve learned a few tricks to make it even better. First off, always squeeze out the excess moisture from the zucchini—wet zucchini can turn your cake heavy and soggy, which nobody wants. I keep a clean kitchen towel nearby just to give it a good squeeze; it’s quick and keeps your batter light. When mixing, I suggest folding the wet and dry ingredients gently—overmixing makes the cake tough, and that’s the opposite of what we want. If you want a more intense cinnamon flavor, sprinkle a little extra into the batter or filling. I tested this cake with a touch of lemon zest in the glaze, and WOW, it brightened everything up! I also experimented with swapping half the sugar for honey or maple syrup—delicious, but reduce the liquid in the batter slightly to keep the right consistency. Finally, watch your baking time—it can vary depending on your oven’s heat distribution. A toothpick test is your best friend here. This recipe is forgiving, though, so don’t stress. Even if your swirl isn’t perfectly uniform, the rustic look is part of its charm!
Storing and Reheating Tips
This cake keeps surprisingly well. Once cooled completely, I store slices in an airtight container at room temperature for up to two days—cover it loosely so it doesn’t get soggy. If I want it to stay fresh longer, I’ll pop it into the fridge; just remember to take it out about 15 minutes before serving so it’s not ice-cold. To freeze leftovers, wrap slices tightly in plastic wrap, then foil, and keep them for up to 3 months. Thaw at room temperature or give it a quick warm-up in the microwave. The glaze or frosting can be added after reheating if it’s in the fridge—trust me, this cake is just as delicious the next day. When reheating, avoid overheating to keep the moisture intact. I’ve found that warming it gently on the lowest oven setting or microwave yields the best results. And if I want that fresh-baked feel, I broil it for 30 seconds just to bring back a little crispness—be careful not to burn it! This cake is forgiving, versatile, and keeps the cozy vibes going all week long.
Frequently Asked Questions
Final Thoughts
If you’re looking for a cozy, forgiving cake that’s almost like a warm hug you bake yourself, this zucchini carrot swirl cake is it. It’s a recipe I turn to when I need a little comfort but also want to sneak in some healthy goodness (shh, don’t tell the kids!). The textures and flavors are simple but wow — they really stand out, especially when it’s fresh out of the oven. I’ve shared this with friends for casual gatherings, taken it to potlucks, and even made mini versions for quick breakfast bites. Every time I bake this, I’m reminded that the best recipes are often the simplest, made with love, and that smell that fills the house? That’s what makes it all worth it. I hope you try it, tweak it to your liking, and that it becomes a new family favorite for you too. Happy baking, and I’d love to hear your twists—drop a comment or share your photos when you make it!
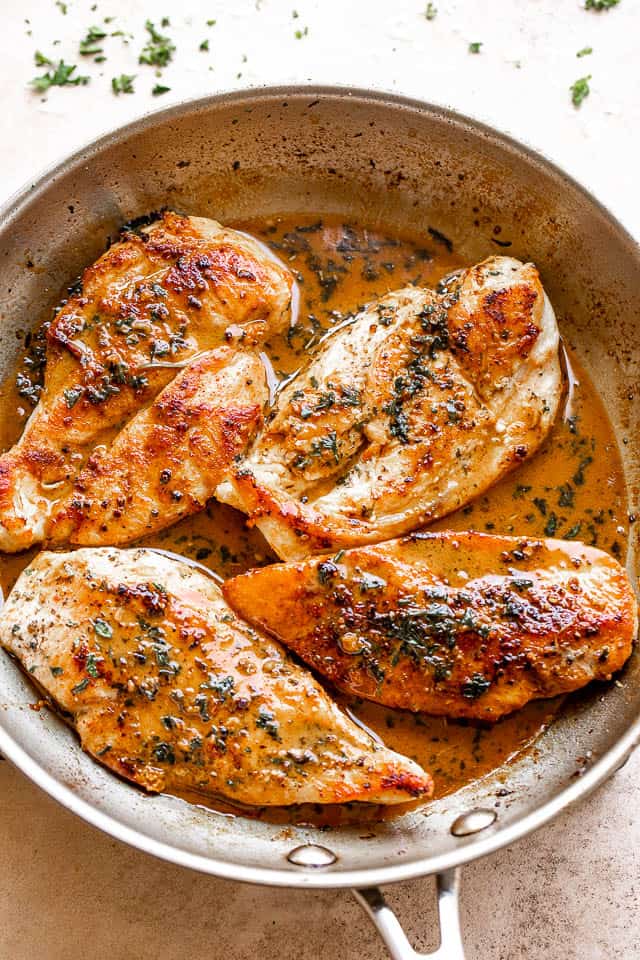
Garlic Butter Pan Fried Chicken Breasts
Ingredients
Method
- Pound chicken breasts to an even thickness and season them with salt and pepper.
- In a small mixing bowl, combine Italian seasoning, paprika, and onion powder; rub the chicken breasts with the prepared seasoning.
- Heat olive oil in a large 12-inch skillet over medium-high heat.
- Add chicken breasts to the hot oil and cook for 6 minutes, undisturbed.
- Flip over the chicken breasts and add 1 tablespoon butter; tilt the pan to swirl around the butter while it melts and continue to cook for 5 more minutes or until cooked through. Chicken is done when its internal temperature reaches 165˚F.
- Remove chicken from skillet and set aside; keep it covered.
- Reduce heat to medium and add 2 tablespoons butter to the same skillet. Stir in the garlic and cook until fragrant, about 15 seconds.
- Add parsley, thyme, and rosemary; cook for 10 seconds.
- Pour in wine or chicken broth and scrape up all the browned bits from the bottom of the pan.
- Add the remaining butter to the skillet and stir until the butter is melted.
- Return chicken to the pan and cook for a minute or until just heated through.
- Spoon sauce over the chicken and remove from heat. Serve.