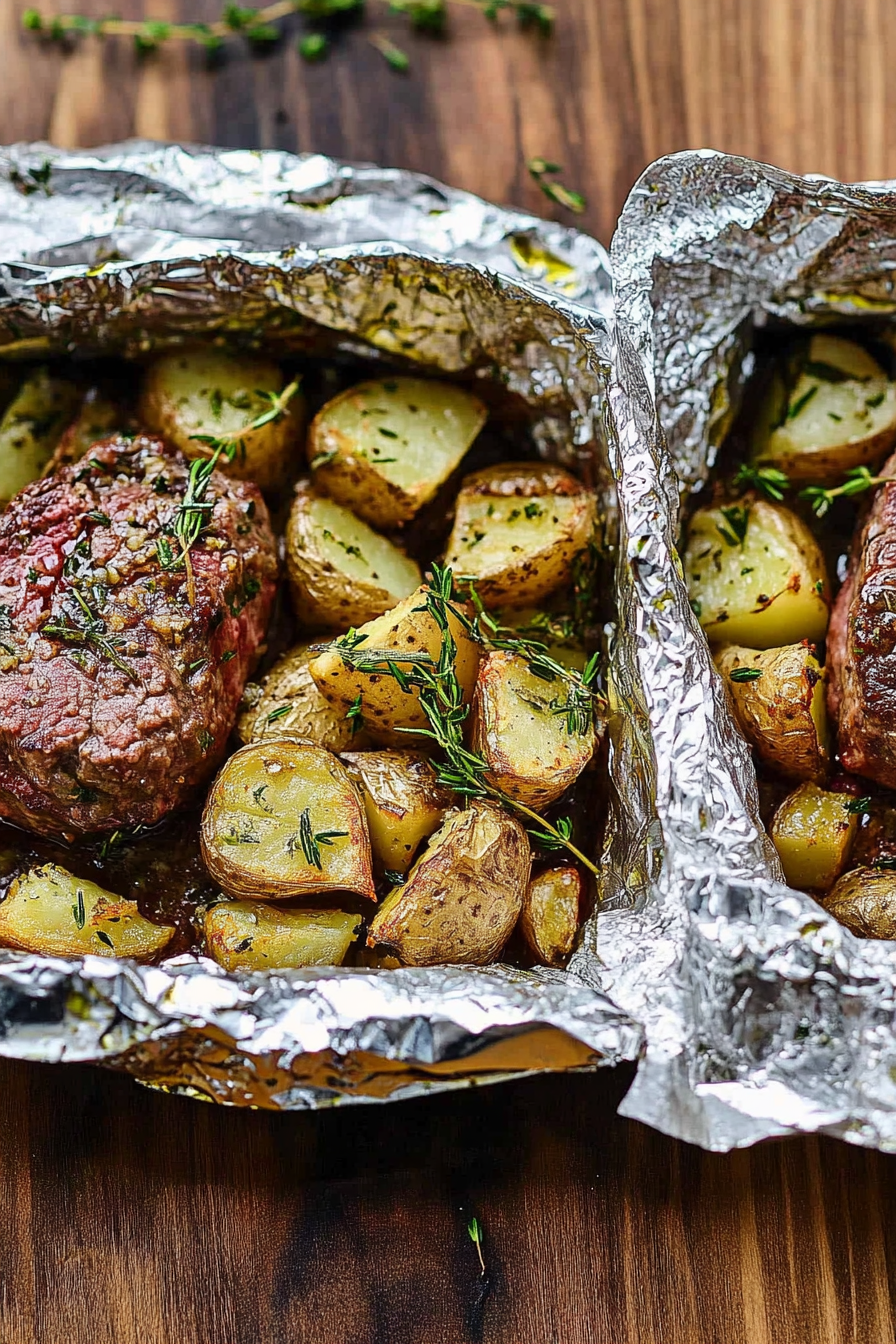
Easy Foil Packet Steak and Potatoes
There’s something about baking with zucchini that’s just… magical to me. I stumbled upon this recipe years ago when I was trying to sneak some greens into my kids’ desserts — and honestly, I was a little skeptical at first. Would they even notice? Would it still taste sweet and moist the way I wanted? Turns out, this zucchini swirl cake is a total game-changer. The zucchini adds a subtle, tender moisture that makes every bite feel like a warm hug, and the swirl of batter and filling makes it look like a work of art. This one’s a lifesaver on busy nights when I want something homemade but don’t want to spend forever in the kitchen. Plus, it’s surprisingly simple — I always do it with ingredients I have on hand, and my family goes nuts for it. Trust me, once you try this, it’ll be in your rotation too, especially when you want to feel a little nostalgic while indulging guilt-free!
What is Zucchini Swirl Cake?
Think of it as a cross between a moist, tender cake and a bright, veggie-packed dessert. The name “zucchini swirl cake” comes from the way you layer and swirl the batter and filling to create those beautiful marbled patterns. It’s essentially a classic quick bread turned into a little showstopper — you get the soft crumb of a cake with a surprise twist of zucchini hiding inside. The name might sound fancy, but honestly, it’s super straightforward to make. I love that it combines the health benefits of zucchini with the comforting warmth of a home-baked treat. It’s not overly sweet — just the right balance of fruity, nutty, and subtly savory notes from the zucchini that elevate the experience. And what I appreciate most is how it’s a perfect way to use up those extra zucchinis from my garden or the bunch that’s been sitting in the fridge too long. You’d be surprised how this humble veggie can shine in a dessert, making your baking feel a little more wholesome and a whole lot more special.
Why you’ll love this recipe?
Honestly, what I love most about this zucchini swirl cake is how versatile and forgiving it is. The flavor combination is just divine — the hint of zucchini keeps the cake incredibly moist, while the swirl of creamy filling adds a rich, luscious contrast. It’s sweet enough to satisfy that dessert craving, but not so sugary that you feel totally indulgent. Plus, it’s incredibly simple to throw together; I’ve made this countless times with kids underfoot, and it never fails. It’s also budget-friendly because most ingredients are pantry staples — just flour, sugar, eggs, and zucchini, which I always have in my fridge. My family asks for this all the time, especially when I want to sneak in some extra greens without a fuss. The best part? You can enjoy it for breakfast, brunch, or even as an afternoon snack alongside a cup of tea. This cake isn’t just a recipe — it’s a little piece of my kitchen story, and I hope you feel the same warmth baking it up too.
How do I make Zucchini Swirl Cake?
Quick Overview
This cake comes together in just a few easy steps. First, you grate and squeeze out the moisture from the zucchini (trust me, doing this makes a huge difference in fluffiness). While it’s draining, you whip up the batter, which is mostly butter, sugar, eggs, and flour — simple stuff. Then, you prepare the filling—usually a mix of cream cheese and sugar—and spoon it in layers. Swirling is my favorite part — I love creating those pretty marbled patterns that make the cake look like a work of art. Once baked to golden perfection, I let it cool just enough to set, then glaze it with a sweet, shiny topping. And voilà — a beautiful, moist cake that’s as stunning as it is delicious!
Ingredients
For the Main Batter:
– 1 ½ cups all-purpose flour (I like to use unbleached for a richer flavor)
– 1 teaspoon baking powder
– ½ teaspoon baking soda
– ¼ teaspoon salt
– ¾ cup granulated sugar
– ½ cup unsalted butter, melted (or olive oil if you prefer a lighter taste)
– 3 large eggs
– 1 teaspoon vanilla extract
– 1 cup finely grated zucchini (squeezed dry — this keeps it moist but not soggy)
For the Filling:
– ½ cup cream cheese, softened
– ¼ cup powdered sugar
– 1 teaspoon vanilla extract
– Optional: a pinch of cinnamon or nutmeg for extra warmth
For the Glaze:
– ½ cup powdered sugar
– 1-2 tablespoons milk or lemon juice
– Optional: a pinch of vanilla or citrus zest for flavor
Step-by-Step Instructions
Step 1: Preheat & Prep Pan
First things first, I crank my oven to 350°F (175°C). I like to line my loaf pan with parchment paper or lightly grease it — makes cleanup easier. If you’re using a different shape, adjust the baking time accordingly. I also always do a quick check of my oven’s heat with an oven thermometer — trust me, those things can be off sometimes, and you don’t want an uneven bake.
Step 2: Mix Dry Ingredients
In a big bowl, I whisk together the flour, baking powder, baking soda, and salt. This step keeps everything evenly distributed so your cake rises perfectly. I find that sifting isn’t necessary here — just a good whisk does the trick. This prepares your foundation for that fluffy, tender texture.
Step 3: Mix Wet Ingredients
In another bowl, I combine the melted butter and sugar until smooth — I love how this smell fills my kitchen! Then, I beat in the eggs one at a time, making sure each is fully incorporated before adding the next. Vanilla comes next, and I usually just eyeball it — maybe a teaspoon or so. I then stir in the grated zucchini, which I make sure to squeeze out as much excess moisture as I can — I’ve learned that leftover water can make the batter too runny, and that’s a no-go for fluffy cake.
Step 4: Combine
Now, I gently fold the dry ingredients into the wet, doing my best not to overmix. Overmixing can develop gluten and make the cake dense, so I stop just as the batter comes together. The smell of fresh batter makes me eager to bake — it’s so cozy.
Step 5: Prepare Filling
While the batter sits, I beat the softened cream cheese, powdered sugar, and vanilla until smooth and creamy. You can add a dash of cinnamon or nutmeg here if you like a bit of warmth — I have, and it’s delicious. This filling is what makes the swirl so pretty and rich, and I always test the taste — it’s so good I want to eat it straight from the bowl!
Step 6: Layer & Swirl
Pour about half of the batter into your prepared pan. Then spread the cream cheese filling on top, smoothing it gently. Top with the rest of the batter and use a knife or skewer to swirl through the layers, making circles and figure-eights. It doesn’t have to be perfect — I think the imperfections add charm! Watching the batter ripple is almost meditative.
Step 7: Bake
Pop it into the oven and bake for about 45–50 minutes, or until a toothpick inserted into the center comes out clean. Keep an eye on it after 40 minutes — ovens vary! If the edges brown too fast, I tent it loosely with foil. The smell alone lures everyone into the kitchen — it’s heavenly.
Step 8: Cool & Glaze
Once baked, I let the cake cool in the pan for about 15 minutes, then transfer it to a wire rack. I wait until it’s just warm to apply the glaze — this helps it set nicely without dripping off entirely. When the glaze is shiny and just thick enough to hold a pretty drizzle, I pour it over the top, letting it cascade down the sides.
Step 9: Slice & Serve
Once cooled completely, I use a sharp serrated knife to cut slices. I love serving it slightly warm with a dollop of whipped cream or a sprinkle of fresh berries — it’s so comforting! Leftovers are best stored covered at room temp for a day, or in the fridge for up to three. Honestly, I think it tastes even better the next day because the flavors meld nicely.
What to Serve It With
This cake is so versatile — my kids adore it for breakfast alongside a glass of milk or a cup of their favorite hot chocolate. It’s perfect for brunch, especially when I want to impress guests without fussing over complicated desserts. After dinner, it pairs beautifully with vanilla ice cream or a drizzle of caramel sauce — trust me, that’s a crave-worthy combo. When we’re just relaxing on a lazy weekend, I like to slice it up for a cozy snack with a warm cup of tea or coffee. I’ve tested this with almond milk in the batter, which made it even creamier and a little lighter — definitely worth a try if you’re dairy-free! The best part? It’s a keep-it-simple dessert that feels fancy enough for guests but makes you feel like a baking pro — all with humble ingredients. I’ve also wrapped individual slices and frozen them — they defrost in minutes and still taste amazing. It’s a recipe I keep coming back to because it hits all the right notes — comfort, flavor, and a little bit of homemade magic.
Top Tips for Perfecting Your Zucchini Swirl Cake
Over the years, I’ve learned a few tricks that help me get this cake just right every time. First, always squeeze out as much moisture as possible from the zucchini — leftover water can turn your batter runny and make the cake dense. I test the zucchini by squeezing handfuls with a clean dish towel until the liquid stops dripping. Regarding mixing, don’t overdo it! A gentle fold is best — I’ve ruined a batch by mixing too vigorously and ending up with a dense cake. When swirling, I suggest starting from the center and working outward, making broad, gentle motions; it creates pretty, natural patterns. For ingredient swaps, I’ve tried using coconut sugar instead of white, which gives it a richer flavor, but you might need a touch less liquid. If you want to make it gluten-free, swap all-purpose flour for a 1:1 blend like almond or oat flour — just remember they might alter the texture slightly. Baking tips? Always check your oven’s accuracy — every oven is different. I also rotate my cake halfway through baking for even browning. And for the glaze, I love adding a splash of lemon juice for brightness — it elevates every bite. My biggest lesson? Patience is key when cooling and glazing. Rushing either stage can mess with the look and taste. Trust me, taking your time pays off, and every slice will look store-bought but taste like a sweet, warm hug from the kitchen.
Storing and Reheating Tips
This cake stays fresh for a couple of days when stored properly. I like to keep it covered loosely with a cloth or in an airtight container at room temperature — it stays moist and soft. If the weather’s warm or I want to extend its life, I pop it in the fridge. Just remember, refrigeration can sometimes dry out cakes a bit, so I recommend bringing it back to room temp before serving. Want to freeze leftovers? Wrap individual slices tightly in plastic wrap, then foil, or store in an airtight container. It keeps well for up to 3 months. To reheat, unwrap and pop it in a low oven (around 300°F) for about 10 minutes — it’ll regain its cozy softness. When it comes to the glaze, I usually wait to add it until just before serving so it doesn’t get sticky or soggy. If you need to reapply or touch up the glaze after reheating, just warm it slightly to make it easier to spread. Honestly, this cake is forgiving — even if it’s been a day or two, it still tastes fantastic, especially with a little warm cup of tea or coffee.
Frequently Asked Questions
Final Thoughts
Honestly, every time I bake this zucchini swirl cake, I’m reminded that the best recipes are the ones born out of simple ingredients and a dash of love. It’s a humble treat that doesn’t take itself too seriously — yet the look and taste always impress. My kids love helping layer and swirl, and their tiny hands add their own artistic messes that make each cake unique. I’ve tried the batter with almond milk, added walnuts, even mixed in a handful of blueberries — and it’s always a hit. When you’re craving something sweet but want it to feel a little nourishing, this cake is my go-to. It’s like a warm hug from your kitchen, a reminder that sometimes the simplest ingredients make the most memorable desserts. I can’t wait to hear how yours turns out — don’t forget to share your own twists in the comments, or tag me on social media. Happy baking, my friend!

steak and potatoes
Ingredients
Method
- Preheat oven to 375°F or preheat the grill to medium-high (about 400°F). Bring a medium-sized pot of water to a boil.
- Cube 2 pounds sirloin steak into bite-sized pieces. Trim excess fat if desired. Set aside.
- Cube 2 pounds red potatoes into bite-sized pieces. Parboil for 5 minutes or microwave with 3 tablespoons water for 3 minutes. Potatoes should be still firm but starting to tender.
- Lay out 4 pieces of aluminum foil, approximately 14x18 inches each. Distribute 1/2 pound of steak, 1/2 pound of potatoes, and about 1 tablespoon of minced jalapenos onto each piece. Adjust jalapenos to taste.
- In a small bowl, mash together 6 tablespoons softened salted butter, 2 tablespoons minced parsley, 2 teaspoons salt, 2 teaspoons black pepper, 2 teaspoons garlic, and 1 tablespoon Worcestershire sauce. Divide and spoon over the ingredients in each packet. Top each with a sprig of rosemary.
- Fold the foil over to seal tightly, ensuring no leaks.
- Bake in the oven for 25 to 30 minutes or grill over medium-high heat for 15 to 20 minutes, flipping as needed. Cook longer if desired for more doneness.