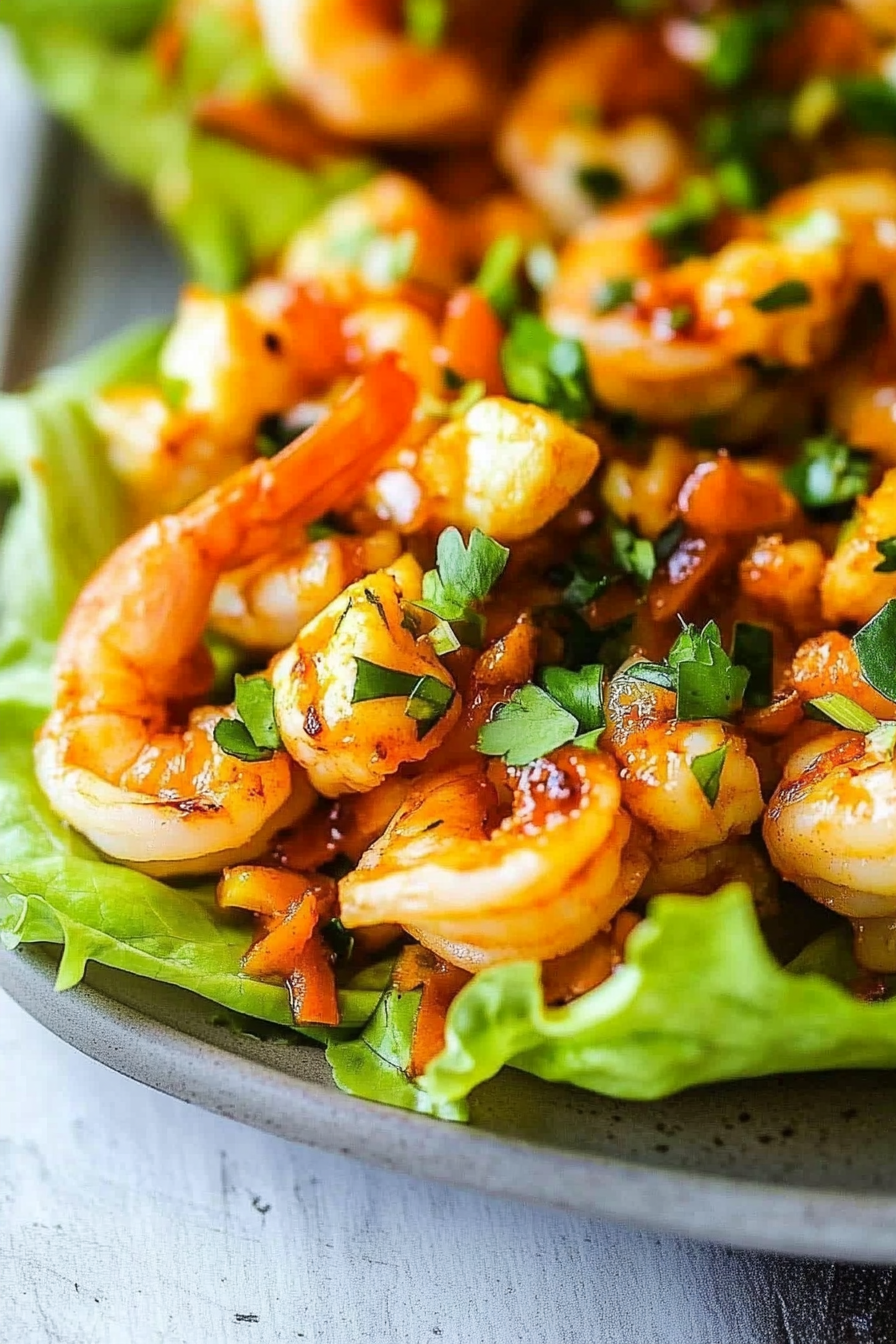
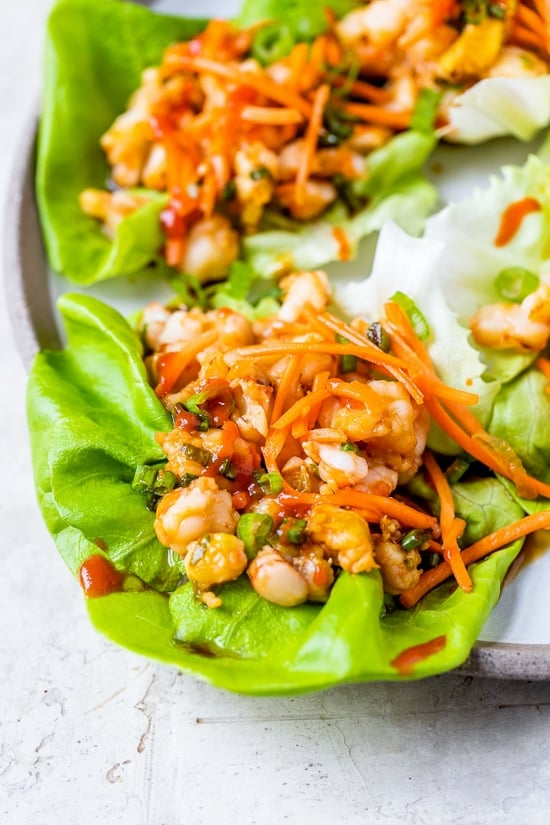
Easy Shrimp Wraps for a Light Dinner
I honestly can’t quite remember the first time I made this zucchini marble cake. It’s one of those recipes that kind of snuck into my life, and now, years later, I can’t imagine a kitchen without it. The smell alone, when it’s baking, reminds me of lazy weekend mornings at grandma’s house—warm, cinnamon-scented air, the gentle hum of the oven, and the thrill of sneaking a bite before it even cools. This cake is a little bit of everything: moist, subtly sweet, and with just enough vegetable goodness to feel a little virtuous. My kids ask for this all the time, and honestly? It’s become our go-to when we’re craving something sweet but don’t want to indulge in a giant piece of cake. It’s such a comforting, everyday kind of treat, and I always do this when I want something that feels like a hug in dessert form. Trust me on this one—you’ll see what I mean when you take that first bite.
What is Zucchini Marble Cake?
Think of this zucchini marble cake as a happy marriage of tradition and surprise—think classic chocolate and vanilla swirled together in a tender, moist cake. The name might sound a little fancy, but it’s really just a charming way of saying “swirled,” or “marbled,” with zucchini added for moisture and a hint of nutrition. It’s essentially a humble sponge cake, but the magic happens when you layer in the richness of cocoa and the delicate, shredded zucchini that keeps everything extra moist. It’s a cake that’s been passed around in my family for ages, and honestly, it’s a perfect way to sneak some vegetables into dessert without anyone batting an eye. I love how versatile it is—serve it for breakfast, brunch, or after dinner—I promise, it fits wherever it lands.
Why you’ll love this recipe?
What I love most about this zucchini marble cake is how it strikes that perfect balance between indulgent and healthy—well, mostly healthy, anyway! The flavor is rich but not overwhelming; it’s got that deeply chocolatey note mingled with soft vanilla swirls that make each bite exciting. Plus, it’s ridiculously easy to make, whether you’re a baking novice or a seasoned pro. I’ve tested this countless times, and it never fails. I always say it’s a lifesaver on busy nights when I want something quick and comforting. The ingredients are budget-friendly—a bag of zucchini from the farmers’ market, cocoa powder I always have in the pantry, and a few staples. And the best part? You can get creative with this base—add nuts, swap out the glaze, or even make mini muffins if you’re feeling playful. Honestly, what’s not to love?
How do you make Zucchini Marble Cake?
Quick Overview
This cake comes together with a simple one-bowl batter—no complicated techniques needed. You’ll mix your dry ingredients separately, blend wet ingredients until smooth, then gently combine everything to avoid overmixing, which keeps the cake super tender. The batter is then split and flavored with cocoa for the chocolate part. Swirling the two together, adding the shredded zucchini, creates that beautiful marble effect. Once baked to perfection, you get a moist, crumb-tender cake that tastes like a treat but has that secret veggie boost. This is perfect for a quick bake, and I’ve found that it’s as forgiving as it is delicious—bake it a little longer if you like a firmer crumb, or a touch less for extra softness. It’s a low-stress, high-reward kind of recipe.
Ingredients
For the Main Batter:
– 2 cups all-purpose flour (I like unbleached for a richer flavor)
– 1 1/2 cups sugar
– 1 teaspoon baking powder
– 1/2 teaspoon baking soda
– 1/2 teaspoon salt
– 1 cup vegetable oil (can use avocado oil for an extra healthy twist)
– 1 cup grated zucchini (squeeze out excess moisture—trust me on this!)
– 3 large eggs
– 1 teaspoon vanilla extract
For the Chocolate Swirl:
– 1/2 cup unsweetened cocoa powder
– 1/4 cup hot water (to make the cocoa paste smooth)
For the Glaze (optional but recommended):
– 1 cup powdered sugar
– 2-3 tablespoons milk (or almond milk)
– 1/2 teaspoon vanilla extract
Step-by-Step Instructions
Step 1: Preheat & Prep Pan
Set your oven to 350°F (175°C) and grease a 9-inch loaf pan or round cake pan. I always line mine with parchment paper for easy removal, especially if I’m being extra cautious. Having everything prepped makes the whole process smoother—trust me, this is where I’ve learned the hard way that rushing at the last minute isn’t fun.
Step 2: Mix Dry Ingredients
In a large bowl, whisk together the flour, sugar, baking powder, baking soda, and salt. Sifting isn’t needed if your flour is fresh, but I do it sometimes just to keep things airy. This step is crucial because it distributes the leavening agents evenly—no one wants dense pockets of baking soda in their cake!
Step 3: Mix Wet Ingredients
In a separate bowl, beat the eggs, then stir in the oil, vanilla, and grated zucchini. I always do this until the mixture looks smooth and a little frothy—that’s when I know it’s well combined. Grated zucchini should be squeezed out really well. I use a clean kitchen towel to do this, which is a trick I picked up after noticing extra moisture can make the batter a little runny.
Step 4: Combine
Pour the wet mixture into the dry ingredients and fold gently—no overmixing! The batter should be a little lumpy but combined. Overmixing can make the cake tough, and nobody wants that. If it seems too thick, growl a little to yourself and add a splash of milk.
Step 5: Prepare Filling
Mix the cocoa powder with hot water until you get a smooth, pourable paste. This part is my favorite—watching the deep brown stir in perfectly and smelling that chocolate aroma. If you want, add a teaspoon of espresso powder here for an extra punch. Set aside.
Step 6: Layer & Swirl
Take about two-thirds of the batter and spread it evenly in the pan. Drop spoonfuls of the chocolate mixture on top, then add the remaining batter. Using a knife or a skewer, swirl through the batter gently to create a marbled effect—no need to be perfect, just enough to see beautiful streaks of chocolate and vanilla in the baked cake.
Step 7: Bake
Pop it in the oven for about 40-45 minutes. Check doneness with a toothpick—if it comes out clean, you’re good! Every oven is different; I’ve had mine take a little extra time sometimes. If the top gets dark too quickly, tent with foil and keep going.
Step 8: Cool & Glaze
Let the cake cool in the pan for about 15 minutes before transferring to a wire rack. If you’re glazing, do so when completely cooled—otherwise, the glaze might melt and lose that glossy sheen. I like to sprinkle some extra cocoa or chocolate shavings on top for presentation.
Step 9: Slice & Serve
Use a serrated knife and cut in gentle, even strokes. I love serving this slightly warm with a dollop of whipped cream or a dusting of powdered sugar. It’s equally lovely at room temperature, though. And honestly, this cake disappears in minutes at my house—be prepared for demands for seconds!
What to Serve It With
This cake is versatile enough to enjoy at any time of day. For breakfast, I love it alongside a strong coffee or a glass of almond milk—it’s like a little treat to start your morning right. During brunch, pair slices with fresh berries and a dollop of yogurt or mascarpone. As a dessert, a drizzle of caramel or a scoop of vanilla ice cream takes it over the top, especially when served warm.
If you’re just craving a cozy snack, warm a slice and spread some butter or nut butter on top. The kids love it — and honestly, I find myself sneaking a piece for myself when no one’s looking. It’s that good.
Top Tips for Perfecting Your Zucchini Marble Cake
After making this a dozen times, I’ve picked up a few tricks:
- Zucchini Prep: Always squeeze out excess moisture like your life depends on it. Moisture’s the enemy for a tender crumb, and trust me, soggy zucchini is no fun.
- Mixing Advice: The key is gentle folding—overmixing makes the cake dense and heavy. Look for a lull in your batter and stop then.
- Swirl Techniques: Don’t overdo the swirling; just a few gentle passes with a skewer or butter knife will do. Too much swirling can blend the colors and lose that marbled effect.
- Ingredient Swaps: Want to try dark chocolate? Use dark cocoa powder; for dairy-free, swap out the eggs with applesauce or flax eggs—I’ve tried both and it works beautifully.
- Baking Tips: Keep an eye on the oven as all ovens vary. Start checking around 40 minutes, and don’t forget the toothpick test.
- Glaze Variations: I love adding a splash of espresso or almond extract to the glaze for a flavor boost. If you prefer a more tart topping, cream cheese frosting works beautifully too.
This recipe is forgiving, and every time I tweak a little ingredient, I learn something new. The most important thing is to treat it like a little kitchen adventure—have fun and don’t stress too much about perfection. It’s all about that warm, cozy, homemade goodness.
Storing and Reheating Tips
This cake keeps well, but a few tips make all the difference. If you’re not serving it immediately, store it covered at room temperature for a day or two—cover tightly with plastic wrap. If you want to keep it longer, pop it in an airtight container in the fridge for up to 4 days. The flavor only gets better overnight, by the way.
To freeze, wrap slices tightly in plastic wrap and then aluminum foil—these little bundles will keep for up to 3 months. Thaw at room temperature or give it a quick microwave zap if you’re in a hurry. Just keep in mind, the glaze is best added fresh—if you’ve glazed it beforehand, it might get a little soggy after freezing but still tastes good.
Frequently Asked Questions
Final Thoughts
This zucchini marble cake is more than just a cozy dessert; it’s a staple in my kitchen that’s been perfected over years of trial, error, and love. It’s the kind of recipe that feels special enough for guests but simple enough for a weekday treat. The combination of tender crumb, the surprise swirl of chocolate, and that hint of zucchini makes each bite memorable. Plus, it’s flexible—adapt it with different flavors or toppings to suit your mood or ingredients in your pantry. I encourage you to play around and make it your own. Cooking should be fun, relaxing, and always nourishing—not just for the body but for the soul. Happy baking, my friend! I’d love to hear how yours turns out – leave a comment or share your tweaks below. And remember, the best part of sharing recipes is the stories we create around them. Now, go ahead—grab that zucchini and get baking!
Shrimp
Ingredients
Method
- To make the quick-pickled carrots, combine 0.25 cups rice vinegar with 2 Tbsp water and honey or sugar. Add the carrots and stir to combine. Set aside.
- Combine 0.25 cups soy sauce with remaining 3 Tbsp rice vinegar, garlic and sesame oil to make the dumpling sauce.
- Prepare the shrimp by thawing if frozen, draining excess water, and finely chopping until the consistency of ground meat. Place in a large bowl.
- Mince the white and light green parts of scallions along with the remaining 1-inch ginger and add to the shrimp bowl.
- Season the shrimp mixture with 1 Tbsp soy sauce and sriracha if using, then stir to combine.
- Set a skillet over medium heat with 1 teaspoon oil. When hot, add the shrimp mixture and cook undisturbed for 1-2 minutes, then stir and cover to finish cooking with residual steam.
- Drain the quick-pickled carrots.
- Serve by wrapping the shrimp filling in lettuce leaves with pickled carrots and sauce, or over cooked rice for rice bowls.