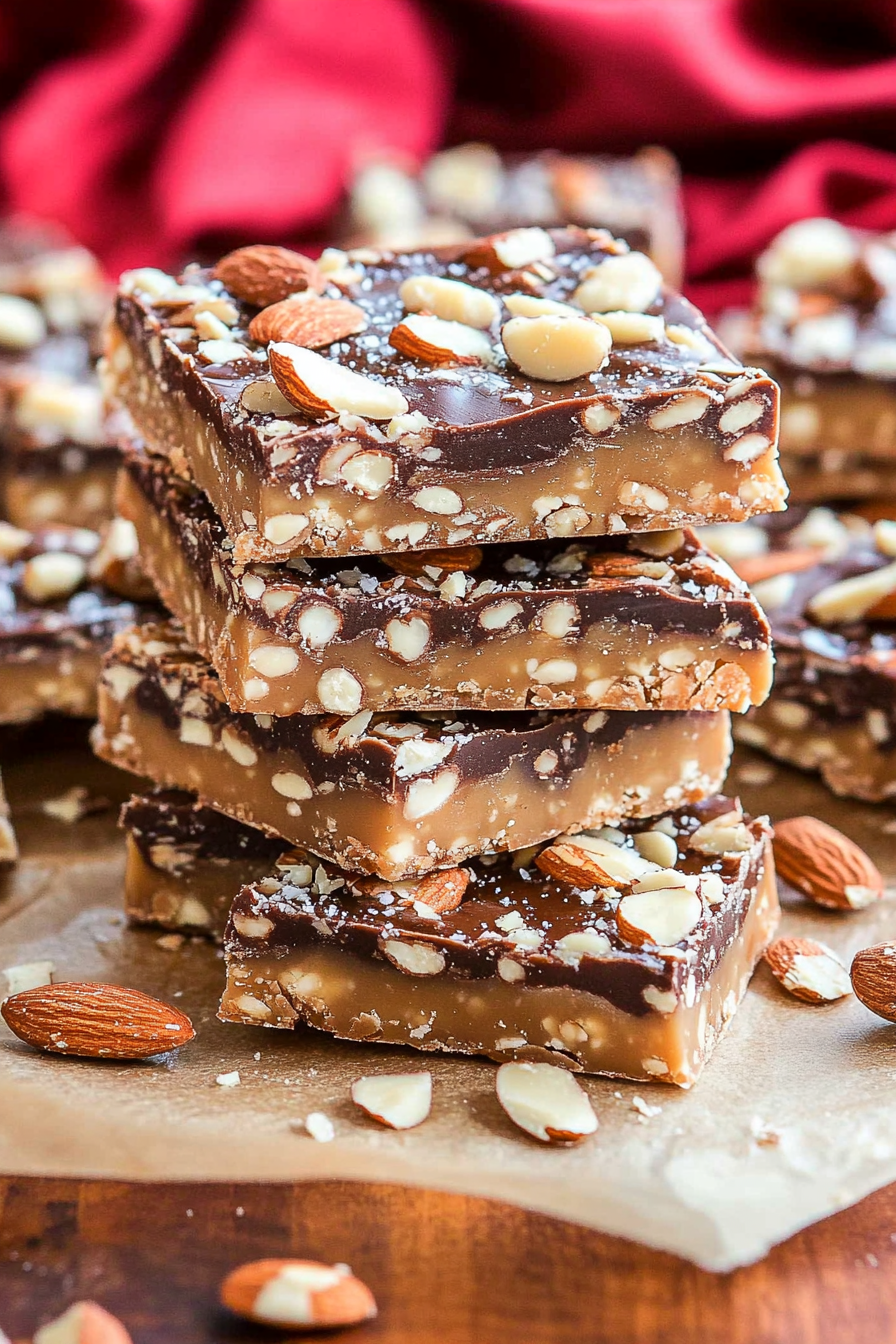
Easy Almond Candy Bites Recipe
There’s something so comforting about pulling a warm loaf of zucchini bread out of the oven, especially when it’s laced with a simple glaze that tastes like sunshine. I remember as a kid sneaking slices from my grandma’s kitchen, the smell alone making my mouth water. I love how this recipe is one of those “secret weapons” in my baking arsenal—it’s incredibly easy, turns out perfectly every time, and my kids ask for it all the time. Plus, it’s a brilliant way to use up those summer zucchinis that seem to grow a little faster than I can keep up with! Trust me on this one—you’ll want to jot down this recipe, because it’s become a household favorite, especially when I want something homemade and a little sweet but don’t want to fuss much. And the best part? It disappears in minutes at my house. I’ve made this countless times and it never fails to bring smiles around the table.
What is Zucchini bread?
Think of zucchini bread as a cozy, moist loaf—kind of like banana bread’s friendly cousin. It’s essentially a sweet quick bread packed with grated zucchini, which makes it moist and tender without adding a ton of fat or sugar. The name is pretty straightforward: zucchini, the vegetable, gets shredded and mixed into batter, then baked into a loaf that’s sweet, slightly nutty, and with a subtle earthiness from the squash itself. The idea originated from a way to sneak extra veggies into dessert, and honestly, who’s gonna complain about that? It’s a simple baking project that’s perfect for lazy weekends, brunch, or even as a gift—wrapped up with a pretty ribbon, it’s bound to make someone’s day. My version is extra moist with a lemony glaze that adds just the right zing. It’s a treat that’s more wholesome than it sounds but still indulgent enough to satisfy that sweet tooth craving.
Why you’ll love this recipe?
What I love most about this zucchini bread is how it pairs the earthy, slightly sweet flavor of zucchini with bright citrus notes from the glaze. It’s like a kiss of sunshine in every bite. The recipe is so straightforward—seriously, even if you’re not a seasoned baker, you’ll find this turns out perfect every time. The batter comes together quickly, with simple ingredients I always keep on hand, which makes it a lifesaver on busy nights or when unexpected guests pop in. And because zucchini is so budget-friendly, you’re not breaking the bank making this. Plus, you can customize it easily—swap out the lemon glaze for orange or vanilla, add nuts, or even toss in some blueberries for a fruity twist. My kids actually ask for this on hectic mornings because I’ve made it ahead, sliced, and stored it—perfect with a cup of coffee or milk. Honestly, it’s one of those recipes that feels like a warm hug, both nostalgic and fresh at the same time.
How do you make Zucchini bread with lemon glaze?
Quick Overview
This zucchini bread is an effortless one-bowl batter made by mixing grated zucchini into a lightly spiced, sweetened dough, then baked until golden and fragrant. The secret to its moistness? Grated zucchini packed with moisture, and careful mixing so you don’t overwork the batter. Once baked and cooled slightly, I drizzle it with a tangy lemon glaze, which lifts the entire flavor — trust me, it’s a game-changer. It’s the kind of recipe that feels like a warm hug, perfect for breakfast, snacks, or a coffee date with friends. Plus, you can customize it to your liking—add nuts, swap citrus, or even throw in some blueberries.
Ingredients
For the Main Batter:
– 2 cups grated zucchini (about 2 small zucchinis)
– 1 1/2 cups all-purpose flour (try almond or gluten-free if needed)
– 1 teaspoon baking powder
– 1/2 teaspoon baking soda
– 1/2 teaspoon salt
– 1 teaspoon ground cinnamon (optional but recommended)
– 1/2 cup granulated sugar
– 1/2 cup packed light brown sugar
– 1/3 cup neutral oil (vegetable, canola, or even melted coconut oil)
– 3 large eggs
– 1 teaspoon vanilla extract
For the Filling (Optional but Delicious):
– 1/2 cup chopped nuts (walnuts, pecans, or almonds)
– 1/2 cup blueberries or chocolate chips for extra fun
For the Glaze:
– 1 cup powdered sugar
– 2-3 tablespoons fresh lemon juice
– Lemon zest (for extra zing)
Step-by-Step Instructions
Step 1: Preheat & Prep Pan
Preheat your oven to 350°F (175°C). Grease a standard loaf pan with butter or non-stick spray and line it with parchment paper for easy removal. Giving your pan a little love ensures the bread releases easily and looks pretty when sliced.
Step 2: Mix Dry Ingredients
In a large bowl, whisk together the flour, baking powder, baking soda, salt, and cinnamon. It’s like giving all the dry components a nice little dance before they meet the wet stuff—makes for a light, airy loaf.
Step 3: Mix Wet Ingredients
In another bowl, beat the eggs, then add the sugars, oil, and vanilla. Mix until smooth and shiny. I always do this first – it makes the batter so much easier to combine later. If your eggs are cold, just give them a couple of seconds in the microwave—it helps everything incorporate better.
Step 4: Combine
Gradually add the wet mixture into the dry ingredients, stirring gently until just combined. Overmixing will make the loaf dense, so I always fold instead of stir vigorously. Also, squeeze out some excess moisture from the grated zucchini with a paper towel—this step is small but makes a big difference in preventing sogginess.
Step 5: Prepare Filling
If you’re adding nuts or blueberries, fold them into the batter now. I love walnuts for crunch or blueberries for bursts of juiciness — both work beautifully. Just toss them with a tiny bit of flour before mixing in to prevent sinking to the bottom.
Step 6: Layer & Swirl
Pour half of the batter into your prepared loaf pan, then add a layer of filling or extra toppings if you like. Top with the remaining batter and give it a gentle swirl with a toothpick or knife. This creates beautiful marbling that’s both pretty and tasty.
Step 7: Bake
Bake for 50-60 minutes, or until a toothpick inserted into the center comes out clean. Keep an eye toward the end—ovens vary. If the top browns too fast, tent with foil to prevent burning. My trick is setting a timer and starting to check for doneness around the 50-minute mark.
Step 8: Cool & Glaze
Let the bread cool in the pan for about 15 minutes, then transfer to a wire rack. Drizzle the lemon glaze over the warm loaf—this keeps it shiny and sticky. If you’re in a rush, you can wait until it’s fully cooled, but honestly, the glaze is best when the bread’s still a little warm.
Step 9: Slice & Serve
Use a serrated knife for clean cuts — patience makes for perfect slices. Serve with coffee or tea, or pack slices into lunchboxes. My kids love this warmed up a bit, with a dollop of marmalade or a smear of butter. It’s just that kind of comfort food that feels special but is so easy to pull together.
What to Serve It With
This zucchini bread is such a versatile little wonder. For breakfast, pair it with a hot cup of coffee or a glass of almond milk and maybe a smear of creamy butter or jam on the side. I also love serving it at brunch—slice it thick and arrange it on a pretty platter with fresh berries and a sprig of mint—and a mimosa or fresh orange juice. It makes a lovely afternoon snack, especially when you want something sweet but not overly indulgent. My family’s favorite way to enjoy it is with a big cup of tea and maybe a little dusting of additional lemon zest on top for extra zing. When served as dessert, I like to plate warm slices topped with whipped cream or a scoop of vanilla ice cream. It’s just one of those recipes that feels like a warm hug and always brings everyone together.
Top Tips for Perfecting Your Zucchini Bread
The secret to moist, tender zucchini bread is in how you handle the zucchini. I always grate and then squeeze out excess moisture—this makes a difference in preventing sogginess and keeps the loaf crumb-ly and perfect. When mixing, avoid overworking the batter; I fold ingredients gently, and that helps keep the loaf light. If you want a fancy swirl or an Instagram-worthy pattern, spoon half of the batter into your pan, add your swirl or filling, then top with the rest and give a gentle swirl with a skewer. For ingredient swaps, I’ve tested almond flour for part of the all-purpose flour—works well, just less rise. Baking tips: oven racks matter—middle rack is best for even heat—and start checking doneness at 50 minutes. For the glaze, I prefer thick yet pourable—add more powdered sugar if it’s too runny, or a little lemon zest if you want it extra flavorful. Trust me, you’ll learn little tricks as you go—just keep an eye on those browning edges and remember, every oven is a little different.
Storing and Reheating Tips
This bread stays moist and delicious for days when stored properly. At room temperature, cover lightly with foil or a clean towel—no plastic wrap, or it’ll get soggy. It’s best eaten within 2-3 days in those conditions. For longer storage, wrap tightly in plastic, then place in an airtight container or zip-top bag and refrigerate—it lasts about a week. Reheating a slice in the microwave for 10-15 seconds restores that freshly baked feel—just keep a close eye so it doesn’t get rubbery. If you’re freezing slices, wrap each piece tightly in plastic, then place in a freezer bag. Thaw at room temp or warm in the microwave. If you’ve added the glaze, store the loaf unglazed and add the topping just before serving—it keeps it shiny and fresh. And honestly, this bread tastes even better the next day, when the flavors have had a chance to meld.
Frequently Asked Questions
Final Thoughts
This zucchini bread with lemon glaze has truly become a staple in my kitchen. It’s a tender, moist loaf packed with real flavor, and I love how versatile and forgiving it is. Whether I’re serving it to guests, packing it in lunches, or just enjoying a slice on Sunday morning, it always feels comforting and special. Plus, the fact that it sneaks in vegetables makes me feel a little guilt-free—and my kids never suspect a thing! If you give this a try, I’d love to hear how it turns out. Feel free to get creative with toppings and mix-ins—this is your cozy baking canvas. Happy baking, friends! And don’t forget to share your favorite tweaks below—I’m always on the lookout for new ideas.

almond toffee
Ingredients
Method
- Arrange almonds in a single layer on a foil lined baking dish or in a silicone brownie bite pan with 24 bites. Set aside.
- In a heavy saucepan, combine butter, margarine, sugar, salt, and vanilla extract. Cook over medium-high heat, stirring constantly until butter melts and mixture reaches a rolling boil.
- Continue boiling and stirring for an additional 5 to 7 minutes until candy turns the color of almonds (approximately 300°F). Pour over almonds. Use a small scoop if using a brownie bite pan, and work quickly.
- Allow the toffee to cool completely, about 2 hours.
- Spread melted chocolate over the cooled toffee. Sprinkle generously with ground walnuts. Let the chocolate set before flipping or cutting into pieces.