Simple Italian Dessert How to Make Tiramisu
If you’ve ever stumbled upon a little bakery and bitten into a slice of that soft, melt-in-your-mouth coffee cake, you know what I mean when I say it’s pure comfort. But here’s the thing — I’ve made so many variations over the years, and my favorite is this zucchini swirl version. It’s honestly like a hug in cake form, with the added bonus of sneaking in some veggies that my kids somehow never notice (well, mostly). I always do this when I want a weekend treat that feels indulgent but also kind of healthy—like a win-win, right? Plus, it’s incredibly easy to whip up on a busy morning or a lazy Sunday afternoon. I tested this with almond milk, and it actually made it even creamier, which I loved. My friends always ask for the recipe, and honestly, I’ve lost count of how many times I’ve made this for brunch gatherings—it’s disappeared in minutes each time. Trust me on this one, this zucchini swirl coffee cake is destined to become your new staple. It’s a recipe that’s packed with flavor, soft spice, and those gorgeous marbled streaks you’ll love to look at—and even more to eat.
What is Zucchini Swirl Coffee Cake?
Think of this as a slightly upgraded classic coffee cake, with a surprising twist—swirls of shredded zucchini folded right into the batter. It’s essentially a moist, tender cake that combines the sweet, cinnamon-spiced crumb with a touch of veggie goodness that keeps it feeling light. The name “swirl” comes from the beautiful marbled pattern you create when you gently twist a layer of zucchini filling into the batter before baking. It’s a cake that’s friendly enough for breakfast, yet rich enough for dessert or a cozy snack with your afternoon coffee. The best part? You don’t need any fancy equipment or gourmet ingredients—just simple pantry staples, a bit of love, and your oven. Think of it as a way to sneak some extra veggies into a recipe that everyone craves—like a secret agent of baking. And the texture? Oh, it’s fluffy, slightly crumbly, with those delightful cinnamon swirls making every bite a little special. My kids love to help layer it, and I swear, the smell alone will bring everyone rushing into the kitchen!
Why you’ll love this recipe?
What I love most about this zucchini swirl coffee cake is how it hits all the right notes—flavor, texture, and that cozy, nostalgic vibe. The aroma of cinnamon and baked zucchini fills the house, making it impossible not to grab a slice. The true beauty of this recipe? It’s so straightforward. I’ve tested it on busy mornings when we’re running late, and it still comes out perfect. Just mix, layer, and bake—no fancy skills required. Plus, the ingredients are budget-friendly and readily available, so you never have to make a special trip to the store.
It’s versatile, too. You can customize the filling by adding chopped nuts, raisins, or even a drizzle of cream cheese frosting if you’re feeling extra indulgent. This cake is also forgiving—overmixing doesn’t ruin it, and you can scale the recipe up or down easily. I love serving it for brunch with a strong cup of coffee, but it’s just as delightful as a late-night treat when you need something sweet but don’t want to fuss with complicated baking. What I really enjoy is how it appeals to both kids and adults alike; the zucchini keeps it moist and tender, and the cinnamon swirl brings all those warm, familiar flavors. Honestly, once you try it, I promise it’ll become one of your household favorites too—just like it is at mine.
How do I make Zucchini Swirl Coffee Cake?
Quick Overview
This coffee cake comes together with a simple batter, a quick zucchini filling, and a gentle swirling that results in stunning marbled layers. I love how straightforward the whole process is—no complicated techniques, just a few good-quality ingredients mixed in a way that’s almost foolproof. The batter is soft and fluffy, while the filling adds a moist, slightly spiced component that perfectly complements the crumb topping. It’s a real showstopper with minimal fuss, and the best part? You get a beautiful, delicious cake that looks like you put hours of effort into it. It’s perfect for those mornings when you want something special but don’t want to spend ages in the kitchen.
Ingredients
For the Main Batter:
- 1 cup all-purpose flour (I always do this with a good quality unbleached flour for a richer flavor)
- 1/2 cup granulated sugar
- 1 teaspoon baking powder
- 1/2 teaspoon baking soda
- 1/2 teaspoon salt
- 1 teaspoon ground cinnamon (because, hello, cozy flavor!)
- 1/2 cup vegetable oil or melted butter (trust me, butter makes it even better)
- 2 large eggs
- 1 teaspoon vanilla extract
- 1/2 cup milk (I sometimes swap this for almond milk or oat milk—totally works!)
For the Filling:
- 1-2 zucchinis, grated (about 1 cup packed — I always try to squeeze out excess moisture)
- 2 tablespoons brown sugar
- 1 teaspoon ground cinnamon
- 1 tablespoon flour (to help stabilize the mixture)
For the Glaze (optional but highly recommended):
- 1/2 cup powdered sugar
- 1-2 teaspoons milk or lemon juice (for flavor)
- A pinch of extra cinnamon or vanilla if you like
Step-by-Step Instructions
Step 1: Preheat & Prep Pan
Set your oven to 350°F (175°C) and butter or line a 9-inch round cake pan or a square baking pan. I like to grease it well so the cake slides out easily. A quick tip: I toss a little flour in after buttering, just to keep things from sticking. While the oven heats, prepare your zucchini by grating it on the fine side of your box grater, then squeezing out as much moisture as you can. Moisture is the enemy in baked goods, and trust me, this prevents your cake from turning into a soggy mess.
Step 2: Mix Dry Ingredients
In a large bowl, whisk together the flour, sugar, baking powder, baking soda, salt, and cinnamon. This step ensures everything is evenly distributed and your baking soda and powder are well incorporated, so your cake rises beautifully. I always do this before adding any wet ingredients—keeps things balanced and fluffy.
Step 3: Mix Wet Ingredients
In a separate bowl, beat the eggs, then stir in the vanilla and milk. Add the oil last—if the butter is too hot, it can seize up, so I usually melt it and let it cool slightly before mixing. Whisk everything until it’s smooth and combined. The smell of vanilla and the richness of the eggs make my kitchen smell like a bakery even before it’s baked!
Step 4: Combine
Add the wet ingredients to the dry and fold gently with a spatula. Don’t overmix—just until everything is combined. You want a soft, slightly lumpy batter; overmixing can create tough cakes, and nobody wants that. The batter should be thick but scoopable—almost like muffin batter.
Step 5: Prepare Filling
In a small bowl, toss the grated zucchini with the brown sugar, cinnamon, and flour. This helps prevent it from sinking or releasing too much moisture during baking. If your zucchini is especially watery, I sometimes sauté it in a skillet for a few minutes first, then drain and cool before mixing it with the sugar. This step is key to maintaining that perfect crumb.
Step 6: Layer & Swirl
Spread half the batter evenly in your prepared pan. Then, dollop spoonfuls of the zucchini mixture over the batter, and gently spread the remaining batter on top. Using a knife or skewer, swirl through the layers to create beautiful marbled patterns—don’t overdo it, you want distinct ribbons, not a total jumble. This swirling, I’ve learned, is what makes the cake so pretty and gives every bite that delightful surprise of zucchini and cinnamon.
Step 7: Bake
Pop it in the oven and bake for about 35-40 minutes, or until a toothpick inserted in the center comes out clean. Ovens vary, so I start checking around the 35-minute mark. If it’s browning too quickly, tent it loosely with foil. Nothing beats that smell wafting through the house, filling it with warmth and cinnamon—it’s irresistible.
Step 8: Cool & Glaze
Let the cake cool in the pan for about 15 minutes, then transfer to a wire rack. Once cooled, mix the powdered sugar with milk or lemon juice until you reach a pourable consistency. Drizzle it over the cake for that professional finish, or simply dust with a little cinnamon for a rustic look. The glaze adds that extra touch of sweetness—you’ll want to lick the spoon!
Step 9: Slice & Serve
Use a sharp serrated knife to cut into lovely slices, and serve slightly warm or at room temperature. I like to pair mine with a cup of strong black coffee or a chai latte. For an extra special touch, I add a dollop of whipped cream or Greek yogurt on the side. Honestly, this cake tastes just as good the next day, and the flavors deepen overnight. I’ve even frozen slices and reheated them—still delicious. Trust me, once you get the hang of swirling and layering, this will become a weekend ritual around your house.
What to Serve It With
This zucchini swirl coffee cake is so versatile; it’s practically a blank canvas for your creativity. I love serving it with different drinks depending on the occasion. For breakfast, a steaming mug of coffee or a cappuccino pairs perfectly, and adding a smear of butter or cream cheese on top takes it to the next level. During brunch, I like to serve it alongside fresh fruit and a citrus-infused sparkling water or mimosa.
As a dessert, it’s lovely on its own, but a scoop of vanilla ice cream or a drizzle of caramel makes it feel even more indulgent. My family asks for this on cozy weekend mornings, and it’s the first thing my kids ask for after school too! When I want a quick sweet fix, I’ll warm up a piece, top it with some yogurt or a dollop of whipped cream, and enjoy with a good book or a chat with friends. It’s one of those recipes that feels special enough for guests but simple enough for everyday joy.
Top Tips for Perfecting Your Zucchini Swirl Coffee Cake
After making this countless times, I’ve picked up a few tricks that make all the difference. First, always squeeze out excess moisture from the zucchini—wet zucchini leads to a soggy cake, which no one wants. I’ve tried grating it finely and even pulsing briefly in a food processor—both work well, but I prefer the fine grate for that delicate texture. Trust me, baking it first in a hot skillet for a few minutes can really firm it up and improve the overall moisture balance.
When it comes to mixing, overworking the batter can make the cake dense. I gently fold just until no streaks of flour remain—that’s it. If you see bubbles forming, that’s a good sign you’ve incorporated enough air. For the swirl pattern, don’t be afraid to layer and gently twist your knife—beauty is in the detail, and a good swirl makes the cake look professionally done. I’ve tested substitutions—using honey instead of sugar, coconut oil for butter—and they all work pretty well, but I prefer the classic’s richness.
For baking, always start checking around the 35-minute mark. If your oven runs hot or cold, adjust the time accordingly. The toothpick test is foolproof—you want it clean with just a few moist crumbs. Once out of the oven, let it cool properly before glancing glaze or slicing, or the layers might slide apart. Speaking of glaze, I’ve experimented with adding a splash of vanilla or even a dash of ginger—totally tasty and adds that extra zing. Don’t be afraid to play around with flavors—this cake is forgiving, and I’ve learned that small tweaks make a big difference.
Storing and Reheating Tips
This cake is best enjoyed within the first two days for optimal freshness. Keep it covered with a clean towel or stored in an airtight container at room temperature if you’re planning to serve it the same day. I find that covering with foil or popping it into a cake carrier helps retain moisture and keeps it soft.
If you want to keep leftovers for longer, refrigerate it in a sealed container. It’ll stay fresh for about 3-4 days, and I suggest bringing slices back to room temperature or giving them a quick microwave blast—30 seconds usually does the trick—to revive that freshly baked softness. Freezing works wonderfully, too. Wrap individual slices tightly in plastic wrap and foil, then stash in a freezer bag. When you’re ready, just thaw at room temp or warm in the microwave. The flavor and moistness stay surprisingly good even after freezing and reheating.
And if you’re adding glaze, I recommend waiting until just before serving—glaze keeps the cake fresh and shiny. If you do want to refrigerate after glazing, just bring it back to room temp before slicing. Trust me, this cake keeps well, and those marbled swirls remain just as gorgeous after a day or two.
Frequently Asked Questions
Final Thoughts
This zucchini swirl coffee cake is one of those recipes I turn to when I want something cozy, a little healthier (thanks to the zucchini!), and just plain delicious. It’s a wonderful way to elevate a humble ingredient into something special—something you’ll be proud to serve to family or friends. Over the years, I’ve perfected the balance of ingredients and swirl technique, and I promise, once you do it a couple of times, it’ll feel like second nature. And here’s the best part—kids love the swirls, and adults adore the warm cinnamon flavor. It’s a recipe that brings smiles, memories, and of course, seconds. So gather your ingredients, roll up your sleeves, and let the aroma of baking fill your home. And hey, I’d love to hear how yours turns out—leave a comment or share your tweaks! Happy baking!

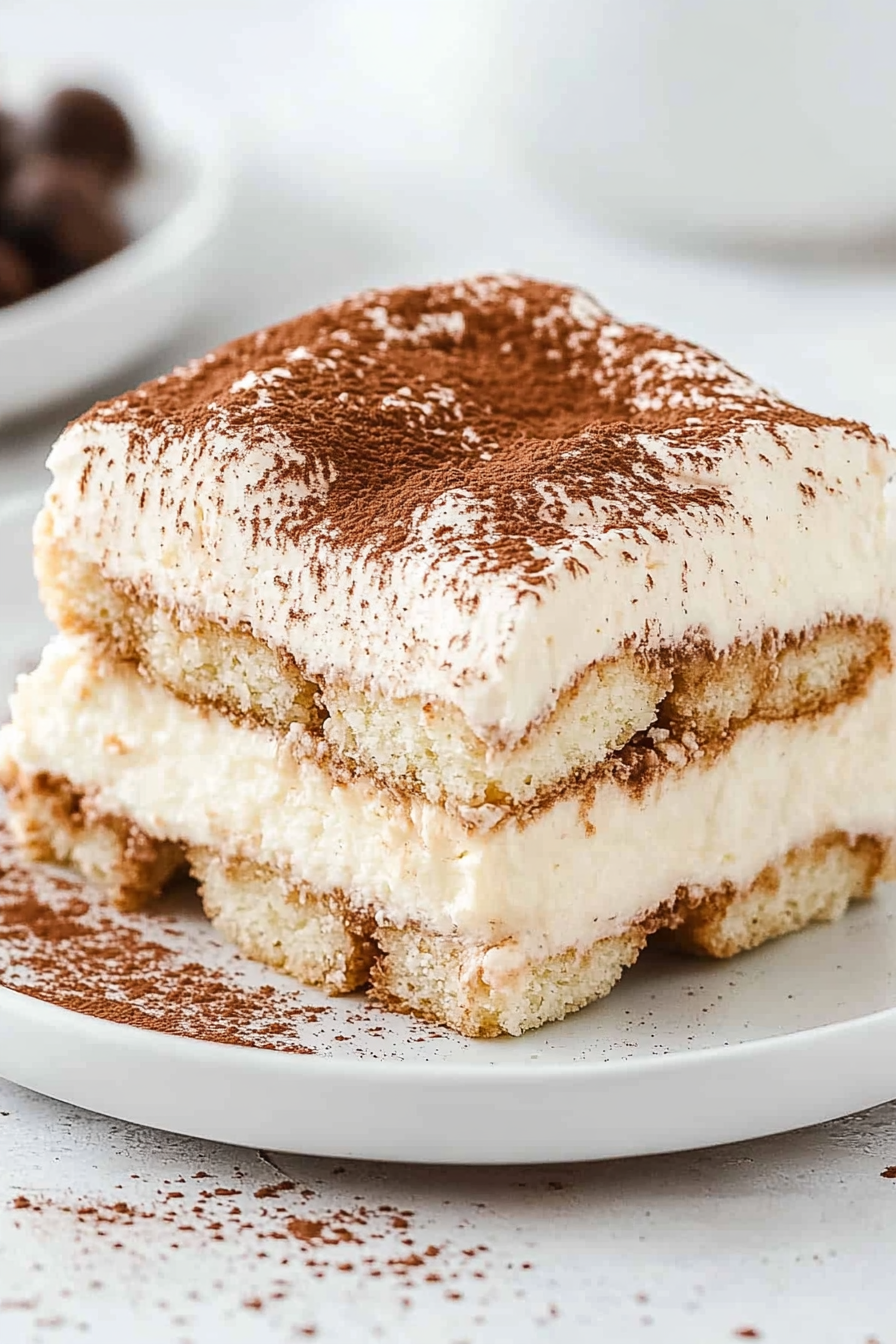
Easy Tiramisu
Ingredients
Method
- Using either a stand mixer with a whip attachment, or a handheld electric mixer on high speed, whip the heavy cream to stiff peaks.
- Reduce the mixer speed to medium, slowly add the granulated sugar and vanilla extract. Mix for 1 to 1.5 minutes.
- Lower the mixer speed to low and add in the mascarpone cheese. Mix just until all the ingredients are incorporated. Set this aside.
- In a small shallow bowl, add the cold espresso, or strong cold coffee. If you are using the coffee flavored liqueur, stir it in with the espresso.
- Dip both sides, do not soak, each lady finger in the espresso mixture.
- Lay the dipped lady fingers in a single layer in the bottom of an 8x8 baking dish.
- Using a silicone spatula, evenly spread half of the cheese mixture on top of the lady fingers layer.
- Repeat the dipped lady fingers layer, and the remaining half cheese mixture layer.
- Using a fine sifter, dust the top of the cheese mixture with the cocoa powder. Cover with plastic wrap and refrigerate for at least 3 hours to overnight.