Twisty Sweet Treats How to Make Pretzel Bars
There’s this warm feeling I get every time I bake my zucchini swirl cake — it’s like a little hug in every bite. I’ve been making this recipe for years, and honestly, it’s become a family favorite. My kids ask for it on lazy Sunday mornings, and it’s my go-to when I need a sweet pick-me-up without overdoing it on sugar. The smell alone, warm and inviting, always brings everyone rushing into the kitchen, noses in the air, trying to guess what’s baking. It’s surprisingly simple to whip up, even on busy weeknights when I only have a little time to spare. I tested this with almond milk once, and it made the batter so creamy that I almost didn’t want to add the glaze — but glad I did because that glaze takes it over the top! If you love quick, cozy baking with a little naughty twist, stay with me — I’ll walk you through every step of making this zucchini swirl cake that’s just as good at breakfast as it is for dessert.
What is Zucchini Swirl Cake?
This cake is really a celebration of humble, everyday ingredients turned into something special. Think of it as a mashup between a moist sponge cake and a sweet, subtly veggie-filled treat. It’s essentially a vanilla batter tinged with grated zucchini — yes, zucchini! — and swirled with a luscious cinnamon-spiced filling. The name “swirl” comes from how I layer the filling gently into the batter, creating gorgeous ribbons that peek through when you slice into it. The best part? It’s so forgiving and adaptable. My grandma used to make something similar but she called it “veggie cake,” and we’d eagerly wait for her to pull it out of the oven. Over time, I added my own touches, like tweaking the filling and testing different glazes, to make it feel like my own. No matter how many times I’ve made it, this recipe always tastes like a warm hug from the kitchen, and I promise you’ll think so too once you take that first bite.
Why you’ll love this recipe?
Honestly, what I love most about this zucchini swirl cake is how perfectly it balances flavor, ease, and that comforting homemade vibe. First, the flavor — the subtly sweet vanilla batter is beautifully contrasted by the cinnamon-spiced filling, and the zucchini adds moisture that keeps everything tender and dreamy. It’s like a secret ingredient that makes the cake so delightfully moist without any added butter or oil. Plus, the swirl pattern—that marbled look—is just so pretty, and it makes slicing feel a little special every time. This cake is incredibly budget-friendly because it’s built around pantry staples: flour, sugar, eggs, and a lonely zucchini from the garden or fridge. My kids can’t get enough of it, and I love how versatile it is — you can serve it slightly warm for breakfast, or adorned with whipped cream or a drizzle of honey for dessert. What I really appreciate about this recipe is that it’s forgiving: you can add more or less cinnamon, swap out the glaze for a dusting of powdered sugar, or even sneak in a handful of nuts. It’s simple, satisfying, and a little nostalgic.
How do I make Zucchini Swirl Cake?
Quick Overview
This cake comes together pretty fast once you get the hang of it. Basically, you make a smooth vanilla batter, prepare a cinnamon-spiced filling, layer everything in your pan, swirl gently to create those beautiful ribbons, bake until golden, and finish with a shiny glaze. The magic lies in the swirl—don’t overmix, or you’ll lose that marbled effect. I love that you don’t need any fancy gadgets for this, just a whisk, a spatula, and a loaf pan or cake pan. It’s super forgiving — even if you’re a beginner, you’ll end up with a cake that looks gorgeous, tastes divine, and just makes everyone smile. Bonus: I’ve tested this with different types of zucchini, even frozen ones, and it works just fine. The real secret is to squeeze out excess moisture from the zucchini so your batter stays tender rather than soggy. Trust me, once you try this once, it’ll become your new favorite cozy baking go-to!
Ingredients
For the Main Batter:
- 2 cups all-purpose flour (or gluten-free blend if needed, just swap with the same amount)
- 1 ½ teaspoons baking powder
- ½ teaspoon baking soda
- ½ teaspoon salt
- 1 tablespoon vanilla extract
- 1 cup granulated sugar
- 2 large eggs
- ½ cup vegetable oil (or melted coconut oil for a tropical twist)
- 1 cup milk (dairy or almond, soy, oat — whatever you keep on hand)
- 1 cup grated zucchini, squeezed dry
For the Filling:
- ½ cup brown sugar
- 1 teaspoon ground cinnamon
- 2 tablespoons softened butter or coconut oil
- Optional: ½ cup chopped nuts or raisins for added texture
For the Glaze:
- 1 cup powdered sugar
- 2-3 tablespoons milk or lemon juice
- Extra cinnamon or vanilla for flavor (optional)
Step-by-Step Instructions
Step 1: Preheat & Prep Pan
Set your oven to 350°F (175°C). Grease a loaf or cake pan with butter or oil, then lightly dust with flour or line with parchment paper. This cake tends to stick if not prepared right, so don’t skip this step — trust me, I’ve learned it the hard way!
Step 2: Mix Dry Ingredients
In a large bowl, whisk together the flour, baking powder, baking soda, and salt. This ensures your leaveners and salt distribute evenly, giving you that perfect rise and texture. It’s a simple step, but don’t rush it — it makes all the difference.
Step 3: Mix Wet Ingredients
In a separate bowl, beat the eggs with sugar until light and slightly fluffy. Combine the oil, vanilla, and milk — I usually do this last, pouring slowly as I whisk. When you add grated zucchini, make sure to squeeze out excess moisture first, so your batter isn’t too watery. You want it to be smooth and pourable but not thin as water.
Step 4: Combine
Pour the wet ingredients into the dry and gently fold together. Be careful not to overmix — just combine until no streaks remain. Overmixing can make the cake dense, and that’s a don’t for this recipe. It should feel light and airy.
Step 5: Prepare Filling
Mix brown sugar with cinnamon and softened butter. If you like crunch, sprinkle in some chopped nuts or raisins. This filling is what creates the beautiful cinnamon ribbons in your cake, so don’t skip this step.
Step 6: Layer & Swirl
Pour half the batter into your prepared pan, then sprinkle half of the cinnamon filling over it. Add the remaining batter, then dollop the rest of the filling on top. Using a toothpick or skewer, swirl gently through the batter to create those pretty marbled patterns. Don’t overdo it — you want distinct ribbons, not a muddled mess.
Step 7: Bake
Pop it into the oven and bake for about 50-60 minutes. Check doneness by inserting a toothpick in the center — if it comes out clean, you’re good. If it’s wet, give it a few more minutes. Every oven is different, so keep an eye on it around the 50-minute mark.
Step 8: Cool & Glaze
Let the cake cool in the pan for about 15 minutes, then transfer to a wire rack. Mix your glaze ingredients and drizzle it over the slightly warm cake, so it melts into all those lovely cracks and ribbons. If you prefer a less sweet look, dust it with powdered sugar instead.
Step 9: Slice & Serve
Wait until it’s cooled completely for neat slices, then serve with a cup of coffee or tea. I love doing this first thing in the morning, or even as a late-night treat — the flavors just get better with a little resting time. Honestly, I’ve made this countless times, and it’s never disappointed. Plus, it keeps beautifully in the fridge for a few days — just reheat slightly before serving for that fresh-baked feel.
What to Serve It With
This cake is incredibly versatile. For breakfast, pair it with a steaming mug of coffee or a glass of cold milk — the cinnamon and zucchini make it feel cozy enough to start your day. On brunch days, you can add a dollop of whipped cream or a smear of mascarpone for extra richness. It’s also perfect as a dessert — warm slices topped with vanilla ice cream or drizzled with honey turn it into a real showstopper. My family loves it with a sprinkle of chopped nuts on top or a dusting of powdered sugar. And if you’re feeling more casual, serve it as a snacking piece with a cup of tea — nothing fancy, just comforting and satisfying. Over the years, I’ve also taken to adding caramel sauce or a smear of cream cheese frosting if I want to jazz things up a little — trust me, it’s equally delicious if you’re feeling indulgent.
Top Tips for Perfecting Your Zucchini Swirl Cake
Here’s the thing — basil is always a good idea, but a good zucchini swirl cake takes some finesse. First, when grating the zucchini, I always do this: use a box grater and then squeeze out as much moisture as I can, pressing with the back of a spoon or my hands. This keeps the batter from turning into a soggy mess. I learned this trick after a few experiments and now it’s routine. When mixing, I recommend folding gently — overmixing will give you a dense crumb, which no one wants. If your swirl doesn’t show as much as you’d like, try swirling a little deeper and more layers next time. Bonus: I tested swapping cinnamon for cardamom or nutmeg — honestly, they add lovely warmth, so don’t be shy with spices. For baking, always check around the 50-minute mark, as oven variations can throw off timing. I’ve also experimented with glaze variations — lemon zest in the glaze adds a bright twist, or a splash of vanilla extract sinks beautifully into the frosting. The key is to keep the texture balanced: not too runny, not too thick, so it spreads easily without sliding off. Lastly, don’t skip the cooling process — patience here makes slicing so much cleaner. A little trial and error, but once you get it, you’ll be making this in your sleep!
Storing and Reheating Tips
This cake keeps surprisingly well. If you’re eating it within a day or two, store it covered at room temperature or in an airtight container — it’ll remain moist and tender. Just avoid direct sunlight or too much humidity, or it might get a little sticky. For longer storage, pop it in an airtight container in the fridge for up to 4 days. I recommend letting it come to room temp before slicing so it regains that soft, moist quality. Want to keep it around longer? Wrap it tightly with plastic wrap and foil, then freeze for up to 3 months — it’s a lifesaver on busy mornings or when you want a special treat on hand. To reheat, microwave on low for a few seconds or warm slices gently in the oven — I swear, warm slices with melty glaze are the best. If you’re serving cold, just give it a few minutes to warm up and let the flavors dance on your palate again. I’ve found that the flavors intensify after a day or two — so don’t be shy about making this ahead! It’s one of those recipes that tastes even better when it sits a little, gaining that extra depth of flavor.
Frequently Asked Questions
Final Thoughts
This zucchini swirl cake is one of those recipes I keep coming back to because it’s simple, hearty, and endlessly customizable. I love that it sneaks in a veggie, making it feel a little healthier without sacrificing flavor. Plus, the swirl pattern makes it look fancy, but it’s totally foolproof — promise. Every time I bake it, I’m reminded how a humble zucchini can turn into something so delightful and comforting. Whether you’re baking for your family or just craving a cozy slice with your afternoon tea, this cake will never disappoint. I’ve shared this recipe with friends, and each time, they leave with a new go-to, asking for seconds. So go ahead — grab that zucchini from your fridge or garden, and give this a try. I can’t wait to hear how yours turns out! Don’t forget to leave a comment or snap a pic — I love seeing your creations. Happy baking!
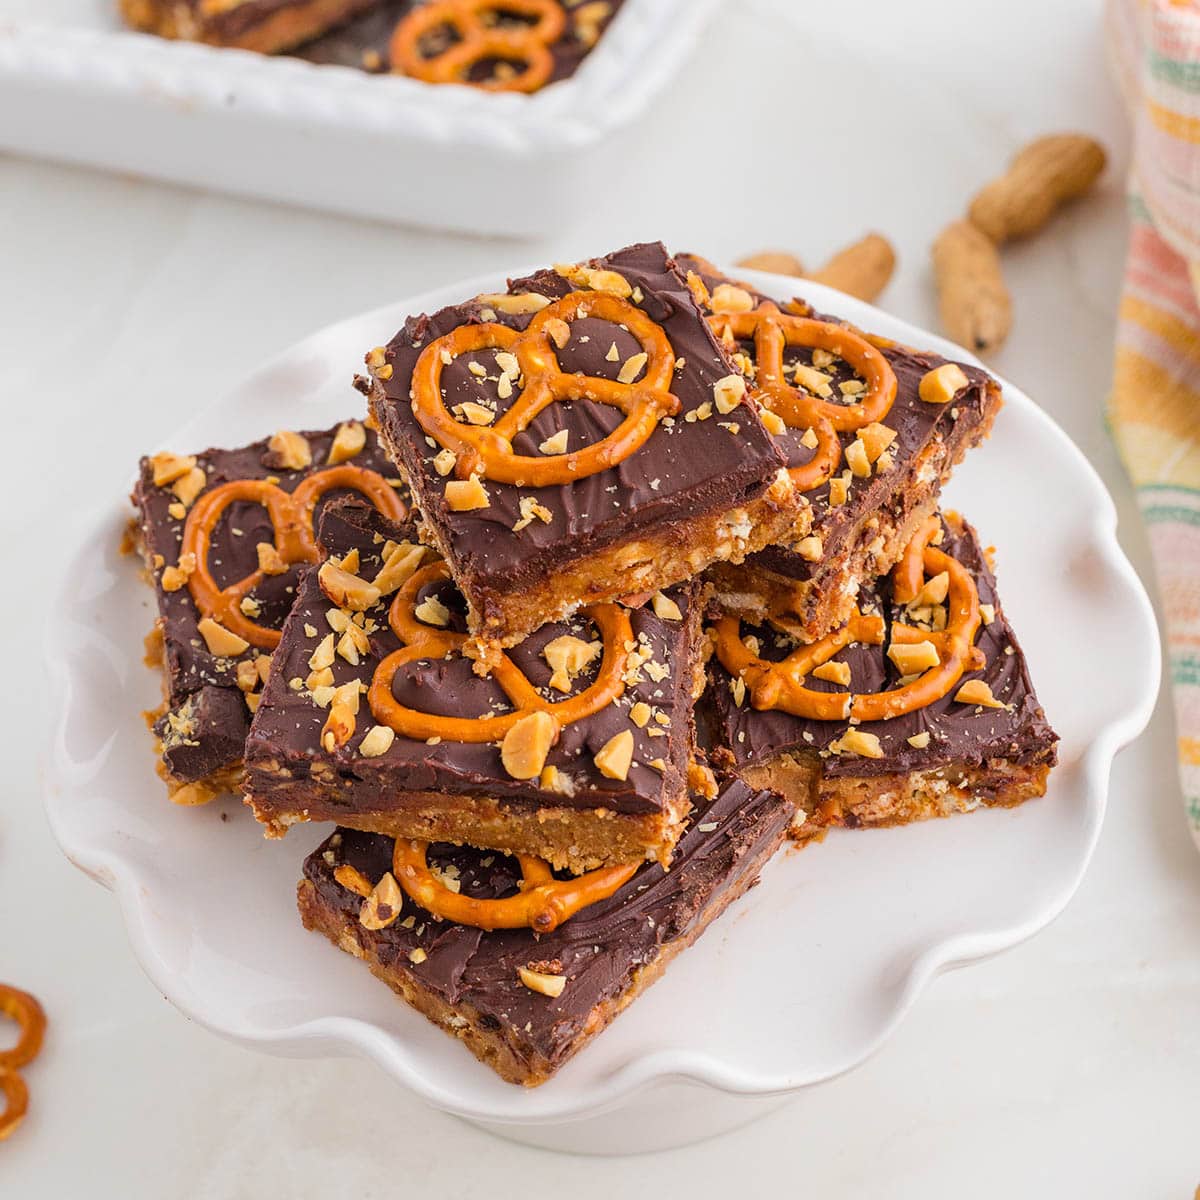
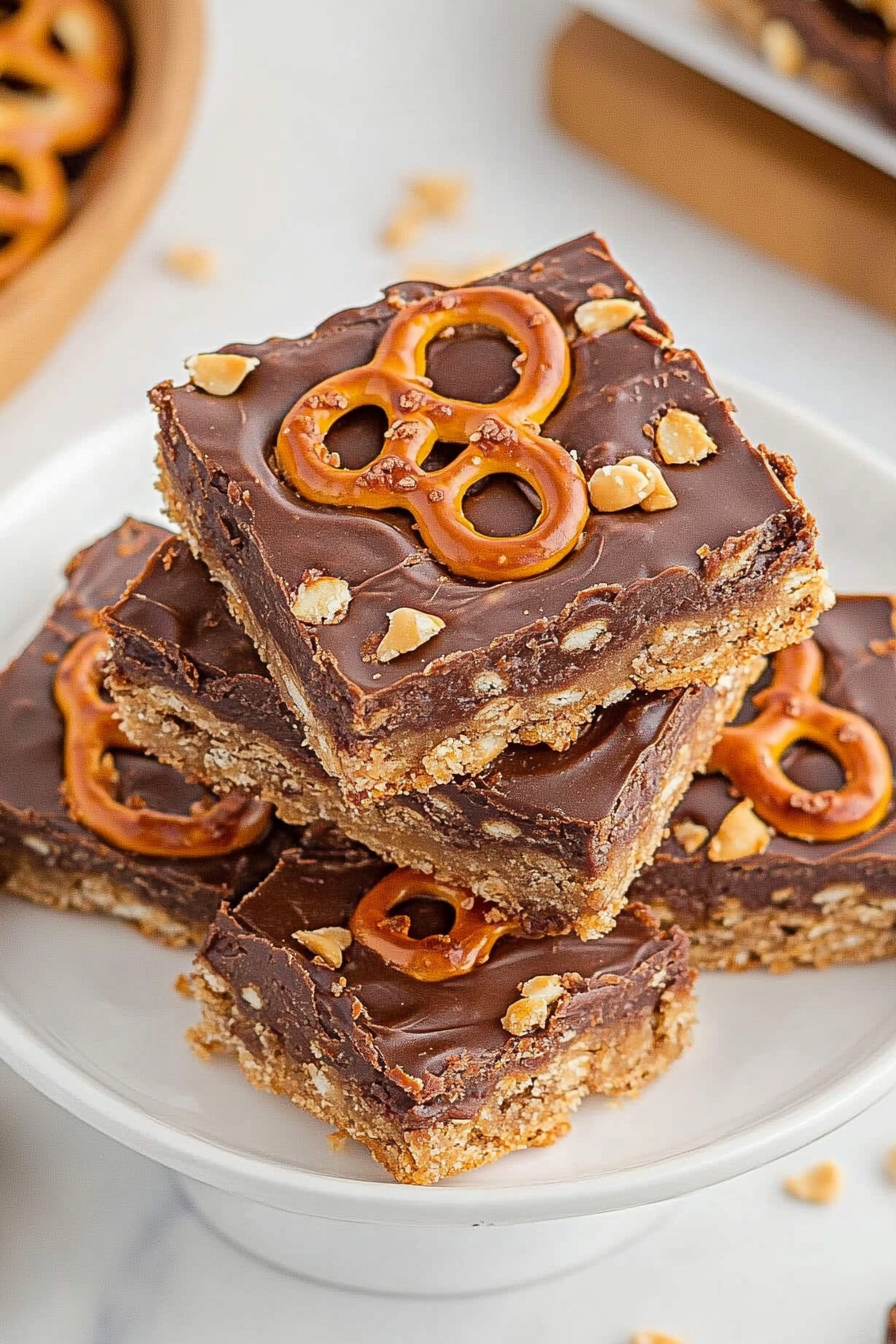
pretzel bars
Ingredients
Method
- In a saucepan over low heat, melt the peanut butter, butter, and brown sugar until smooth and pourable.
- Mix in the crushed pretzels.
- Spread the mixture evenly into the bottom of a parchment-lined baking dish.
- Clean the saucepan and melt the chocolate chips, stirring until fully melted.
- Pour the melted chocolate over the peanut butter layer, spreading evenly.
- Sprinkle crushed peanuts and some intact pretzels over the chocolate layer for added crunch and visual appeal.
- Place the baking dish in the refrigerator for at least 2 hours, or until the bars are fully set.
- Once set, cut into squares and serve.