Easy Coconut Shrimp Recipe
There’s something magic about a slice of zucchini cake — maybe it’s how the moist, tender crumb combined with that tangy cream cheese swirl feels like a cozy hug in every bite. I’ve been making this cake for years, especially when my garden is overflowing with zucchinis. Honestly, it’s my go-to whenever I need something sweet that feels almost sneaky because, well, it’s got those healthy vibes from zucchini. I swear, every time I pull this out of the oven, my kids ask for seconds, and my friends always ask for the secret. It’s simple, it’s forgiving, and there’s a certain nostalgia in every forkful that reminds me of lazy summer afternoons at grandma’s house. If you’ve ever wondered what “human” really means in the kitchen — it’s about those imperfect, warm moments of sharing food that bring people closer. Trust me on this one — this zucchini cake is a total lifesaver on busy nights or when you just need a treat that feels special but is actually quick to whip up.
What is Zucchini cake?
Think of zucchini cake as a moist, spiced loaf or cake packed with shredded zucchini, which keeps it incredibly tender without any weird flavors. It’s essentially a sweet, cozy treat that sneaks in some veggies — a win-win if you’re trying to get your kids to eat more greens! The name “zucchini cake” is pretty straightforward, but honestly, it’s more like a bread or quick dessert that’s perfect for tea, coffee, or even breakfast. It’s what I call a “secret vegetable” dessert — the kind of thing that tastes indulgent but has a hidden health boost. I love how versatile it is, too — you can serve it plain, frost it, or just drizzle a little glaze on top. The scent alone when this bakes — warm cinnamon, vanilla, and that subtle freshness from the zucchini — will make your kitchen smell like a cozy bakery. Think of it as a cross between a coffee cake and a sweet veggie bread. Totally addictive!
Why you’ll love this recipe?
What I love most about this zucchini cake is how effortless it is, yet it feels like you’ve stepped into a bakery. It’s secretly one of my all-time favorites because it’s hearty, flavorful, and somehow, even better the next day. The flavor profile is warm and inviting — cinnamon, vanilla, maybe a hint of nutmeg if you’re feeling fancy. The best part? This cake is super budget-friendly because it’s made with pantry staples and zucchinis from the garden that I always seem to have in abundance. Plus, it’s customizable — add nuts, chocolate chips, or dried fruit if you like. The texture is what gets people: moist, not dense, with just enough crumb to keep it interesting. I always do this when I need a quick dessert that won’t overwhelm the kitchen — just one bowl, a whisk, and I’m good to go. And trust me, this is one you’ll want to make over and over — I swear, it disappeared in minutes at my house!
How do you make Zucchini cake with cream cheese swirl?
Quick Overview
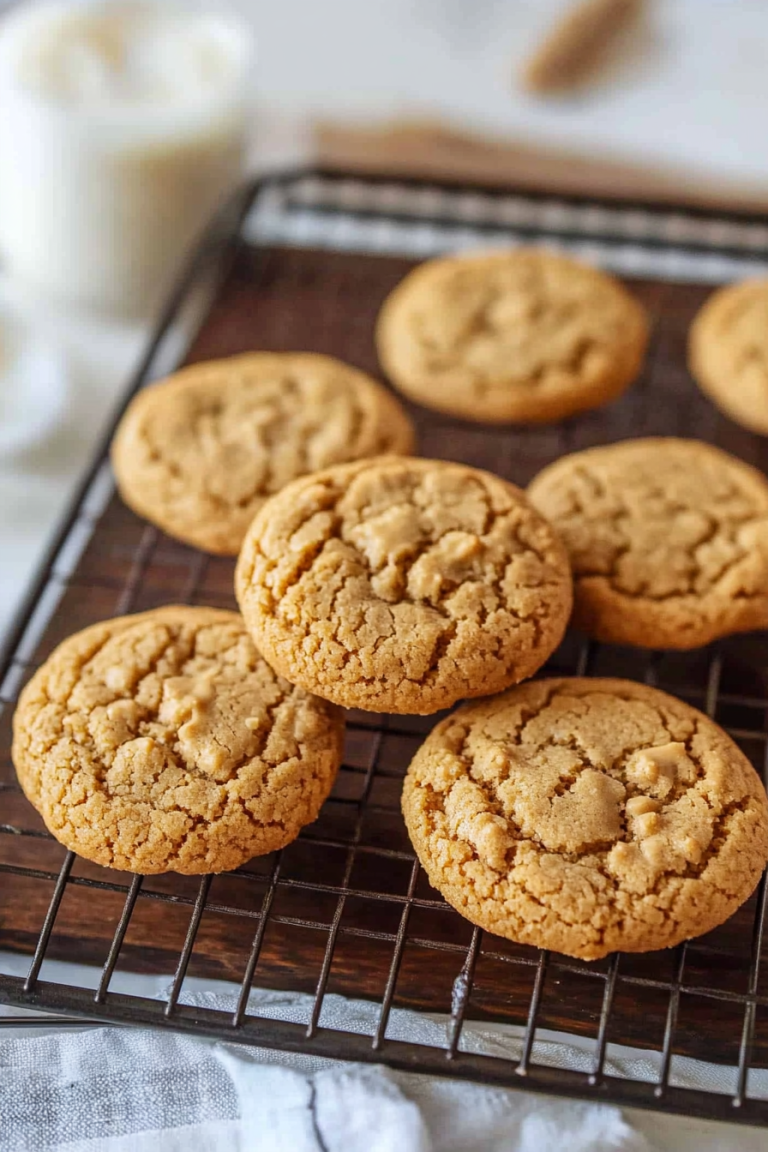
Basically, you mix dry and wet ingredients separately, fold in shredded zucchini, pour the batter into a loaf pan or round cake pan, and swirl in a tangy cream cheese mixture before baking. The whole process takes about 10 minutes of prep, and the oven does the rest. What makes this recipe special is that the zucchini keeps everything super moist, and the swirl adds a creamy contrast that’s almost velvety. It’s really a one-bowl kind of deal — no complicated steps, just patience while it bakes. When it’s done, you get this beautiful marbled look from the cream cheese swirling through, and the smell will have everyone’s noses pressed to the oven glass. Easy and charming — that’s my kind of dessert.
Ingredients
For the Main Batter:
- 2 cups grated zucchini (about 2 medium zucchinis, grated and unsqueezed to remove excess moisture)
- 1 1/2 cups all-purpose flour (I’ve tested this with whole wheat, and it’s still delicious with a bit of extra moisture)
- 1 cup granulated sugar (feel free to reduce it slightly if you prefer less sweetness)
- 1/2 teaspoon baking soda
- 1 teaspoon baking powder
- 1 teaspoon ground cinnamon
- 1/4 teaspoon nutmeg (optional but adds a lovely warmth)
- 1/2 teaspoon salt
- 1/3 cup vegetable oil (or melted coconut oil for a richer flavor)
- 2 large eggs
- 1 teaspoon vanilla extract
For the Filling:
- 4 ounces cream cheese, softened
- 1/4 cup powdered sugar (or more, to taste)
- 1 teaspoon vanilla extract
For the Glaze:
- 1/2 cup powdered sugar
- 2-3 teaspoons milk or lemon juice (start with less and add to reach your preferred consistency)
Step-by-Step Instructions
Step 1: Preheat & Prep Pan
Set your oven to 350°F (175°C). Grease a loaf pan or round cake pan generously with butter or non-stick spray. You can also line it with parchment paper for easy removal. I always do this early because I hate fighting to get the cake out — trust me, a little prep makes everything smoother.
Step 2: Mix Dry Ingredients
In a large bowl, whisk together the flour, sugar, baking soda, baking powder, cinnamon, nutmeg, and salt. Make sure everything’s combined evenly—this step helps prevent clumping and ensures your baking soda and powder are evenly distributed for the perfect rise.
Step 3: Mix Wet Ingredients
In a separate bowl, beat the eggs, then add oil, vanilla, and the grated zucchini. I always do this right in the measuring cup or bowl to minimize dishes. The mixture will look a little loose and wet, but that’s exactly what you want — moist and easy to mix.
Step 4: Combine
Pour the wet mixture into the dry ingredients and fold gently with a spatula; don’t overmix. Just stir until everything is moistened. Overmixing can make your cake dense, and nobody wants that!
Step 5: Prepare Filling
Mix the softened cream cheese, powdered sugar, and vanilla until smooth. I like to do this with a fork or small whisk. It should be creamy but not runny. Feel free to add a pinch more powdered sugar if you like it sweeter or a squeeze of lemon for brightness.
Step 6: Layer & Swirl
Pour half the batter into your prepared pan. Drop spoonfuls of the cream cheese mixture on top, then add the remaining batter. Use a knife or toothpick to swirl the cream cheese into the batter, creating a pretty marbled pattern. Trust me, the more you swirl, the more stunning the effect — and the more everyone will get that delightful cream cheese surprise in each slice.
Step 7: Bake
Bake for about 45-50 minutes, or until a toothpick inserted in the center comes out clean. Ovens vary, so start checking around 45 minutes. If it’s browning too fast, tent with foil. My trick for doneness? Gently press the top — it should spring back slightly and feel firm. When it’s ready, let it cool in the pan for about 15 minutes, then transfer to a wire rack.
Step 8: Cool & Glaze
Once cooled, whisk together the powdered sugar and milk or lemon juice to make the glaze. Drizzle it over the cake while it’s just warm or fully cooled — your choice. The glaze adds a nice sweet finish and a little glossy look that makes it feel special.
Step 9: Slice & Serve
Use a serrated knife for clean slices, especially if you’ve added nuts or chocolate chips. Serve plain, with a dollop of whipped cream, or a drizzle of more glaze if you’re feeling decadent. This cake is perfect warm or at room temperature. My family loves it slightly warmed — just pop a slice in the microwave for 10 seconds and enjoy that cozy aroma again.
What to Serve It With
This zucchini cake is so versatile — I often serve it as a breakfast, brunch treat, or a cozy dessert after dinner. For mornings, I pair it with a strong black coffee or a milky chai; it’s almost like having a cinnamon roll in cake form. If I’m hosting brunch, I like to add some fresh berries and whipped cream on top. It’s also fantastic as an afternoon snack with a glass of cold milk or hot herbal tea. When I want to keep it simple for a quick treat, I just cut a slice and sprinkle a tiny bit of powdered sugar or extra glaze for extra sweetness.
And truthfully, this cake’s family-approved — my kids ask for it almost weekly, and I’ve even brought leftovers to friends’ houses, where it disappears in minutes. It’s the kind of dessert that makes everyone feel at home, no matter the occasion.
Top Tips for Perfecting Your Zucchini Cake
Over the years, I’ve picked up a few tricks to make this zucchini cake even better:
- Zucchini Prep: Always squeeze out excess moisture after shredding to avoid sogginess. I keep a kitchen towel nearby to pat the zucchini dry. Wet zucchini can make your batter too loose, and nobody wants a flat cake.
- Mixing Advice: Be gentle when folding the wet and dry ingredients — overmixing can lead to dense, chewy cake. If the batter feels like it’s resisting mixing, just walk away and fold slowly and patiently.
- Swirl Customization: Play with the swirl pattern. I’ve learned that dropping spoonfuls and then dragging a skewer or knife through creates a marbling that’s so pretty and tasteful.
- Ingredient Swaps: I’ve swapped almond extract for vanilla, added chopped walnuts, or threw in chocolate chips for extra fun. Just remember, if you add dry ingredients like nuts or chips, reduce the flour slightly so the batter remains balanced.
- Baking Tips: Check for doneness using a toothpick—when it comes out clean, you’re ready. If your oven runs hot, lower the temperature a bit or adjust baking time.
- Glaze Variations: Add lemon zest or vanilla to your glaze for different flavor profiles. I’ve also experimented with a drizzle of honey or maple syrup — delicious!
This recipe has been my home kitchen favorite for so many reasons. I’ve learned that patience in folding, paying attention to moisture, and not over-baking are key. Every oven is different, so use your senses, and don’t be afraid to tweak a little—trust me, each batch gets better with a bit of your personal touch.
Storing and Reheating Tips
To keep this zucchini cake fresh, I usually slice what I want and store leftovers in an airtight container at room temperature for up to 2 days. If you want it to stay luscious longer, pop it into the fridge — just know it might be a little drier, so I recommend eating it within 3-4 days. Wrap it well to maintain moisture, especially if you’ve added a glaze or frosting.
If you’re freezing leftovers, tightly wrap slices in plastic wrap and then foil, or place them in a freezer-safe container. They’ll keep for 2-3 months. To reheat, microwave a slice for about 10 seconds, or let it thaw in the fridge overnight. The flavor and moisture are best preserved if you reheat gently — trust me, it tastes almost like fresh when warmed up just right.
I avoid adding glaze until serving to keep the shine and texture crisp. If you plan to reheat with glaze, add a light brush of warm glaze afterward for that glossy, tempting look.
Frequently Asked Questions
Final Thoughts
This zucchini cake with cream cheese swirl has truly become a staple in my house — it’s like the warm hug everyone needs on a chilly afternoon. The best part? It’s so forgiving and versatile that even a beginner baker can pull it off, and it tastes like a bakery treat. Whether I bake it as a quick breakfast, a brunch centerpiece, or a dessert for special gatherings, it always gets rave reviews. Plus, squeezing the excess moisture out of the zucchini is the secret trick I’ve learned—trust me, it keeps the cake moist without making it soggy. I hope you give this recipe a try and add your own spin — maybe with chocolate chips or walnuts? Whatever you do, I’m sure it’ll become a favorite in your home, just like it is in mine. Happy baking, and I’d love to hear how yours turns out — don’t forget to leave a comment below or share your pics!

Coconut Shrimp
Ingredients
Method
- Combine apricot preserves and sweet chili sauce for the serving sauce and set aside.
- Rinse the shrimp in cold water and pat dry thoroughly with paper towels.
- Set up a dredging station with three shallow bowls. In the first bowl, combine the all-purpose flour, salt, and garlic powder. In the second bowl, beat the eggs until well blended. In the third bowl, combine the shredded coconut and panko breadcrumbs.
- Dredge each shrimp first in the flour mixture, then dip into the beaten eggs, and finally press firmly into the coconut and breadcrumb mixture. Place the coated shrimp on a plate or baking sheet until ready to cook.
- Add about ¼ inch of vegetable oil to a large skillet and place over medium-high heat.
- Heat the oil until it shimmers (approximately 350 degrees F). Carefully add the shrimp to the hot oil, being careful not to overcrowd the pan. Fry for about 2 minutes per side, or until golden brown and crispy. Remove the shrimp with a slotted spoon and drain on paper towels. Serve immediately with the prepared dipping sauce.