How to Bake a Fizzy Cherry Soda Cake
There’s something about the smell of freshly baked zucchini cake that instantly takes me back to my grandma’s kitchen. I remember walking in and being greeted by the warm aroma of cinnamon and vanilla, and my grandma always had a smile on her face while she whisked together the most tender batter. This cake isn’t just about nostalgia, though — it’s a perfect blend of moist, rich goodness with a subtle veggie boost that keeps it feeling light yet satisfying. I always do this when I want a treat that’s indulgent but not overly heavy; it’s honestly become my go-to when friends drop by or I need a quick pick-me-up on a busy night. And trust me — nobody notices the zucchini until they take a bite! It’s amazing how this simple veggie elevates the entire flavor. I’ve made this countless times and it never fails to disappear in minutes at my house. My kids ask for seconds every single time, and I love knowing I’m sneaking in some vegetables without anyone noticing. This one’s a lifesaver on days when I want comfort food but also want to feel good about what I’m eating. Plus, it’s surprisingly straightforward — you’ll see what I mean!
What is a Moist Zucchini Cake with Creamy Glaze?
Think of this cake as a cozy, slightly upgraded version of your favorite quick bread but in a lovely dessert form. It’s essentially a soft, tender sponge packed with shredded zucchini that keeps the crumb incredibly moist and hearty. The name might sound fancy, but believe me, it’s one of the easiest baking projects — no complicated techniques, just good old mixing and baking. The “moist” part is not an exaggeration; the zucchini and a splash of yogurt or milk create a texture that’s almost velvety with every bite. The creamy glaze on top is like the finishing touch of a warm hug — sweet yet subtly tangy, drizzled over the slightly warm cake so it soaks in just enough to add that glossy finish. It’s a perfect treat for breakfast, brunch, or even a casual dessert when you want something homemade but don’t want to fuss too much. Think of it as a recipe that everyone in the family will love, no matter their age. I’ve seen friends whip this up with quick substitutions, making it super flexible for whatever ingredients you have on hand. Honestly, once you make it a couple of times, you’ll have a go-to recipe for any occasion.
Why you’ll love this recipe?
What I love most about this zucchini cake is how it balances flavor, simplicity, and versatility. The first thing you notice when you cut into it is how incredibly moist and tender the crumb is — the zucchini really does its job here! The flavor is subtly sweet, with warm hints of cinnamon and vanilla, but it’s not overly rich, so you can enjoy a generous slice guilt-free. This cake is a huge time-saver on busy mornings or last-minute get-togethers; it comes together quickly, and the prep requires minimal fuss. Plus, it’s budget-friendly — most of us already have the ingredients lurking in our pantry and fridge, making it an easy choice for an impromptu treat. I also love how versatile it is: you can serve it warm with the glaze dripping over, or cool and dusted with powdered sugar. Sometimes I add a handful of walnuts or shredded coconut into the batter for extra texture, and it always turns out beautifully. My family asks for this all the time, especially when I want to make something that feels special but doesn’t demand hours of my time. What’s even better? Leftovers stay moist for days, which is a huge win in my book. It’s proof that simple ingredients, treated with some love, can create a truly memorable dessert. The smell alone — the sweet cinnamon and zucchini aroma filling the house — makes everyone eager to taste it once it’s out of the oven. Honestly, once you try it, you’ll wonder why you didn’t make zucchini cake more often!
How do I make Zucchini cake with cream?
Quick Overview
This zucchini cake starts with grating fresh zucchini, mixing it into a tender batter with cinnamon, vanilla, and a splash of yogurt. While it bakes until golden and a toothpick comes out clean, you prepare a simple glaze by combining powdered sugar, a touch of vanilla, and a little milk or cream. Once cooled slightly, drizzle the glaze over the warm cake — the best part is how it soaks into every nook and cranny, creating a glossy, irresistible finish. It’s honestly so easy and forgiving — perfect for bakers of all levels. The key is to not overmix the batter and to make sure your zucchini is well-drained, so the cake doesn’t turn out dense. My favorite part? The first bite, when the moist crumb melts in your mouth with that sweet cinnamon aroma lingering. This is definitely one of those “every time I make it, I get rave reviews” kinds of recipes — I promise you, it’s that good!
Ingredients
For the Main Batter:
- 2 cups grated zucchini (about 2 small zucchinis) — I always squeeze out excess moisture with a clean kitchen towel before mixing; it really makes a difference
- 1 ½ cups all-purpose flour — I’ve tested this with whole wheat and it still works beautifully, just a tad denser
- 1 teaspoon baking powder
- ½ teaspoon baking soda
- 1 teaspoon ground cinnamon — the real stuff makes it fragrant, but feel free to add a pinch of nutmeg or ginger for extra warmth
- ½ teaspoon salt
- ¾ cup granulated sugar — I sometimes use honey or maple syrup for a healthier twist
- ½ cup vegetable oil or melted butter
- 2 large eggs
- 1 teaspoon vanilla extract
- ¼ cup plain yogurt or sour cream — I tested almond milk and it actually made it even creamier!
For the Filling:
Usually just plain grated zucchini is enough, but sometimes I add chopped walnuts or chocolate chips to make it feel more special.
For the Glaze:
- 1 cup powdered sugar
- 1 teaspoon vanilla extract
- 2-3 tablespoons milk or cream — adjust for desired consistency, I like mine on the thicker side for that drizzly look
Step-by-Step Instructions
Step 1: Preheat & Prep Pan
Set your oven to 350°F (175°C). Grease a 9-inch round cake pan or line it with parchment paper — I love this size because it’s perfect for slicing, and it cooks evenly. Have your grated zucchini ready, and make sure your baking station is organized. Trust me, this step will set the tone for a smooth bake!
Step 2: Mix Dry Ingredients
In a medium bowl, whisk together the flour, baking powder, baking soda, cinnamon, and salt. I do this first because it distributes the leavening agents evenly, and it helps prevent clumps later. It’s simple but vital — I’ve had clumpy batter before and learned my lesson!
Step 3: Mix Wet Ingredients
In a large mixing bowl, whisk the eggs, sugar, oil, vanilla, and yogurt until smooth. When I do this, I make sure the eggs are at room temperature — it blends better, and the batter comes together more seamlessly. The smell of vanilla and cinnamon at this stage? Heaven! I usually give it a quick taste to check the sweetness—trust your palate.
Step 4: Combine
Gradually add the dry ingredients into the wet, folding gently until just combined. Be careful not to overmix — it’s tempting to keep going, but this will make your cake dense. I turn off the mixer once the flour disappears, then use a spatula to finish folding for that tender crumb.
Step 5: Prepare Filling
Stir in the grated zucchini. If you’re adding extras like nuts or chocolate chips, fold them in now. If you want the cake to be extra moist, sprinkle a few extra zucchini shreds on top and swirl into the batter gently. It’ll look a little rustic — that’s part of the charm!
Step 6: Layer & Swirl
Pour the batter into your prepared pan. If you’re feeling playful, add a few dollops of extra filling on top and swirl it into the batter with a toothpick for a marbled effect. It’s just like painting — every swirl is unique, and it makes each cake a little special.
Step 7: Bake
Into the oven it goes for about 40-45 minutes. I start checking around the 38-minute mark — insert a toothpick into the center; if it comes out clean, you’re good! Ovens vary, so don’t be disappointed if it takes a little longer or shorter. The kitchen will smell incredible, and the top will turn golden with a slight crackle.
Step 8: Cool & Glaze
Let it cool in the pan for about 15 minutes before transferring it to a wire rack. Warm, but not hot — that’s the perfect moment to drizzle the glaze. Mix powdered sugar, vanilla, and milk until it’s thick but pourable. Drizzle generously and watch that glossy finish develop, sinking into the warm cake and making it irresistible.
Step 9: Slice & Serve
Once fully cooled, slice with a serrated knife for clean cuts. I love serving it slightly warm with a cup of coffee or milk. It’s equally good at room temperature — just make sure the glaze has set. If you want to fancy it up, add some fresh berries or a sprig of mint. Honestly, it’s simple but looks stunning, and everyone asks for the recipe!
What to Serve It With
This cake is a chameleon — perfect for breakfast, brunch, or dessert. For breakfast, serve a slice warm with a dollop of Greek yogurt and a drizzle of honey; the sweetness pairs beautifully with your morning coffee. When I host brunch, I love stacking slices with a smear of mascarpone and fresh berries on top — looks fancy but takes seconds to assemble. As a dessert, it’s lovely all by itself, especially with the glaze adding just enough sweetness. I’ve also snuck a scoop of vanilla ice cream onto a warm piece, and wow — pure comfort. Sometimes I’ve served it as a casual snack with a cup of tea during lazy afternoons, and it always hits the spot. I’ve made it with walnuts, coconut, and even blueberries — the possibilities are endless, and each tweak feels like a little baking adventure. It’s a family favorite for a reason — simple, rustic, delicious comfort that everyone loves.
Top Tips for Perfecting Your Moist Zucchini Cake with Creamy Glaze
From experience, I’ve gathered a few tricks to make this cake truly shine. First, always squeeze out excess moisture from the zucchini — too much wetness can make your cake dense and heavy. I’ve learned to grate and then press with a paper towel; it’s the secret to a perfect crumb. When mixing the batter, fold gently and avoid overmixing — a common mistake I’ve made repeatedly — because that makes the cake tough instead of tender. For the swirl effect, I recommend adding dollops of batter and using a toothpick or skewer to create a marble pattern — no fancy piping required! If you want to customize the flavor, try adding a teaspoon of almond extract or swapping out cinnamon for cardamom — it’s surprisingly good. In the oven, I always position my cake in the middle rack to ensure even baking, especially since I’ve had tall cakes bake unevenly on the edges. Always do the toothpick test at 40 minutes; every oven is slightly different, and you don’t want to overbake it. When making the glaze, start with less milk and add gradually; you can always thin it out, but it’s tougher to thicken once it’s too runny. My biggest lesson? Let the cake cool slightly before glazing — the glaze will drip beautifully, and the cake will absorb just enough to stay moist. Once you get these little details down, you’ll be making this recipe in your sleep!
Storing and Reheating Tips
This cake keeps surprisingly well, which is great when you want leftovers for the next day. If you plan to eat it within a day or two, cover it tightly with plastic wrap or store in an airtight container at room temperature. It stays moist for at least two days this way — I often find myself sneaking slices for breakfast! For longer storage, I prefer refrigerating — just cover it well, and it’ll stay fresh for up to a week. I found that wrapping individual slices in plastic and freezing them is a game-changer; just thaw at room temperature or warm briefly in the microwave. A tip: glaze the cake immediately after reheating for the most luscious shine and texture. The glaze firms up nicely, making each slice look as tempting as when it first came out of the oven. Just give it a quick rewarm if it’s been in the fridge, and it’ll taste fresh and tender. I’ve even frozen the baked batter before baking, then baked from frozen for a little extra time — it works like a charm! The key is to keep the cake wrapped well enough to prevent freezer burn, and the glaze always tastes best fresh, so I recommend glazing just before serving. Trust me — with a little planning, you can enjoy this moist zucchini cake any time!
Frequently Asked Questions
Final Thoughts
This moist zucchini cake is one of those recipes that feels like a warm hug — familiar yet special. I love how versatile it is, how forgiving, and how it always seems to turn out just right, no matter the tweaks I make. It’s equally perfect on a lazy Sunday morning with a cup of coffee or dressed up for a festive brunch. The secret, for me, is to treat the zucchini well, not overmix, and don’t forget that glaze — it really makes all the difference! Once you’ve made this a couple of times, I bet it’ll become a staple in your kitchen as well. It’s one of those recipes that sparks memories, comforts the soul, and impresses friends and family without demanding hours or fancy ingredients. I can’t wait to hear how yours turns out! Drop a comment below, share your twists, and happy baking!Remember, the magic really happens in the little details — so have fun with it and enjoy every bite.
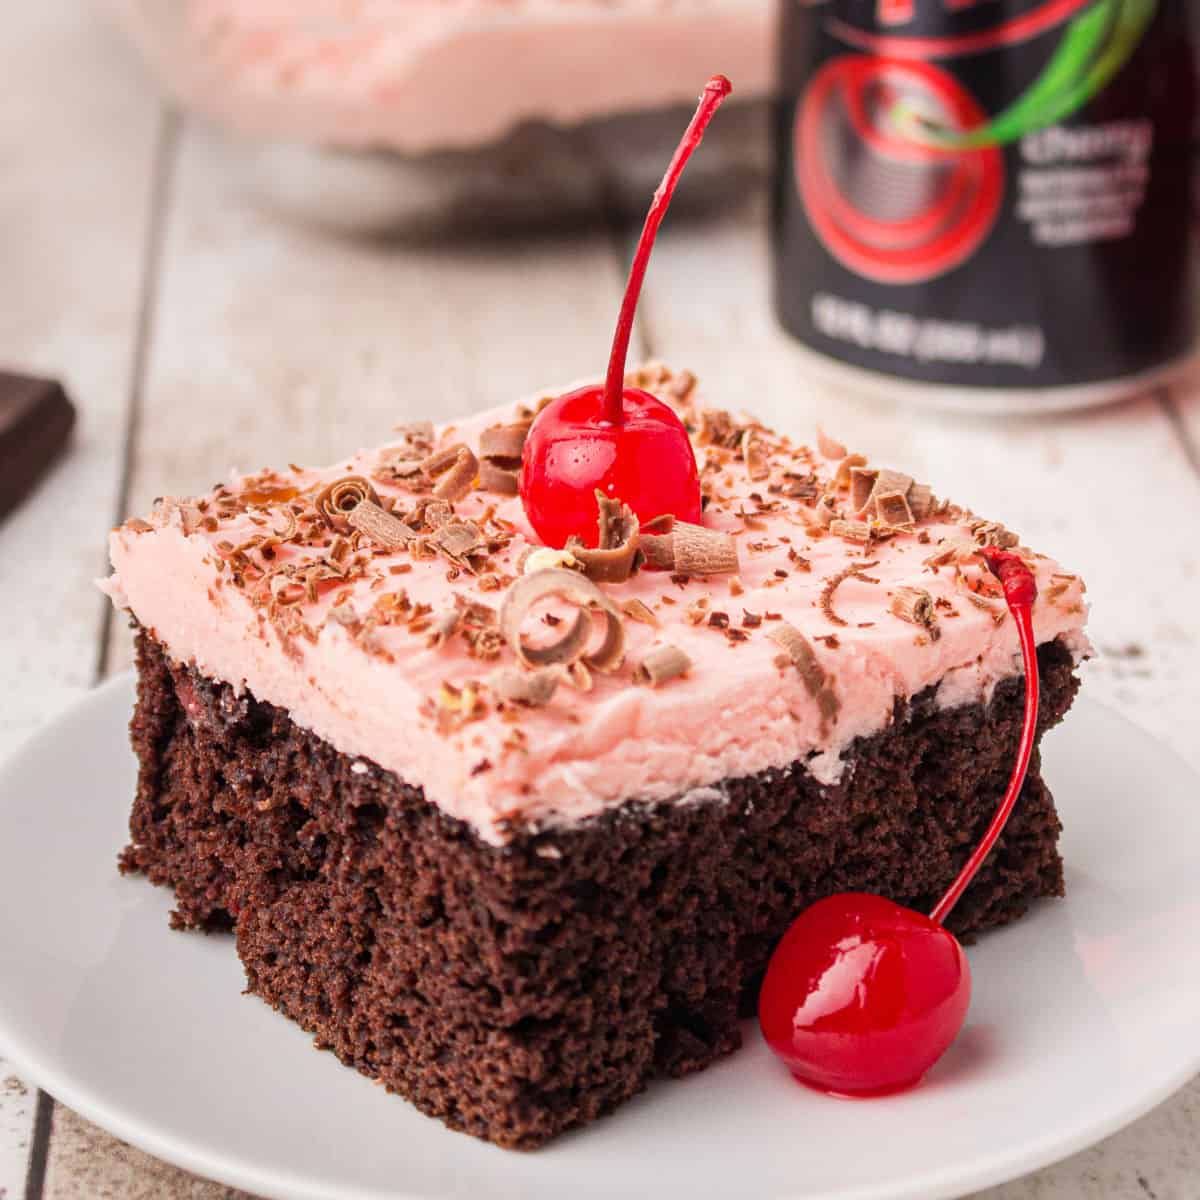
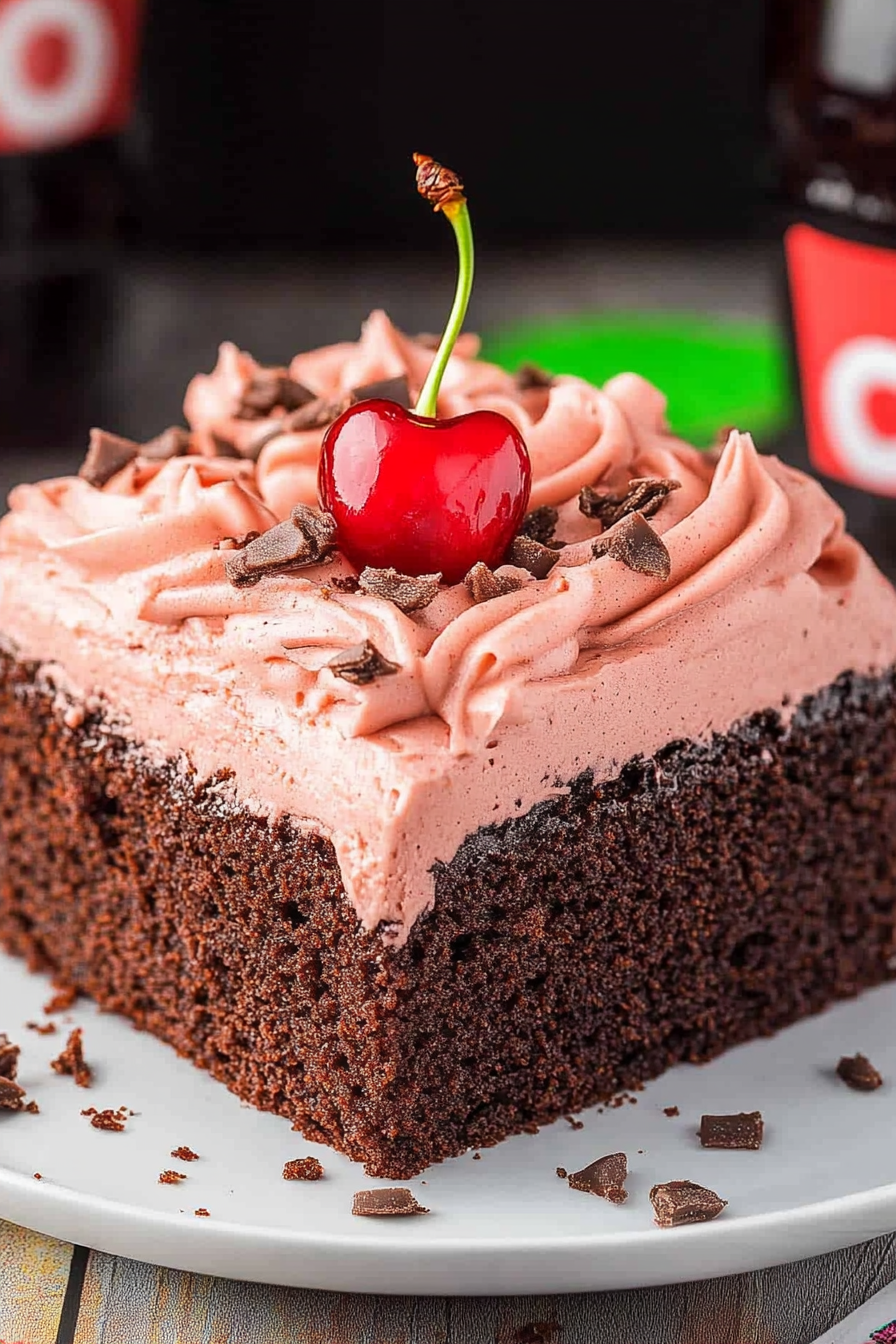
Cherry Dr. Pepper Cake
Ingredients
Method
- Preheat the oven to 350°F.
- Lightly spray a 9x13 baking dish with baking spray.
- Remove the cherries from the jar, reserving the liquid for the frosting. Remove the stems from 15 cherries. Slice the cherries in half, then slice the halves again. Keep the remaining cherries with stems for garnish.
- In a stand mixer or large bowl, combine the dry cake mix and cherry Dr. Pepper. Mix on low until just combined.
- Stir in the sliced cherries.
- Pour the batter into the prepared baking dish. Bake for 28 minutes, or until a toothpick inserted comes out clean. Let the cake cool completely.
- In a stand mixer or large bowl, cream together softened butter and reserved cherry juice.
- Reduce mixer speed to low. Gradually add powdered sugar, ½ cup at a time, until the frosting reaches a firm but spreadable consistency, similar to canned frosting. Add up to an additional 0.5 cup of powdered sugar if needed.
- Spread the frosting evenly over the cooled cake.
- Gently score the cake into serving portions.
- Place one reserved cherry with a stem in the middle of each serving. If short on stemmed cherries, garnish with halved cherries.
- Chill the cake in the refrigerator for 30 minutes to 1 hour to help the frosting set.
- Sprinkle chocolate shavings evenly over the top of the frosting. If using a chocolate bar, create shavings using a vegetable peeler.