Easy Chicken Gnocchi Pot Pie Delight
There’s a little magic in the kitchen when I whip up these zucchini carrot cake bars. They’re like a warm hug in dessert form—moist, flavorful, and just sweet enough to satisfy that sweet tooth without feeling guilty. I always do this when I want something homemade but don’t want to spend hours baking. My kids ask for these all the time, especially when I’ve grated zucchini and carrots leftover from dinner. The smell alone brings everyone to the kitchen—cinnamon, warm vanilla, a hint of nutmeg—so cozy and inviting. Honestly, this one’s a lifesaver on busy nights or when I need a quick treat that feels special. I tested it with almond milk once, and it made the texture even creamier. Trust me on this: these bars disappear in minutes at my house. They remind me of the old family carrot cake but packed with sneaky veggies. Plus, they’re so versatile—you can add nuts, raisins, or even swap out ingredients. So, let me take you through my best-loved recipe for these homemade zucchini carrot cake bars that I know you’ll love just as much as I do.
What are some healthy Zucchini Carrot Cake bars?
Think of these as a grown-up, healthier twist on classic carrot cake, but in convenient bar form. They’re essentially a moist, tender cake made primarily from grated zucchini and carrots, baked into luscious, sliceable bars. The name says it all—healthy, because we’re sneaking in those veggies that kids pretend they don’t like, but actually love in disguise. It’s a pretty forgiving recipe, perfect for when you want a sweet treat but don’t want to feel like you’ve overindulged. These bars are a cross between a snack and a dessert—think of them as a fruit-flecked, spiced cake that’s easy to pack in lunchboxes or serve at brunch. The name “healthy” is more about mindset than strict rules—because, honestly, these taste decadent enough to satisfy everyone’s cravings. I love that they’re made with ingredients I usually keep on hand, so I can whip them up whenever I need a quick, wholesome pick-me-up. They’re moist, hearty, and perfect for folks watching their sugar or carbs, but trust me—they don’t skimp on flavor!
Why you’ll love this recipe?
What I love most about these zucchini carrot cake bars is how you get that rich, cozy flavor—cinnamon, nutmeg, a touch of vanilla—mixed with the freshness of grated produce. They’re not just healthy-looking—they taste incredible. I’ve made this countless times, and it never fails to impress. The batter comes together in minutes, and the best part? You don’t need fancy ingredients. Mostly pantry staples, a few fresh veggies, and you’re good to go. It’s such a budget-friendly recipe—no need for expensive mixes or complicated steps. Plus, these bars are super versatile. I’ve added chopped walnuts or raisins, or even extra spices when I’m feeling fancy. My kids ask for these all the time, especially for breakfast or a cozy after-school snack. They’re perfect when you want something sweet but not overly indulgent. The texture is what really keeps people hooked—moist, fluffy, and packed with bits of carrot and zucchini that make every bite interesting. And trust me, the aroma alone will lure everyone into the kitchen. I’ve even tested this with plant-based milk, and it turned out just as creamy and tender—so good! Ever since I started making these, I keep a batch in the fridge—they’re my secret weapon for busy mornings or quick treats. When I need comfort food, I just slice one up with a warm cup of tea, and I’m in heaven.
How do I make Zucchini Carrot Cake Bars?
Quick Overview
This recipe is so straightforward it almost feels like cheating. You start by grating fresh zucchini and carrots, then mix them into a simple batter with spices, flour, and a hint of sweetener. Pour everything into a lined pan, swirl in your favorite add-ins—like nuts or raisins—and bake until golden. The whole process takes about 40 minutes, and the result is a fragrant, moist snack that slices easily into squares or bars. What makes this recipe special is how adaptable it is—you can swap ingredients, add a little more sweetness, or skip the glaze to suit your mood. The batter is forgiving, so don’t stress about precision, just trust your senses. Once baked, I like to let it cool for a bit before glazing or dusting with powdered sugar. It’s a hands-off recipe that always impresses—perfect for making ahead or tossing together last-minute.
Ingredients
For the Main Batter:
– 2 cups grated zucchini (about 2 small zucchini)
– 1 cup grated carrots (about 2 large carrots)
– 1½ cups all-purpose flour (or whole wheat for a healthier twist)
– ½ cup packed light brown sugar
– ½ cup honey or maple syrup (syrup makes it extra moist!)
– ½ cup vegetable oil or melted coconut oil
– 2 large eggs
– 1 teaspoon vanilla extract
– 1 teaspoon ground cinnamon
– ½ teaspoon ground nutmeg
– 1 teaspoon baking powder
– ½ teaspoon baking soda
– Pinch of salt
For the Filling:
– Optional: Cream cheese or Greek yogurt spread, or a drizzle of honey for extra sweetness
For the Glaze:
– 1 cup powdered sugar
– 2-3 tablespoons milk or plant-based milk
– ½ teaspoon vanilla extract
– Optional: lemon zest or cinnamon for flavor variation
Step-by-Step Instructions
Step 1: Preheat & Prep Pan
Set your oven to 350°F (175°C). Line a 9×9-inch baking pan with parchment paper—I always do this so the bars come out clean and easy to cut. Lightly grease the paper if needed. This simple step saves so much frustration when you’re ready to serve.
Step 2: Mix Dry Ingredients
In a large bowl, whisk together the flour, cinnamon, nutmeg, baking powder, baking soda, and salt. I’ve learned the hard way that properly mixing these dry ingredients prevents clumps and ensures even rising. It also helps distribute the spices so every bite has that warm, cozy flavor.
Step 3: Mix Wet Ingredients
In another bowl, combine the eggs, honey (or maple syrup), oil, and vanilla. Whisk until smooth. I like to make sure the eggs are at room temperature; it mixes more evenly and helps the batter come together nicely. If I’m in a rush, I just microwave the eggs for about 10 seconds before mixing.
Step 4: Combine
Pour the wet ingredients into the dry and gently fold together. Do not overmix—or the bars might turn dense instead of tender. I always check the batter for moisture; it should be thick but not dry. If it feels stiff, just add a splash of milk. Fold in the grated zucchini and carrots last, making sure they’re evenly distributed. This is my favorite part—seeing the colorful flecks come together.
Step 5: Prepare Filling
If you’re adding a filling like cream cheese or Greek yogurt, soften it first or whip it lightly. For the swirl, just dollop spoonfuls on top of the batter in the pan, then use a toothpick or skewer to swirl gently. It creates a marbled look that’s totally Instagram-worthy and adds an extra layer of flavor.
Step 6: Layer & Swirl
Spread the batter evenly in the pan. Drop spoonfuls of your filling on top, then swirl with a toothpick or skewer. I love not overdoing it — just enough to get a pretty marbled pattern. Think of it like painting a picture—less is sometimes more.
Step 7: Bake
Pop it into the oven for about 30-35 minutes. Start checking at 30 minutes by inserting a toothpick into the center; it should come out clean. Every oven is different, so keep an eye on it to avoid overbaking. The top should be golden and slightly firm to the touch. I like to let it cool in the pan for about 10 minutes, then transfer to a wire rack.
Step 8: Cool & Glaze
Once cooled, mix up the glaze ingredients—powdered sugar, milk, and vanilla. Add a little more milk if it’s too thick, or more powdered sugar if it’s too runny. Drizzle it on top with a spoon, and let it set for a few minutes. You can also sprinkle some chopped nuts or coconut flakes for extra crunch.
Step 9: Slice & Serve
Use a sharp knife to cut into squares or bars. I always wipe the knife clean after each cut for perfectly neat edges. Serve at room temperature or slightly chilled—either way, these are incredible. I love to pair them with a cup of coffee or a glass of cold milk. They make a lovely breakfast, a cozy snack, or an easy dessert that everyone can enjoy. Trust me, once you make these, they’ll become a staple in your house too!
What to Serve It With
These zucchini carrot cake bars are so versatile—they go with just about anything. For breakfast, I love serving them alongside a hot cup of coffee or tea; the spices and subtle sweetness make for a perfect morning start. My family often enjoys them with a smear of cream cheese or a dollop of Greek yogurt, which adds a tangy contrast. If it’s brunch time, pile them on a nice platter, add fresh fruit like berries or sliced bananas, and serve with mimosas or herbal tea—fancy enough for weekend guests but simple enough for a weeknight treat. For dessert, I sometimes warm a piece and top it with whipped cream or a scoop of vanilla ice cream. It’s also a fantastic snack when you want something wholesome but still indulgent. I love packing these into lunchboxes—my kids think they’re special, and I feel good knowing they’re getting some veggies. Carrot and zucchini keep these bars moist and flavorful, so they’re perfect for making ahead and enjoying later. Honestly, I think this recipe will become part of your regular rotation too!
Top Tips for Perfecting Your Healthy Zucchini Carrot Cake Bars
Over the years, I’ve picked up a few tricks that make these bars shine every single time. First, always squeeze out excess moisture from your grated zucchini and carrots—this keeps the batter from getting too wet and helps the bars hold together better. I discovered that using a clean towel or cheesecloth to gently press out moisture works wonders. For an extra tender crumb, I sometimes substitute half the all-purpose flour with whole wheat or oat flour—I find it adds a bit more depth and fiber. Be cautious with overmixing once you combine the wet and dry ingredients; that’s how dense muffins happen, and trust me, you want these bars moist and fluffy. When layering or swirling in fillings, less is more—think of it as painting a picture: deliberate but gentle strokes. When it comes to baking, every oven is different, so keep an eye on the timing and do the toothpick test. If your top is browning too quickly and the inside isn’t set, tent it loosely with foil and continue baking. For the glaze, I love adding a splash of lemon zest or cinnamon for extra flavor. Sometimes, I even mix in a tiny pinch of cardamom or ginger—whatever makes you happy! A little experimentation makes cooking fun, and after many tries, I’ve found that patience and gentle mixing are key. Oh! And if you’re feeling festive, sprinkle some colored sugars or edible glitter on top for special occasions. These little touches turn an everyday snack into something festive and delightful.
Storing and Reheating Tips
These bars are surprisingly sturdy, so storing them is easy. Once cooled completely, I transfer them to an airtight container. At room temperature, they stay fresh for about 2 days, covered tightly—perfect for a quick snack or breakfast stash. If you want to keep them longer, pop the container in the fridge for up to a week. I recommend placing a paper towel underneath to catch any moisture. For freezer storage, wrap each bar tightly in plastic wrap, then place in a resealable bag or airtight container. They’ll keep well for up to 3 months. Thaw at room temperature for about 30 minutes or microwave for 10-15 seconds for a quick warm-up. When it’s time to reheat, I prefer the microwave or oven on low heat—just enough to bring back that soft, moist texture. Add the glaze after reheating if you want extra sweetness. I’ve found that even chilled, these bars are still delicious—sometimes they taste even better the next day after the flavors meld. Just keep an eye on the glaze—you can reapply or add a little fresh dusting of powdered sugar if needed. These storage tips mean you can enjoy your favorite homemade treat whenever the craving strikes, no rush needed.
Frequently Asked Questions
Final Thoughts
Honestly, if you’re after a wholesome treat that hits all the right notes—moist, flavorful, easy to make and perfect for any time of day—these healthy zucchini carrot cake bars are it. They remind me of backyard picnics, family brunches, and quiet mornings spent savoring something homemade. Every time I make them, I feel a little burst of pride, knowing I’m nourishing my family with something both tasty and sneaky healthy. The best part? They’re flexible—whether you add nuts or keep it simple, bake them plain or top with your favorite glaze, they always turn out fantastic. I’ve shared this recipe countless times, tweaking here and there, and I love seeing people beam when they taste that first bite. So, give it a try—trust me, your kitchen will smell amazing, and your family will ask for seconds. Happy baking! And don’t forget to leave a comment with your favorite variations—I love hearing how you make it your own!
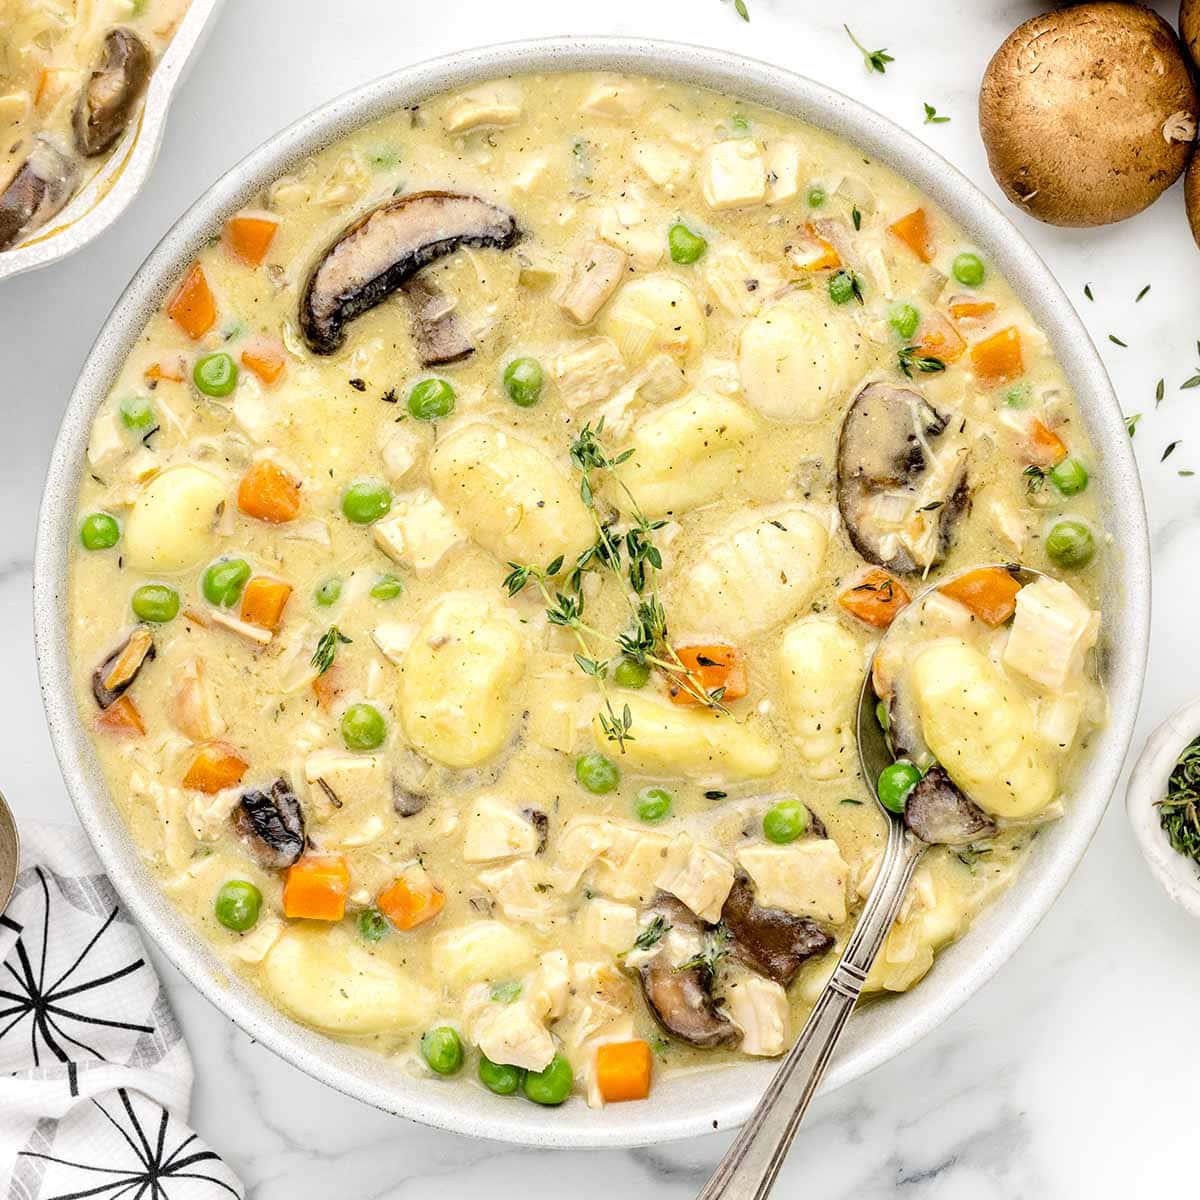
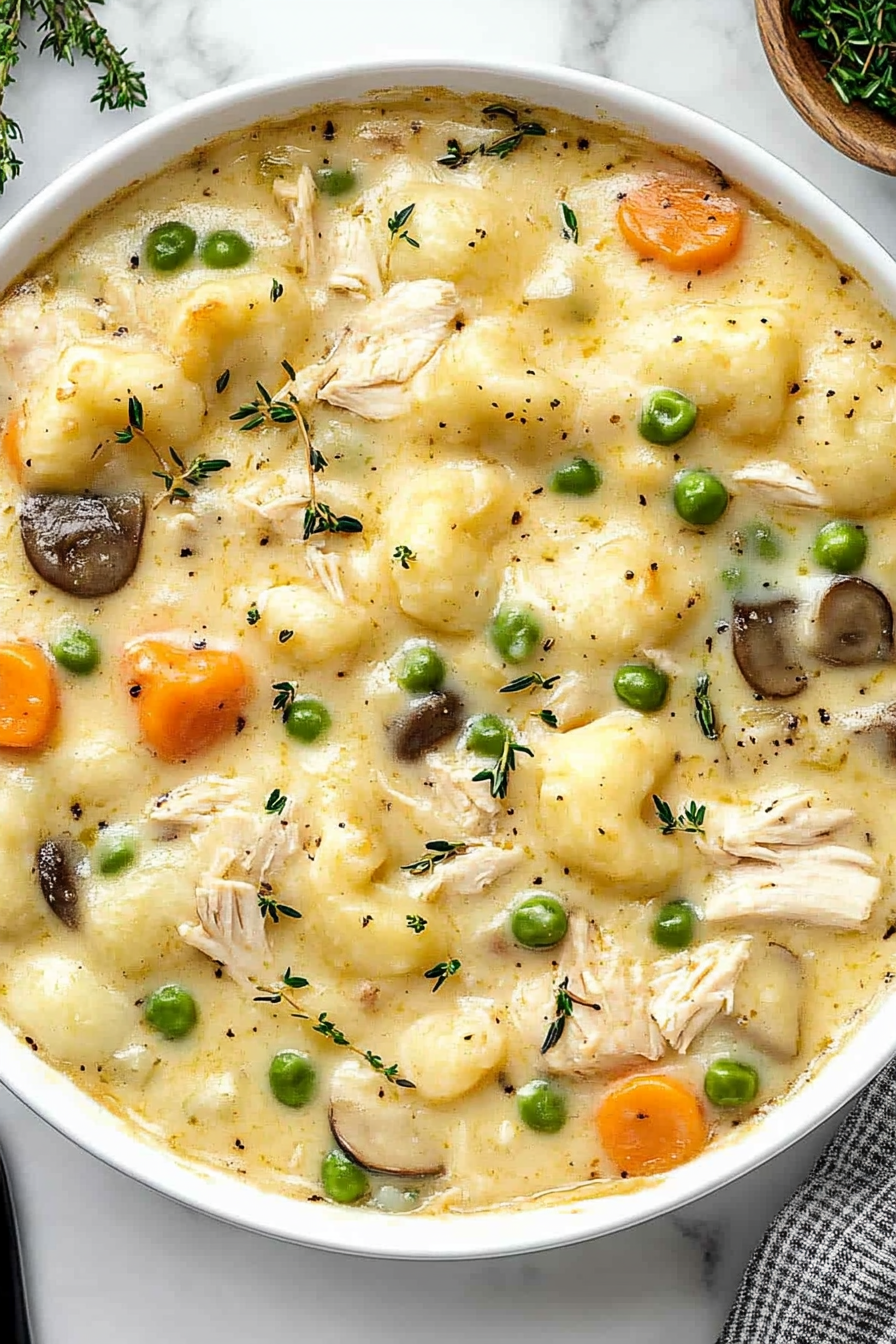
Chicken Gnocchi Pot Pie
Ingredients
Method
- In a large saute pan (12 inches wide x 3 inches deep), on medium heat, add the butter, sliced cremini mushrooms, diced onions, fresh thyme leaves, chicken bouillon, salt, and black pepper. Saute the vegetables for 2-3 minutes or until they are tender.
- Add the diced rotisserie chicken, peas & carrots, and cream of chicken with herbs soup to the saute pan. Stir to combine fully.
- Slowly stir in the chicken stock until the pot pie mixture is smooth and fully blended.
- Bring the filling mixture to a low boil, add the potato gnocchi, and reduce the heat to medium-low. Simmer the gnocchi chicken pot pie mixture for 10-15 minutes or until the gnocchi is fully cooked and tender. Be sure to stir often to keep the gnocchi from sticking together.
- Remove from the heat and garnish with additional fresh thyme leaves if desired.