Easy Eggplant Parmesan Recipe for Lighter Dinners
If you’ve ever stood in your kitchen, slicing fresh zucchinis while the sunlight streams through the window, you probably know that magic can happen with simple ingredients. I remember my grandma making something similar — a humble cake that smelled like warm summer mornings and tasted like childhood itself. It’s funny, isn’t it? How something so straightforward can evoke such strong feelings? That’s exactly why I wanted to share my favorite zucchini swirl cake with you today. It’s a recipe I’ve refined over years—trust me, I’ve made every mistake and discovered every tip along the way—and it still manages to surprise me every time. This one’s a lifesaver on busy nights when I need something sweet but don’t want to fuss in the kitchen for hours. Plus, it’s an absolute hit with my kids—they ask for it all the time—and I love how vibrant and moist it ends up. Honestly, I think this might just become a new family classic for you, too.
What is Zucchini Swirl Cake?
Think of zucchini swirl cake as the love child of a moist, tender cake and a surprise burst of fresh zucchini goodness. It’s essentially a simple, butter-rich batter layered with quick-cooked, cinnamon-spiked zucchini filling that gets swirled through before baking. The name comes from that beautiful marbled effect you get when you gently swirl the filling into the batter—kind of like a cocoa swirl in a chocolate swirl cake, but way healthier and more refreshing. It’s a clever way to sneak vegetables into a dessert, which, let’s be honest, makes it feel a little less indulgent and a lot more wholesome. This is the kind of recipe that feels fancy enough for entertaining, but it’s so easy you’ll want to whip it up just because. Plus, no complicated equipment needed—just a bowl, a spoon, and your oven. And the smell? Oh man, the smell alone will draw everyone into the kitchen, promising a slice of happiness in every bite.
Why you’ll love this recipe?
What I love most about this zucchini swirl cake is its surprise factor—people take that first bite and can’t believe how moist and flavorful it is, especially with that cinnamon-spiced zucchini swirl running through the middle. It’s like a warm hug, but in cake form. The flavor profile is perfectly balanced: a bit sweet, a touch spicy, and so fresh from the zucchini that you’ll taste summer even if it’s midwinter outside. This cake is also incredibly simple—I always do this when I’m short on time or energy, and it just comes together effortlessly. I’ve tested it with different flours, switching between all-purpose and almond, and honestly, it works beautifully either way. Another thing? It’s budget-friendly. The ingredients are staples, and you probably have most of them in your pantry right now. What makes this stand out from other quick cakes is that swirl—no two slices are exactly the same, each one a little piece of edible art. Plus, it’s versatile—you can serve it for breakfast, brunch, dessert, or even a cozy snack with tea. My kids ask for this all the time, especially warm, with a drizzle of honey or a dusting of powdered sugar. It’s one of those recipes that feels special but is truly made for every day.
How do I make Zucchini Swirl Cake?
Quick Overview
This zucchini swirl cake is a breeze to make. You start by preparing a simple, moist batter—think butter, eggs, sugar, and flour—that’s mixed just until combined. Meanwhile, the zucchini filling is quick-cooked with cinnamon until tender and fragrant. Then, you pour your batter into a loaf or cake pan, dollop the zucchini mixture on top, and swirl it in with a skewer or toothpick, creating a mesmerizing pattern. Pop it in the oven, and within about 45 minutes, you’ll have a golden, aromatic cake that’s begging to be sliced. The key is not overmixing your batter or over-swirl the filling—you want those beautiful layers without losing the tender crumb. Once baked, I always let it cool just enough so the swirl stays intact when you cut into it. Drizzle with a simple glaze or dust with powdered sugar, and you’re good to go. Honestly, this is the kind of treat that looks impressive but is secretly so forgiving—you’ll wonder why you haven’t made it sooner!
Ingredients
For the Main Batter:
– 2 cups all-purpose flour (or almond flour for a nutty twist)
– 1 cup granulated sugar
– ½ cup unsalted butter, melted (trust me, that butter makes it rich!)
– 3 large eggs
– 1 teaspoon vanilla extract
– 1 teaspoon baking powder
– ½ teaspoon baking soda
– A pinch of salt
– ½ cup milk (dairy or plant-based—whatever you prefer, I tested with almond milk and loved how creamy it made the batter)
For the Filling:
– 2 small zucchinis, grated (squeeze out excess moisture—I’ve learned to do this, or the cake gets a little soggy)
– ½ cup brown sugar
– 1 teaspoon ground cinnamon
– 1 tablespoon butter (for sautéing)
– 1 teaspoon lemon zest (optional, but adds a fresh zing)
For the Glaze:
– ½ cup powdered sugar
– 1-2 teaspoons milk or lemon juice
– A splash of vanilla (if you like)
Step-by-Step Instructions
Step 1: Preheat & Prep Pan
Set your oven to 350°F (175°C). Grease a loaf or 8-inch round cake pan—trust me, using parchment paper makes everything easier when you’re ready to serve. Line it with parchment, then give it a little spray with non-stick spray or a butter brush. While the oven warms up, you can start on your filling.
Step 2: Mix Dry Ingredients
In a large bowl, sift together the flour, baking powder, baking soda, and salt. This step ensures even distribution of the leavening agents and keeps your batter light and fluffy. I always do this first so I don’t forget later. The smell of the dry ingredients mixing is such a good marker—reminds me of baking at grandma’s house.
Step 3: Mix Wet Ingredients
In a separate bowl, whisk together the melted butter, sugar, eggs, and vanilla. I like to do this in one big bowl, so I don’t have to dirty more dishes. Whisk until everything’s smooth, with no streaks of egg or sugar—about 2 minutes. I’ve learned that making sure the eggs are at room temperature helps the mixture come together faster and makes the cake extra tender.
Step 4: Combine
Pour the wet mixture into the dry ingredients and gently fold until just combined. Never overmix—this is the secret to a tender crumb! The batter will be thick but pourable. If it feels too stiff, a splash of milk can loosen it up. Remember, we’re not making a bread dough here; keep it light and airy.
Step 5: Prepare Filling
In a skillet, melt the butter, then toss in the grated zucchini, cinnamon, and brown sugar. Cook over medium heat, stirring often, until the zucchini is soft and fragrant—about 5 minutes. If you’re adding lemon zest, do it at the end. Let it cool a bit—you don’t want the filling to melt the batter when you swirl it in.
Step 6: Layer & Swirl
Pour about two-thirds of your batter into the pan, spreading out evenly. Dollop spoonfuls of zucchini filling on top, then pour the remaining batter over, smoothing it out gently. Take a skewer or a butter knife, and swirl through the batter—figure-eight motions work best. Don’t overdo it—just enough to create pretty marbled patterns. I love watching the swirl form—it’s like an accidental piece of art.
Step 7: Bake
Pop it into the oven and bake for 40-45 minutes. The top should be golden and a toothpick inserted in the center comes out clean. Every oven is different—so keep an eye on it after 40 minutes. If it starts to brown too quickly, tent with foil. The smell of cinnamon and baked zucchini is the best invitation to the table.
Step 8: Cool & Glaze
Allow your cake to cool in the pan for about 15 minutes, then transfer to a wire rack. Drizzle with the glaze once the cake is just warm or completely cooled—either works! For a runnier glaze, add a tad more milk; for a thicker one, more powdered sugar. It’s all about personal preference.
Step 9: Slice & Serve
Use a sharp knife to cut through with clean, smooth strokes—if the cake sticks, gently warm the knife with hot water and dry it first. Serve slices warm or at room temperature, maybe with a dollop of whipped cream or a dusting of powdered sugar. Trust me—this cake disappears in minutes at my house, and I always find myself sneaking an extra slice whenever I can.
What to Serve It With
This zucchini swirl cake shines with a variety of accompaniments. For breakfast, it’s lovely alongside a steaming cup of coffee or tea—think about adding a smear of cream cheese or a drizzle of honey for extra richness. On brunch tables, I’ve served it warm with fresh berries and a splash of vanilla bean yogurt—it’s sophisticated but still cozy. As a dessert, it pairs beautifully with vanilla ice cream or a dollop of mascarpone. My kids love it just as it is, with maybe a little extra cinnamon sprinkled on top. Sometimes, I serve thick slices with a cup of hot chocolate or spiced chai for a perfect fall or winter treat. It’s also great for cozy family movie nights, served with a warm mug, while the house smells like cinnamon and baking love. Honestly, I’ve gotten great feedback from friends, too, who say it feels like a little slice of sunshine. And that, to me, is the best kind of dessert—delicious, versatile, and a little bit nostalgic.
Top Tips for Perfecting Your Zucchini Swirl Cake
Like all good baking adventures, perfecting this cake took some practice—and a few lessons learned the hard way. Here are some of my top tips:
- Zucchini Prep: Always squeeze out as much moisture as possible from the grated zucchini. I use a clean kitchen towel or cheesecloth—trust me, excess moisture turns your batter into a soggy mess. The zucchini should be moist but not wet.
- Mixing Advice: Overmixing your batter is the quickest way to a dense cake. Mix until just combined—think ‘light and fluffy’ rather than ‘smooth as butter’. Use a gentle folding motion, especially once you add the zucchini filling.
- Swirl Customization: Use a skewer or a chopstick to make figure-eight swirls. For a more dramatic effect, try layering different fillings—maybe add a handful of chopped nuts or a swirl of fruit jam for variation.
- Ingredient Swaps: I’ve experimented with coconut oil instead of butter, and even swapped in whole wheat flour for a nuttier flavor. It turns out great, but be prepared for a slightly denser crumb. Adjust the baking time accordingly.
- Baking Tips: Every oven is different; keep a close eye after 40 minutes. If the top is browning too quickly, tent with foil. Use a toothpick to test doneness—the key is to see a few moist crumbs, not wet batter.
- Glaze Variations: For a tangy twist, add lemon juice or zest to your glaze. Or sprinkle on some chopped nuts or coconut flakes for texture. I love experimenting with different toppings to keep things interesting.
One thing I’ve learned is that patience makes a difference—waiting until the cake is almost fully cooled before slicing keeps those beautiful swirls intact. And, trust me, the first time you see that marbled pattern emerge, you’ll feel like you’ve just made an edible piece of art. Every batch teaches you something new, but whether it’s a little too moist or a tad too crumbly, it’s always delicious—and that’s what truly counts.
Storing and Reheating Tips
This cake is surprisingly forgiving and keeps well, which means you can enjoy it over a few days (if it lasts that long!). For the best freshness, store it inside an airtight container at room temperature for up to 2 days—cover loosely with foil to prevent it from drying out. If you want to keep it longer, refrigerate it in an airtight container for up to 4 days; just let it come to room temperature before slicing for that perfectly tender bite. Considering freezing? Wrap slices tightly in plastic wrap, then a layer of foil, and stash in the freezer for up to 3 months. To reheat, warm slices gently in the microwave or oven—trust me, the smell of warm cake is such a comfort. When reheating, if you plan to add glaze or toppings, do it right after warming so the flavors stay fresh and the texture remains moist.
Remember, if you’re using the glaze, add it when the cake is just cooled—it soaks in better and avoids that soggy glaze effect. Honestly, this cake tastes just as good the next day, and even better with a little time for the flavors to meld.
Frequently Asked Questions
Final Thoughts
There’s something truly special about a dessert that’s both simple and impressive—this zucchini swirl cake fits that bill perfectly. It’s a reminder that the best recipes often come from humble ingredients and a little bit of love. Every time I make this, I’m transported back to lazy Sunday afternoons in my childhood kitchen, with the smell of cinnamon filling the air. Whether you’re baking for family, friends, or just for yourself, I guarantee that this cake will become a staple in your recipe box, just like it is in mine. It’s versatile, forgiving, and above all, a little taste of happiness that I can’t wait for you to try. Happy baking! And I’d love to hear how yours turns out—leave a comment or share your variations. We’re all in this delicious journey together!
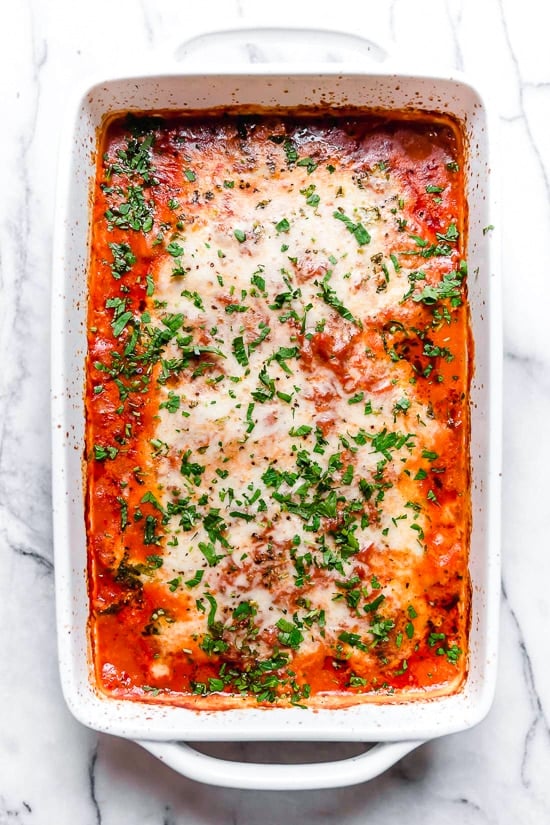
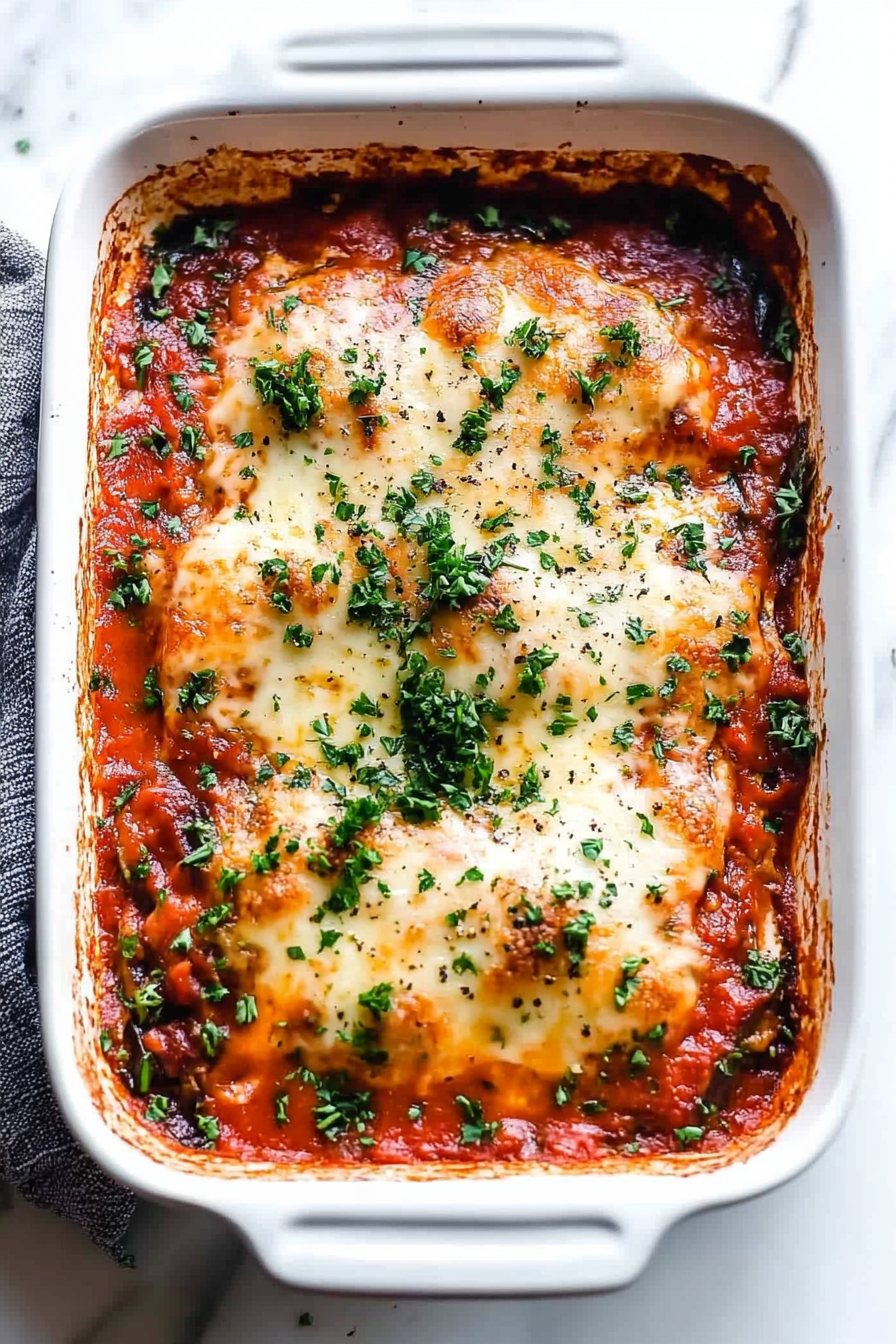
Eggplant Parmesan
Ingredients
Method
- Start by making the marinara sauce if you don't have any already prepared.
- Preheat the oven to 450°F and spray two sheet pans with oil.
- Slice the eggplant into 1/4 inch thick slices. Arrange on prepared pans, season with salt, and bake for 20 minutes, flipping halfway, until golden.
- Meanwhile, in a bowl, mix ricotta, egg, parsley, and Parmesan cheese.
- Spread 1/2 cup marinara sauce at the bottom of a 9x12-inch baking dish. Layer one-third of the eggplant over sauce, then one-third of the ricotta mixture, one-quarter of the mozzarella, and one-quarter of the marinara. Repeat layering until all ingredients are used, ending with mozzarella and remaining sauce on top.
- Preheat the oven to 400°F. Cover the dish with foil and bake for 40 minutes until bubbly and melted.
- Remove foil and bake an additional 10 minutes. Let sit 10 minutes before serving.