Golden Fudge Recipe How to Make It
There’s something magically comforting about pulling out a slice of warm, homemade cake. I remember my grandma’s kitchen, the smell of cocoa and fresh zucchini filling the air, and feeling that cozy, nostalgic rush every time. I’ve made countless chocolate zucchini cakes over the years, tweaking the recipe just enough to make it my own, and I can honestly say—this one’s a game-changer. It’s moist, rich, and so chocolatey—yet sneaks in a veggie that my kids actually ask for. What I love most about this is how forgiving it is; even if you’re not a perfect baker, it comes out amazing every single time. Plus, it’s a great way to use up the bounty of zucchini at the height of summer and turn it into something that will disappear in minutes at my house. Trust me on this one—you’ll want to keep this recipe close, especially when you need a quick, cozy dessert that people will rave about.
What is chocolate Zucchini cake?
Think of this cake as a cozy, chocolatey hug from the oven that’s secretly good for you. It’s essentially a moist, dense cake made with shredded zucchini, which keeps it tender without adding extra fat or calories. The name might sound odd—“zucchini” and “cake” don’t always go together unless you’re into veggie-packed baking—but it’s a classic for a reason. The zucchini dissolves into the batter, giving it a subtle, almost-hidden vegetable boost, while the cocoa and chocolate chips make every bite feel decadent. This cake is what I call a “secret weapon” for sneaking more greens into your family’s diet, all while satisfying that chocolate craving. It’s also incredibly versatile—you can serve it with a splash of cream, a dusting of powdered sugar, or a drizzle of chocolate ganache. Think of it as the friendly cake that’s as good at a casual teatime as it is for a birthday party.
Why you’ll love this recipe?
Honestly, what makes this chocolate zucchini cake stand out is how it balances flavor, ease, and versatility. The first time I made it, I was a little skeptical—how could zucchini in a cake possibly taste good? But I was hooked from that first bite. The moistness is next level, thanks to the zucchini, which keeps the crumb soft and flavorful. The cocoa is rich without being overpowering, and those chocolate chips? They melt just enough to create pockets of gooey goodness throughout. Plus, it’s so simple that even a beginner baker can nail it. I always do this when I want a comfort dessert that’s budget-friendly too—I don’t need fancy ingredients or fancy techniques. It’s perfect when you’re craving something sweet at the end of a busy day but don’t want to spend hours baking. My kids ask for this all the time, especially when I’ve got a basket of zucchini from the garden. It’s also incredibly versatile—you can swap in dark chocolate, add a handful of nuts, or make mini muffins for a snack on the go. What I love most about this recipe is how it feels like a little celebration in every slice—chocolate-rich, moist, and just a tiny bit healthy too. It’s truly my go-to when I want something that feels indulgent but still hits those nourishing notes.
How do I make Zucchini cake?
Quick Overview
Making this cake is honestly a breeze. It all comes down to mixing the ingredients just right—starting with grating your zucchini, then whipping up a simple batter. The key is not overmixing once you combine the wet and dry ingredients, so the cake stays tender. You layer in shredded zucchini right into the batter, fold in chocolate chips, pour it into your baking pan, and bake until a skewer comes out clean. While it’s baking, your kitchen will smell like cocoa heaven. When it’s done, let it cool slightly before glazing or serving plain. This cake comes together in about an hour, making it perfect even on busy weeknights. Trust me, the results are so worth it—moist, rich, and packed with those chocolate-zucchini flavors that just improve over time. I always do this on Sundays or when I have friends over because it’s a guaranteed crowd-pleaser—you might even call it a secret family recipe now!
Ingredients
For the Main Batter:
– 2 cups grated zucchini (about 2 medium zucchinis, shredded and drained)
– 1 ¾ cups all-purpose flour
– ½ cup unsweetened cocoa powder (trust me, Dutch-processed is best)
– 1 teaspoon baking soda
– ½ teaspoon baking powder
– ½ teaspoon salt
– 1 cup granulated sugar
– ½ cup brown sugar (for extra moisture and depth)
– 3 large eggs
– ½ cup vegetable oil or melted coconut oil
– 1 teaspoon vanilla extract
– ½ cup buttermilk or regular milk (almond milk works too!)
For the Filling:
– ½ cup chocolate chips (quality matters—dark or semi-sweet)
– Optional: chopped nuts or dried berries for variety
For the Glaze:
– ½ cup semi-sweet chocolate chips
– 2 tablespoons heavy cream or coconut cream
– Optional: a pinch of sea salt or a splash of vanilla
Step-by-Step Instructions
Step 1: Preheat & Prep Pan
Set your oven to 350°F (180°C). Grease a 9-inch round cake pan or line it with parchment paper. Lightly dust with cocoa powder or flour to prevent sticking. While the oven heats up, grate your zucchini, then toss it in a clean kitchen towel and squeeze out any excess moisture—this step is crucial to keep the cake from getting soggy. I do this over the sink; it’s my little secret for perfect texture!
Step 2: Mix Dry Ingredients
In a large bowl, whisk together the flour, cocoa powder, baking soda, baking powder, and salt. This ensures everything is evenly distributed. A perfect dry mix will have a uniform, slightly grainy texture, which helps prevent clumps once combined with wet ingredients.
Step 3: Mix Wet Ingredients
In a separate bowl, beat the eggs, sugar, and brown sugar until smooth and slightly fluffy. Then add the oil, vanilla, and milk, mixing until combined. I like to do this by hand but using a mixer makes it faster, especially if you’re short on time. The smell of vanilla and cocoa together? Heavenly.
Step 4: Combine
Pour the wet mixture into the dry ingredients, folding gently with a spatula just until combined. Resist the urge to overmix—this is the secret to a light, tender crumb. Stirrings should look homogeneous but not pasty or thick. Then fold in the grated zucchini and chocolate chips, distributing evenly throughout the batter. I’ve tested this with different chocolate types—semi-sweet, dark, even white chocolate, and they all work beautifully.
Step 5: Prepare Filling
If you’re adding extra goodies like nuts or berries, fold them in now. The chocolate chips are optional but highly recommended—they melt slightly into the batter, creating gooey pockets, and people love that surprise element. You can even sprinkle extra on top before baking for a beautiful finish.
Step 6: Layer & Swirl
Pour the batter into your prepared pan. For visual flair, I like to sprinkle some more chocolate chips on top before inserting it into the oven. If you want to get artistic, swirl a spoonful of peanut butter or Nutella into the batter before baking—that’s a personal favorite in my house.
Step 7: Bake
Pop it into the oven and bake for about 40-45 minutes. Check doneness by inserting a skewer or a toothpick into the center—if it comes out clean, it’s ready. Every oven is different, so start checking at 38 minutes—you want moist crumbs but no wet batter. If the top gets too dark before it’s baked through, tent it with foil for the last 10 minutes. Ah, the smell—that rich cocoa, melting chocolate—it’s like a warm hug.
Step 8: Cool & Glaze
Let the cake cool in the pan for about 15 minutes, then transfer it to a wire rack. If you’re glazing, do it while the cake’s still warm but not hot—this helps the glaze set beautifully. Melt the chocolate chips and cream together, stirring until smooth, then pour or spoon over the top. It’s optional but really elevates the finished look and flavor.
Step 9: Slice & Serve
Once cooled completely (or just warm, if you’re impatient!), slice with a serrated knife. The texture is best when the cake has rested a bit—it’s dense but tender, with a moist crumb. Serve plain, dusted with powdered sugar, or with a dollop of whipped cream. A scoop of vanilla ice cream on the side? Absolutely divine. I like to serve this with a hot cup of coffee or a cold glass of milk—it’s comfort in every bite.
What to Serve It With
This cake is incredibly versatile. For a cozy breakfast, pair it with a steaming latte or a hot cup of tea. I love serving it at brunch with fresh berries and a dusting of powdered sugar—looks pretty and tastes delightful. As a dessert, it’s perfect with a scoop of vanilla ice cream or a drizzle of caramel. I also enjoy it as a quick snack, sliced thick and enjoyed with a glass of milk or a cup of coffee. Whenever I make this, I always make enough to stash some in the freezer for late-night cravings—because, honestly, it’s just as good cold, maybe even better the next day. This cake has become part of my family’s comfort food repertoire, and I can’t wait for you to try it—you’re going to love how simple, moist, and chocolatey it is!
Top Tips for Perfecting Your Chocolate Zucchini Cake
Over the years, I’ve picked up a few tricks that make this cake turn out perfectly every time. First, don’t skip squeezing out excess moisture from the zucchini—the last thing you want is a soggy cake! I always do this over the sink with a clean kitchen towel—it only takes a minute and makes all the difference. When mixing your ingredients, remember: the less you overmix, the lighter your cake will be. I used to beat everything until smooth, but I learned that gentle folding gets that tender crumb everyone loves. For the swirl pattern, I like using a skewer or toothpick to create a marbled effect when layering the batter, but honestly, even freehand works! Also, feel free to swap in alternative chocolates—dark, white, or even a handful of peanut butter chips for a twist. Don’t forget to check the cake early—ovens differ and overbaking makes it dry. That toothpick should come out with moist crumbs—this is my golden rule. As for the glaze, I often add a pinch of sea salt or a splash of vanilla to balance the sweetness. One thing I’ve learned is that storing the cake properly makes all the difference—cover it well at room temperature for up to two days, refrigerate for a week or freeze for longer. Just make sure to bring it to room temperature before serving for maximum flavor and texture. Trust me, every tweak I’ve tried has made this cake better, and I promise—your family will thank you. It’s become a staple here that I make when I want a real treat without much fuss, and I know it’ll become one of yours too.
Storing and Reheating Tips
Once you’ve sliced up this chocolate zucchini cake, you’ll want to keep it fresh and delicious. At room temperature, it’ll stay good for about 2 days—just cover it tightly with plastic wrap or store in an airtight container to keep it moist. If you’re planning to keep it longer, refrigerator storage is the way to go—simply wrap it well or store it in a sealed container. It’s still quite moist and flavorful after a week, though I recommend bringing slices back to room temp before serving to enjoy the best flavor and texture. Freezing is easy—wrap individual slices with plastic wrap, then stash them in a resealable bag or airtight container. They’ll last up to three months, and I like to defrost at room temperature for about 20 minutes before digging in. When it comes to the glaze, I usually add it just before serving because it’s way better fresh and glossy. If you’re freezing the cake with the glaze applied, just briefly warm to melt it slightly after thawing—otherwise, it can get a little dull. Bottom line: keep it covered and enjoy within a week or two for the freshest taste, but don’t be alarmed—this cake keeps well if you follow these tips!
Frequently Asked Questions
Final Thoughts
This chocolate zucchini cake has truly become a staple in my baking repertoire—not just because it’s delicious, but because it’s a little reminder that dessert can be simple, nourishing, and totally satisfying all at once. Every time I make it, I get a happy reaction from family or friends, and I love watching their faces when they realize there’s zucchini hiding in that rich brownie-like crumb. It’s moist, flavorful, and surprisingly versatile—you can dress it up with fancy toppings or keep it cozy with just a dusting of cocoa powder. Most importantly, it’s a recipe that I’ve perfected over the years, learning from my mistakes and adding personal touches. I hope you love it as much as we do! Happy baking—and don’t forget to share your own twists or photos in the comments. I’d love to hear how yours turns out!
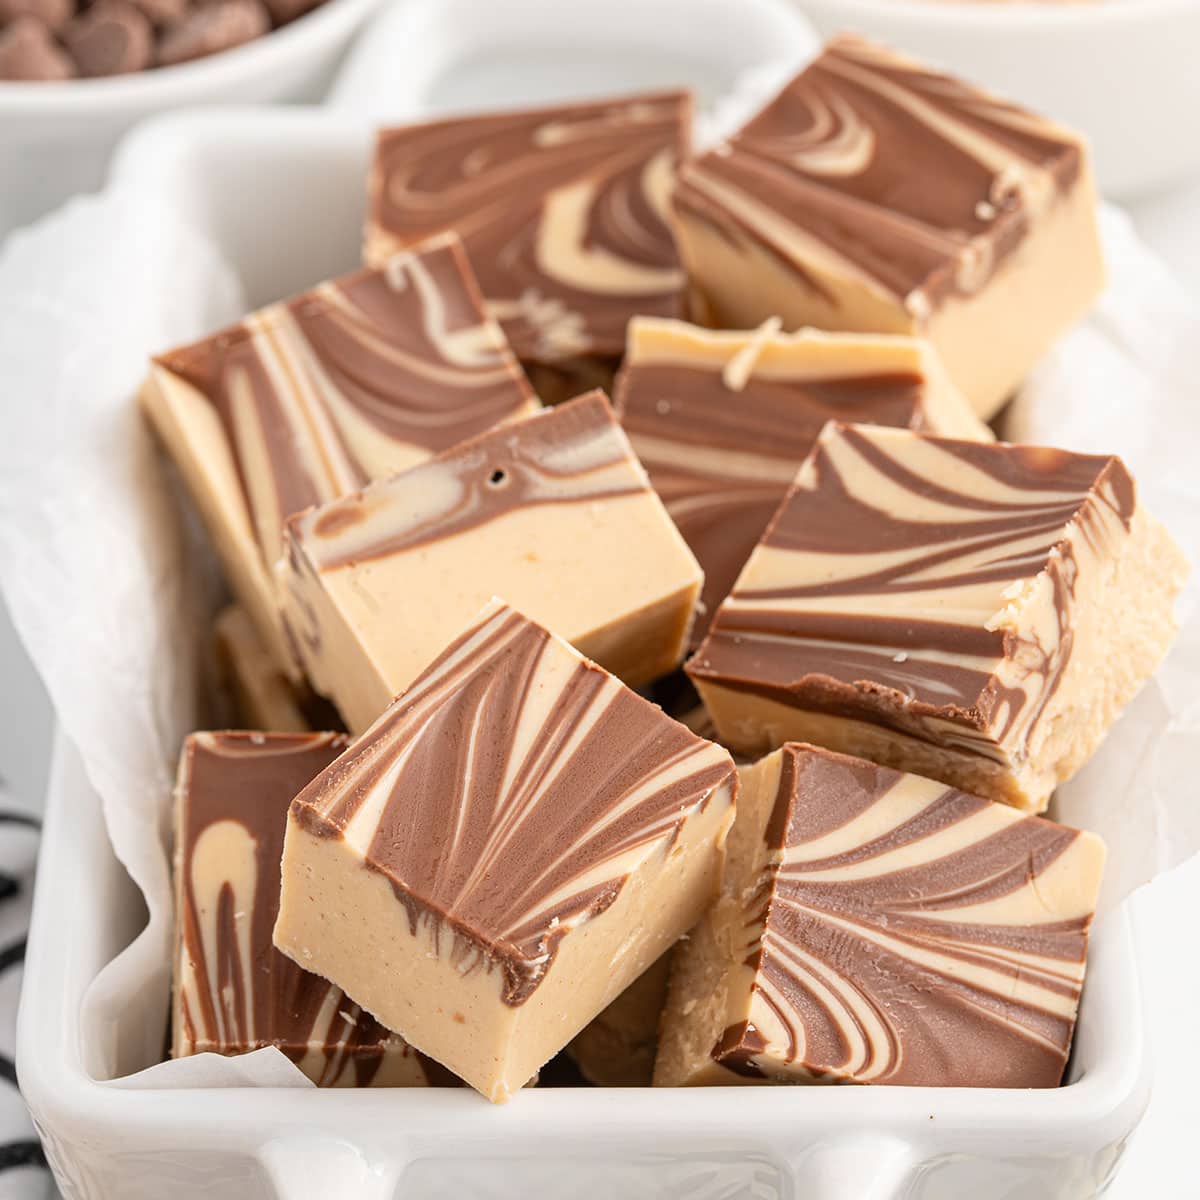
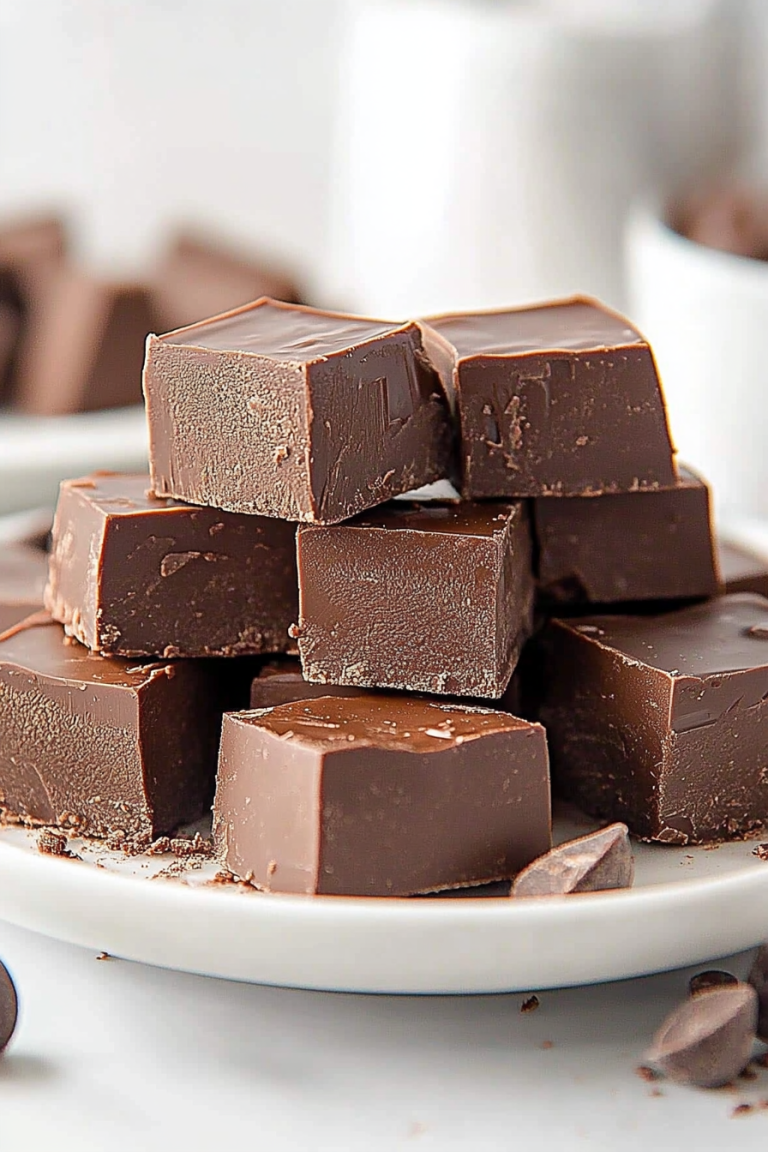
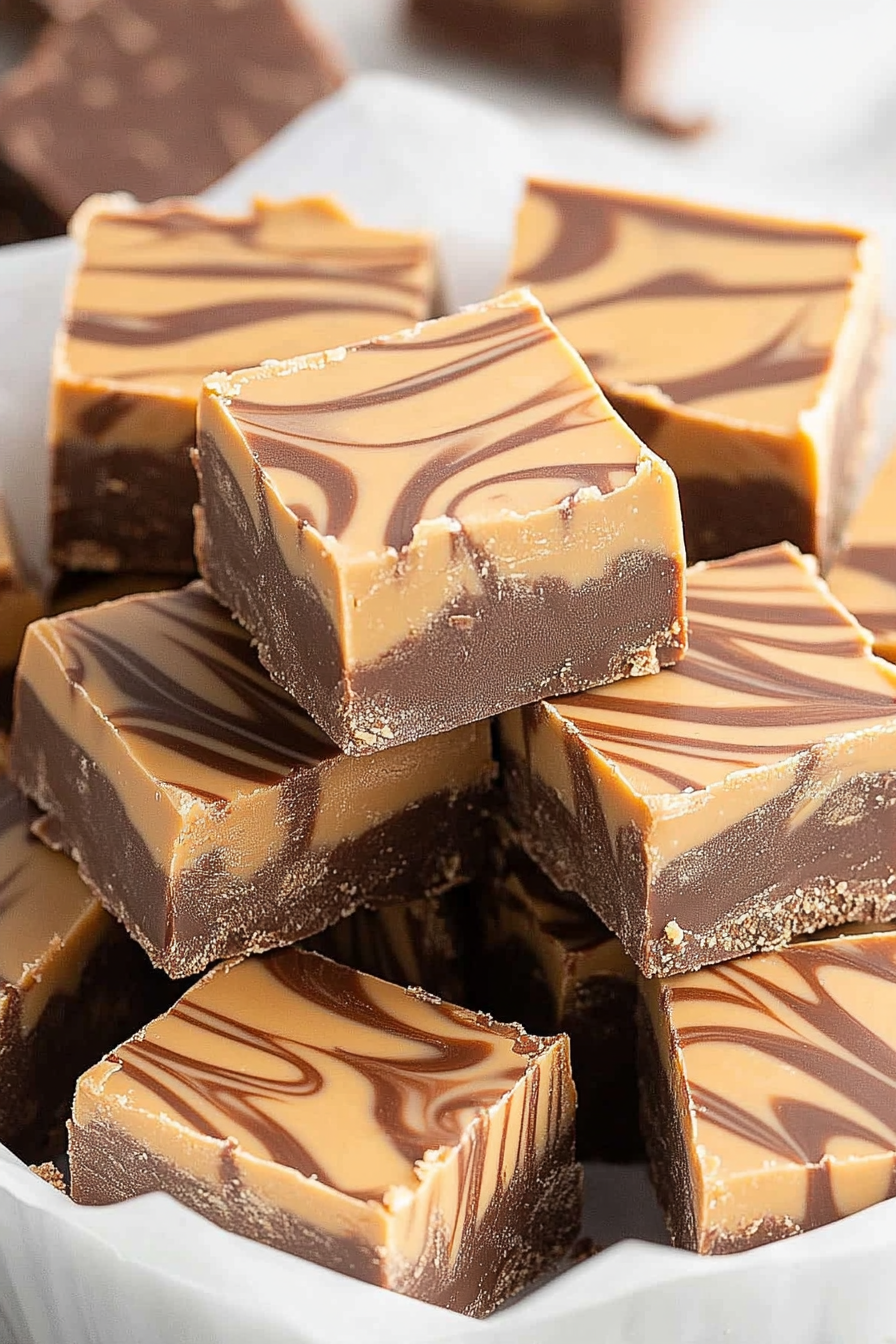
Tiger Butter Fudge
Ingredients
Method
- Line an 8x8 baking dish with parchment paper, leaving a slight overhang to remove the fudge. You can use small binder clips to fasten the top edge of the parchment paper to the baking dish to prevent it from folding over.
- Add the white baking chips to a medium microwave-safe bowl. Microwave on full power for 1 minute, stir well, and continue to microwave in 30-second intervals until completely melted and smooth.
- Add the peanut butter to a small microwave-safe bowl. Heat at full power for 30 seconds, stir well, and pour into the melted white baking chips. Stir until combined.
- Pour the melted white baking chips and peanut butter into the lined baking pan. Tilt the pan to evenly distribute.
- Add the milk chocolate chips and vegetable oil to a small microwave-safe bowl. Microwave on full power for 30 seconds and stir well. If needed, microwave for another 15 seconds until completely melted and smooth. If the melted milk chocolate is too thick, stir in 1 teaspoon of vegetable oil.
- Pour the melted milk chocolate over the white chocolate and peanut butter in zigzag lines.
- Using a knife, create a swirl design by dragging the tip of the knife around the pan. Cover tightly with aluminum foil and chill in the refrigerator for 45 minutes.
- Just before serving, remove the pan from the refrigerator. Use the parchment paper overhang to lift the fudge out of the pan.
- Place the fudge on a cutting board and use a sharp knife to cut into 6 slices by 6 slices. Keep refrigerated until ready to serve.