How to Make Nutty Praline Cheesecake
Picture this: it’s a rainy Saturday afternoon, the kettle is whistling, and the whole house smells like chocolate melting into a buttery batter. That’s the exact moment I first fell in love with my Zucchini Chocolate Swirl Cake – a humble, slightly mischievous dessert that somehow sneaks a veggie into a sweet treat without anyone noticing. I still remember the first time I served it to my kids; they dug in with such enthusiasm that the whole pan vanished in minutes. It’s the kind of recipe that feels like a secret handshake between busy parents and anyone craving a slice of comfort without the guilt of a whole cake. The best part? It’s ridiculously easy, budget‑friendly, and adaptable enough to keep you experimenting for years. Trust me, once you try this, you’ll be wondering how you ever lived without a chocolate‑zucchini swirl in your pantry.
What is Zucchini Chocolate Swirl Cake?
Think of Zucchini Chocolate Swirl Cake as a cross‑between a moist coffee‑cake and a fudgy brownie, with a surprise burst of garden freshness tucked inside. The name says it all: grated zucchini adds humidity and a tender crumb, while a generous ribbon of melted chocolate creates that classic swirl you see in bakery windows. The origin of the dish is a happy accident – I was trying to stretch a batch of chocolate cake batter with whatever I had on hand, and a grated zucchini from last night’s stir‑fry slipped in. The result was a cake that stayed soft for days, tasted richer than a traditional chocolate loaf, and somehow felt a little healthier. In short, it’s essentially a one‑bowl wonder that lets you enjoy indulgence and a sneak‑in of veggies in a single bite.
Why you’ll love this recipe?
What I love most about this Zucchini Chocolate Swirl Cake is how it checks every box on the “must‑have” list for home cooks. First, the flavor is a perfect marriage of deep cocoa and subtle earthiness; the chocolate provides that luxurious richness while the zucchini contributes a faint, almost buttery backdrop that keeps the crumb from drying out. Second, the simplicity is a game‑changer – you only need a handful of pantry staples, a grater, and a mixing bowl, and you’re good to go. Third, the cost‑efficiency is unbeatable; a medium zucchini and a bar of chocolate cost less than a single slice of store‑bought cake, yet the taste feels premium. Finally, the versatility is endless: serve it warm with a scoop of vanilla ice cream for a cozy dessert, slice it thin for a sweet breakfast toast, or drizzle extra glaze for a party platter. I’ve even turned it into mini cupcakes for my daughter’s birthday, and they disappeared faster than the candles on the cake. If you’ve ever wanted a dessert that feels both indulgent and smart, this is it.
How do I make Zucchini Chocolate Swirl Cake?
Quick Overview
In a nutshell, you’ll whisk together dry ingredients, blend wet components, fold in grated zucchini, swirl in a chocolate mixture, bake, and finish with a glossy glaze. The whole process takes about an hour, including prep and cooling, and the only tricky part is getting that perfect marble pattern without over‑mixing. The beauty of this method is that you can prep the batter while your coffee brews, and the cake practically bakes itself while you catch up on your favorite podcast. By the time the timer dings, you’ll have a golden‑brown loaf that’s soft enough to cut with a spoon and sweet enough to satisfy any late‑night craving.
Ingredients
For the Main Batter:
- 1 ½ cups all‑purpose flour (I like to sift it for extra fluffiness)
- ½ cup unsweetened cocoa powder (a good quality Dutch‑process gives a richer color)
- 1 tsp baking soda
- ½ tsp baking powder
- ¼ tsp sea salt
- ¾ cup granulated sugar (you can cut this to ½ cup if you prefer less sweet)
- ¼ cup brown sugar, packed (adds a subtle caramel note)
- ½ cup melted unsalted butter, cooled slightly
- 2 large eggs, room temperature
- 1 tsp vanilla extract
- ¾ cup plain Greek yogurt (or substitute with almond milk for a dairy‑free version)
- 1 medium zucchini, grated and squeezed dry (about 1 ½ cups)
For the Filling:
- ½ cup semi‑sweet chocolate chips
- 2 Tbsp heavy cream (or coconut cream for a vegan twist)
- 1 Tbsp maple syrup (optional, for extra shine)
For the Glaze:
- ¼ cup powdered sugar
- 1‑2 Tbsp milk (dairy or plant‑based, adjust for desired thickness)
- ½ tsp vanilla extract
- A pinch of sea salt (to balance the sweetness)
Step-by-Step Instructions
Step 1: Preheat & Prep Pan
Set your oven to 350°F (175°C) and let it fully preheat – this ensures even rising. While the oven warms up, grease a 9×5‑inch loaf pan with butter or spray, then line the bottom with parchment paper. The paper makes removal a breeze, especially after the glaze sets.
Step 2: Mix Dry Ingredients
In a large bowl, whisk together flour, cocoa powder, baking soda, baking powder, and sea salt. The cocoa should be fully incorporated so you don’t end up with specks of chocolate in the final crumb. I like to give the mixture a quick sift; it aerates the flour and prevents clumps.
Step 3: Mix Wet Ingredients
In a separate bowl, beat the melted butter with both sugars until the mixture looks glossy and the sugars start to dissolve. Add the eggs one at a time, whisking after each addition, then stir in vanilla and the Greek yogurt. The yogurt adds moisture and a slight tang that balances the chocolate.
Step 4: Combine
Pour the wet mixture into the dry ingredients and fold gently with a spatula. Stop as soon as you see no more streaks of flour – overmixing will make the cake dense. At this point, fold in the grated zucchini, making sure it’s evenly distributed. I always squeeze the grated zucchini in a clean kitchen towel first; too much water can make the batter soupy.
Step 5: Prepare Filling
Combine chocolate chips, heavy cream, and maple syrup in a microwave‑safe bowl. Heat in 20‑second bursts, stirring between each, until the chocolate is smooth and glossy. If you prefer a thicker swirl, let the mixture cool for a few minutes before using.
Step 6: Layer & Swirl
Pour half of the batter into the prepared loaf pan, spreading it evenly. Drop spoonfuls of the chocolate mixture over the batter, then use a knife or skewer to gently swirl the two together. Pour the remaining batter on top, repeat the chocolate drizzles, and swirl again. The key is to create a marbled effect without fully mixing the chocolate – you want ribbons, not a uniform brown loaf.
Step 7: Bake
Slide the pan into the oven and bake for 45‑55 minutes, or until a toothpick inserted into the center comes out with just a few moist crumbs. If the top starts to darken too quickly, tent it loosely with foil. Oven temperatures can vary, so start checking at the 40‑minute mark.
Step 8: Cool & Glaze
Let the cake rest in the pan for 10 minutes, then transfer it to a wire rack. While it’s still warm, whisk together powdered sugar, milk, vanilla, and a pinch of salt until smooth. Drizzle the glaze over the top, letting it cascade down the sides. The glaze sets faster on a warm cake, creating a shiny finish.
Step 9: Slice & Serve
Allow the glaze to set for about 5 minutes, then slice with a serrated knife for clean cuts. Serve warm with a dollop of whipped cream, a scoop of vanilla ice cream, or simply on its own with a cup of coffee. The cake stays moist for days, so feel free to make it ahead of time for a brunch crowd.
What to Serve It With
One of the joys of this cake is how it pairs with almost anything. Below are a few of my favorite ways to present it, depending on the occasion.
For Breakfast: Warm a slice, spread a thin layer of almond butter, and enjoy with a steaming mug of cold‑brew. The chocolate and zucchini make a surprisingly energizing start to the day.
For Brunch: Cut the cake into bite‑size cubes, arrange on a platter, and serve alongside fresh berries, a citrus mimosa, and a light rosemary‑infused tea. The glaze adds a glossy touch that looks as good as it tastes.
As Dessert: Plate a generous slice, top with a scoop of salted caramel ice cream, and sprinkle toasted hazelnuts. The contrast of hot cake and cold ice cream is pure magic.
For Cozy Snacks: Keep a few slices in a small airtight container and pair them with a glass of cold milk or a mug of hot chocolate. It’s the perfect comfort snack on a lazy Sunday.
Top Tips for Perfecting Your Zucchini Chocolate Swirl Cake
Zucchini Prep: After grating, place the zucchini in a clean kitchen towel and press firmly to remove excess moisture. Too much water can make the batter soggy, while a dry zucchini gives the cake its signature tenderness.
Mixing Advice: Use a rubber spatula for folding – it scrapes the bowl clean and prevents overmixing. Look for a batter that looks glossy but still has a few small lumps; that’s the sweet spot.
Swirl Customization: For a more dramatic marble, use a fork instead of a knife to create tighter, tighter swirls. If you love chocolate, add a second drizzle of melted chocolate after the first glaze for an extra glossy finish.
Ingredient Swaps: Want a dairy‑free version? Replace butter with coconut oil, Greek yogurt with coconut yogurt, and heavy cream with oat cream. The texture stays moist, and the flavor gets a subtle tropical twist.
Baking Tips: Position the rack in the middle of the oven for even heat. If your oven runs hot, lower the temperature to 325°F and add a few extra minutes; this prevents the edges from over‑browning while the center sets.
Glaze Variations: Swap powdered sugar for powdered maple syrup for a caramel‑like glaze, or add a dash of espresso powder for a mocha twist. Adjust the milk amount to get a pourable consistency that coats but doesn’t pool.
One lesson I learned the hard way: never skip the cooling step before glazing. If you pour glaze onto a hot cake, it will soak in and become soggy. Patience pays off – the glaze should sit on top, forming that beautiful, glossy crust we all adore.
Storing and Reheating Tips
Room Temperature: Keep the cake in a sealed container or covered with foil for up to 2 days. The glaze will stay shiny, and the crumb stays tender if you avoid direct sunlight.
Refrigerator Storage: Store slices in an airtight container with a piece of parchment paper between layers. It lasts up to 5 days; the chocolate swirl may firm up slightly, but a quick microwave for 10‑15 seconds revives the softness.
Freezer Instructions: Wrap the whole loaf tightly in plastic wrap, then a layer of aluminum foil. Freeze for up to 3 months. To thaw, move it to the fridge overnight, then let it sit at room temperature for 30 minutes before glazing or serving.
Glaze Timing Advice: If you plan to freeze, I recommend glazing after thawing. The glaze can become cloudy if frozen, but a fresh drizzle restores that glossy finish.
Frequently Asked Questions
Final Thoughts
There you have it – my beloved Zucchini Chocolate Swirl Cake, a recipe that feels like a warm hug on a plate. It’s quick enough for a weekday treat, elegant enough for a weekend brunch, and flexible enough to adapt to any dietary need you throw its way. I’ve watched my friends rave about it, my kids beg for seconds, and even my picky aunt admit it’s “the best thing she’s ever baked.” Give it a try, experiment with the glaze, and make it your own. I can’t wait to hear how your version turns out – drop a comment, share a photo, or let me know what tweaks you made. Happy baking, and enjoy every bite!
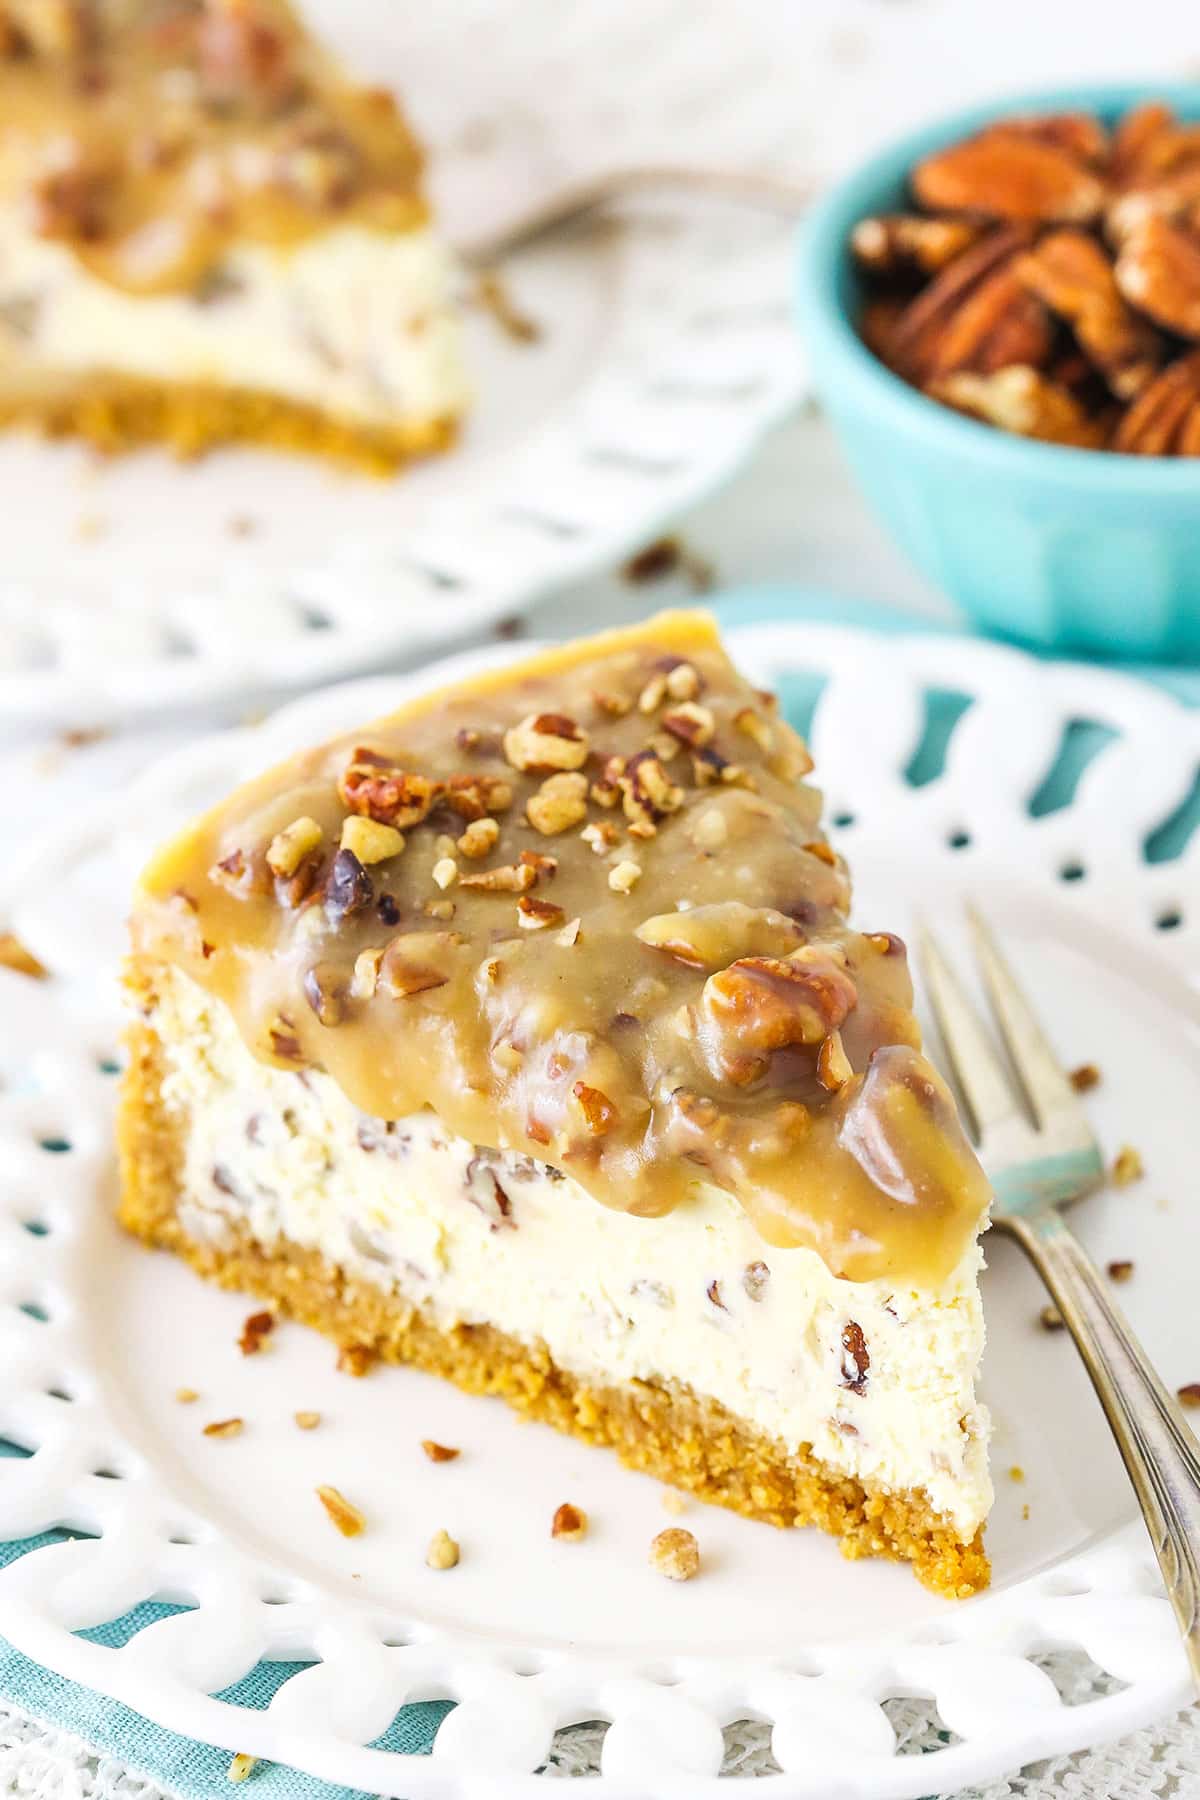
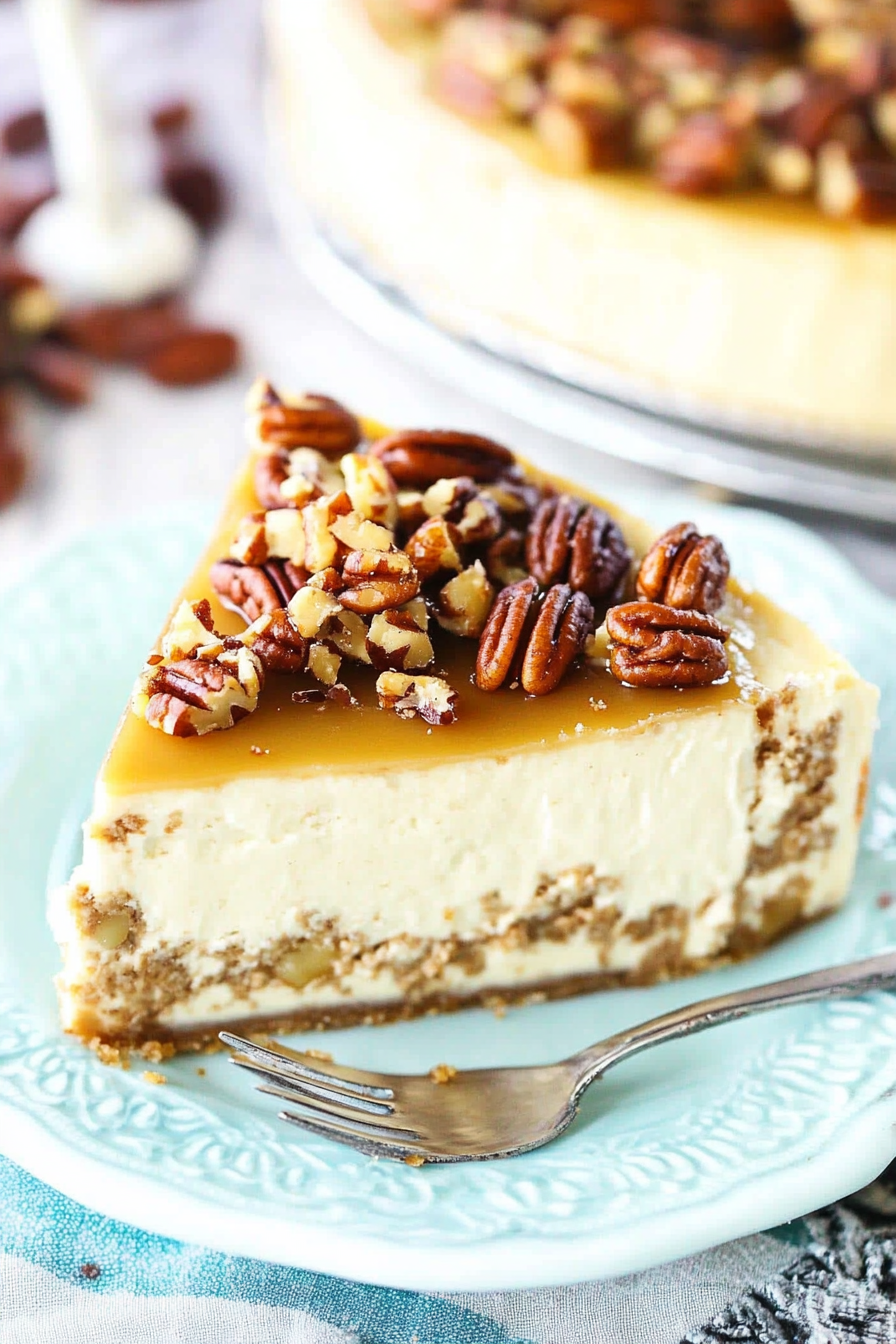
pecan praline cheesecake
Ingredients
Method
- Preheat the oven to 325°F (163°C). Line the bottom of a 9‑inch springform pan with parchment paper and grease the sides.
- Combine graham cracker crumbs, 5 tbsp brown sugar, 0.125 tsp salt, and 10 tbsp melted butter. Press the mixture evenly into the bottom and up the sides of the pan to form the crust.
- Bake the crust for 10 minutes, then set aside to cool while you prepare the filling.
- Reduce the oven temperature to 300°F (148°C). In a large bowl, beat the cream cheese, 1.25 cup light brown sugar, and 3 tbsp flour on low speed until smooth.
- Add the sour cream and 1 tbsp vanilla extract; mix until just combined. Add the eggs one at a time, mixing on low speed after each addition.
- Stir in 1 cup toasted pecans. Pour the cheesecake batter over the cooled crust.
- Place the springform pan inside a larger roasting pan. Fill the outer pan with hot water until it reaches halfway up the sides of the springform pan.
- Bake for 1 hour 15 minutes, until the center is set but still slightly jiggly. Turn off the oven, leave the door closed, and let the cheesecake cool in the oven for 30 minutes, then open the door for another 30 minutes.
- Remove the cheesecake from the water bath, cool completely, then refrigerate for at least 5 hours or overnight.
- To make the topping, combine 0.5 cup granulated sugar, 0.5 cup light brown sugar, 0.75 cup heavy cream, and 4 tbsp butter in a saucepan over medium‑low heat. Stir until the butter and sugars melt, then increase heat to medium and bring to a boil, stirring constantly until the mixture reaches 220°F (about 2 minutes).
- Remove from heat and stir in 0.75 cup toasted pecans, 0.5 tsp salt, and 1 tsp vanilla extract. Let the topping cool to room temperature, then spread evenly over the chilled cheesecake.
- Slice, serve, and enjoy! Store leftovers refrigerated.