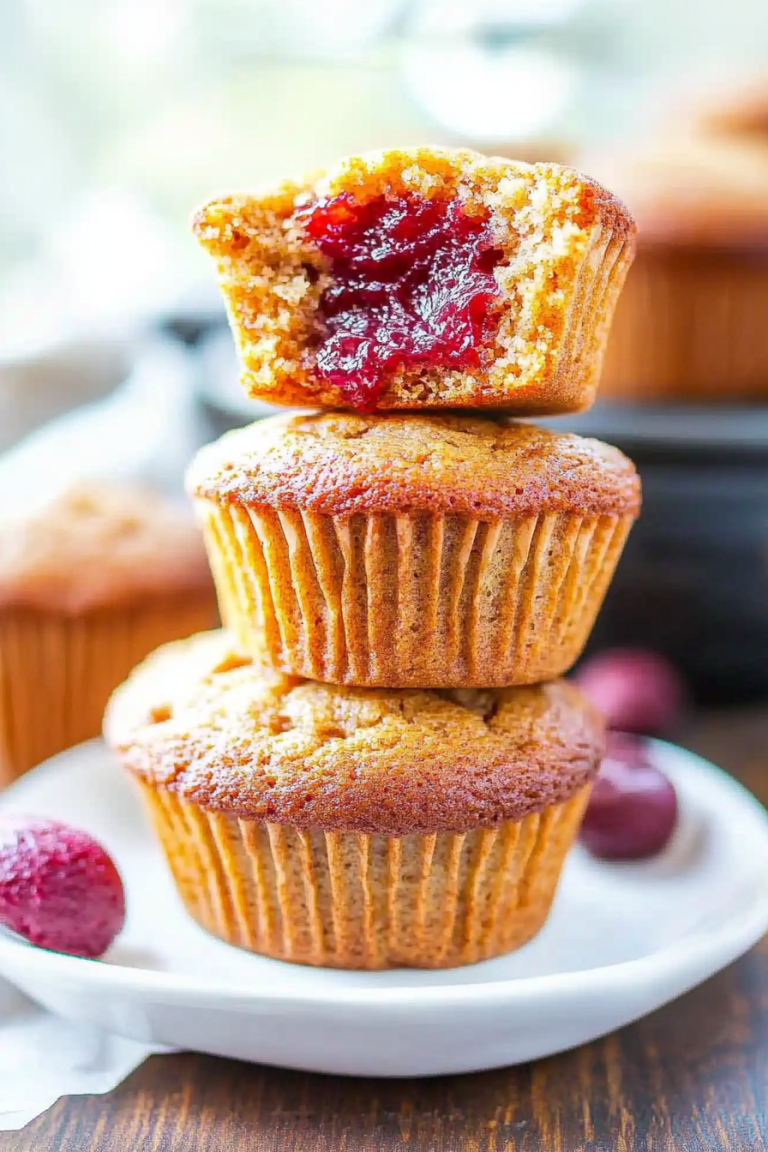
You know those recipes that just feel like a warm hug? The ones you can whip up on a whim, and they always turn out perfectly? This zucchini bread is exactly that for me. It’s the kind of thing I’ve been making for years, and it never, ever gets old. Honestly, it’s probably one of the most requested things in my house, right up there with my chocolate chip cookies (and you know how I feel about those!). I remember the first time I really perfected it; I was a little nervous because, well, zucchini in baked goods can sometimes be… well, a bit mushy if you’re not careful. But this one? It’s the polar opposite. It’s incredibly moist, bursting with flavor, and has the most delightful tender crumb. If you’ve ever been skeptical about baking with zucchini, trust me on this one. It’s honestly my secret weapon for using up those garden-variety giants when they get a little out of hand. Think of it as a delicious disguise for something healthy, but in the best way possible. It’s like a simpler, more comforting cousin to a classic banana bread, but with its own unique charm.
What is Zucchini bread?
So, what exactly *is* zucchini bread, you might ask? At its heart, it’s a quick bread that uses grated zucchini as a key ingredient. Don’t let that fool you, though – it doesn’t taste overwhelmingly like zucchini. What it *does* do is add incredible moisture to the batter, resulting in a loaf that’s unbelievably tender and stays fresh for days. It’s essentially a sweet bread, often flavored with cinnamon, nutmeg, and sometimes nuts or chocolate chips, that just happens to have a secret weapon in the form of a humble squash. The name itself is pretty straightforward, but the magic is in how that zucchini transforms the texture. It’s not a cake, though it can certainly feel decadent enough, and it’s not quite a loaf cake either. It’s in its own delicious category, perfect for any time of day. It’s the kind of treat that makes your kitchen smell absolutely divine while it’s baking, a scent that instantly signals comfort and home.
Why you’ll love this recipe?
There are so many reasons why this zucchini bread recipe has earned a permanent spot in my recipe binder, and I’m so excited for you to discover them too! First off, the flavor is just spot on. It’s warmly spiced with cinnamon and a hint of nutmeg, and when you add in some chocolate chips or walnuts (my personal favorite!), it takes things to a whole new level of delicious. The zucchini, as I mentioned, makes it unbelievably moist. Seriously, you can make this loaf one day, and it’ll still be perfectly tender and delicious two or three days later. For a recipe that’s so simple, the payoff in terms of texture and taste is huge. And speaking of simple, that’s another huge win here. It’s a one-bowl situation for the batter, and the prep is really minimal. This one’s a lifesaver on busy weeknights when you want to whip up something special without a lot of fuss, or even for a weekend treat that doesn’t require hours in the kitchen. It’s also surprisingly budget-friendly, especially if you have a garden or a friend with one! Zucchini is often abundant and inexpensive. Plus, it’s incredibly versatile. I’ve included some ideas for serving below, but honestly, it’s good just as is. It’s the perfect balance of sweet and comforting, without being overly rich. It’s one of those recipes that just makes you feel good while you’re making it and even better when you’re eating it.
How do you make Zucchini bread?
Quick Overview
Making this zucchini bread is surprisingly straightforward. You’ll start by prepping your pan and preheating your oven. Then, it’s pretty much a matter of mixing your dry ingredients in one bowl, your wet ingredients in another, and then gently combining them. The star of the show, the grated zucchini, gets mixed in right at the end. A quick swirl of your chosen add-ins, like chocolate chips or nuts, and it’s ready for the oven. The result is a beautifully golden, incredibly moist loaf that smells like heaven. It’s truly foolproof, even for beginner bakers.
Ingredients
For the Main Batter:
2 ½ cups all-purpose flour
1 teaspoon baking soda
½ teaspoon baking powder
½ teaspoon salt
1 ½ teaspoons ground cinnamon
¼ teaspoon ground nutmeg (freshly grated is even better if you have it!)
1 cup granulated sugar (you can reduce this slightly if you prefer it less sweet, but I find this amount perfect)
½ cup packed brown sugar (adds a lovely depth of flavor)
2 large eggs, at room temperature
¾ cup vegetable oil (or a neutral oil like canola; I’ve also tested this with avocado oil and it works wonderfully)
¼ cup unsweetened applesauce (this is my secret for extra moisture without making it oily!)
1 teaspoon vanilla extract
2 cups grated zucchini, excess moisture squeezed out (about 1 medium-large zucchini)
For the Filling (Optional, but highly recommended!):
1 cup chocolate chips (dark or semi-sweet are my go-tos)
OR
½ cup chopped walnuts or pecans
OR
A combination of both!
For the Glaze (Optional, but it adds a lovely touch!):
1 cup powdered sugar
2-3 tablespoons milk (or non-dairy milk like almond or oat milk)
½ teaspoon vanilla extract
Step-by-Step Instructions
Step 1: Preheat & Prep Pan
First things first, let’s get your oven fired up to 350 degrees Fahrenheit (175 degrees Celsius). This is a pretty standard baking temperature, and it ensures the bread bakes evenly without burning the outside before the inside is cooked. While the oven is doing its thing, grab a standard 9×5 inch loaf pan. You’ll want to grease it really well. I like to use butter or cooking spray, and then I dust it with a little bit of flour. This extra step makes sure your beautiful loaf doesn’t stick one bit. For extra insurance, you can also line the bottom with parchment paper, leaving a little overhang on the sides so you can easily lift it out later. That’s a trick I learned after one too many stuck loaves!
Step 2: Mix Dry Ingredients
In a large mixing bowl, whisk together the all-purpose flour, baking soda, baking powder, salt, cinnamon, and nutmeg. Give it a really good whisk for about 30 seconds. This isn’t just about mixing; it’s about aerating the flour and making sure all those leavening agents and spices are perfectly distributed. If they’re not mixed well, you can end up with pockets of baking soda or uneven flavor, and nobody wants that! You should see a nice, uniform blend of all the spices and flour. This step is super important for a light and airy texture.
Step 3: Mix Wet Ingredients
In a separate medium bowl, whisk together the granulated sugar and brown sugar. Then, add in your eggs, vegetable oil, unsweetened applesauce, and vanilla extract. Whisk everything together until it’s smooth and well combined. You want this mixture to be a lovely, uniform color with no streaks of egg yolk. The applesauce is my little secret for an extra tender crumb and supreme moistness without adding a ton of extra fat. I’ve found it makes a noticeable difference, making the bread almost foolproof.
Step 4: Combine
Now, pour the wet ingredients into the bowl with the dry ingredients. Using a spatula or a wooden spoon, gently fold them together until *just* combined. It’s really important not to overmix here. A few streaks of flour are okay; they’ll disappear when you add the zucchini. Overmixing can develop the gluten in the flour too much, which can lead to a tough, dense bread. We’re going for tender and moist, remember? So, gentle is the name of the game.
Step 5: Prepare Filling
If you’re adding chocolate chips or nuts, now’s the time to get them ready. Give them a quick toss with a tablespoon of the flour from your dry ingredient mix. This little step helps prevent them from sinking all the way to the bottom of the loaf during baking, keeping them nicely distributed throughout. I love using a mix of dark chocolate chips and toasted walnuts for the perfect balance of sweet and crunchy. It really elevates the whole experience!
Step 6: Layer & Swirl
Now for the star ingredient: the grated zucchini! Gently fold the grated zucchini into the batter. Make sure you’ve squeezed out as much excess moisture as possible before adding it; this is crucial for texture. Once the zucchini is incorporated, if you’re using chocolate chips or nuts, gently fold them in. If you want a more marbled effect, you can reserve about a third of the batter, gently fold the chips/nuts into the remaining two-thirds, then layer the plain batter over the top, and gently swirl it with a knife or skewer. It’s purely for aesthetics, but it looks so pretty when you slice into it!
Step 7: Bake
Pour the batter evenly into your prepared loaf pan. Smooth the top with your spatula. Now, pop it into your preheated oven. Bake for about 55-65 minutes. How long it takes can vary a bit depending on your oven, so it’s important to check for doneness. You’ll know it’s ready when a wooden skewer or toothpick inserted into the center comes out clean, with maybe just a few moist crumbs attached, but no wet batter. If the top starts browning too quickly before the inside is cooked, you can loosely tent it with aluminum foil for the last 15-20 minutes. I usually start checking around the 50-minute mark, just to be safe!
Step 8: Cool & Glaze
Once it’s baked to perfection, take the loaf pan out of the oven. Let the zucchini bread cool in the pan for about 10-15 minutes. This initial cooling period allows it to set up a bit, making it easier to remove without falling apart. After that, carefully invert the pan onto a wire rack to release the loaf. Let it cool completely on the wire rack before you even think about glazing it. If you try to glaze a warm loaf, the glaze will just melt and slide right off. For the glaze, whisk together the powdered sugar, milk, and vanilla extract until you have a smooth, drizzly consistency. Add the milk a tablespoon at a time until you get it just right. Once the bread is totally cool, drizzle the glaze all over the top. It hardens slightly as it sits, giving it a lovely finish.
Step 9: Slice & Serve
Once the glaze has set (or if you skipped the glaze!), it’s time to slice this beauty. Use a sharp serrated knife for the cleanest cuts. I like to serve it at room temperature. It’s perfect just as is, but it’s also divine with a little smear of butter. The way the glaze cracks just slightly when you slice into it is so satisfying. This is where all that hard work (which wasn’t really that hard, was it?) pays off. The moist crumb, the warm spices, the hint of sweetness – it’s pure bliss in every bite. It’s honestly perfect for a mid-morning snack, an afternoon pick-me-up, or even a light dessert.
What to Serve It With
This zucchini bread is honestly so good on its own, but it’s also wonderful when paired with other things! For a simple
For Breakfast:
breakfast treat, I love a slice with my morning coffee. It’s not too sweet, so it’s a lovely way to start the day. Sometimes, I’ll just have a piece with a glass of cold milk – that’s a classic for a reason, right? It’s a quick and easy breakfast when you’re running out the door, or a nice comforting bite on a lazy weekend morning.
For a slightly more elegant
For Brunch:
brunch, I like to serve it on a pretty platter with a side of fresh fruit salad. The bright flavors of the fruit complement the warm spices of the bread beautifully. You could also pair it with a dollop of Greek yogurt or a light cream cheese frosting if you’re feeling a bit fancy. It’s a crowd-pleaser that feels a little special without being complicated.
As a
As Dessert:
dessert, it’s surprisingly satisfying. A warm slice, perhaps with a little scoop of vanilla bean ice cream melting into it, is pure indulgence. It’s also lovely after dinner with a cup of herbal tea. It hits that sweet craving without being heavy like a rich chocolate cake might be.
And for those
For Cozy Snacks:
cozy snack times when you just need something comforting, this bread is your best friend. I’ll often cut a thick slice and enjoy it with a warm cup of apple cider or hot chocolate. It’s the ultimate comfort food, perfect for curling up on the couch with a good book or while watching a movie. My kids ask for this all the time when they’re looking for a little something sweet after school, and I’m always happy to oblige because I know it’s made with good ingredients!
Top Tips for Perfecting Your Zucchini Bread
I’ve made this zucchini bread more times than I can count, and through those countless loaves, I’ve picked up a few tricks that I think make all the difference. So, listen up, because these are the little nuggets of wisdom that will take your zucchini bread from good to absolutely spectacular!
Zucchini Prep: This is probably the most important step! You absolutely MUST squeeze out as much moisture as possible from your grated zucchini. If you don’t, you’ll end up with a soggy, dense loaf. I usually grate my zucchini (using the large holes on a box grater), then dump it into a clean kitchen towel or cheesecloth. Then, I twist it up tight and squeeze, squeeze, squeeze! You’ll be amazed at how much liquid comes out. Grate the zucchini just before you need it to prevent it from oxidizing and turning brown. It should look like pale green shreds, not wet mush.
Mixing Advice: Remember what I said about not overmixing? It bears repeating! Gently fold the wet and dry ingredients together until *just* combined. A few small lumps of flour are perfectly fine. It’s better to have a slightly streaky batter than a tough loaf. Once you add the zucchini, fold it in gently until it’s evenly distributed. The batter will be thick, but it shouldn’t be stiff. It’s a delicate balance!
Swirl Customization: If you’re adding chocolate chips or nuts, I mentioned tossing them with a little flour to prevent sinking. But if you want that beautiful marbled look, here’s how: divide your batter into two bowls. Fold your mix-ins into one bowl. Then, dollop spoonfuls of both batters alternately into your prepared loaf pan. Once it’s all in, take a butter knife or a skewer and gently swirl the batters together in a figure-eight motion. Don’t over-swirl, or you’ll lose the definition!
Ingredient Swaps: I’ve experimented quite a bit! For a dairy-free version, you can easily swap the milk in the glaze for almond or oat milk. I’ve also had success using a mix of whole wheat and all-purpose flour (try 1 ½ cups AP and 1 cup whole wheat) for a heartier loaf, though it might be slightly denser. For the oil, melted coconut oil works, but it can impart a slight coconut flavor, which might or might not be what you want. I tested this with almond milk instead of regular milk in the glaze once, and it was actually even creamier! For the sugars, you can reduce the granulated sugar by a quarter cup if you prefer something less sweet, but I find this amount is perfect for that classic sweet bread flavor.
Baking Tips: Always use the middle rack in your oven for even heat distribution. If you find your oven tends to run hot, consider lowering the temperature by 25 degrees and baking for a few extra minutes. The toothpick test is your best friend here. Don’t just poke it once; try a few different spots in the center of the loaf. If it comes out clean or with just a few moist crumbs, it’s done. If it comes out with wet batter, it needs more time.
Glaze Variations: The simple powdered sugar glaze is lovely, but you can get creative! For a citrusy zing, add a teaspoon of lemon or orange zest to the glaze. For a richer flavor, use cream cheese mixed with a little milk and powdered sugar. You can also skip the glaze altogether and just dust the cooled loaf with a bit of powdered sugar or cocoa powder for a different look. The key is letting the bread cool completely first!
Storing and Reheating Tips
The best part about this zucchini bread is how well it keeps! Because of the moisture from the zucchini and the applesauce, it stays wonderfully fresh for several days.
Room Temperature: Once completely cooled, I like to store the loaf either in an airtight container or wrapped tightly in plastic wrap. At room temperature, it should stay fresh and delicious for about 3-4 days. The flavors actually seem to meld and deepen a bit overnight, so the second day is often even better!
Refrigerator Storage: If you live in a very warm or humid climate, or if you simply want it to last a little longer, you can store it in the refrigerator. Wrap it tightly in plastic wrap and then place it in an airtight container. It will keep well for about a week. Just a heads-up, though, refrigeration can sometimes make baked goods a little firmer, so you might want to warm a slice before enjoying it (more on that below!).
Freezer Instructions: This is a fantastic recipe for making ahead and freezing. Once the loaf is completely cooled and glazed (or unglazed, if you prefer to glaze after thawing), wrap it very tightly in plastic wrap, then in a layer of aluminum foil. You can also place the wrapped loaf in a freezer-safe bag for extra protection. It should keep beautifully in the freezer for up to 3 months. To thaw, simply unwrap it and let it come to room temperature on a wire rack. This usually takes a few hours. If you froze it unglazed, you can add the glaze once it’s thawed.
Glaze Timing Advice: If you plan to freeze the bread, I highly recommend glazing it *after* it has thawed. The glaze can sometimes get a little sticky or weird in the freezer. If you’re just storing it at room temperature or in the fridge for a few days, you can glaze it right away. If you do freeze a glazed loaf, the glaze should mostly be intact, but it’s just something to be aware of. If you’re storing it at room temperature and it’s getting close to day 3, adding a fresh drizzle of glaze can perk it right up!
Frequently Asked Questions
Final Thoughts
So there you have it – my absolute favorite zucchini bread recipe. It’s more than just a recipe to me; it’s a source of comfort, a reliable go-to, and a little bit of magic in the kitchen. The way it stays moist for days, the subtle warmth from the spices, and the sheer ease of making it make it a winner in my book, every single time. If you’re looking for a treat that’s both wholesome and wonderfully indulgent, this is it. It’s perfect for using up those summer zucchini hauls, or for simply satisfying a sweet craving with something homemade and delicious. I really hope you give this a try. I’m genuinely excited for you to experience how incredible this zucchini bread turns out. If you love this, you might also enjoy my recipe for {{< a href=”/blog/my-perfect-banana-bread-recipe” >}}Perfect Banana Bread{{}} or my {{< a href=”/blog/easy-apple-crumble-recipe” >}}Easy Apple Crumble{{}} – they have that same cozy, comforting vibe!
I can’t wait to hear how yours turns out! Please leave a comment below and tell me what you think, or share your favorite variations. Happy baking, everyone!
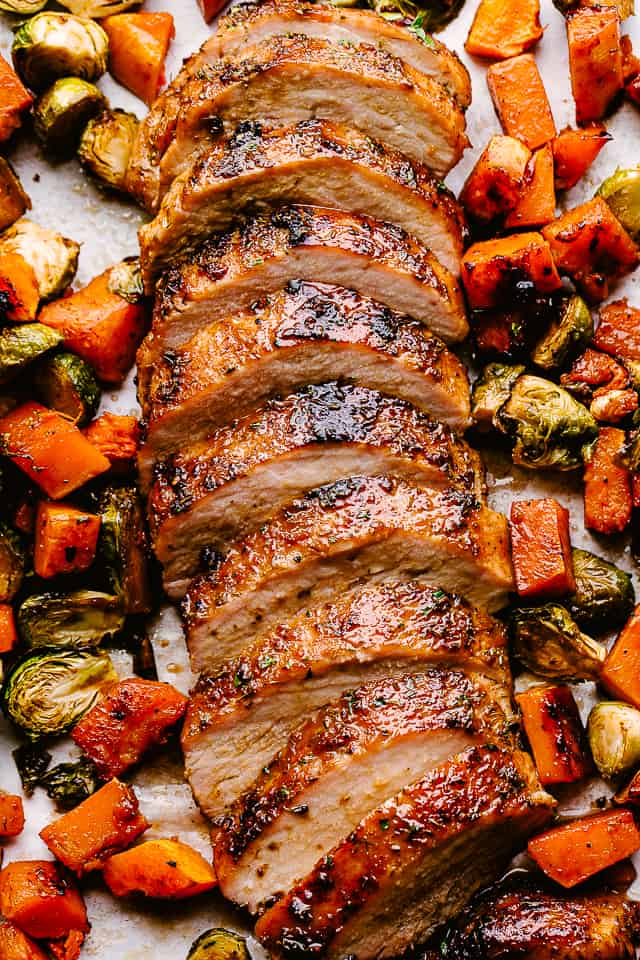
pork loin roast recipe
Ingredients
Method
- Preheat oven to 375˚F. Line a rimmed baking sheet with aluminum foil or parchment paper and set aside. Pat dry pork loin with paper towels.
- In a small mixing bowl combine paprika, garlic powder, onion powder, thyme, rosemary, salt and pepper.
- Lightly spray pork loin with cooking spray. This will make it easier for the spice mix to stick.
- Take the spice mix and rub it all over the pork loin.
- Heat olive oil over medium heat and sear the pork loin until browned on all sides; about 3 to 5 minutes per side. Transfer pork loin to previously prepared baking sheet, fat-layer side up; set aside.
- In a bowl, combine garlic, honey, soy sauce, mustard and oil; whisk until well combined. If too thick, add a bit more oil or soy sauce. Reserve 2 tablespoons of the sauce to use for the vegetables.
- Brush remaining honey mixture over the pork loin. Roast for 25 minutes.
- In the meantime, toss the vegetables with a tablespoon of olive oil and the reserved honey mixture. Pull pork roast out of the oven and add the vegetables all around it in one layer.
- Tent a piece of foil over the pork so the top doesn't burn, but the inside continues to cook. Put back in the oven and continue to cook for 25 to 30 more minutes, or until internal temperature of the pork loin reaches 145˚F. Use an Instant Read Thermometer to check for doneness. Stir vegetables half way through cooking.
- Remove baking sheet from oven and loosely cover meat and veggies with foil; let rest 10 minutes. Cut the pork in slices and serve with veggies.