You know those recipes that just feel like a warm hug? The ones that smell like childhood and make your kitchen feel instantly cozy? This zucchini bread is exactly that for me. It’s not just any zucchini bread, though. My family calls it the “secret ingredient” zucchini bread because there’s something about it that makes it utterly irresistible, and honestly, it’s mostly just how I prepare the zucchini! It’s incredibly moist, perfectly spiced, and that little hint of sweetness? Divine. I’ve tried a lot of zucchini bread recipes over the years, and while many are good, this one has a special place in my heart – and my recipe box. It’s the kind of treat that disappears in minutes, whether it’s for a lazy weekend breakfast or a quick after-school snack. If you’ve ever felt intimidated by baking with vegetables, trust me, this recipe will change your mind completely. It’s surprisingly simple, and the results are always, always phenomenal.
What is the secret ingredient of Zucchini bread?
So, what’s the big secret? Well, it’s not exactly a *secret* secret, but it’s a technique that truly elevates this humble loaf. Think of it as a super-moist, ridiculously flavorful quick bread that just happens to have zucchini in it. The zucchini itself is the star, not because you taste it overtly, but because it lends this incredible tenderness and moisture to the crumb that you just can’t achieve with other ingredients. It’s essentially a classic quick bread batter infused with grated zucchini, warm spices, and a touch of sweetness, then baked to golden perfection. It’s not dense or heavy like some quick breads can be; instead, it’s light, airy, and incredibly satisfying. It’s the kind of thing you can whip up without much fuss, and it always feels like a special treat, even on a Tuesday afternoon. It’s the opposite of a complicated cake, but delivers just as much joy.
Why you’ll love this recipe?
Honestly, where do I even begin? This zucchini bread is a lifesaver for so many reasons. First off, the flavor is just out of this world. It’s perfectly spiced with cinnamon and nutmeg, but it’s the subtle sweetness that comes through that’s so addictive. It’s not cloyingly sweet, just perfectly balanced. And the texture? Oh, the texture! It’s unbelievably moist and tender, thanks to that magical zucchini. I’ve tried baking it with other vegetables, like carrots or pumpkin, but zucchini just gives it that unparalleled soft crumb that stays that way for days. That’s what I love most about this recipe – its staying power. It doesn’t dry out quickly like some baked goods. Plus, it’s ridiculously easy to make. Seriously, if you can stir things together, you can make this bread. No fancy equipment needed. And it’s so budget-friendly! Using up those extra zucchinis from the garden or from a good sale at the grocery store feels so rewarding. It’s also incredibly versatile. While I adore it plain, it’s also fantastic with a handful of chocolate chips folded in, or even a swirl of cream cheese or a nutty streusel topping. It’s a fantastic way to sneak in some veggies without anyone even noticing, which is always a win in my book, especially with my picky eaters!
How do you make Zucchini bread?
Quick Overview
The magic of this zucchini bread lies in its simplicity and the way the zucchini melts into the batter, creating an unbelievably tender crumb. You’ll start by prepping your zucchini and then combine your dry ingredients before creaming your wet ingredients together. The key is to gently fold the two together, then pour into your prepared pan and bake until golden. It’s a straightforward process that yields spectacular results every single time. It’s really one of those dump-and-stir kind of recipes that feels effortless.
Ingredients
For the Main Batter:
We’re talking simple pantry staples here, folks!
- 2 cups all-purpose flour
- 1 teaspoon baking soda
- 1/2 teaspoon baking powder
- 1 teaspoon ground cinnamon
- 1/2 teaspoon ground nutmeg
- 1/4 teaspoon ground cloves (optional, but adds a lovely warmth!)
- 1/2 teaspoon salt
- 1 cup granulated sugar (you can reduce this slightly if you prefer, but I find this is perfect for sweetness and texture)
- 1/2 cup unsalted butter, softened (or a good quality vegetable oil, like canola or grapeseed)
- 2 large eggs, at room temperature
- 1 teaspoon vanilla extract
- 1 1/2 cups grated zucchini (this is key! See my tips below for the best way to prep it)
Make sure your eggs are at room temperature; they incorporate much better into the batter that way. Softened butter is also crucial for that light, fluffy texture.
For the Filling (Optional, but oh-so-good!):
This is where you can really have some fun and add extra deliciousness.
- 1/2 cup chopped walnuts or pecans (optional)
- 1/2 cup chocolate chips (semi-sweet or dark are my faves!)
- 1 tablespoon granulated sugar
- 1 teaspoon ground cinnamon
If you’re adding chocolate chips or nuts, make sure they are relatively dry so they don’t sink to the bottom. A little toss with a tablespoon of flour helps!
For the Glaze (Highly Recommended!):
This glaze takes it from delicious to absolutely divine.
- 1 cup powdered sugar
- 2-3 tablespoons milk (or buttermilk for extra tang)
- 1/4 teaspoon vanilla extract
You can also add a pinch of cinnamon to the glaze for an extra kick. The consistency is key here – you want it pourable but not too thin!
Step-by-Step Instructions
Step 1: Preheat & Prep Pan
First things first, get your oven preheating to 350°F (175°C). Then, grab a 9×5 inch loaf pan. I like to grease it really well with butter or non-stick cooking spray, and then dust it with a little flour. This ensures the bread pops out cleanly every single time. You can also line it with parchment paper, leaving an overhang on the sides – that makes lifting the bread out super easy later!
Step 2: Mix Dry Ingredients
In a large bowl, whisk together the flour, baking soda, baking powder, cinnamon, nutmeg, cloves (if using), and salt. Give it a good whisk to make sure everything is evenly distributed. This is important because it helps the leavening agents work uniformly, leading to an even rise. No one wants a sunken middle!
Step 3: Mix Wet Ingredients
In a separate medium bowl, cream together the softened butter (or oil) and granulated sugar until light and fluffy. If you’re using butter, this usually takes about 2-3 minutes with an electric mixer. Beat in the eggs one at a time, making sure each is fully incorporated before adding the next. Then, stir in the vanilla extract.
Step 4: Combine
Now, it’s time to bring the wet and dry ingredients together. Add about half of the dry ingredients to the wet ingredients and mix on low speed (or stir gently with a spatula) until just combined. Then, add the grated zucchini and mix again until it’s just incorporated. Finally, add the remaining dry ingredients and mix *just* until no streaks of flour remain. This is where you need to be careful not to overmix! Overmixing develops the gluten in the flour, which can make your quick bread tough and dense. A few little lumps are totally fine. Remember, we’re going for tender, not chewy.
Step 5: Prepare Filling
If you’re adding any of those delicious fillings, now’s the time to gently fold them into the batter. Think chocolate chips, nuts, or even a sprinkle of extra cinnamon and sugar. I usually just do a gentle fold with a spatula until they’re evenly distributed. Don’t overdo it!
Step 6: Layer & Swirl
Pour about half of the batter into your prepared loaf pan and spread it evenly. If you’re using a streusel or cream cheese swirl, you’d add a layer here. For simple chocolate chip or nut versions, just pour the rest of the batter on top and spread it to the edges. If you want to do a swirl, dollop spoonfuls of the filling over the batter and use a knife or skewer to gently swirl it through. This creates beautiful pockets of flavor.
Step 7: Bake
Bake in your preheated oven for 50-65 minutes. The exact time will depend on your oven, of course. You’ll know it’s done when a wooden skewer or toothpick inserted into the center comes out clean or with just a few moist crumbs attached. If the top starts to brown too quickly, you can loosely tent it with aluminum foil.
Step 8: Cool & Glaze
Once baked, let the bread cool in the pan for about 10-15 minutes. This allows it to firm up a bit. Then, carefully turn it out onto a wire rack to cool completely. This is super important – you *must* let it cool completely before glazing, otherwise, the glaze will just melt off. While it’s cooling, whisk together the powdered sugar, milk (start with 2 tablespoons and add more if needed), and vanilla extract until you have a smooth, pourable glaze. Drizzle it all over the cooled bread. It’s like the cherry on top!
Step 9: Slice & Serve
Once the glaze has set a bit, slice it up and enjoy! I find the best way to slice it is with a serrated knife for clean cuts. This bread is fantastic served at room temperature, maybe with a nice cup of coffee or tea. It’s also quite lovely slightly warm.
What to Serve It With
This zucchini bread is so wonderfully versatile, it truly fits into any part of your day. For a quick and satisfying breakfast, I love to have a thick slice with my morning coffee. The spices and sweetness are the perfect wake-up call. Sometimes, I’ll even warm a slice slightly and spread a thin layer of butter on it – pure bliss! For a more leisurely brunch spread, it’s a fantastic addition. Serve it alongside some fresh fruit salad, yogurt parfaits, or even some crispy bacon. It adds a lovely touch of sweetness and homemade goodness that guests always rave about. As a dessert, it’s a winner too. I love serving a slice with a scoop of vanilla bean ice cream or a dollop of whipped cream. The contrast between the warm bread and cold ice cream is heavenly. And for those moments when you just need a comforting snack, this bread is your best friend. It’s perfect with a glass of cold milk or a warm cup of tea. My kids always ask for seconds when they have this after school, especially if I’ve added chocolate chips!
Top Tips for Perfecting Your “Secret Ingredient” Zucchini Bread
I’ve made this countless times, and over the years, I’ve picked up a few tricks that make it even better. Here are my top tips to ensure your loaf is absolutely perfect every single time.
Zucchini Prep: This is arguably the most crucial step for achieving that incredible moisture without a soggy loaf. You need to grate your zucchini – I prefer a medium grate. The absolute most important thing is to squeeze out as much excess moisture as possible. After grating, place the zucchini in a fine-mesh sieve or wrap it in a clean kitchen towel or cheesecloth and wring it out thoroughly. Seriously, get as much liquid out as you can! This prevents the bread from becoming heavy or waterlogged. I’ve skipped this step before and learned my lesson – the texture just wasn’t the same. A well-drained zucchini is key to a tender crumb.
Mixing Advice: As I mentioned, don’t overmix! This is a quick bread, and the less you handle the batter once the flour is added, the more tender your final product will be. Mix until the ingredients are *just* combined. A few small lumps are totally fine and actually preferable to a tough loaf. I always use a spatula for the final fold to ensure I’m not overworking it.
Swirl Customization: If you’re adding a swirl (like cinnamon sugar or even a thin layer of cream cheese frosting), don’t go overboard. Too much filling can make the bread heavy or cause it to cook unevenly. A thin, even layer is usually best. For a cinnamon-sugar swirl, mix about 1/4 cup sugar with 1 teaspoon cinnamon and sprinkle it over the first layer of batter before adding the second half. Gently swirl with a knife.
Ingredient Swaps: While this recipe is fantastic as is, I’ve experimented a bit. For a slightly healthier twist, you can substitute half of the all-purpose flour with whole wheat flour. It will make the bread a bit denser, but still delicious. I’ve also tried using buttermilk instead of regular milk in the glaze, and it adds a lovely tangy counterpoint to the sweetness. For oil instead of butter, I find a neutral-flavored oil like grapeseed or canola works best for the batter. It actually makes it even moister!
Baking Tips: Always know your oven! If you find your oven tends to run hot, you might need to slightly reduce the baking time or tent the bread with foil a bit earlier. A digital oven thermometer is a fantastic investment for home bakers. Ensure your loaf pan is in the center of the oven for even heat distribution. Doneness testing is key: a clean toothpick is your best friend here. If it comes out with wet batter, it needs more time. If it comes out perfectly clean, it’s done!
Glaze Variations: The basic vanilla glaze is amazing, but feel free to experiment. A touch of lemon zest or orange zest in the glaze adds a lovely brightness. You can also add a tiny bit of espresso powder for a mocha note, or even a swirl of cocoa powder. The key is to get the consistency right – it should be thick enough to coat the bread but thin enough to drizzle easily. If it’s too thick, add milk a teaspoon at a time. If it’s too thin, add more powdered sugar.
Storing and Reheating Tips
One of the best things about this zucchini bread is how well it keeps. I’ve found that it actually improves in flavor after a day or two! Here’s how I store it to maintain that perfect moisture:
Room Temperature: Once the bread is completely cooled and the glaze has set, I store it in an airtight container at room temperature. It stays wonderfully moist and delicious for about 3-4 days. If I’m in a hurry and don’t have a container, I’ll wrap the loaf tightly in plastic wrap, then in aluminum foil. This is great for keeping it fresh for a few days.
Refrigerator Storage: If you live in a very warm climate or just want it to last a bit longer, you can store it in the refrigerator. Make sure it’s in a well-sealed container. It will last about a week this way, though the texture might become slightly firmer. To refresh it, you can gently warm a slice.
Freezer Instructions: This bread freezes beautifully! Once completely cooled, I wrap the entire loaf or individual slices very tightly in plastic wrap, then in aluminum foil, and finally, I place it in a freezer-safe bag. It can be stored in the freezer for up to 3 months. To thaw, I usually take it out of the freezer and let it thaw at room temperature overnight. If you’re freezing slices, you can even pop a frozen slice directly into the toaster or a warm oven for a few minutes.
Glaze Timing Advice: If you plan to freeze the bread, I highly recommend glazing it *after* thawing. The glaze can sometimes become a little sticky or weepy in the freezer. So, bake, cool, wrap and freeze. Then, thaw completely, and *then* make and apply the glaze. This ensures a beautiful finish.
Frequently Asked Questions
Final Thoughts
Honestly, this zucchini bread is more than just a recipe to me; it’s a little piece of home. It’s the scent that fills my kitchen on a rainy afternoon, the treat that makes my kids’ eyes light up, and the go-to for unexpected guests. The way the zucchini transforms into this impossibly moist crumb is just magical, and that subtle hint of spice and sweetness? Perfection. If you’ve never baked with zucchini before, please, please give this a try. It’s so approachable and the reward is immense. It’s a true testament to how simple, fresh ingredients can create something truly spectacular. I hope it becomes a beloved staple in your home too!
If you love this recipe, you might also enjoy my Banana Nut Bread or my Apple Cinnamon Scones! They have that same cozy, homemade feel.
I can’t wait to hear what you think! Please leave a comment below and let me know how your “Secret Ingredient” Zucchini Bread turned out. Did you add chocolate chips? What did your family think? I love seeing your creations and hearing your stories! Happy baking!
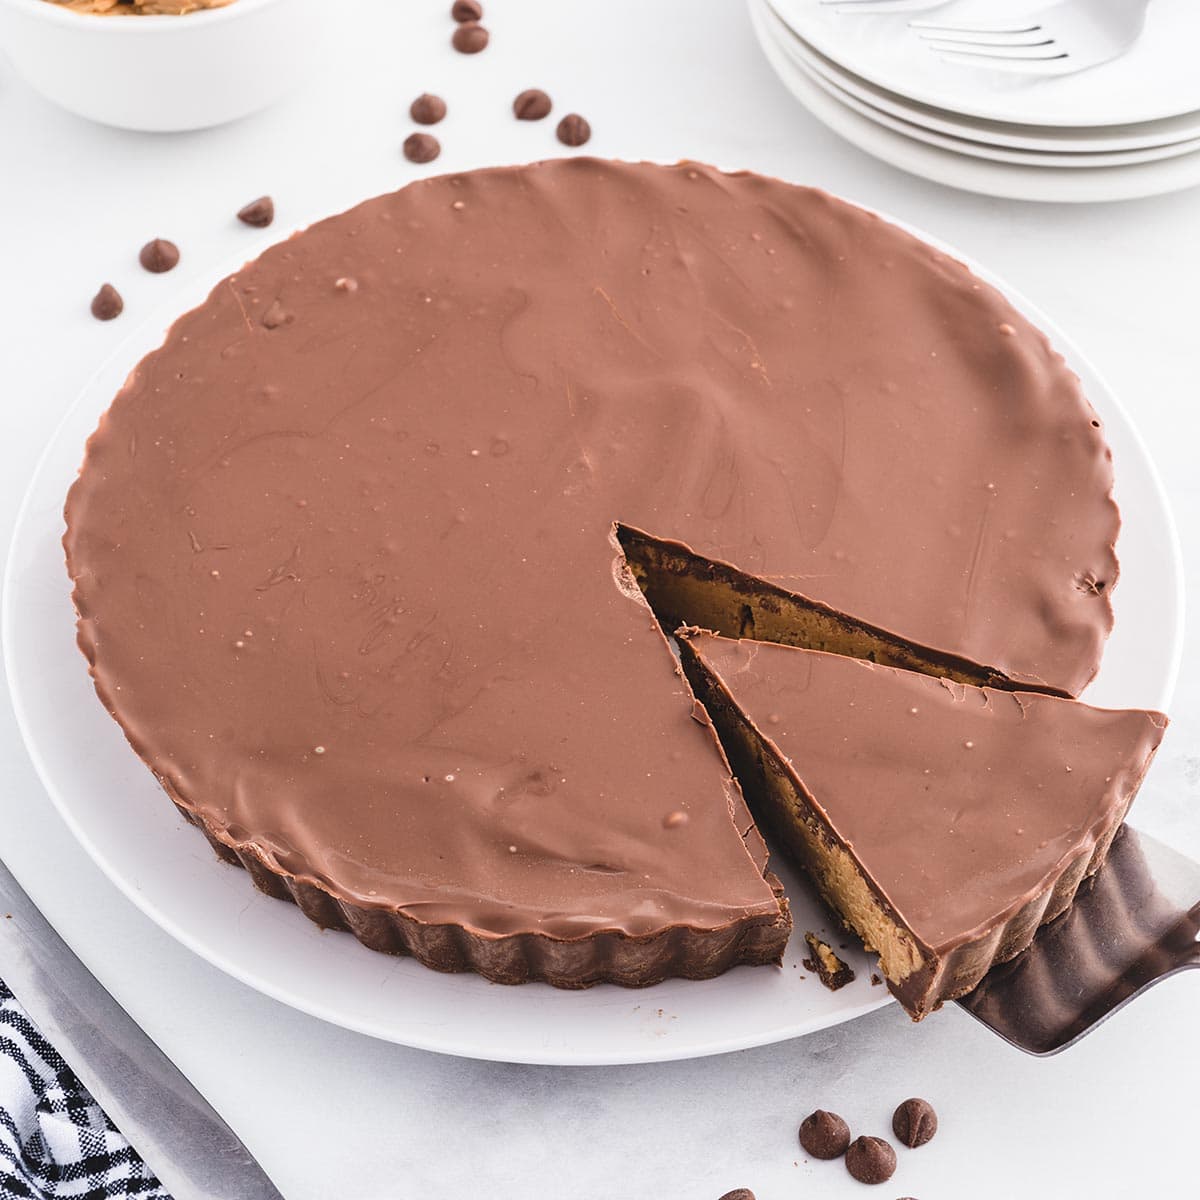
Reese's peanut butter pie
Ingredients
Method
- Line the bottom circle of a 9-inch fluted tart pan with a circle of parchment paper. Lightly spray the parchment circle with nonstick spray. Set it aside.
- Using a medium-size heat-safe mixing bowl, combine the chocolate chips and vegetable oil. Heat the chips and oil for 45 - 55 seconds in the microwave. Stir until the chocolate chips are completely melted and smooth.
- Spoon 0.5 of the melted chocolate into the prepared tart pan. Using a large spoon or offset spatula, evenly spread the chocolate over the bottom and up the sides of the tart pan. Chill the coated tart pan in the refrigerator while preparing the chunky peanut butter filling.
- Using a large mixing bowl, whisk together the powdered sugar and graham cracker crumbs. Set it aside.
- Using a medium-size heat-safe mixing bowl, add the chunky peanut butter and the butter. Heat in the microwave for 45 seconds. Remove the bowl and stir to thoroughly combine.
- Pour the chunky peanut butter mixture over the powdered sugar and graham cracker crumbs. Stir until the mixture is completely incorporated.
- Remove the chocolate-coated tart pan from the refrigerator. Using either a silicone spatula or an offset spatula, spread the chunky peanut butter mixture into the bottom of the coated tart pan. Be sure the chunky peanut butter mixture is smooth and even.
- Spoon the remaining melted chocolate mixture on top of the chunky peanut butter layer. Use the spoon or an offset spatula to evenly smooth the chocolate all the way to the sides.
- Once the remaining chocolate has been spread, gently tap the tart pan to ensure the chocolate settles. Chill in the refrigerator for 4 hours to overnight.
- When you are ready to serve, remove the tart pan from the refrigerator. To remove the peanut butter cup from the tart pan, center the pan over a small mixing bowl and apply slight pressure to the edge of the tart pan to encourage the sides to come away. Have a serving platter or 10-inch cake circle ready to place the peanut butter cup pie on.
- Gently flip the pie upside down to remove the removable tart pan bottom, and carefully peel off the parchment circle. Place the serving plate or cake circle over the bottom of the pie and flip the pie back over.
- Slice into wedges and serve.