You know those recipes that just feel like a warm hug? The ones you can whip up on a whim, that fill your kitchen with the most incredible aroma, and that disappear the second they hit the cooling rack? This zucchini bread is *that* recipe for me. It’s honestly one of my absolute favorites, and I’ve been making it for years. It’s not just about the incredible flavor, though that’s definitely a huge part of it. It’s about the memories too – baking it with my kids when they were little, bringing it to potlucks where it’s always the first to go, or just having a slice with my morning coffee when I need a little pick-me-up. If you’ve ever tried a store-bought version and found it a bit… meh, then trust me, this homemade zucchini bread is a game-changer. It’s so much better than any boxed mix, and honestly, it’s not even that hard to make. It’s got that perfect balance of moistness, sweetness, and a hint of spice that just makes you want another slice. It’s truly the ultimate comfort food, and I’m so excited to share my go-to recipe with you!
What is the best Zucchini bread?
So, what exactly *is* this zucchini bread I’m always raving about? Think of it as your classic quick bread, but taken to a whole new level. It’s not a cake, but it’s definitely dessert-worthy. The star ingredient, of course, is zucchini, but don’t let that fool you! It doesn’t taste *like* zucchini at all. Instead, it adds this incredible moisture and tenderness that’s just divine. I always tell people it’s like a secret ingredient for making baked goods extra delicious. It’s essentially a simple batter that comes together in one bowl (mostly!), gets swirled with a cinnamon-sugar mixture, and then baked until golden and fragrant. The name “ultimate” isn’t just for show; it’s because I’ve tinkered with it over the years, tried all sorts of little tweaks, and landed on this version that I truly believe is perfect. It’s my definition of foolproof, delicious, and just plain happy baking.
Why you’ll love this recipe?
Okay, let me count the ways! First off, the FLAVOR. Oh my goodness, the flavor. You get this wonderfully moist, tender crumb that’s perfectly spiced with cinnamon and a hint of nutmeg. The swirl is like a little ribbon of pure joy running through it, adding pockets of extra sweetness and cinnamon goodness. It’s not overly sweet, which I really appreciate, so you can enjoy it any time of day. And speaking of any time of day, that brings me to its SIMPLICITY. Honestly, this is a lifesaver on busy weeknights when you need a sweet treat but don’t have hours to spend in the kitchen. Most of the ingredients are pantry staples, and it comes together really quickly. Plus, it’s incredibly COST-EFFECTIVE! Zucchini is usually pretty affordable, and the other ingredients are all common baking staples. I’ve tested this with everything from store-brand flour to fancy organic nuts, and it always turns out wonderfully. What I love most about this recipe, though, is its VERSATILITY. It’s perfect for breakfast, a mid-afternoon snack, or even a light dessert. You can easily add chocolate chips, nuts, or even a cream cheese swirl if you’re feeling fancy. It’s also a fantastic way to use up that surplus zucchini from your garden (or your neighbor’s!). Compared to other quick breads, like banana bread (which I also love, by the way!), this zucchini bread has a lighter texture and a more delicate flavor profile that just sings. It’s the kind of recipe that makes you feel like a baking pro, even if you’re a total beginner.
How do I make Zucchini bread?
Quick Overview
The beauty of this zucchini bread lies in its straightforward approach. You’ll basically mix your dry ingredients, whisk your wet ingredients, then combine them gently. While that’s happening, you’ll whip up a quick cinnamon-sugar swirl. The magic happens when you layer the batter and swirl in that delicious filling. Bake until it’s golden brown and a toothpick comes out clean, then let it cool. It’s a surprisingly simple process for such a deeply satisfying result, making it one of my go-to recipes when I need something impressive without the fuss.
Ingredients
For the Main Batter:
- 2 cups all-purpose flour: I usually just grab whatever’s in the pantry, but a good quality all-purpose flour works best.
- 1 teaspoon baking soda: This is crucial for getting that perfect rise! Make sure it’s fresh.
- 1/2 teaspoon salt: Balances out the sweetness perfectly.
- 1 teaspoon ground cinnamon: For that warm, cozy flavor.
- 1/4 teaspoon ground nutmeg: Just a pinch to add a little depth.
- 1 1/2 cups grated zucchini, squeezed dry: This is key! We want the moisture *in* the bread, not dripping out. I’ll tell you how to do this in the tips section.
- 3/4 cup granulated sugar: This gives it sweetness without being overpowering.
- 1/2 cup packed light brown sugar: Adds a lovely caramel note and extra moisture.
- 2 large eggs: Room temperature eggs incorporate better.
- 1/2 cup vegetable oil or melted unsalted butter: I’ve used both and both are delicious! Oil makes it super moist, butter adds a richer flavor.
- 1/4 cup milk (any kind works – I’ve used dairy, almond, and oat milk, and they all make it wonderfully creamy!): This helps with the overall texture.
- 1 teaspoon vanilla extract: Because, vanilla.
For the Filling:
- 1/2 cup packed light brown sugar: This is the base for our sweet swirl.
- 1 tablespoon ground cinnamon: Plenty of cinnamon for that classic flavor.
- 1/4 teaspoon ground nutmeg (optional, but I love it): For an extra layer of warmth.
For the Glaze (optional, but highly recommended!):
- 1 cup powdered sugar
- 2-3 tablespoons milk (or lemon juice for a tangy kick!)
- 1/2 teaspoon vanilla extract
Step-by-Step Instructions
Step 1: Preheat & Prep Pan
First things first, let’s get your oven ready. Preheat it to 350 degrees Fahrenheit (175 degrees Celsius). Now, grab a standard 9×5 inch loaf pan. I like to grease it really well with butter or non-stick spray, and then dust it with a little flour. This helps make sure your beautiful loaf slides out like a dream. You can also line it with parchment paper if you’re worried about sticking – that’s a pro move!
Step 2: Mix Dry Ingredients
In a large bowl, whisk together the all-purpose flour, baking soda, salt, cinnamon, and nutmeg. Give it a good whisk to make sure everything is evenly distributed. This step ensures you don’t end up with pockets of baking soda or salt in your bread. It’s simple but important!
Step 3: Mix Wet Ingredients
In a separate medium bowl, whisk together the granulated sugar, brown sugar, eggs, oil (or melted butter), milk, and vanilla extract. Whisk until everything is well combined and the sugars have started to dissolve into the wet ingredients. It should look nice and smooth.
Step 4: Combine
Now, pour the wet ingredients into the bowl with the dry ingredients. Use a spatula or wooden spoon to gently fold them together. Be careful not to overmix! We just want to combine them until there are no dry streaks of flour visible. A few small lumps are totally fine – overmixing is the enemy of tender quick breads!
Step 5: Prepare Filling
In a small bowl, combine the 1/2 cup of brown sugar, 1 tablespoon of cinnamon, and the optional nutmeg. Stir it all together until it looks like coarse, fragrant sand. This is our magical swirl mixture!
Step 6: Layer & Swirl
Now for the fun part! Pour about half of the batter into your prepared loaf pan and spread it out evenly. Sprinkle about half of the cinnamon-sugar filling over the batter. Then, pour the remaining batter on top and spread it out again. Finally, sprinkle the rest of the cinnamon-sugar filling over the top layer. For the swirl effect, grab a butter knife or a skewer and gently swirl it through the batter a few times. Don’t go crazy, just a few gentle twists will create those beautiful ribbons of cinnamon goodness. You want to see the swirl pattern when you cut it, but you don’t want to over-mix it into the batter itself.
Step 7: Bake
Pop that pan into your preheated oven and bake for 50-65 minutes. The exact time will depend on your oven, of course. You’ll know it’s done when a toothpick inserted into the center comes out clean, or with just a few moist crumbs attached. If the top starts to brown too quickly, you can loosely tent it with foil for the last 15-20 minutes of baking.
Step 8: Cool & Glaze
Once it’s baked, let the loaf cool in the pan on a wire rack for about 10-15 minutes. This allows it to set up a bit. Then, carefully invert the pan to remove the loaf and let it cool completely on the wire rack. Once it’s completely cool, you can whip up the glaze. Whisk together the powdered sugar, 2 tablespoons of milk, and vanilla extract until smooth. If it’s too thick, add a little more milk, a teaspoon at a time. If it’s too thin, add a bit more powdered sugar. Drizzle it over the cooled loaf. The glaze is totally optional, but it adds a lovely touch of extra sweetness and makes it look extra special!
Step 9: Slice & Serve
Once the glaze is set (or if you skipped the glaze!), slice into your beautiful zucchini bread. I love serving it slightly warm, but it’s also fantastic at room temperature. It’s best sliced with a serrated knife for clean cuts. Enjoy every single moist, flavorful bite!
What to Serve It With
This zucchini bread is a chameleon when it comes to pairing. For a simple Breakfast, it’s absolutely divine with a hot cup of coffee or a tall glass of cold milk. I often just grab a slice as I’m heading out the door, or I’ll toast a thick slice and serve it with a smear of butter. For a more elegant Brunch spread, I like to cut thicker slices and arrange them nicely on a platter. It pairs beautifully with fresh fruit salad, a cheese board, or even a light quiche. For a decadent Dessert, a warm slice is heavenly on its own, but you could also serve it with a dollop of whipped cream, a scoop of vanilla bean ice cream, or a drizzle of caramel sauce. It’s perfect for those 10 pm cravings when you want something sweet but don’t want to commit to a full cake. And for those Cozy Snacks, it’s the ultimate comfort food. It’s perfect after a long day, curled up on the couch with a good book and a warm beverage. My kids always love it as an after-school treat, and it’s usually gone by dinnertime!
Top Tips for Perfecting Your Zucchini Bread
After making this zucchini bread more times than I can count, I’ve picked up a few tricks that I swear by. First, Zucchini Prep is crucial. You absolutely must squeeze out as much moisture as you can from the grated zucchini. I usually use cheesecloth or a fine-mesh sieve and just press down firmly. This is the secret to avoiding a gummy bread and ensuring a tender crumb. Grating it on the large holes of a box grater usually works best. For Mixing Advice, remember that overmixing is the enemy! Gluten develops when you mix flour and liquid, and too much gluten makes for tough bread. Stop mixing as soon as you don’t see any dry flour. A few lumps are your friends here. When it comes to Swirl Customization, don’t be afraid to get creative! You can add a tablespoon of cocoa powder to the swirl for a chocolate-cinnamon swirl, or even some chopped nuts like walnuts or pecans. For pattern techniques, a simple zig-zag with a knife works wonders, but you can also use a skewer to create more intricate patterns. If you’re wondering about Ingredient Swaps, I’ve found that you can easily swap out half the all-purpose flour for whole wheat flour for a nuttier flavor and added fiber, though it might make the bread slightly denser. You can also use unsweetened applesauce instead of some of the oil for a slightly healthier twist, but you might lose a bit of the moisture. For Baking Tips, always know your oven. If it runs hot, you might need to reduce the temperature slightly or shorten the baking time. I usually bake mine on the middle rack. A good doneness test is key – a toothpick coming out clean is your best friend! And for Glaze Variations, don’t feel limited to just powdered sugar. A simple dusting of powdered sugar is lovely, or you could make a lemon glaze for a bright, tangy counterpoint to the sweet bread. For consistency, just remember to add your liquid slowly until you reach your desired drizzling thickness.
Storing and Reheating Tips
This zucchini bread is surprisingly forgiving when it comes to storage, and it holds up really well. Stored at Room Temperature, it stays wonderfully moist for about 2-3 days. Just make sure to keep it wrapped tightly in plastic wrap or in an airtight container. It’s best to avoid storing it in a bread box if your kitchen tends to be warm and humid, as it can sometimes encourage mold growth. If you need it to last longer, Refrigerator Storage is your best bet. Wrapped well in plastic wrap and then in foil, it should keep for about a week. The texture might firm up slightly in the fridge, so I often pop a slice in the toaster for a minute or two to warm it up and restore that lovely soft texture. For longer storage, Freezer Instructions are a lifesaver. Let the bread cool completely, then wrap it tightly in plastic wrap, followed by a layer of aluminum foil or a freezer-safe bag. It can be stored in the freezer for up to 3 months. To thaw, simply unwrap it and let it sit at room temperature for a few hours, or thaw it in the refrigerator overnight. You can also reheat slices directly from frozen in a toaster or a low oven. As for Glaze Timing Advice, I always recommend letting the bread cool completely before glazing. If you glaze it while it’s warm, the glaze will melt and become a sticky mess rather than a beautiful, set topping. If you plan to freeze the glazed bread, be aware that the glaze might slightly change texture upon thawing, so sometimes it’s best to glaze after thawing and reheating if you’re particular about that!
Frequently Asked Questions
Final Thoughts
So there you have it – my absolute favorite zucchini bread recipe! It’s the kind of recipe that brings joy, comfort, and a whole lot of deliciousness into your kitchen. It’s proof that simple ingredients can create something truly spectacular. I really hope you give this a try; I’m convinced it will become a beloved recipe in your home too. If you love this recipe, you might also enjoy my other quick bread recipes, like my famous banana bread or my delightful apple crumble loaf. They’re all made with the same love and attention to detail! I can’t wait to hear how your zucchini bread turns out. Please leave a comment below and let me know your thoughts, or share any fun variations you come up with. Happy baking, everyone!
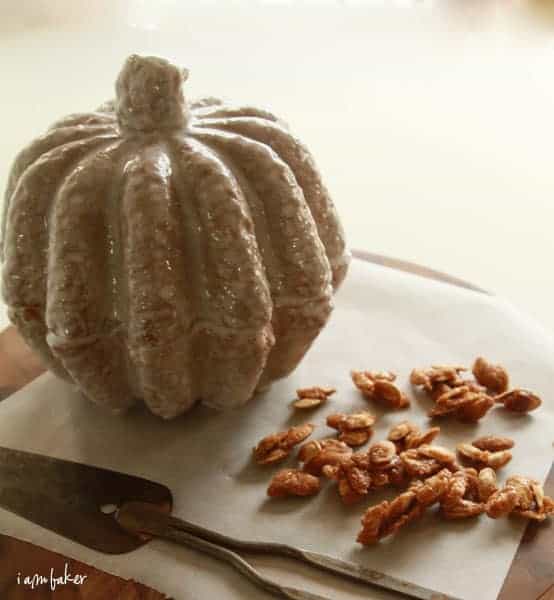
Candied Pumpkin Seeds Spice Cake
Ingredients
Method
- In a small saucepan, combine 0.5 cup granulated sugar and 0.25 cup water. Bring to a simmer over medium heat, stirring until sugar dissolves completely.
- Add 1 cup raw pumpkin seeds, 0.5 teaspoon ground cinnamon, and 0.25 teaspoon salt to the saucepan. Cook, stirring constantly, until the water evaporates and the sugar crystallizes and coats the seeds, about 5-7 minutes. Be careful not to burn them.
- Spread the candied pumpkin seeds in a single layer on a baking sheet lined with parchment paper. Allow them to cool completely and harden. Once cooled, break apart any clumps.
- Preheat your oven to 350 degrees Fahrenheit (175 degrees Celsius).
- Prepare your chosen cake pans by greasing and flouring them. If using a shaped pan, ensure all crevices are well-coated.
- In a large mixer bowl, combine the all-purpose flour, cornstarch, white sugar, baking powder, baking soda, salt, allspice, and ground cinnamon. Mix briefly to combine.
- Add the shortening and whole milk to the dry ingredients. Mix on medium speed for about two minutes, scraping down the sides of the bowl as needed.
- Add the large eggs one at a time, mixing for a few seconds after each addition until just combined. Do not overmix.
- Pour the cake batter evenly into your prepared pans.
- Bake for 35-45 minutes, or until a wooden skewer inserted into the center of the cake comes out clean. Baking time may vary depending on pan size and oven.
- Let the cake cool in the pans for 10-15 minutes before inverting onto a wire rack to cool completely.
- Once the cake is completely cool, frost as desired and decorate generously with the prepared candied pumpkin seeds.