You know those recipes that just *feel* like home? The ones that smell incredible the moment they hit the oven, and disappear from the plate faster than you can say “more, please”? This zucchini bread is that recipe for me. It’s my go-to for a reason, and honestly, I’ve lost count of how many loaves I’ve whipped up over the years. It’s one of those comforting, deeply satisfying bakes that feels fancy enough for guests but is perfectly casual for a Tuesday afternoon. If you love a good banana bread, you’re going to adore this. It’s got that same moist, tender crumb, but with a subtle sweetness and a hint of warmth that’s just divine. I’m so excited to share this with you, because this zucchini bread is truly special.
What is Zucchini bread?
So, what exactly *is* zucchini bread? Well, on the surface, it’s a quick bread where grated zucchini is the star ingredient. But trust me, it’s so much more than just a vehicle for hidden veggies! Think of it as a super-moist, incredibly tender cake that just happens to have a secret ingredient that makes it unbelievably good for you (well, a little bit good for you!). The zucchini itself doesn’t really have a strong flavor once it’s baked into the batter; instead, it lends an amazing moisture and a tender texture that’s hard to beat. It’s essentially a delightful way to use up that garden bounty or those extra zucchinis you always seem to end up with. The “bread” part of the name comes from its loaf shape and its delightful crumb, but honestly, it’s more of a sweet treat than a savory bread. It’s a clever baking trick that I fell in love with years ago!
Why you’ll love this recipe?
Okay, let’s talk about why this zucchini bread is a total winner. First off, the FLAVOR! Oh my goodness. It’s perfectly sweet without being cloying, with warm spice notes that just make you want to curl up with a good book. And the texture? It’s incredibly moist and tender, thanks to that secret zucchini weapon. It’s the kind of bread that doesn’t crumble apart when you slice it. Then there’s the SIMPLICITY. Seriously, you don’t need to be a baking pro for this one. It’s a one-bowl wonder for the batter, and the filling comes together in a snap. It’s honestly a lifesaver on busy nights when I want to bake something special but don’t have a ton of time. It’s also surprisingly COST-EFFICIENT. Zucchini is usually pretty affordable, and the other ingredients are pantry staples. You get a gorgeous, delicious loaf for a fraction of the price of a bakery treat. And the VERSATILITY! This is where it really shines. You can enjoy it warm with a dollop of butter, toast it for breakfast, or even serve it as a light dessert. I’ve even tossed in some chocolate chips or nuts for extra decadence. What I love most about this specific recipe is that it’s so forgiving. I’ve forgotten it in the oven a minute too long, swapped out sugar for honey, and it *still* turned out beautifully. It’s the kind of reliable recipe that builds confidence in the kitchen.
How do you make Zucchini bread?
Quick Overview
The magic of this zucchini bread is its straightforward approach. You’ll be whisking together your wet and dry ingredients separately, then gently combining them with the star, grated zucchini. A simple swirl of cinnamon-spiced goodness goes in next, and then it bakes into a golden-brown masterpiece. It’s designed to be fuss-free, so you can get that amazing homemade smell filling your kitchen with minimal effort. The whole process from start to finish usually takes less than an hour, and that includes baking time!
Ingredients
For the Main Batter:
2 cups all-purpose flour (I always use unbleached, it makes a difference in texture)
1 teaspoon baking soda
1/2 teaspoon baking powder
1/2 teaspoon salt
1 teaspoon ground cinnamon
1/4 teaspoon ground nutmeg (optional, but I love the warmth it adds)
1/2 cup unsalted butter, softened (you can use oil too, but butter gives it a richer flavor)
1 cup granulated sugar (I’ve experimented with brown sugar, and it adds a lovely caramel note!)
2 large eggs, at room temperature (this helps them incorporate better)
1 teaspoon vanilla extract
1/2 cup milk (I’ve tested this with almond milk and it actually made it even creamier! Dairy or non-dairy works)
2 cups grated zucchini, squeezed dry (this is key! More on this later)
For the Filling:
1/4 cup packed brown sugar
1 tablespoon ground cinnamon
1/4 teaspoon ground cloves (just a pinch, it’s potent!)
For the Glaze:
1 cup powdered sugar
2-3 tablespoons milk (or lemon juice for a tangier flavor!)
1/2 teaspoon vanilla extract
Step-by-Step Instructions
Step 1: Preheat & Prep Pan
First things first, get your oven preheated to 350°F (175°C). While that’s warming up, grease and flour a 9×5 inch loaf pan. I like to use butter or non-stick spray for greasing, and then a light dusting of flour. For extra insurance against sticking, you can also line the pan with parchment paper, leaving some overhang so you can lift the loaf out easily. This is a trick I learned after a few loaves decided to get cozy with the bottom of the pan!
Step 2: Mix Dry Ingredients
In a medium bowl, whisk together the flour, baking soda, baking powder, salt, cinnamon, and nutmeg (if using). Give it a good whisk to make sure everything is evenly distributed. This is important because it ensures your leavening agents and spices are spread throughout the batter, so you don’t get little pockets of baking soda taste or uneven spice distribution.
Step 3: Mix Wet Ingredients
In a large bowl, cream together the softened butter and granulated sugar until light and fluffy. This usually takes a few minutes with an electric mixer, or a good bit of arm work with a whisk! Beat in the eggs one at a time, making sure to scrape down the sides of the bowl after each addition. Then, stir in the vanilla extract and the milk. It might look a little separated, but don’t worry, that’s totally normal at this stage.
Step 4: Combine
Now, here’s where the magic happens! Gradually add the dry ingredients to the wet ingredients, mixing on low speed (or by hand) until *just* combined. It’s crucial not to overmix here. A few streaks of flour are okay; they’ll disappear as you fold in the zucchini. Overmixing can develop the gluten too much, leading to a tough loaf, and nobody wants that!
Step 5: Prepare Filling
In a small bowl, mix together the brown sugar, cinnamon, and cloves for the filling. This little spiced sugar mixture is what creates those irresistible ribbons of flavor throughout your zucchini bread. It’s so simple, but it makes such a big difference!
Step 6: Layer & Swirl
Gently fold the grated, squeezed zucchini into the batter. Then, pour about half of the batter into your prepared loaf pan. Sprinkle the cinnamon-sugar filling evenly over the top. Spoon the remaining batter over the filling, making sure to cover it completely. Now, for the swirl! You can use a knife or a skewer to gently swirl the filling into the batter. Don’t go crazy; just a few passes will create beautiful marbling. I usually do a figure-eight motion a couple of times.
Step 7: Bake
Bake for 50-65 minutes, or until a wooden skewer or toothpick inserted into the center comes out clean (or with a few moist crumbs attached, but no wet batter). Ovens can be a bit quirky, so I always start checking around the 50-minute mark. If the top starts to brown too quickly, you can loosely tent it with aluminum foil.
Step 8: Cool & Glaze
Once baked, let the loaf cool in the pan for about 10-15 minutes. This allows it to firm up a bit. Then, carefully invert it onto a wire rack to cool completely. Don’t even *think* about glazing it while it’s warm, or you’ll have a melty mess! Once completely cool, whisk together the powdered sugar, milk, and vanilla extract until smooth. If it’s too thick, add a tiny bit more milk; if it’s too thin, add more powdered sugar. Drizzle the glaze over the top of the cooled loaf, letting it drip down the sides. It’s that perfect finishing touch!
Step 9: Slice & Serve
Once the glaze has set a bit (or you just can’t wait any longer!), slice into your beautiful zucchini bread. I love using a serrated knife for clean slices. It’s delicious at room temperature, but I honestly think it’s best slightly warm, especially with a pat of butter. The aroma alone is enough to make your day better!
What to Serve It With
This zucchini bread is so versatile, it fits into pretty much any meal or occasion. For BREAKFAST, I love it toasted and served with a smear of cream cheese or a dollop of Greek yogurt. A simple cup of coffee or a mug of tea is its perfect companion. For BRUNCH, it’s a more elegant addition. I’ll often cut thicker slices and arrange them on a nice platter alongside fresh berries or a fruit salad. It’s a lovely sweet contrast to savory brunch dishes like quiche or bacon. As a DESSERT, it’s wonderful served slightly warm, perhaps with a scoop of vanilla bean ice cream or a drizzle of chocolate sauce. It’s perfect when you’re craving something sweet at 10pm but don’t want to bake a whole cake. And for COZY SNACKS? This is its happy place. Just a slice on its own, maybe with a glass of cold milk, is pure comfort. My family also loves it with a drizzle of honey or a spread of peanut butter. Honestly, there’s no wrong way to enjoy it!
Top Tips for Perfecting Your Zucchini Bread
I’ve made this so many times, I’ve picked up a few little tricks along the way that I think make a big difference. First, about the ZUCCHINI PREP: It’s absolutely vital to squeeze out as much moisture as you can from the grated zucchini. I usually grate it using the large holes of a box grater, then pile it into a fine-mesh sieve or a clean kitchen towel and wring it out with all your might. If you skip this step, your bread will be too wet and gummy. Use fresh, firm zucchini for the best results!
My big MIXING ADVICE is to always, always err on the side of under-mixing. Seriously, just mix until you don’t see big dry flour pockets anymore. A few little lumps are fine. You want a tender crumb, and overmixing is the enemy of tenderness. Trust me on this one.
For the SWIRL CUSTOMIZATION, don’t over-swirl! You want distinct ribbons of cinnamon sugar, not a muddy mess. Just a couple of gentle passes with a knife or skewer will do the trick. You can also play with the amount of filling – some people like more, some like less. Adjust to your personal preference!
When it comes to INGREDIENT SWAPS, I’ve found this recipe to be quite adaptable. If you don’t have granulated sugar, you can use an equal amount of brown sugar for a deeper flavor. I’ve also successfully used a mix of whole wheat and all-purpose flour (about 50/50) for a heartier loaf, though it might be slightly denser. And as I mentioned, milk alternatives work beautifully. I’ve tested this with almond milk and it actually made it even creamier! For additions, chocolate chips (about 1/2 cup) or chopped walnuts/pecans (about 1/2 cup) are fantastic additions to the batter. Just fold them in at the end with the zucchini.
For BAKING TIPS, pay attention to your oven. If your loaf is browning too fast on top, loosely tent it with foil. Also, the skewer test is your best friend. If it comes out with wet batter, it needs more time. If it comes out perfectly clean, it’s done. Don’t be afraid to let it bake a few minutes longer if needed; it’s better than a raw center.
Finally, GLAZE VARIATIONS are fun! You can add a touch of lemon zest to the glaze for a bright citrus note, or use orange juice instead of milk for a different flavor profile. For a simpler finish, you can skip the glaze entirely and just dust the cooled loaf with a little powdered sugar. It’s still delicious!
Storing and Reheating Tips
Proper storage is key to keeping this zucchini bread fresh and delicious. At ROOM TEMPERATURE, an unfrosted loaf can be kept in an airtight container or well-wrapped in plastic wrap for up to 3 days. If it’s glazed, I’d probably aim for 2 days at room temperature to keep the glaze from getting too soft. Make sure it’s completely cool before wrapping!
For REFRIGERATOR STORAGE, this is a good option if you live in a warm climate or want to keep it for a bit longer. Wrap it tightly in plastic wrap, then in foil, or store it in an airtight container. It should stay good for up to a week in the fridge. The texture might firm up slightly, but it’s still perfectly enjoyable. When you’re ready to eat, you can enjoy it cold, or pop a slice in the toaster or microwave for a few seconds to warm it up.
FREEZER INSTRUCTIONS are great if you’ve baked a double batch or just want to have some on hand for future cravings. Let the loaf cool completely, then wrap it very tightly in plastic wrap, followed by a layer of aluminum foil or a freezer-safe bag. It should keep well in the freezer for up to 3 months. To thaw, simply unwrap it and let it sit at room temperature for a few hours, or thaw it overnight in the refrigerator.
When it comes to GLAZE TIMING ADVICE, I always wait until the bread is completely cool before glazing. If you’re freezing it, I highly recommend freezing it *un-glazed* and adding the glaze after thawing. This prevents the glaze from cracking or becoming gummy in the freezer. You can simply make a fresh batch of glaze once it’s thawed.
Frequently Asked Questions
Final Thoughts
Honestly, this zucchini bread is one of those recipes that just brings me so much joy. It’s comforting, it’s delicious, and it’s a fantastic way to use up those summer squashes. It’s the perfect balance of sweet, spiced, and incredibly moist. I truly believe this recipe will become a favorite in your kitchen too. If you enjoy this, you might also love my recipe for moist banana bread or my easy apple crumble cake – they have that same cozy, homemade vibe. Please, please let me know in the comments below how your zucchini bread turns out! I’d love to hear about any variations you tried or any special touches you added. And if you share a picture on social media, tag me – I can’t wait to see it! Happy baking!
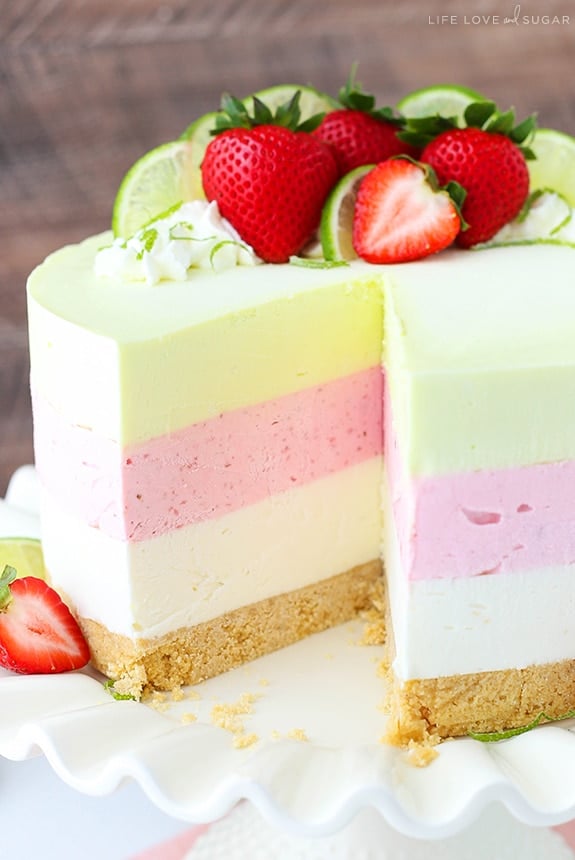
Key Lime Strawberry Coconut Ice Cream Cake
Ingredients
Method
- To set up your cake pan, line an 8×3 inch springform pan with parchment paper that goes about 2 inches above the top edge of the pan. A springform pan is best so that you can easily remove the cake once it’s been assembled. If you only have a regular 8×3 inch cake pan, line the cake pan with plastic wrap (which can later be used to lift your cake out of the pan once it’s assembled and frozen), then add the parchment paper. You can also place a cardboard cake circle in the bottom of the pan, on top of the clear wrap. In lieu of using a cake pan to build the cake, you could also use cake collars.
- Combine strawberry puree, water, sugar and cornstarch for the strawberry filling in a small bowl. Microwave in 10 second increments until thickened, about 30 seconds to a minute. Set aside to cool.
- Combine key lime juice, sugar and cornstarch for the key lime filling in a small bowl. Microwave in 10 second increments until thickened, about 30 seconds to a minute. Set aside to cool.
- To make the crust, combine the shortbread crumbs, sugar and melted butter. Press the crust into the bottom of the cake pan and form an even layer. Set the crust in the freezer to firm.
- To make the coconut ice cream, beat the cream cheese and sugar together until smooth.
- Add the milk and coconut extract and mix until well combined. Set aside.
- In another bowl, whip the heavy whipping cream and powdered sugar for the coconut ice cream until stiff peaks form.
- Gently fold about 1/3 of the whipped cream into the cream cheese mixture until combined, then fold in the remaining whipped cream.
- Add the coconut ice cream on top of the crust and spread into an even layer. Place cake back into the freezer.
- To make the strawberry ice cream, beat the cream cheese and sugar together until smooth.
- Add the milk, strawberry extract and strawberry filling and mix until well combined. Set aside.
- In another bowl, whip the heavy whipping cream and powdered sugar for the strawberry ice cream until stiff peaks form.
- Gently fold about 1/3 of the whipped cream into the cream cheese mixture until combined, then fold in the remaining whipped cream. Fold in the pink food coloring.
- Add the strawberry ice cream on top of the coconut ice cream and spread into an even layer. Place cake back into the freezer.
- To make the key lime ice cream, beat the cream cheese and sugar together until smooth.
- Add the milk and key lime filling and mix until well combined. Set aside.
- In another bowl, whip the heavy whipping cream and powdered sugar for the key lime ice cream until stiff peaks form.
- Gently fold about 1/3 of the whipped cream into the cream cheese mixture until combined, then fold in the remaining whipped cream. Fold in the lime green food coloring.
- Add the key lime ice cream on top of the strawberry ice cream and spread into an even layer. Place cake back into the freezer until completely firm, 5-6 hours or overnight.
- Once firm, remove the cake from the pan. If needed, smooth the sides of the cake using a warm offset spatula, and place cake on a serving plate. Top the cake with whipped cream (you can use Cool Whip or make homemade whipped cream) and fresh strawberries and lime slices. Allow to sit out of the freezer for at least 30 minutes before cutting into it.